Working With Groups of Projects
This section describes how to:
Create groups of projects.
Manage groups of projects.
Test groups of projects.
View test output.
Share projects and groups.
To create a group of projects:
Launch Send Master and select .
Select .
Enter a name for the new group.
Define the project group:
From the Run In drop-down list, select one of the following options to determine how the projects in the group run.
Field or Control
Definition
Parallel Run all projects in the group at the same time.
Succession Run projects in the group in succession.
Time Lapse Run projects in the group in the interval that you specify in the Delay field.
(Optional.) In the Override URL field, enter a URL to override the one specified in the Server URL field in the Project work space.
Add projects to the group.
In the Group Projects section, from the Projects drop-down list, select a project.
Click the Add a new project button to add the project to the group.
From the Method drop-down list, select an HTTP method.
In the Amount field, enter the number of instances of the project to include in the group.
From the Run In drop-down list, select one of the following options to specify how the projects run among themselves.
Field or Control
Definition
Parallel Run all instances of the project at the same time. The limited availability of open ports and other system resources requires you to determine the optimal number of projects to run at a single time. Start with 10 projects and slowly add projects to determine how many concurrent requests the system can process.
Succession Run instances of the project in succession.
Time Lapse Run instances of the project in the interval that you specify in the Delay field.
Repeat steps a through to add additional projects to the group.
Select
You might occasionally need to revise projects that you have added to a group. The following information will help you manage groups of projects:
To change the order of a project in a group, in the Group Projects section, use the arrow buttons to move the project.
To temporarily inactivate a project in a group, in the Project Settings section, select Inactive.
To remove a project from a group, in the Group Projects section, select its file and click the Delete button.
After you have created a group of projects, you can test them.
To test a groups of projects:
Open Send Master and select .
In the Group Definitions section, from the Group drop-down list, select the group to test.
The projects in the group appear in the Group Projects section.
Make any needed adjustments to the group, such as changing the order of projects in the group, specifying inactive or active projects, and so forth.
Click the Start Projects button to run the test of projects in the group.
After you run a test on a group of projects, you can view processing information and response information for any project in the group.
Viewing Processing Information
After you run a group of projects, the Completed Projects Output section displays all of the projects in the group and the instances for each project in a hierarchical tree format. To expand and collapse a project folder, click the icon to the left of the folder.
Image: Completed Projects Output
When you expand a project folder, the instances for the project appear as shown in the following graphic.
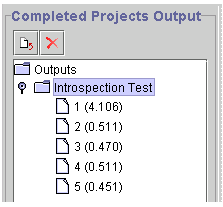
Each page icon represents a project instance. The number in parentheses represents the time needed to process the project instance.
To view detailed processing information about the entire group of projects, select a project, click the Export the Results to File button, and save the contents as a text file. You can then open the text file and view information, such as the total number of project instances in the group, the total time to process all project instances, processing start and end times, and so on. The following example shows the type of output you can view using the Export feature.
   Count                   : 5

   Round-trip times
        Total              : 0.961 (s)
        Minimum            : 0.180 (s) [2]
        Maximum            : 0.200 (s) [3]
        Average            : 0.192 (s)
        Process per second : 5.203

   [1]
        Request            : 0.191 (s) [start = 10:19:20.095, end = 10:19:20.286]
        Response           : 200 - OK
   [2]
        Request            : 0.180 (s) [start = 10:19:20.296, end = 10:19:20.476]
        Response           : 200 - OK
   [3]
        Request            : 0.200 (s) [start = 10:19:20.486, end = 10:19:20.686]
        Response           : 200 - OK
   [4]
        Request            : 0.190 (s) [start = 10:19:20.696, end = 10:19:20.886]
        Response           : 200 - OK
   [5]
        Request            : 0.200 (s) [start = 10:19:21.017, end = 10:19:21.217]
        Response           : 200 - OK
Viewing Response Information for a Project Instance
Send Master enables you to view response information for any project instance in a group of projects.
To view response information for a project instance:
Select a project instance in the Completed Projects Output section.
Click a project instance.
Response information appears in the Output Information section.
When you create projects and groups, the system stores all data in the Send Master properties file. The location of this file depends on the web server.
For Oracle WebLogic the location is:
<PIA_HOME>\webserv\<DOMAIN>\applications\peoplesoft\PSIGW.war\WEB-INF\classes\com\peoplesoft\pt\sendmaster\sendmasterproperties.xmlThis file is not created until you use Send Master.
You can share and reuse projects and groups that you or others have created for other versions of Send Master or that have been used on other workstations. You do so by copying the sendmasterproperties.xml file into the Send Master directory. You must rename or delete the existing properties file before you copy the new file into the directory.
After you copy the sendmasterproperties.xml file into the Send Master directory, you can access the project and groups in the normal manner, by accessing them from the Project drop-down list in the Project work space, or from the Group drop-down list in the Batch Processing work space.