Comparing and Merging Text Definitions and Files
This section discusses how to compare and merge text definitions and files.
To run the merge process for text definitions:
Launch the Upgrade Definition Type window for a text definition.
Select the definition you want to compare and merge.
Right-click, and select Merge Definition.
Select one of the following:
Database. Select this option if the definition to which you are comparing exists in another database. The system prompts you to sign on to the other database.
File. Select this option if the definition to which you are comparing exists in a project file. The system prompts you to navigate to the project file.
After selecting what you want to be the result of the final merge, click Save.
To run the merge process for a single pair of external text files:
Select .
In the To Merge File 'A': dialog box, navigate to, and select the file you want to merge, and click Open.
Typically, the 'A' file is the file that is either older or contains less lines to merge into the most current file.
In the To Merge File 'B': dialog box, navigate to, and select the file you want to merge, and click Open.
Typically, the 'B' file is the file that is most recent and contains more of the lines you want to remain in the resulting merged file.
To run the merge process for multiple pairs of external files:
Select .
In the Merge Folder dialog box navigate to and select the appropriate directory for Folder A: and Folder B:.
How you have the options set on the Merge Properties dialog box, determines to which directory the system saves the merged results.
Select Include sub-folders if you intend to compare multiple sub-folders within one directory, otherwise, the system only compares and merges files in the immediate directory specified.
Click OK.
Image: Merge interface for a text definition
The following is a screenshot of Merge interface for a text definition.
The merge interface displays three windows: the A: window, the B: window, and the Output window.
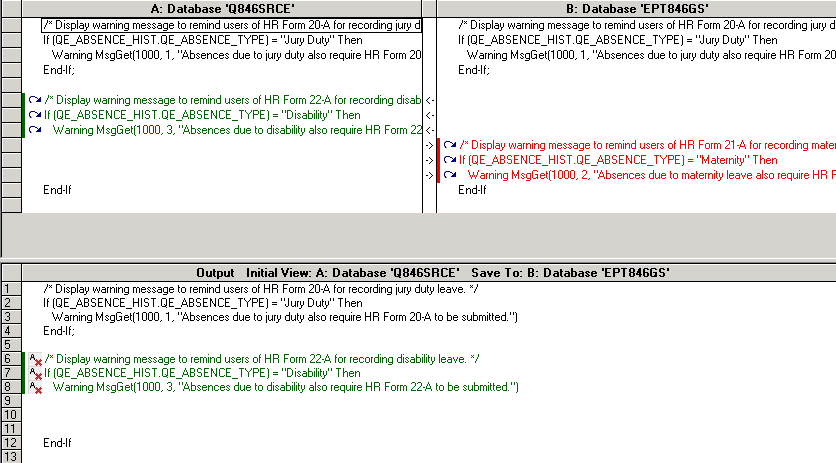
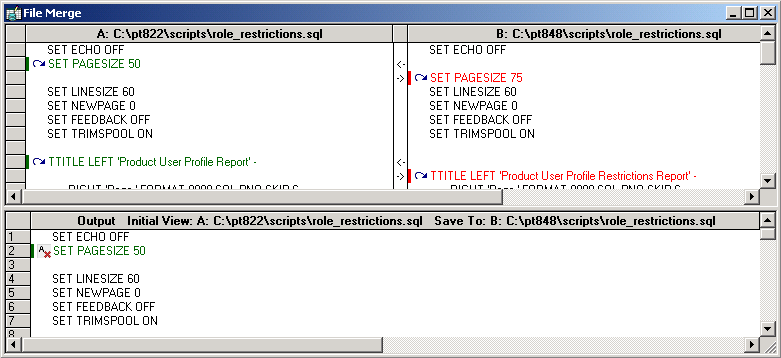
Image: Merge interface for an external text file
The following is a screenshot of Merge interface for an external text file.
The merge interface displays three windows for an external text file: the A: window, the B: window, and the Output window.
Working with the A: and B: Windows
|
Text Type |
Description |
|---|---|
|
Text definition |
The A: window displays the definition existing in the database to which you are currently signed on. Code that appears only in this definition appear in the color specified in the Merge Properties for A:. The label of the A: window adheres to the following syntax: A: Database '<Database Name>' The B: window displays the definition existing in the database or file to which you are comparing the definition existing in database A:. Code that appears only in this definition appear in the color specified in the Merge Properties for B:. The label of the B: window adheres to the following syntax: B: <Database/File> '<Database/File Name>' |
|
External text file |
The A: window displays the text file specified in the To Merge File 'A' dialog. Code that appears only in this file appears in the color specified in the Merge Properties for A:. The label of the A: window adheres to the following syntax: A: <file path> The B: window displays the text file specified in the To Merge File 'A' dialog. Code that appears only in this text file appears in the color specified in the Merge Properties for B:. The label of the B: window adheres to the following syntax: B: <file path> Note: If you are comparing and merging multiple files in a directory structure (using the Folders option), you view individual pairs of files by selecting them in the Folder Merge Diff List window. |
Note: In the context of the merge feature, there is not necessarily a concept of "source" and "target." Assigning an "A" and "B" value is used only to distinguish the different locations of definitions and external text files.
Working with the Output Window
The output window displays what will be the finished result of the merge after clicking Save.
Initially either the A: or B: definition view will appear, depending on what you selected as the Initial Output View in the Merge Properties dialog. The Initial View window label displays the value you selected.
The output window label also displays the Save To value, which represents the location in which the merged results will be saved.
You can perform simple editing of a line in a text definition appearing in the output window, but you cannot add new lines.
Note: The Merge tab of the PeopleSoft Application Designer output window, displays any PeopleCode compile syntax errors. The merged result cannot be saved if there are syntax errors.
Note: While there is an output window for the merge feature, the output window for the PeopleSoft Application Designer is also visible.
Note: PeopleSoft Application Designer does not provide a method for you to track the change history of a text definition or external file. Developers must keep track of the changes made during the merge process.
Moving Lines of Code into the Output Window
|
Field or Control |
Definition |
|---|---|
 |
Click the arrow button to insert lines of code from window A: or B: into the output window. This button only appears next to lines of code in the A: and B: windows that are unique to that definition or file. |
 |
Click this button to remove from the output window lines of code that exist only in the A: definition or file. |
|
Field or Control |
Definition |
|---|---|
 |
Click this button to remove from the output window lines of code that exist only in the B: definition or file. |
 |
Use the Previous Difference and Next Difference buttons to navigate quickly between the differences flagged within the active window. |
Saving Merged PeopleCode
After you are satisfied with PeopleCode in the output window that you have merged, click Save to save the changes to the database specified as the Save Output Destination.
After you have successfully saved the merged PeopleCode, to view the merged PeopleCode as it appears in the Saved Output Destination, click the line in the output window indicating that the PeopleCode was successfully saved.
Saving Merged External Files
After you are satisfied with the content of the output window, click Save to save the changes to the file specified as the Save Output Destination in the Merge Properties. To view the results, navigate to the directory containing the file and open it using the appropriate program.