Reviewing Upgrade Settings
After your project is populated with definitions and has been compared (if applicable), review it and check the upgrade settings before copying it. To reduce the number of definitions through which you must search, filter out the information that you don't need to see by setting your view options. Afterwards, you can adjust the default upgrade settings.
This section provides an overview of reviewing upgrade settings.
Filter your view of the upgrade definition window by selecting one of the options in the View, Filtering menu. These same options are available in the upgrade pop-up menu in the Filtering menu. The options are:
|
Field or Control |
Definition |
|---|---|
| No Filtering |
Select to display all definitions. |
| Tagged for Upgrade |
Select to display only definitions with the Upgrade check box selected. |
| Not Tagged for Upgrade |
Select to display only definitions with the Upgrade check box cleared. |
| Done |
Select to display only definitions with the Done check box selected. |
| Not Done |
Select to display only definitions with the Done check box cleared. |
| Custom Filtering |
Select to open a dialog box in which you can specify which definition status combinations to display. |
When you apply a filter, the filter type appears in the bar above the upgrade columns.
Select to access the Custom Filtering dialog box, which includes a matrix that is similar to that found on the Report Filters tab in the Project Properties dialog box.
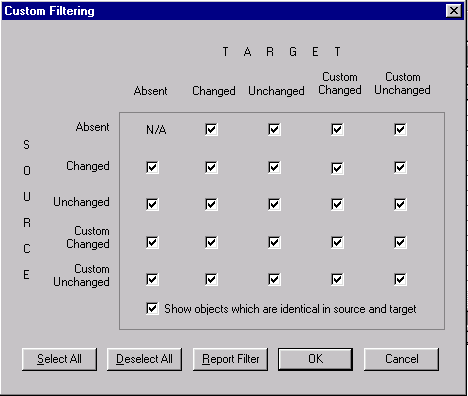
Custom Filtering
Select the definition status combinations to display in the upgrade definition window.
Image: Custom Filtering dialog box
The following is a screenshot of selecting Custom view settings in the Custom Filtering dialog box. You can find definitions for the fields and controls later on this page.
|
Field or Control |
Definition |
|---|---|
| Report Filter |
Click to set these options to be the same as your settings on the Report Filter tab in the Project Properties dialog box. |
| Show objects which are identical in source and target |
Select to display definitions with a status combination of Same and Same. This status combination is possible only if you performed a project comparison and if definitions in the project were defined the same way in the source and target. You can never have a Same and Same status combination for definition types on which you performed a database comparison. |
After reviewing your project and its compare reports, you can override the default upgrade column values for any definitions by changing the Upgrade and Action values.
For example, to preserve a definition that PeopleSoft Application Designer plans to delete from the target (Action is Delete and the Upgrade check box is selected) change the Upgrade value. You can also remove a definition from the project. This does not delete the definition from the database.
Overriding defaults helps if you want to propagate deletions from one database to another.
This section discusses how to:
Specify whether action is taken on a single definition.
Specify whether action is taken on a group of definitions.
Specify which action is performed on a definition during a copy.
Remove a definition from a project.
Select and tag definitions for copying or deleting.
Specifying Whether Action is Taken on a Single Definition
To specify whether action is taken on a single definition, select or clear the definition’s Upgrade check box.
When the Upgrade check box is selected, the displayed action is performed when you copy the project. If the check box is cleared, no action is taken.
Specifying Whether Action is Taken on a Group of Definitions
To specify whether an action is taken on a group of definitions:
Select a group of definitions.
Use the Ctrl and Shift keys, or select all definitions in the upgrade definition window by clicking the top, left-hand cell of the grid.
Right-click one of the definitions and select one of these options:
Tag for Upgrade
Select to select the Upgrade check boxes for all of the selected definitions.
Untag for Upgrade
Select to clear the Upgrade check boxes for all of the selected definitions.
Specifying Which Action is Performed on a Definition During a Copy
To specify which action is performed on a definition during a copy:
Click the Action cell of the definition.
This activates a drop-down list box in the cell.
Select Copy or Delete from the drop-down list box.
Remove a Definition From a Project
To remove a definition from a project, select the definition and press Del.
Selecting and Tagging Definitions for Copying or Deleting
To select and tag definitions for copying or deleting:
Select the definition rows.
Right-click one of the definitions and select Set Action.
Select Copy or Delete.
Your selected definition reflects this change in the Action column. When you upgrade the project, it is copied or deleted from the target database.
You can also select Set Action for Project to tag all of the definitions in a project for a selected action.
After you change the default upgrade settings, save the project. You might also want to print a hard-copy record of the project in its current state. You can rerun the Compare process (as a project compare) to regenerate new upgrade reports, or you can print the contents of the upgrade definition window to save a high-level view of the project.
This section discusses how to:
Regenerate upgrade reports.
Print the contents of the upgrade definition window.
Regenerating Upgrade Reports
To regenerate upgrade reports:
Set up the reporting filter.
Perform a project comparison.
A project comparison compares only the definitions in the project, not the action and upgrade settings. Your project contents are not altered unless record fields have changed in the target database, in which case the corresponding changes are made in the project.
This comparison generates new upgrade reports that reflect the configured action and upgrade settings.
Printing the Contents of the Upgrade Definition Window
To print the contents of the upgrade definition window:
Open the upgrade definition with the appropriate definition type displayed.
To do this, select the appropriate folder in the upgrade view.
Select
The print job is automatically in landscape format.