Working With Compare Reports
This section discusses how to work with compare reports.
To perform a comparison:
Save any changes to objects and close all windows before starting the Compare process.
This ensures that all generated reports are saved during the Compare process. Once the process is complete, you can open the reports from a file and view them online.
Lock all of the PeopleSoft Application Designer definitions in the target database.
If you perform a full comparison, it might take several days for you to review all of the comparison reports and set the upgrade settings accordingly. Locking the PeopleSoft Application Designer definitions in the target database ensures that those definitions cannot be changed between the comparison and the time that you perform the copy.
Turn off all tracing.
Select , and select one of these options:
From Database: The PeopleSoft Signon dialog box appears, prompting you to sign in to an upgrade target database.
To File: The Compare and Report From File : Select Project dialog appears for you to select the project to compare.
On the Compare and Report dialog box, select the types of definitions to compare from the Definition list.
Click Options to access the Upgrade Options dialog box.
Set all upgrade options including comparison report filters.
Select the appropriate Project Item Status / Insert Child Definitions option (if enabled it allows you to preserve the original project).
Click Compare to perform the comparison.
The system creates online reports for the definitions that you are comparing. Upgrade Compare reports are saved to the location you specify in the Report Output Directory field in on the General tab.
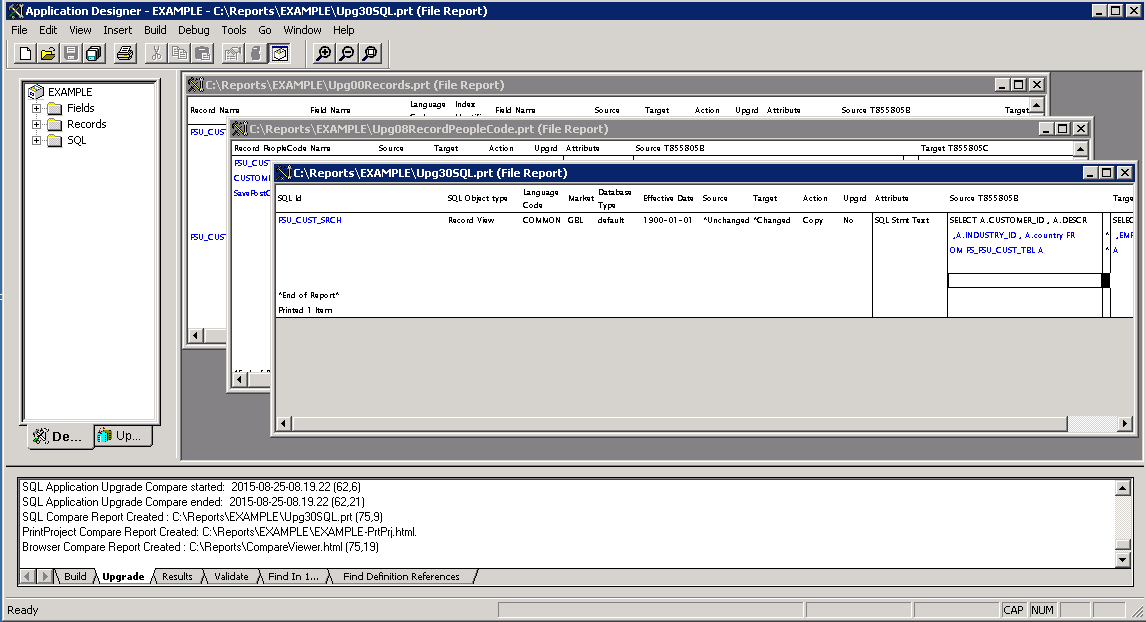
When the compare process completes, the PRT reports (if selected) are opened in Application Designer. Links to reports are displayed in the Output window, as well as compare messages.
Image: Compare Results
This example illustrates the fields and controls in Application Designer when the compare process completes.
Note: You can also compare definitions using command line syntax.
See Comparing Definitions for Upgrade Using the Command Line.
Image: Compare and Report From File dialog box
This example illustrates the fields and controls on the Compare and Report From File dialog box. You can find definitions for the fields and controls later on this page.
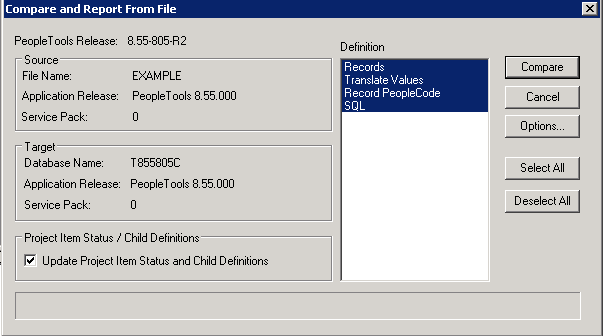
Note: Depending on whether you are comparing to a database or from a file, the dialog box name changes accordingly.
|
Field or Control |
Definition |
|---|---|
| Source |
Identifies the file or database name, the application release, and the service pack level of the source file or database. |
| Target |
Identifies the database name, the application release, and the service pack level of the target database. |
| Update Item Status/Child Definitions |
Deselect the Update Project Item and Child Definitions option to preserve the status of the items in your upgrade project and the child definitions when running a compare. Child definitions apply only to records and fields in which fields are the child definitions of the record, and field labels are the child definitions of record fields. When running a compare report, the system compares the definitions in an another database or file to the database to which you are currently signed on. Based on the compare results, the system updates the status of the project items in your upgrade project in the definition window. For example, after running the compare, the system inserts the status of the Source and Target (Absent, Changed, Unchanged, and so on), the Action to take (None, Copy, CopyProp, and so on). Regarding child definitions with the case of records, if a record is the same version in both places, the system removes the fields. With the case of fields, if a field is the same version in both places the system removes the field labels from the upgrade project definition. When a child item is found to be different between the two places, then that item is inserted into the project so the child item can then be copied as a unique item. When this option is deselected, no child items are deleted nor inserted into the project. In some cases, as in when you want to compare the same upgrade project to multiple sources, for example a demo database, a production database, and a project file, you may decide to deselect this option so that the source upgrade project remains unchanged. When deselected, the project item status and child definitions information only appears in the generated compare report, not online in the PeopleSoft Application Designer project definition. Note: By default, this setting is selected, which should accommodate most situations. Note: This option applies only when performing project compares, and is not applicable when performing a full database compare (Compare Type is set to Database on the Compare Options tab in the Upgrade Options dialog box). A full database compare should start with an empty upgrade project and insert the different items into the upgrade project. Note: When performing a compare from file, if the option is turned off, the resulting project definition after the compare will have the same status settings and project items as in the file project definition. The compare reports will still reflect the status settings and differences in any child items. When the option is left on, the compare will change the project definition based on the compare results, changing the status settings, and inserting or deleting child items as needed. |
| Definition |
Displays the current set of definitions being compared. The system only compares the definitions in the list that are highlighted. |
| Compare |
Executes the compare process. |
| Cancel |
Cancels the compare process. |
| Options |
Opens the Upgrade Options dialog box. |
| Select All/Deselect All |
Selects all the definitions in the Definition list, or deselects all. |