Configuring PeopleSoft CTI Queues and CTI Agents
To configure CTI queues and agents, use the Queue Configuration (PT_CTI_QUEUE) and CTI Agent Configuration (PT_CTI_AGENT) components.
Access the Queue Configuration page using the following navigation path:
Image: Queue Configuration page
This example illustrates the fields and controls on the Queue Configuration page. You can find definitions for the fields and controls later on this page.
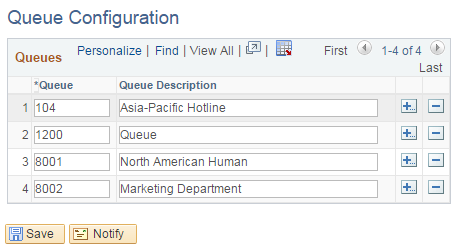
Use this page to add queues for agents.
|
Field or Control |
Definition |
|---|---|
| Queue |
Enter the directory number identifying an ACD group. Calls to a group are distributed to ACD agents belonging to that group, according to ACD algorithms. Note: Queue names can be alphanumeric. |
| Queue Description |
Enter a brief description of the queue. |
Access the CTI Agent Configuration page using the following navigation path:
Image: CTI Agent Configuration page
This example illustrates the fields and controls on the CTI Agent Configuration page. You can find definitions for the fields and controls later on this page.

Configuring CTI agents involves the CTI Agent Configuration page, the Phone Book page, and the Personalization page.
|
Field or Control |
Definition |
|---|---|
| User ID |
Displays the PeopleSoft user ID of the agent. |
Agent Information
|
Field or Control |
Definition |
|---|---|
| Effective Date |
Enter the date on which the current configuration should become active. |
| Agent ID |
Enter a user ID for the agent within the switch. |
| Agent Password |
Enter the password that the agent uses to sign in to the phone, if any. |
| Queue |
Enter the name of the queue that you want to assign to an agent. Use the Queue Configuration page to associate a queue with a directory number identifying an ACD group. |
| Configuration ID |
Select the name of the configuration that you want to associate with the agent. The configuration ID is the name of the configuration that you created using the CTI Applet or CTI Configuration page. |
| Application User Name/Password |
These fields are applet-specfic and appear only in the applet-based solution. Enter the CTI user name and password of the agent. |
| CTI Client Signature |
Note: This option appears only for Cisco configurations. This control shows the signature of a particular agent. The signature uniquely identifies an agent if you have implemented call monitoring. Typically, this value appears as an email address, such as john.doe@example.com. |
| Trace Level |
Options are:
If a value other than 0 is selected, a tracer window appears to display activities and events on the chat or MultiChannel Console for debugging purposes. If you are using the JSMCAPI console, two tracers (a JSMCAPI tracer and a console tracer) appear if trace level 2, Debug, is selected. If you are using the Java applet console, trace information is written to the browser’s Java Console, which must be enabled. In Microsoft Internet Explorer, enable the Java Console by selecting Tools, Internet Options, Advanced, Java, Java Console. View the Java Console by selecting View, Java Console. To clear the console, press C on your keyboard. In Sun Java, enable Java Console by selecting Tools, Sun Java. Note: Setting the trace level to 2 - Debug can degrade performance. Unless you are troubleshooting the system, set the trace level to None. |
| Limit debug tracer log size |
This check box is enabled when the value entered for Trace Level is not 0. Select this check box to enable the agent to clear the tracer log based on Number of log messages to save when cleared and Maximum number of log messages to allow. If the check box is cleared, the tracer log will not get cleared and the Number of log messages to save when cleared and Maximum number of log messages to allowfields will be disabled. |
| Number of log messages to save when cleared |
Specify the minimum number of recent tracer log messages that should be maintained in the tracer window. |
| Maximum number of log messages to allow |
Specify the maximum number of tracer log messages that will be maintained in the tracer window. |
Access the Personalization page using the following navigation path:
Image: Personalization page
This example illustrates the fields and controls on the Personalization page. You can find definitions for the fields and controls later on this page.
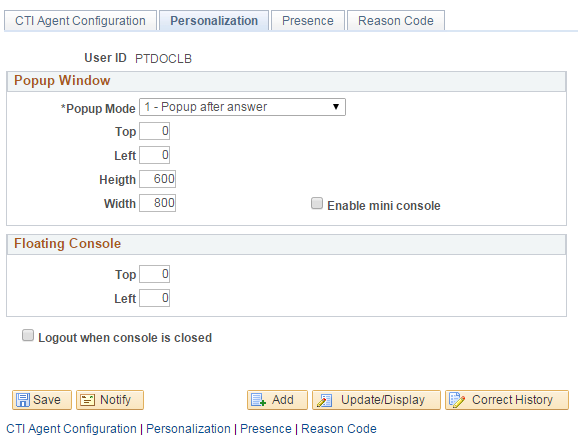
Use this page to personalize timing, size, and position of the pop-up window on the desktop as well as the position of the floating console.
Popup Window
|
Field or Control |
Definition |
|---|---|
| Popup Mode |
Enables you to configure when the pop-up window appears. You can have it appear after the call is answered, or you can have it appear when a call comes in. If it appears before the call is answered, the agent can determine whether she or he wants to answer the call based on the information that appears in the pop-up window. The default pop-up mode is 1- Popup after answer. In some cases, for example accepting a transfer, although you set the value as 0- Popup when incoming, you still get the pop-up window after you answer. This is because no call data was attached by the CTI vendor to the incoming event, and consequently the PeopleSoft CTI Console couldn't build the URL for the pop-up window. For example, assume party A is transferring a call to party B. Party B gets the incoming event, but party B doesn’t get a pop-up window. This is because the console did not receive the user data to generate the URL despite the fact that the mode is set to 0. But after B answers this call, A completes the transfer. Then, B gets the event partychanged, receives the user data, and generates the URL and pop-up window. |
| Top |
Enter the top position, in pixels. This value is relative to the top of the screen. |
| Left |
Enter the left position, in pixels. This value is relative to the left side of the screen. |
| Height |
Enter the height of the window, in pixels. The minimum value is 100. |
| Width |
Enter the width of the window, in pixels. The minimum value is 100. |
| Logout when console is closed |
This setting depends on CTI vendor support in applet-based consoles, and may not be supported by all vendors. For JSMCAPI consoles and applet consoles with vendor support, select this setting to automatically sign out the agent when the CTI Console is closed. |
| Enable mini console |
Select to enable the administrator or user to configure the presence of the CTI mini console in the pop-up window. If this check box is not selected, the mini console does not appear in the popup window. Note: The mini console has performance overhead. |
Floating Console
|
Field or Control |
Definition |
|---|---|
| Top |
Enter the top position in pixels. This value is relative to the top of the screen. |
| Left |
Enter the left position in pixels. This value is relative to the left side of the screen. |
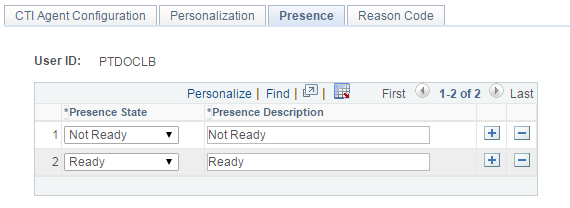
Access the Presence page using the following navigation path:
.
Search for the user id. The CTI Agent Configuration page displays. Select the Presence tab.
Image: Presence page
This example illustrates the fields and controls of the Presence page where you can uodate the presence status.
|
Field or Control |
Definition |
|---|---|
| Presence State |
Select from Not Ready and Ready. |
| Presence Description |
Enter a description for the state. |
Access the Reason Code page using the following navigation path:
.
Search the user id. The CTI Agent Configuration page displays. Select Reason Code tab.
Image: Reason Code page
This example illustrates the fields and controls on the Reason Code page.
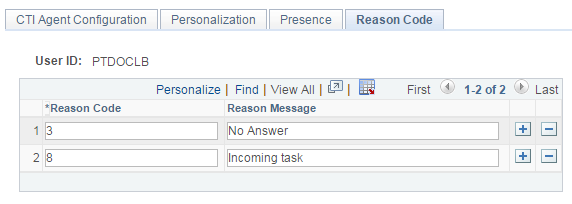
This page is used by the third-party vendors to define their customized codes.
Access the Agent Information page using the following navigation path:
Image: Agent Information page
This example illustrates the fields and controls on the Agent Information page. You can find definitions for the fields and controls later on this page.
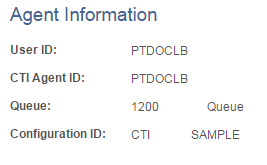
The Agent Information page is a read-only page that displays the following information about a CTI agent.
|
Field or Control |
Definition |
|---|---|
| User ID |
Displays the agent's PeopleSoft user ID. |
| Agent ID |
Displays the agent's CTI middleware ID. |
| Queue |
Displays the queue to which an agent is assigned. |
| Configuration ID |
Displays the configuration ID associated with the agent. |