Distributing Reports for Scopes Based on Tree Nodes
If your scope is defined based on PeopleSoft tree nodes, you can attach routing information to the tree that can be used for bursting PS/nVision reports.
The following section provides an example how to distribute PS/nVision reports for scopes based on tree nodes. The basic steps include:
Clone tree node table—create record DEPT_NODE_TBL.
Clone tree node page—create page DEPT_NODE_TBL.
Grant access to tree node pages.
Update tree structures to use the new node table and node page.
Populate routing information.
Link routing information into PS/nVision.
In this example, you have a scope DIVISIONS with scope field DEPTID based on the node table in DEPARTMENTS tree. The tree structure for DEPARTMENTS tree is DEPTID. In tree structure DEPTID, the node table is TREE_NODE_TBL, the node page is DEPARTMENT, and the detail field is DEPTID.
Since your scope is based on tree nodes, the key to entering appropriate distribution information into the tree is to modify the tree node table to include additional distribution fields. You need to add the additional fields, DISTLIST and EMAIL_TO,to the node table to be the distribution fields for web and email distribution separately. You can run the following SQL scripts to move the nodes from record TREE_NODE_TBL to record DEPT_NODE_TBL, while adding the two new fields to record DEPT_NODE_TB.
To move all nodes where the tree has detail values based on a given field (such as DEPTID), use the following script:
Note: You need to change the field name in quotes to the field you want to key from.
INSERT INTO PS_DEPT_NODE_TBL
SELECT DISTINCT A.SETID, A.TREE_NODE, A.EFFDT, A.EFF_STATUS, A.DESCR, ' ', ' '
  FROM PS_TREE_NODE_TBL A, PSTREENODE B
  WHERE A.TREE_NODE = B.TREE_NODE
    AND B.TREE_NAME IN (SELECT C.TREE_NAME
  FROM PSTREEDEFN C, PSTREESTRCT D
  WHERE D.TREE_STRCT_ID = C.TREE_STRCT_ID
    AND ( C.EFFDT = B.EFFDT
    AND C.SETID = B.SETID
    AND D.DTL_FIELDNAME = 'DEPTID' ))
To move all nodes for a given tree name, use the following script:
Note: You need to change the tree name in quotes to the tree name you want to key from.
INSERT INTO PS_DEPT_NODE_TBL
SELECT DISTINCT A.SETID, A.TREE_NODE, A.EFFDT, A.EFF_STATUS, A.DESCR, ' ', ' '
  FROM PS_TREE_NODE_TBL A, PSTREENODE B
  WHERE A.TREE_NODE = B.TREE_NODE
    AND B.TREE_NAME = 'DEPARTMENTS'
To move all nodes where the tree is based on a specific tree structure ID, use the following script:
Note: You need to change the structure name in quotes to the structure ID you want to key from.
INSERT INTO PS_DEPT_NODE_TBL
SELECT DISTINCT A.SETID, A.TREE_NODE, A.EFFDT, A.EFF_STATUS, A.DESCR, ' ', ' '
  FROM PS_TREE_NODE_TBL A, PSTREENODE B
  WHERE A.TREE_NODE = B.TREE_NODE
    AND B.TREE_NAME IN (SELECT C.TREE_NAME
  FROM PSTREEDEFN C
  WHERE C.TREE_STRCT_ID = 'DEPTID'
    AND ( C.EFFDT = B.EFFDT
AND C.SETID = B.SETID ))In Application Designer, clone the DEPARTMENT page to get a new DEPT_NODE_TBL (Department Node Table) page.
In this table, add new page fields (as in the Routing Information section of the example below) to be the data population area for record fields DISTLIST and EMAIL_TO.
Note: The page DEPT_NODE_TBL has associated PeopleCode to construct a single DISTLIST and EMAIL_TO field for each node in the node table with the multiple recipients (Email ID or Distribution ID) that users enter in the Routing Information of the page.
Also in Application Designer, create a new component DEPT_NODE and include the DEPT_NODE_TBL page in it. And then, make this new component DEPT_NODE a part of the Tree Manager page system.
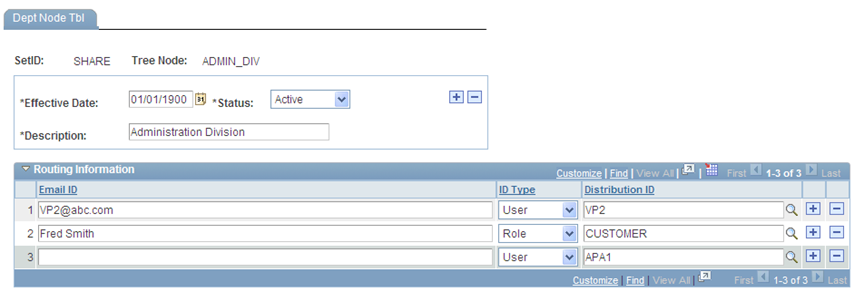
Image: Example of the DEPT_NODE_TBL page
This example illustrates the fields and controls on the DEPT_NODE_TBL page.
Use the Page Permissions page (ACL_PAGES2) to grand security permissions, set distribution information, and make the new node pages available to users when they maintain the tree.
Navigation
Image: Page Permissions page
This example illustrates the fields and controls on the Page Permissions page.
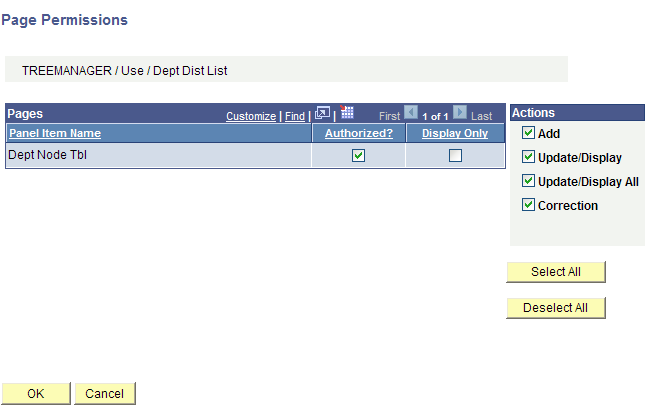
To grant security permissions for the tree in PIA:
Select
Open a permission list.
For example, to grant user VP1 to maintain the tree when VP1 belongs to the ALLPNLS permission list, open the permission list for ALLPNLS.
Select the Pages tab.
Find the TREE_MANAGER item in the list and click the Edit Components link.
The Component Permissions page appears, and the Dept Node (Department Node) component should be in the list and not authorized.
Click the Edit Pages link in the row where the Dept Node component is listed.
Click the Select All button to grant access to the page, and then click the OK button.
Click the OK button on the Component Permissions page.
Click the Save button on the Permission List page.
Use the Tree Structure – Nodes page to modify the tree structure to use the new node table and node page.
Image: Tree Structure – Nodes page
This example shows a version of tree structure (TREE_NODE_DISTRIB) that was modified to use the new node table (DEPT_NODE_TBL) and node page (DEPT_NODE_TBL).
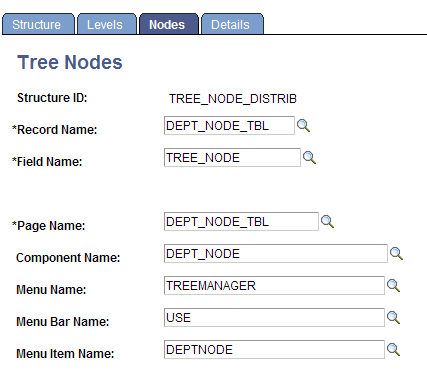
To set up Tree Manager in PIA to use the new page:
Select
Select a structure.
Select the Nodes tab to change where the node information is stored.
Modify the structure to use the new DEPT_NODE_TBL record and new DEPT_NODE_TBL page.
Use the Dept Node Tbl (Department Node Table) page to enter either email addresses, distribution IDs, or a combination of both in the new node page DEPT_NODE_TBL. When populating distribution IDs, you are populating the users or roles that Report Manager uses.
To add distribution route information to a tree:
Select
Highlight the tree nodes and click the Edit Data icon to add the distribution routing information.
The Dept Node Tbl page appears.
Add the distribution routing information.
Click the OK button to save.
When Security and Tree Manager have the correct information, the final step is to connect it to PS/nVision.
This section describes the steps to complete this task:
Check scope definition.
Specify scope in report request.
Specify email and security delivery template options.
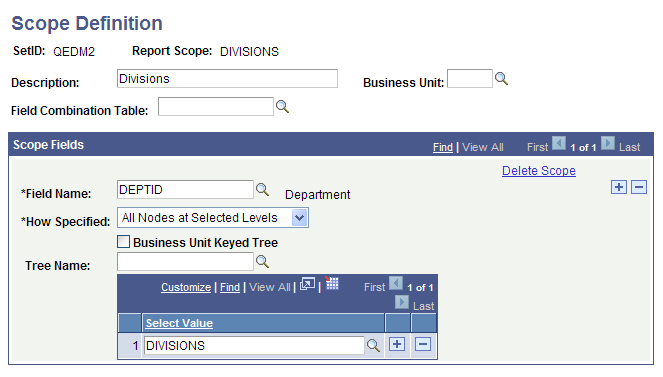
Checking Scope Definition
The following example shows the scope definition DIVISIONS, which is on the field DEPTID against all nodes at the level DIVISION using the DEPARTMENTS tree.
Image: Scope Definition page
This example illustrates the fields and controls on the Scope Definition page.
Specify Scope in Report Request
Specify the scope for which the report is being run. The scope drives the distribution process. So in this example, make sure scope DIVISIONS is used in your report request.
To specify scope in nVision report request:
Select
Search for an existing business unit or create a new one.
Click the Scope and Delivery Templates link in the nVision Report Request page.
Click the Scope Definition link in the output page.
Enter the set ID and report scope, as needed.
The Scope Definition page appears.
Specify the scope for which the report is being run.
Specifying Email and Security Template Options
The Email and Security template fields in the report request tell PS/nVision who to distribute the report to and by what route, for example, email or via the web. To route each scope-based report instance to the person associated with each scope value that drives the generation of the report, use the %DES% variable to pick a field value from the tree node table.
Select in PIA.
Click the Scope and Delivery Templates link.
To distribute the report by email, enter %DES…EMAIL_TO% in the Email Template field.
When you run the report, PS/nVision bursts report instances based on the nodes in DIVISION level of the DEPARTMENT tree and delivers the results through email to the email addresses associated with each node. Those email addresses are the ones specified in the Email ID in NODE_DEPT_TBL page.
Alternatively, to distribute the report via the web, enter %DES…DISTLIST% in the Security Template field.
When you run the report, PS/nVision bursts report instances based on the nodes in DIVISION level of the DEPARTMENT tree and delivers the results to the Report Managers of associated users of each node. Those users are specified in the Distribution ID in NODE_DEPT_TBL page.