Personalizing NVSUSER.XLS
The NVSUSER worksheet provided by PeopleSoft includes macros to personalize the user menu and toolbar.
This section describes how to:
Customize buttons.
Add buttons with the button wizard.
Customize menus.
Make Excel row and column indicators visible.
Change the toolbar.
Each button on the NVSUSER sheets has a macro assigned to it to perform a function. As delivered, NVSUSER buttons are grouped into Run, View, and Command groups. You can change the groupings and meanings of the buttons. You can also format the button sheet to personalize its color and appearance.
To change the macro, a button is assigned to:
Position the mouse pointer over the button (it becomes a hand), but do not click it.
Right-click and select from the shortcut menu.
Enter the name of the macro you want to run when the button is clicked.
Click the OK button to complete the assignment.
Note: If you have macros that were created using Microsoft Excel 95, the Excel Edit Name dialog box appears when you define the name for the cell in which the macro begins. Select the Command-type option to identify your macro as a Command macro. The Excel Edit Name dialog box does not appear for later versions of Microsoft Excel.
To use the button wizard in PS/nVision:
Select
Click the Add Buttons from the NVSUSER.XLS home page.
Select whether to run a report or view a report, and click the Next button.
Select either your report request or your instance.
You can navigate to an instance from the button with ellipses on it.
Click the Next button.
Type in a caption for your button.
Optionally, select a picture for your button by clicking the Image button and navigating to the location of an image file.
Click the Finished button.
The new button is placed directly below the lowest-positioned button in a specific Run or View category. After initially placed on the sheet, the button can be moved or changed. However, try not to ungroup buttons with images. If necessary, remember the defined button name before ungrouping; then, when regrouped, rename the button group accordingly.
To ungroup the button, right-click it, select the ungroup function from the menu, and make your changes.
To regroup, right-click it again and select the regroup function from the menu.
Access the PeopleSoft nVision Menu Control Table window by clicking the PSMenu tab on the nVision homepage NVSUSER.XLS.
Image: PeopleSoft nVision Menu Control Table window
This example illustrates the fields and controls on the PeopleSoft nVision Menu Control Table window.
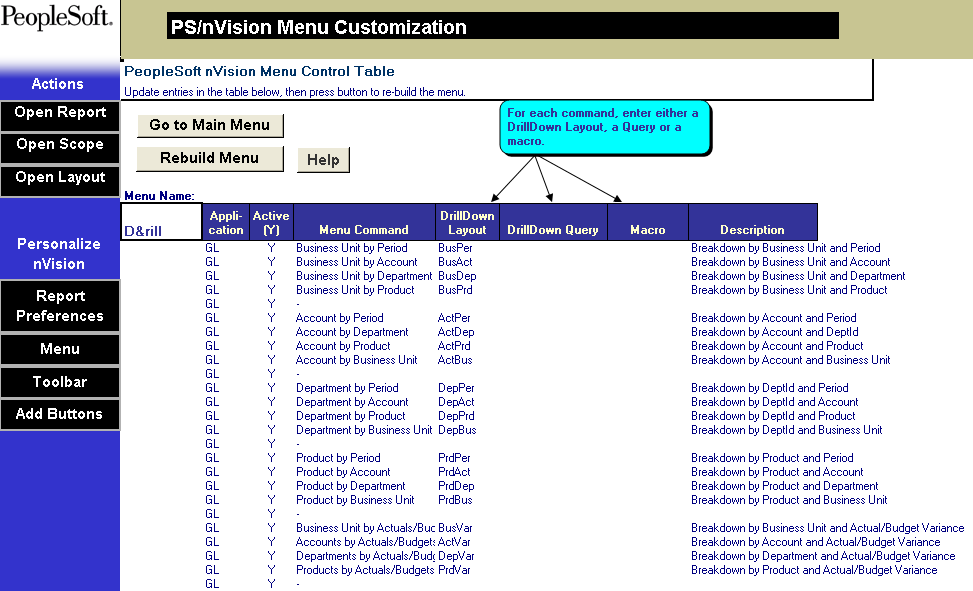
Note: You can select a DrillDown layout, DrillDown query, or a macro to run when a menu command is selected.
|
Field or Control |
Definition |
|---|---|
| Application |
Identifies the application that uses this menu item. This identification makes it easier to enable or disable the actions associated with an application by setting its Active option. The Application field is not used by the supplied macros, but it acts as a description on this page. |
| Active |
Enter Y to make the menu item active or N to keep it in the table but deactivated. |
| Menu Command |
Enter the text that appears when the user pulls down the menu. |
| DrillDown Layout |
Select a layout, present in your DrillDown layout path, to be used in a matrix or tabular DrillDown. |
| DrillDown Query |
Enter a query name to be used in a PeopleSoft Query Link-style tabular DrillDown. |
| Macro |
Enter the name of a macro to run when the item is selected. |
| Description |
Enter descriptive text to appear in the status bar when a user highlights the command. |
Rebuilding the Menu
To rebuild the menu with new information that has been entered, click the Rebuild Menu button.
To make Microsoft Excel row and column indicators visible for both the PeopleSoft menu and toolbar sheets:
Open Microsoft Excel and select from the Excel menu.
On the View tab, select the Row & column headers option and click the OK button.
Row indicators 1,2,3, and so on. Column indicators A,B,C, and so on.
Insert or delete rows or columns by clicking a row or column indicator to highlight the row or column.
After you have made your changes to the PeopleSoft menu or toolbar sheet, hide the row and column indicators by clearing the Row & column headers option before you save the modified NVSUSER.XLS.
To personalize the toolbar in PS/nVision:
Access PS/nVision and select the Toolbar tab on the nVision homepage NVSUSER.xls.
Optionally, edit the name of the toolbar in the Toolbar Name box.
Set the location of the toolbar in the Docking Position box.
You can enter left, right, top, or bottom to have the toolbar docked accordingly; or you can select Float to have the toolbar float over the spreadsheet.
Edit the table of tool commands, adding, changing, and deleting items to get the toolbar you want.
For each tool you add or change, specify one of the following actions:
A layout, present in your DrillDown layout path, to be used in a matrix or tabular DrillDown.
A query name to be used in a PeopleSoft Query Link-style tabular DrillDown.
The name of a macro to run when the tool button is clicked.
For each tool, specify the following:
Active: Select Y to make the tool active; select N to keep it in the table but not in the toolbar.
Face: The name of the picture that identifies the tool. Either use a picture already defined in the Toolbar worksheet or design your own using a drawing program such as Paintbrush. The picture must be 16 pixels square. Copy the picture from the drawing program and paste it into the Toolbar worksheet. While it is selected, enter a name for it, and enter this name in the Face column.
Gap: To leave a gap between tools, enter gap in the Face column.
Status text: Enter descriptive text to appear in the status bar when the mouse rests over the tool.
Tip text: Enter a brief description to appear in a tool tip when the mouse rests over the tool.
When the table is as you want it, click Rebuild Toolbar to build the new toolbar.