Application Deployment and System Configuration Considerations
This section discusses:
File attachment functions in an environment with multiple application server domains.
Configuring the web server to support additional MIME types.
Restricting the file types that can be uploaded or downloaded.
Setting up virus scanning.
Using the HTML sanitizer.
Considerations when attaching text files.
File attachment chunk size.
Using interfaces to the CopyAttachments and CleanAttachments functions.
The topics in this section are of interest primarily to customers deploying file processing applications, and secondarily to application developers.
In an environment involving multiple application server domains, a call to one of the PeopleCode file attachment functions must not be passed a parameter designating a file that is located on the file system of a particular application server domain. The problem is that at the time of the call, the application server domain currently in use (as a consequence of load-balancing) might not be the application server domain that has the file in question. In this case, a file-not-found error would result. For example, this may be an issue for a call to PutAttachment, or this might cause a call to GetAttachment to result in the file being downloaded to an unexpected location (the file system of the wrong application server domain) or to fail entirely if the specified destination directory does not exist on the application server domain currently in use. Therefore, the path to the local file must be specified with this in mind by creating directories that can be comparably accessed regardless of which application server domain actually services the request at runtime.
When a browser attempts to open a file attachment, the browser invokes a viewer based on the MIME (Multipurpose Internet Mail Extensions) type sent in the response header from the web server. For example, if the user tried to view an MP3 file, the response header sent to the browser by the web server would indicate the audio/MPEG content type:
HTTP/1.1 200 OK
Server: Microsoft-IIS/5.0
Date: Mon, 01 Oct 2001 21:25:51 GMT
Content-Type: audio/mpeg
Accept-Ranges: bytes
Last-Modified: Mon, 01 Oct 2001 21:00:26 GMT
ETag: "78e21918bc4ac11:cc8"
Content-Length: 60
Notice that the content-type is audio/mpeg. The browser uses this MIME type to determine that the viewer for audio/MPEG is the appropriate application to open this attachment. If the web server did not send this content-type header, the browser would not be able to determine the nature of the file being transmitted, and it would be unable to invoke the correct viewer application. The browser would try to display the file as text/plain, which is often the wrong behavior.
The web server maps file extensions to MIME types through entries in a web.xml configuration file. A copy of web.xml is deployed to each web server instance when it is installed. After a web server instance is created, edit its deployed copy to add any additional MIME types.
The location of the deployment copies varies depending on the web server:
|
Web Server |
Location of Deployment Copy |
|---|---|
|
WebLogic |
PS_HOME/webserv/web_server/applications/peoplesoft/PORTAL.war/WEB-INF/web.xml |
See your web server documentation for the name and location of the master copy of this configuration file.
This file contains definitions similar to the following:
  <mime-mapping>
    <extension>
      doc
    </extension>
    <mime-type>
       application/msword
    </mime-type>
  </mime-mapping>
  <mime-mapping>
    <extension>
      xls
    </extension>
    <mime-type>
       application/vnd.ms-excel
    </mime-type>
  </mime-mapping>
Let's say you want to add a mapping that causes .log files to be interpreted as regular text files. To determine the correct MIME type, check RFC (Request for Comments) documents 2045, 2046, 2047, 2048, and 2077, which discuss internet media types and the internet media type registry.
After checking the RFCs, you determine that the correct MIME type is text/plain. The following is an example of code you would add to the previous section of the configuration file:
  <mime-mapping>
    <extension>
      log
    </extension>
    <mime-type>
       text/plain
    </mime-type>
  </mime-mapping>
Once you save the file, the .log extension is associated with the content type of text/plain.
Note: You must restart your web server before these changes are recognized.
Note: When trying to view the objects, the extension must exactly match what is set up in the web.xml file. This value is case-sensitive. Therefore, if the PreserveCase parameter has been used when uploading files, it will be necessary to add a MIME type entry for each case-permutation of the file extension in question. If the object view appears garbled, chances are that either the extension is not set up in the web.xml file or there is a case mismatch.
Also see the documentation for your web server.
You can restrict the file types that can be uploaded to or downloaded from your PeopleSoft system. The file type restrictions apply to the AddAttachment, DetachAttachment, MAddAttachment, and ViewAttachment functions. Allowable or disallowed file extensions are managed through a file extension list and through the FILE_EXT_LIST property of the URL object.
Note: File extension lists cannot be applied to ad hoc URL strings.
PeopleTools: System and Server Administration contains detailed information on creating and maintaining file extension lists.
See File Extension List.
This section discusses:
Enabling virus scanning.
Configuring VirusScan.xml.
Logging virus scans.
Virus scan errors and return codes.
Virus scanning can be performed on all files uploaded with the AddAttachment, InsertImage, and MAddAttachment functions.
Note: If the HTML sanitizer is also configured on this web server, virus scanning is performed on the file before the HTML sanitizer is run.
Enabling Virus Scanning
To enable virus scanning, open the file VirusScan.xml and set the value of disableAll to "False". By default, disableAll is "True".
<Providers disableAll="False" logFile="./servers/PIA/logs/VirusScan%u.log">The location of VirusScan.xml on your system for WebLogic is at this location:
PS_CFG_HOME\webserv\web_server\applications\peoplesoft\PORTAL.war\WEB-INF\classes\psft\pt8\virusscan\
Configuring VirusScan.xml
These tags are mandatory in VirusScan.xml:
|
Tag |
Description |
Example Value for Scan Engine |
|---|---|---|
|
<class> |
Provider class of the scan engine Default provider class is: |
|
|
<icapversion> |
ICAP version |
ICAP/1.0 |
|
<service-name> |
Service name for the scan engine host. |
/SYMCScanResp-AV |
|
<policycommand> |
Policy command used by the Scan Engine. Only SCAN is supported. |
?action=SCAN |
|
<address> |
IP address of Scan Engine host. |
IP address of the machine where the scan engine is running |
|
<port> |
IP port of Scan Engine host. |
Port where the scan engine is running |
See PeopleTools: MultiChannel Framework for complete details on configuring VirusScan.xml.
Logging Virus Scans
Detailed logging is configured in the logging.properties file for WebLogic server:
PS_CFG_HOME\webserv\web_server\applications\peoplesoft\logging.properties
Set the location of the log file in VirusScan.xml.
<Providers disableAll="False" logFile="./servers/PIA/logs/VirusScan%u.log"> The following results are logged with the date and the file name that was scanned:
CLEAN, INFECTED, and SCANERROR
The results for these statuses is logged in this form:
filename = resultFor example:
finance.xls = INFECTEDCONNECTERROR and CONFIGERROR
The results for these statuses is logged in this form:
Unable to connect to the Scan engine: REASON = resultFor example:
Unable to connect to the Scan engine: REASON = CONFIGERROR
Virus Scan Errors and Return Codes
If the file is uploaded successfully and no problems are found in the virus scan, the AddAttachment, InsertImage, and MAddAttachment function returns %Attachment_Succeeded.
If a problem is found, the PeopleCode function returns one of the following return codes:
|
Numeric Value |
Constant Value |
Description |
|---|---|---|
|
13 |
%Attachment_ViolationFound |
File violation detected by virus scan engine. |
|
14 |
%Attachment_VirusScanError |
Virus scan engine error. |
|
15 |
%Attachment_VirusConfigError |
Virus scan engine configuration error. |
|
16 |
%Attachment_VirusConnectError |
Virus scan engine connection error. |
Setting Up the HTML Sanitizer
The HTML sanitizer is used to scan and sanitize HTML files uploaded with the AddAttachment and MAddAttachment functions. To use the HTML sanitizer, you configure a whitelist file to specify the files to be scanned and sanitized by file extension along with the specific HTML tags to be allowed.
Note: If virus scanning is also configured on this web server, virus scanning is performed on the file before the HTML sanitizer is run.
To enable and configure the HTML sanitizer on your web server:
Locate the HTMLWhitelisting.xml file for WebLogic server:
PS_CFG_HOME\webserv\web_server\applications\peoplesoft\PORTAL.war\WEB-INF\classes\psft\pt8\htmlsanitizer\Edit the HTMLWhitelisting.xml file to enable the HTML sanitizer:
<Sanitizer enable="True">Explicitly specify each file extension that you want to be scanned and sanitized. In the following example, only files with an extension of html will be scanned and sanitized. All other files will not pass through the HTML sanitizer:
    <AppliedFileExtentions>
        <Extention>html</Extention>
<!-- <Extention>htm</Extention>
        <Extention>shtml</Extention>
        <Extention>xhtml</Extention>
        <Extention>hta</Extention> -->
    </AppliedFileExtentions>
Note: File extension specifications are case sensitive; HTML and hTML are not equivalent to html.
Identify the tags that you want to be allowed (written) as tags themselves in the HTML output.
Identify the tags for container elements— for example, <html>, <head>, and <body>.
Identify the tags for content elements—for example, <p>, headings (<h1>, <h2>, and so on), lists (<ol>, <ul>, <li>), and other content elements.
Identify the tags for additional content attributes—for example, <id>, <src>, <height>, and so on.
If a tag is not specified in the whitelist file, then the tag itself will be stripped from the HTML output. However, the content of the tag will still be allowed in the output.
Conversely, to strip the content of the tag (but not the tag itself), use allowtext="False".
Explicitly specify each tag for the container elements as well as whether to allow untagged text content within those container tags. The following example allows the <html>, <head>, and <body> tags along with untagged text:
    <Element name="html" allowtext="True">
    </Element>

    <Element name="head" allowtext="True">
    </Element>

    <Element name="body" allowtext="True">
    </Element>
Note: Allowing untagged text within a container element will ensure that line breaks are not stripped from files that pass through the HTML sanitizer.
Explicitly specify each tag for content elements and their attributes. As an example, the following entries allow <title>, <p>, and <b> tags. However, the text within the <b> tag is disallowed and stripped from the HTML output:
        <Element name="p" allowtext="True">
        </Element>

        <Element name="b" allowtext="False">
        </Element>

        <Element name="title" allowtext="True">
        </Element>
In this example, the src attribute is allowed for the <img> tag:
       <Element name="img" allowtext="False">
            <Attribute name="src">
            </Attribute>
        </Element>
Testing the HTML Sanitizer
You can use the PeopleTools Test Utilities page to test the settings you’ve made in the HTMLWhitelisting.xml file. To test the HTML sanitizer:
Select .
In the URL Id or String URL field, enter the following URL ID: URL.FILEDB
Click the Attach button and browse to select an HTML file to upload for the test.
Click the View button to view the sanitized file in a new browser tab. Click the Detach button to download the sanitized file.
If the file is uploaded successfully and no problems are encountered by the HTML sanitizer, the AddAttachment or MAddAttachment function returns %Attachment_Succeeded. If a problem is encountered, the PeopleCode function returns one the following return codes (which are the same codes as used by the virus scan engine):
|
Numeric Value |
Constant Value |
Description |
|---|---|---|
|
13 |
%Attachment_ViolationFound |
File violation detected by HTML sanitizer. |
|
14 |
%Attachment_VirusScanError |
HTML sanitizer error. |
|
15 |
%Attachment_VirusConfigError |
HTML sanitizer configuration error. |
|
16 |
%Attachment_VirusConnectError |
HTML sanitizer connection error. |
Example
The following example presents:
An example of a configured HTMLWhitelisting.xml file.
A sample HTML input file.
The HTML output of the HTML sanitizer.
Example HTMLWhitelisting.xml
The following code provides an example of a simple whitelist file to demonstrate the inclusion and exclusion of tags as well as the effects of the allowtext setting:
<?xml version="1.0" encoding="UTF-8"?>
<!--HTML white listing configuration file -->
<Sanitizer enable="True">
    <AppliedFileExtentions>
        <Extention>html</Extention>
<!--    <Extention>htm</Extention>
        <Extention>shtml</Extention>
        <Extention>xhtml</Extention>
        <Extention>hta</Extention> -->
    </AppliedFileExtentions>

    <Element name="html" allowtext="True">
    </Element>

    <Element name="head" allowtext="True">
        <Element name="title" allowtext="True">
        </Element>
    </Element>

    <Element name="body" allowtext="False">

        <Element name="p" allowtext="True">
        </Element>

        <Element name="b" allowtext="False">
        </Element>

        <Element name="style" allowtext="True">
        </Element>

<!--        <Element name="img" allowtext="False">
            <Attribute name="src">
            </Attribute>
        </Element>

        <Element name="a" allowtext="True">
           <Attribute name="href">
                <AllowURL>True</AllowURL>
                <RegularExp>(?:ht|f)tps?:.*</RegularExp>
           </Attribute>
        </Element>

        <Element name="h1" allowtext="True">
        </Element>
    </Element> -->

    </Element>

</Sanitizer>
Sample HTML File
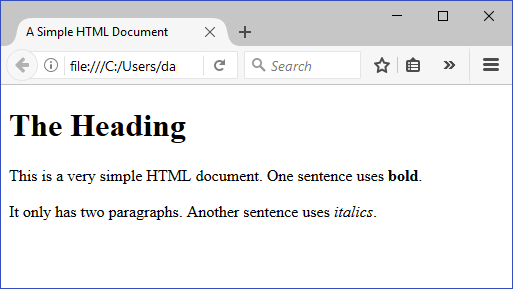
The following code presents the contents of a simple HTML file. The line numbers are included for reference only and are not part of the file:
[01]  <!DOCTYPE html>
[02]  <html>
[03]  <head>
[04]  <title>
[05]  A Simple HTML Document
[06]  </title>
[07]  </head>
[08]  <body>
[09]  <h1>The Heading</h1>
[10]  <p>This is a very simple HTML document. One sentence uses <b>bold</b>.</p>
[11]  <p>It only has two paragraphs. Another sentence uses <i>italics</i>.</p>
[12]  </body>
[13]  </html>
Image: Example file: HTML output
The browser displays this example HTML file as follows:
Example of Sanitized HTML Output
The following code presents the sanitized HTML output of the simple HTML file. Similarly, the line numbers are included for reference only and are not part of the file:
[01]
[02]  <html>
[03]  <head>
[04]  <title>
[05]  A Simple HTML Document
[06]  </title>
[07]  </head>
[08]  <body>The Heading<p>This is a very simple HTML document. One sentence uses <b></b>.</p><p>It only has two paragraphs. Another sentence uses italics.</p></body>
[09]  </html>
Image: Example file: Sanitized HTML output
The browser displays this sanitized HTML output file as follows:

The PeopleCode file attachment functions do not provide text file conversions when files are attached or viewed. In fact, when any file is uploaded, it is always copied to the specified destination byte-for-byte.
Warning! You may encounter problems when a text file is uploaded from one operating system or environment and then later viewed on another. For instance, suppose a text file on a DB2 system is encoded in EBCDIC. A user viewing that file in a Windows environment might see garbled content because the text file viewer is expecting ANSI encoding.
Similar issues can occur when two file systems have different character sets, such as Japanese JIS and Unicode, or different line endings.
It is the developer's responsibility to manage this issue in their environments. A number of text file conversion utilities are available for various platforms.
Some steps you can take to avoid conversion problems include:
Educate your users.
Standardize on file formats and encodings.
Make sure that the user's environment supports the files being transferred.
Restrict attachments to file types that are known to be compatible across user platforms.
When using a database table as the storage location, the file is automatically “chunked,” or stored, in multiple rows of the database table. The size of each chunk is determined by the Maximum Attachment Chunk Size field on the PeopleTools Options page.
Because each file is chunked, you cannot pull whole files directly from the database. You must use the PeopleCode file attachment functions, which automatically put the data back together into one file for you. Because the chunk size is stored with the file, if you change the system chunk size, you can still retrieve files with different chunk sizes.
PeopleTools provides three interfaces to executing the CopyAttachments and CleanAttachments functions (select PeopleTools, Utilities, Administration, Administer File Processing):
Copy File Attachments (Batch) page.
Use the Copy File Attachments (Batch) page to execute the CopyAttachments function asynchronously via the COPYATTS Application Engine program. This ensures that a large CopyAttachments job does not terminate prematurely due to a timeout. See Copy File Attachments (Batch) for more information.
Delete Orphan Files (Batch) page.
Use the Delete Orphan Files (Batch) page to execute the CleanAttachments function asynchronously via the CLEANATT84 Application Engine program. This ensures that a large CleanAttachments job does not terminate prematurely due to a timeout. See Delete Orphan Files (Batch) for more information.
Manage Attachment Repositories page.
Use the Manage Attachment Repositories page to execute either CopyAttachments or CleanAttachments directly in a synchronous manner. See Manage Attachment Repositories for more information.
Note: Executing either CopyAttachments or CleanAttachments directly in a synchronous manner may result in a timeout if the number of file attachments to be processed is large. Therefore, Oracle recommends that you use the batch processing interfaces instead.
Note: None of these interfaces allow you to set all of the optional parameters of either CopyAttachments or CleanAttachments. If you want to enable the use of these optional parameters, you must clone and then modify the existing PeopleCode or implement your own PeopleCode to do this.