Understanding Application Class Tile Content
When you specify an application class as the data type in Tile Wizard, in addition to specifying the application class ID, you also specify these options in Tile Wizard:
Tile content type
Live data (on/off)
Badge data (on/off)
These options determine what dynamic content and data will appear in the tile. Your implementation of the application class in PeopleCode will determine the specifics of the dynamic content and data. However, your PeopleCode implementation can also override the options chosen in Tile Wizard.
Image: Content, live data, and badge areas on a tile
The following diagram illustrates where these items appear within a tile and where these items are defined (Tile Wizard, PeopleCode, or both). These items are described in more detail in the sections that follow this diagram.
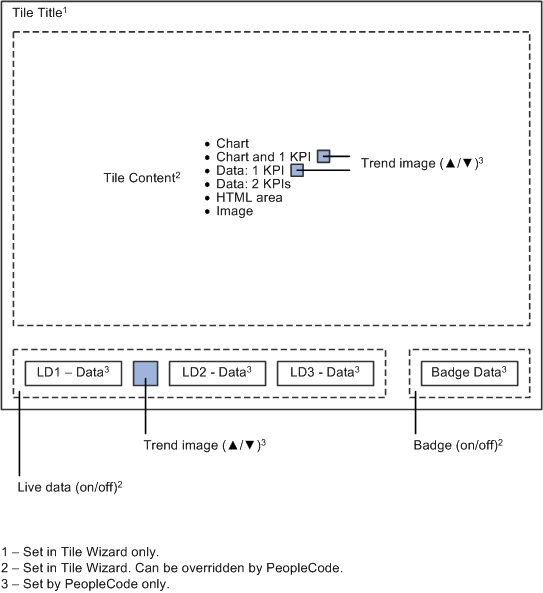
The tile’s title appears in the title bar at the top of the tile. The title is defined at Step 1 in Tile Wizard, and cannot be overridden in PeopleCode.
The tile content consumes the majority of the face of the tile, beneath the title bar and above the live data and badge areas on the tile. While the tile content type is specified at Step 2 in Tile Wizard, it can be overridden in PeopleCode. The specific tile data for any tile content type must be defined in PeopleCode.
The live data region appears at the bottom of the tile. Whether live data is displayed on a tile is specified at Step 2 in Tile Wizard; this setting can be overridden in PeopleCode.
Live data consists of four elements, each of which is optional:
Live data value 1 + Trend image + Live data value 2 + Live data value 3
A trend image, typically an up or down arrow, is an optional element of the live data region. The trend image depicts at a glance the direction of change of the second live data value, which is typically a metric or numerical value.
When a trend image is enabled with the hasLivedataTrendImage property, it can be displayed with a key performance indicator (KPI) instead when only a single KPI is displayed as tile content (either the 1 KPI or the chart and 1 KPI content types).
Note: Only one trend image can be displayed on a tile. The default location is in the live data area. Therefore, if you want to associate a trend image with KPI data, you should not enable the live data area for the tile. If you enable the live data area, the trend image will be displayed there and not with the KPI data.
The badge data region appears at the bottom right of the tile, to the right of the live data region. A badge is a simple integer, typically a count of items (for example, new requisitions, open purchase orders, and so on).
The following example illustrates how tile content, live data, and badge data will appear together on a tile, and which properties were used to set which data values and formatting options. In Tile Wizard, the following options were set for this tile definition:
Title: Open Requisitions
Tile content: Data-1-KPI
Live data: Enabled
Badge data: Enabled
Image: Example of tile content
The following diagram illustrates example tile content:
TileKPI_1 value: $1.23
TileKPI_1_Label value: Revenue (in Millions)
TileLiveData_1 value: As of 11:50 AM
TrendImage value: ▲
TileLiveData_2 value: 0.18%
TileTransCount value: 5
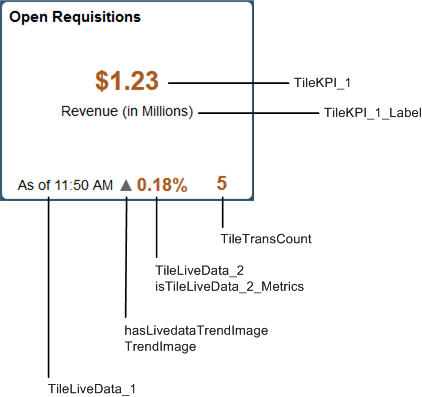
The following PeopleCode excerpt provides an example of how specific data values and formatting options were set for this tile:
/* 1 KPI tile content */
%This.TileKPI_1 = %This.getAmountFormattedValue(1.23456789, "USD");
%This.TileKPI_1_Label = "Revenue (in Millions)";

/* Live data */
%This.TileLiveData_1 = "As of " | DateTimeToLocalizedString(%Datetime, "h:mm a");

%This.hasLivedataTrendImage = True;
%This.TrendImage = %This.k_strTrendUpImage;

%This.TileLiveData_2 = "0.18%";
%This.isTileLiveData_2_Metrics = True;

/* Tile badge */
%This.TileTransCount = &req_cnt;