Creating New Queries
Use the Query Preferences page to (QRY_PREFERENCES) specify query preferences.
Navigation
To access the Query Preferences page:
Select
Create a new query or search for an existing one.
Access the Query Preferences page by clicking the Preferences link on any page of the Query Manager component (except the Run page).
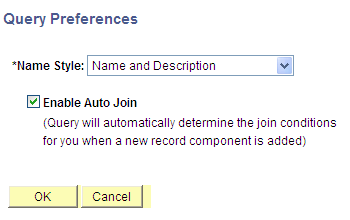
Image: Query Preferences page
This example illustrates the fields and controls on the Query Preferences page. Definitions for the fields and controls appear following the example.
|
Field or Control |
Definition |
|---|---|
| Name Style |
Specify how record and field names are displayed. Select one of the following:
This is used mostly for global users where the record and field names are in English but the descriptions are in another language. |
| Enable Auto Join |
Select to indicate that your query should automatically determine the join conditions when a new record component is added. |
Use the Records page (QRY_RECORDS) to select the records upon which to base the new query.
Navigation
To access the Records page:
Select
Click the Create New Query link.
Click the Search button.
Image: Records page
This example illustrates the fields and controls on the Records page.
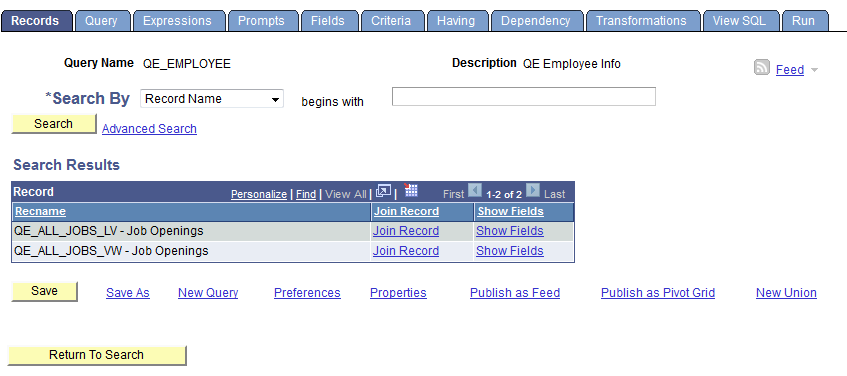
Note: In your PeopleSoft database, tables are represented as record definitions. In PeopleSoft Query, we refer to the record definitions as records.
To select a record in the Records page:
Find the record upon which to base the query.
If you know the entire record name, description, access group name, or field name included in the record, select the appropriate item in the Search By drop-down list.
Enter the name in the field (or click the Look Up button if searching by access group name). Then click the Search button to display a list of records that match your search criteria.
You can perform a partial search by entering part of the name in the Search By field.
Note: Enter as much of the name as possible to find the correct record.
You can perform an advanced search by clicking the Advanced Search link.
You can perform a progressively narrower search by selecting conditions for the record name, record description, or field name contained in the record, and then entering an appropriate search string in the fields that correspond to your selections. For access group name, select a condition, click the Lookup Name button, and then select the access group name from the list of access group trees that appears.
If you want to view a list of available records, leave the field blank and click the Search button to display a list of up to 300 records.
By default, only the first 20 records appear on the page. To see more records from the list, use the navigation buttons and links located on the header bar. To display 100 records, select the View 100 link, and use the scroll-bar to go through the rest of the list.
If you want to view a record's fields, click the Show Fields link next to the record in question.
A page displays the record's fields. You can use this information to verify whether you want to base the query upon this record.
After viewing the fields, click the Return button to return to the Records page.
Click the Add Record link next to the record that you want to add to the query.
The Query page appears enabling you to select the fields from the selected record to add to the query.
Note: In most cases, you select only one base record from this page. If you navigate back and select a second base record, you are creating an any join for the two records.
Use the Query page (QRY_QUERY) to add fields to the query content and add additional records by performing joins.
Navigation
To access the Query page:
Select
Click the Create New Query link.
Click the Search button to find an existing record, and click the Add Record link for the desired record.
Note: When you first access this page, if you have selected the record for an effective-dated table, a page informs you that an effective date criteria has been automatically added for this record. Click the OK button to close the page.
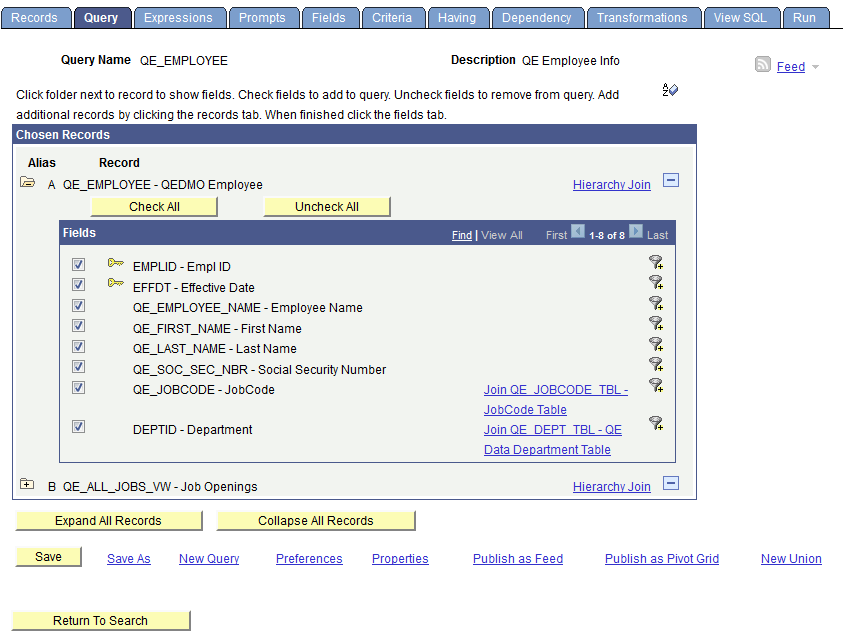
Image: Query page
This example illustrates the fields and controls on the Query page. Definitions for the fields and controls appear following the example.
|
Field or Control |
Definition |
|---|---|
 |
Click the Sort button once to list fields in alphabetical order. Click the button again to return to the original sort. |
| Alias |
The alias name that the system automatically assigns to the selected records. Note: You can select and add up to 676 records for each query. The record alias goes from A to Z for record number 1 to record number 26. When you add record number 27 and after, the record alias starts at AA and follows the pattern AB, AC, AD, and so on. The record alias doesn't include AS and TO, and ends with ZX, ZY, and ZZ. |
| Hierarchy Join |
Click this link to join a child table to its parent table. |
| Check All |
Click this button to check all fields in the record. After you select a field, the system automatically adds it to the query and you can view it on the Fields page. This button does not appear when the field names are hidden. |
| Uncheck All |
Click this button to clear all fields in the record. |
| Fields |
Select the check box to the left of each field that you want to add to your query content. |
| Join <record name> |
Click the related record join link to join two records that are based on a shared field. For example, in the above example, the QE_DEPT_TBL record is related to the QE_EMPLOYEE record by the DEPTID field. |
| Expand All Records |
Click this button to view all fields in the records This button appears only when there is more than one record listed. |
| Collapse All Records |
Click this button to hide all fields in the records. This button appears only when there is more than one record listed. |
In the Query page, to add fields to your query:
Select the fields to add to the query either by clicking their Fields check boxes or by clicking the Check All Fields button.
When you have selected the desired fields, select the Fields tab.
Use the Fields page (QRY_FIELDS) to view how fields are selected for output and the properties of each field. You can also change headings, order-by numbers, and aggregate values.
Navigation
To access the Fields page:
Select
Click the Create New Query link.
Click the Search button to find an existing record.
Click the Add Record link for the desired record.
Select the desired fields, and then select the Fields tab.
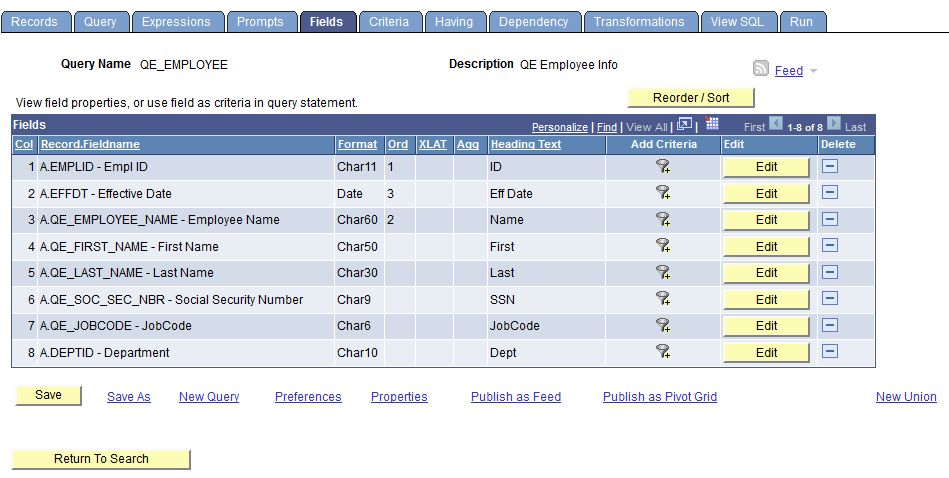
Image: Fields page
This example illustrates the fields and controls on the Fields page. Definitions for the fields and controls appear following the example.
|
Field or Control |
Definition |
|---|---|
| Format |
Field type and length for each field listed. |
| Ord (order) |
Shows one or more fields selected to sort your query output. If the field is the first sort field, a 1 appears, and the system sorts rows that are based on this field first. The second sort field that is selected is numbered 2, and so on. You can also specify a descending sort order. The letter D appears if you are sorting fields in descending order. |
| XLAT (translate) |
Specifies the translate value that you want to appear in the query results: N (none), S (short), or L (long). The table you’re querying may include fields that use the Translate table. If so, the field itself contains a short code of some kind, for which the Translate table provides a set of corresponding values. For example, if the table includes an EFF_STATUS field, the value is A or I, which the Translate table translates into Active and Inactive. If a field has values on the Translate table, a letter appears in the XLAT column for that field. In your query results, you might want to display the translated value rather than the code (for example, Active instead of A). To instruct PeopleSoft Query to make this substitution, specify L as the translate value. Translate tables are effective-dated, so you must select which effective date to use for them. For most tables, PeopleSoft Query defaults to the current date, meaning that it uses the currently active list of Translate table values. However, if the table you’re querying is also effective-dated, PeopleSoft Query uses the value in the EFFDT field for a row. That is, for each row the query returns, PeopleSoft Query uses the Translate table values that were active as of that row’s effective date. If neither of these effective date options are what you want, you have two more options:
|
| Agg (aggregate) |
Aggregate function for each field listed. |
| Heading Text |
The heading assigned to appear at the top of the column for the query output for each field listed. |
| Add Criteria |
Select the Add Criteria icon to access the Edit Criteria Properties page, where you can edit selection criteria properties for your query statement. |
| Edit |
Click this button to display the Edit Field Properties page. |
| Reorder/Sort |
Click this button to display the Edit Field Ordering page, which enables you to change the column order and/or sort order for multiple fields. |
Use the Edit Field Ordering page (QRY_FIELDS_ORDER) to change the column and sort order for multiple fields.
Navigation
To access the Edit Field Ordering page:
Select
Create a new query or search for an existing one.
Select the Fields tab, and click the Reorder/Sort button.
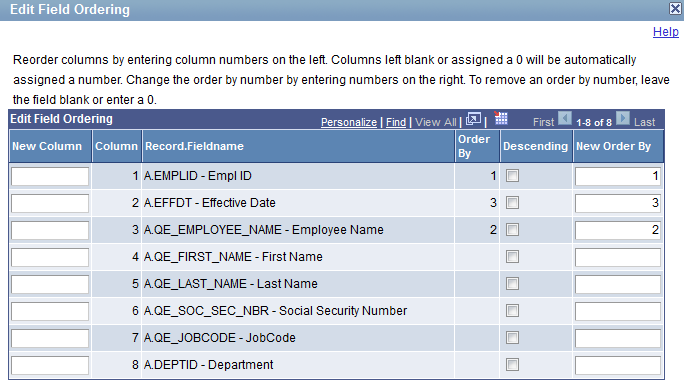
Image: Edit Field Ordering page
This example illustrates the fields and controls on the Edit Field Ordering page. Definitions for the fields and controls appear following the example.
|
Field or Control |
Definition |
|---|---|
| New Column |
Enter the new column number to reorder the columns. Columns that are left blank or assigned a zero are automatically assigned a number. |
| Column |
By default, the fields appear in the same order as they are listed in the record on the Query page. |
| Order By |
Indicates current sort order. |
| Descending |
Select this check box to sort fields in the descending order. |
| New Order By |
Enter the new sort order number to change the sort order. Enter zero to remove a sort order. If the field is the first sort field, enter 1 and the system sorts rows based on this field first. To designate the second sort field, enter 2, and so on. |
Use the Edit Field Properties page (QRY_FIELDS_SEC) to format the query output; for example, to change column headings or display translate table values in place of codes.
Navigation
To access the Edit Field Properties page:
Select
Create a new query or search for an existing one.
Select the Fields tab, and then click an appropriate Edit button.
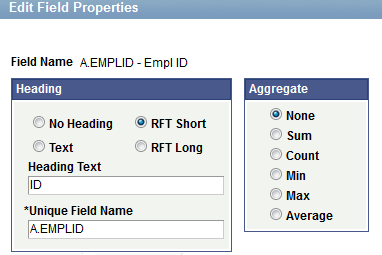
Image: Edit Field Properties page
This example illustrates the fields and controls on the Edit Field Properties page. Definitions for the fields and controls appear following the example.
|
Field or Control |
Definition |
|---|---|
| Field Name |
The name of the field for which you are editing properties. |
| Heading |
Select a column heading from the following options:
|
| Unique Field Name |
Used for translations. There is no need to change the default value, which is the alias for the record followed by the record field name (for example, A.NAME or B.EMPLID). |
| Aggregate |
If you are using aggregate values, select the aggregate function value for this field. An aggregate function is a special type of operator that returns a single value based on multiple rows of data. When your query includes one or more aggregate functions, PeopleSoft Query collects related rows and displays a single row that summarizes their contents.
|
Use the Query Properties page (QRY_PROPERTIES) to view and edit data about the current query such as the query name and description, record information about your query, and so on. You also use this page to define how the image fields are displayed in the query results.
Navigation
To access the Query Properties page:
Select
Create a new query or search for an existing one.
Click the Properties link on any page of the Query Manager component except the Run page.
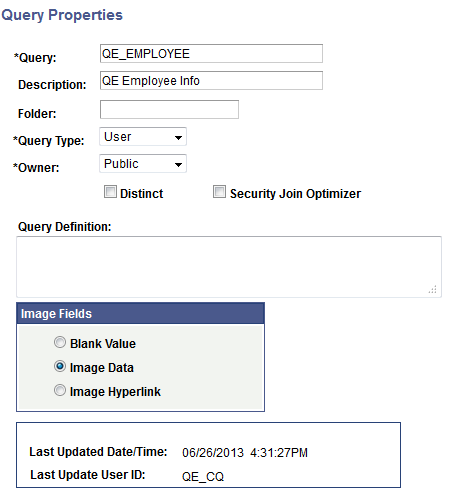
Image: Query Properties page
This example illustrates the fields and controls on the Query Properties page. Definitions for the fields and controls appear following the example.
|
Field or Control |
Definition |
|---|---|
| Query |
Use this field to edit the name of the query. The field can take 30 characters. The name can contain US ASCII alphabetic and numeric characters, as well as underscores. |
| Description |
Edit the description of the query. |
| Folder |
Enter the name of the folder in which you would like the query to reside. To create a new folder, enter the name of the new folder. |
| Query Type |
Select Archive, Process, Role or User. Workflow queries are either Process or Role. |
| Owner |
Select from the following options:
|
| Distinct |
Select this option to eliminate duplicate rows in a query result. Some queries return the same row more than once because it satisfies the query in more than one case. For example, if you query the JOB record to return all JOBCODES, you receive multiple rows that look identical because some employees have the same JOBCODE. If you select the Distinct option, you receive each JOBCODE once. This option is not visible for union selections because unions are automatically distinct. Note: In Oracle databases, PeopleSoft LongCharacter fields use the CLOB datatype when their length definition exceeds 1333. Since CLOBS and other binary datatypes are not valid columns for all operators, all queries including columns with LongCharacter field length definition that exceeds 1333 should not include the DISTINCT operator. |
| Security Join Optimizer |
If the tables being joined in the current query are associated with the same query security record, use this option to determine whether the joins should be optimized.
Note: For left outer joins, PSQuery uses either ‘inner join’ or ‘in line view’ (in the case of Oracle (+) proprietary syntax) logic to join the individual tables to their security records first, before performing the left outer join. In these cases, the Security Join Optimizer option is not applied to ensure the query returns correct results. |
| Query Definition |
Free text area that you can use to further describe your query. |
| Image Fields |
Use this section to define how the image fields are displayed in the query results. The available options are:
|
Query Image Field Handling
Query supports the use of image fields in the query definition. Setting the Image Fields property under the Query Properties page determines how these field values are displayed in the Query resultset. If the image field property is set to Image Data, the image field value (binary image) will be displayed as an embedded image in the resultset when you run the query to HTML output format. If you run a query to any other type of format (for example, XML or TXT), a Base64 encoded data string representing the image will be displayed instead. When setting the property to Image Hyperlink, a URL will be returned in place of the field value. When accessed, this URL will return the image as an image file in a new browser window.
Regardless of how the query is run, whether through PSQuery API methods (RunToRowset, RunToFile, and so on) or through the Query Manager or Query Viewer page, the image fields are handled the same way.
Note: The above-mentioned image handling behavior applies to PeopleSoft Image type fields only. Although other field types such as Long Character, Attachment, and Image Reference are capable of storing image data, these field types are not handled by PSQuery in the same way.
Although all available Image Formats for an image field are supported for the query result set, only a subset of these formats can be successfully displayed as embedded images in Query HTML output. These are BMP, DIB, GIF, JPG, PNG and SVG.
Regardless of the size of the original image, the system resizes images to 100 pixels by 100 pixels in query output.
Image: Run page
This example shows the query results after you run the query using the Run page in Query Manager, with the Image Fields property set to Image Data.
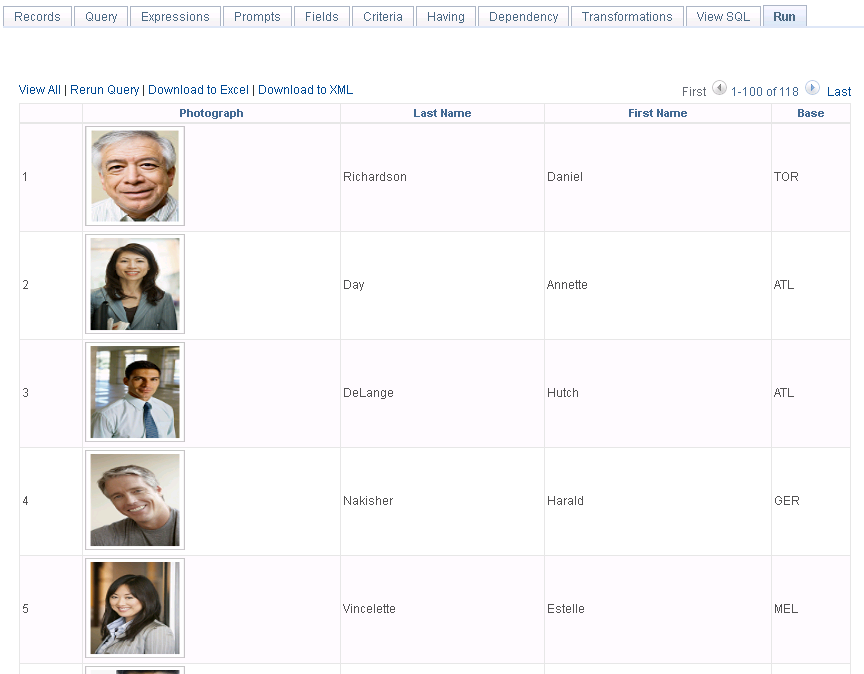
Image: Query results using the HTML link
This example shows the query results after you run a query using the HTML link in Query Manager, with the Image Fields property set to Image Hyperlink.

Note: When accessing a Query Image URL (Image Hyperlink), users must be signed into the PeopleSoft PIA environment and have the permission to view the images. If you are not signed into PIA, the Sign On page appears asking for your authentication sign-on. If you don’t have access to the images based on both Query Access List security and security joins defined by the underlying records in the query (row-level security), the required rows with image data are not returned and an error message appears.
Note: If you set the Image Fields section to Image Data for a query, its online performance can be impacted by the size of the images and the number of rows returned.
Use the View SQL page (QRY_SQL) to view the underlying SQL code that Query Manager generates based on your query definition. You can select the XLAT/Related Language check box to display the full SQL, including the system generated XLAT and Related Language left outer joins; otherwise, deselect this check box to display the SQL without the XLAT and Related Language joins. You cannot modify SQL on this page.
Navigation
Select
Create a new query or search for an existing one.
From the Fields page, select the SQL tab.
Image: View SQL page
This example illustrates the fields and controls on the View SQL page.
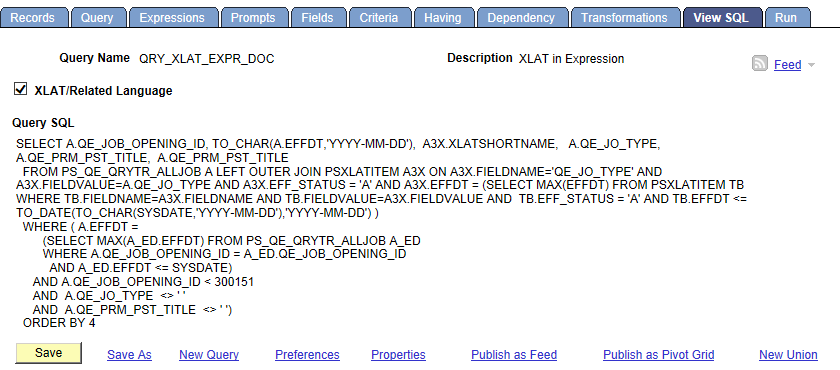
Note: To copy the SQL statement, highlight the text of the statement, copy it using your browser’s copy command, and then paste it into another application.
Use the Run page (QUERY_VIEWER) to view the results of your query prior to saving in order to verify that your query yields the results that you need. Continue to adjust and preview your query as necessary.
Navigation
To access the Run page:
Select
Create a new query or search for an existing one.
From the Fields page, select the Run tab.
Image: Run page
This example illustrates the fields and controls on the Run page. Definitions for the controls appear following the example.
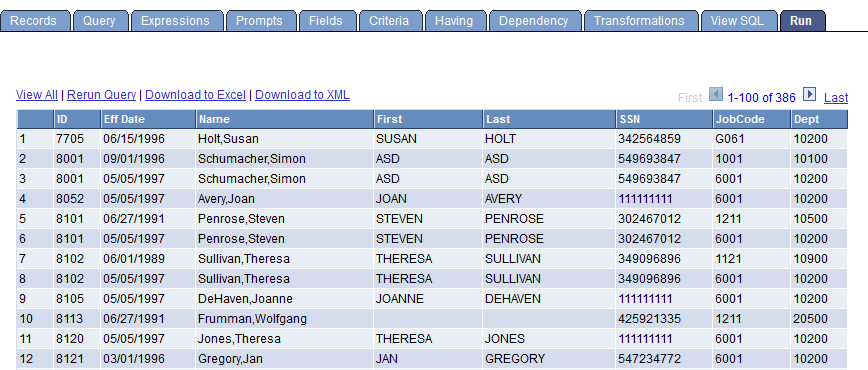
Note: Currently, PeopleSoft Query partly supports iOS (Apple's mobile operating system), you can use touch-friendly devices to view query results or rerun query from the Run page, but they cannot download query results using the Download to Excel or Download to XML link.
|
Field or Control |
Definition |
|---|---|
| View All |
Click this link to view all rows and use scroll bar to navigate. |
| Rerun Query |
Click this link to rerun your query preview. If you have made changes to your query since the last preview, you must rerun the query to see the effect of your changes. Note: If you do not want to rerun the query every time you want to preview it, deactivate the Enable Auto Preview feature. When this feature is active, your query automatically runs each time you select the Run tab. To activate Enable Auto Preview, click the Preferences link and then select Enable Auto Preview. The Preferences link is available on every page except the Run page. |
| Download to Excel |
Click this link to download your query to Microsoft Excel. Note: To grant users access to download your query to Microsoft Excel, you must make sure that their permission lists include the WEBLIB_QUERY web library with full access. |
| Download to XML |
Click this link to download your query result as XML format to another browser window. Note: To grant users access to download your query to XML, you must make sure that their permission lists include the WEBLIB_QUERY web library with full access. |
Query Results in Double-Byte Characters
In the Run page, the width of rows are automatically adjusted to show the query results. If the query results are in double-byte characters (for example, Japanese), rows may wrap vertically.
To view the row horizontal with no line break:
In PeopleSoft Application Designer, open the PTQUERYSTYLESUB definition.
Open the PSQRYRESULTSHDR style class properties.
In the Spacing/Alignment tab, select the Nowrap option from the White Space drop-down list.
See Setting Style Class Attributes, Specifying Spacing and Alignment.