Working With Search Instances
A search instance in the PeopleSoft Search Framework represents a single instance of the search engine. The search instance(s) created using the PeopleSoft Search Framework define the instances that will be used by the PeopleSoft applications to provide end user search.
The search instance definition specifies connectivity and other administration settings required for:
running queries against the search server.
administrative tasks.
To define a search instance, access the Search Instance Properties page by selecting PeopleTools, Search Framework, Search Admin Activity Guide, Configuration, Search Instance.
You can also define a search instance by using the SEARCH_TEMPLATE configuration template in Automated Configuration Manager (ACM). The steps to run the template are described later in this topic, see Creating a Search Instance in Automated Configuration Manager.
Image: Search Instance Properties page
This example illustrates the fields and controls on the Search Instance Properties page. You can find definitions for the fields and controls later on this page.
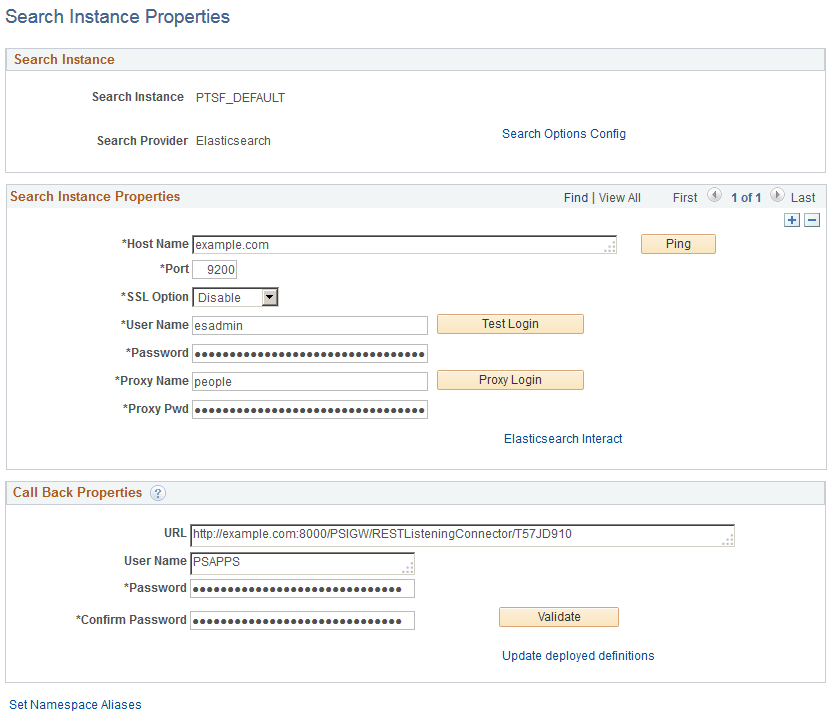
Search Instance
To enable connectivity between your PeopleSoft system and the search engine, you need to provide these search instance values.
|
Field or Control |
Definition |
|---|---|
| Search Instance |
Enter a name for the search instance. Note: PeopleSoft Search Framework enables you to create multiple search instances for the purpose of fail-over mechanism. See Understanding High Availability Feature in PeopleSoft Search Framework and Implementing Fail-over Mechanism for more information. When you create multiple search instances, you can use the Search Instance Administration page to specify priority for each search instance. See Administering Search Instances. |
| Search Provider |
Elasticsearch is the default search provider. |
| Search Options Config |
Search Instance Properties
This section contains details for the user name and password used to connect to the search engine. These credentials are part of the authentication mechanism from PeopleSoft to the search engine. During an incoming search request, the search engine matches these credentials with values stored in the configuration file to authenticate the incoming search request.
Note: Use this section to add multiple nodes for an Elasticsearch search instance by clicking the scroll bar plus button. Configuring multiple nodes enables you to use the fail-over mechanism when one of the nodes may go down for any reason. In a multi-node Elasticsearch cluster, always ensure that the replica value is set to at least 1. For details, see Managing General Search Options.
For more information, see Implementing Fail-over Mechanism.
Oracle PeopleSoft recommends setting up an Elasticsearch cluster with three nodes on machines that are not on the same physical server.
For information on creating additional Elasticsearch nodes, see Adding a New Node to an Existing Cluster.
|
Field or Control |
Definition |
|---|---|
| Host Name |
Enter the server name of the host where the search engine is running, including the domain. The host name value can be a DNS name or an IP address. For example: example.com |
| Port |
Enter the port on which the search engine listens for requests. Note: The default port for Elasticsearch is 9200. If a load balancer or reverse proxy is used between Elasticsearch and PeopleSoft, the Elasticsearch port number should be the same across all nodes in the cluster. |
| SSL Option |
Select one of the options for SSL:
|
| Ping |
Click to make sure your host name and port are correct and that the search engine is available. A positive result displays a success message. Ping Test Result: Success. Elasticsearch Version 2.3.2 (262,613) |
| Admin User |
Enter the user name to connect to the search engine. |
| Admin Password |
Enter the password associated with the user name. |
| Test Login |
Click to test the credentials you have specified against the search engine. A positive result displays a success message. Login Success. (262, 615) |
| Proxy User |
Enter a trusted entity. This enables the PeopleSoft system to log into the search engine using a proxy identity to run a query. This proxy account is a Trusted Entity. You may need to contact your administrator to obtain Trusted Entity credentials or to have those credentials created for the Search Framework query service. Important! Even though the Search Framework is authenticated by the search engine as the Trusted Entity, the search engine uses the identity of the currently signed on PeopleSoft user for query authorization. Note: In Elasticsearch, Proxy User acts as an authentication user for every search request. |
| Proxy Password |
Enter the password associated with the trusted entity. |
| Proxy Login |
Click to test the credentials you have specified against the search engine. A positive result displays the success message. Login Success (262,615) |
| + (plus sign) |
Click the + (plus) sign in the grid to enter details of another node if you plan to implement fail-over mechanism. Note: Oracle PeopleSoft recommends a three-node cluster initially. Then, depending on the hardware, memory availability, and search performance, you may add nodes to the existing cluster. |
| Elasticsearch Interact |
Click this link to open the Elasticsearch Interact page that enables you to choose the cluster and index level options on which you want to obtain information from the Elasticsearch search engine. See Administering Elasticsearch Using the Elasticsearch Interact Page. |
Call Back Properties
The callback properties are used to perform a callback to PeopleSoft to fill in data such as search attribute values, so you need to provide the URL and password for this access.
Note: In Elasticsearch, PeopleSoft Search Framework uses the REST ListeningConnector for callback.
|
Field or Control |
Definition |
|---|---|
| URL |
Enter the URL for the PeopleSoft system listening connector, using the following syntax. http://<server>:<port>/PSIGW/RESTListeningConnector/<node> Note: If the callback URL is https and if SSL is not configured on Elasticsearch, then the PeopleSoft root CA needs to be installed in the Elasticsearch truststore and the truststore path and password should be specified in the elasticsearch.yml configuration file. If Elasticsearch is behind a load balancer and the setting is to terminate SSL at load balancer, the orclssl.callback property should be set to false in the elasticsearch.yml configuration file. |
| User Name |
Enter the PeopleSoft user name granted the permission list PTPT3300. This user must have the Search Server and Search Query Administrator roles. Note: This user name must exist as an active user profile on the PeopleSoft system listed in the URL specified. This is generally a system user as opposed to an interactive user. In addition, if you have attachments on an FTP server that will be accessed by Elasticsearch, this user must also be authorized to access the FTP site. |
| Password\Confirm Password |
Enter and confirm the password associated with the PeopleSoft user name. |
| Validate |
Click to validate the URL, service operations, and credentials you have entered. A positive result displays the following message on the Validation Report page: All validations are successful. The following service-operation validations are performed to confirm:
|
| Update deployed definitions |
Click this link to invoke a bulk update for all definitions currently deployed to the search engine. If you have changed any of the callback properties (URL, user name, or password), all currently deployed search definitions need to be updated with the new callback values to continue successful interaction with the Search Framework. |
| Set Namespace Aliases |
Click this link to set namespace aliases when you clone an environment. See Setting Namespace Aliases for more information. |
You can modify any of the search instance values if the information changes for the specified server. That is, if the server receives a new IP address or a new DNS name, if the port for the search services changes, or if any credentials change, then the values can be updated as needed.
Important! You may not reuse a search instance entry for an entirely new instance of a search server if the existing search instance contains deployed search definitions and search categories. If you reuse an existing search instance entry that contains deployed search definitions and search categories, it may cause deployment errors.
Deleting a saved search instance is not supported.
If you have multiple PeopleSoft applications, you can share a single search instance among the PeopleSoft systems. When sharing a search instance, keep these items in mind:
Single signon needs to be implemented among all of the PeopleSoft systems sharing the search instance.
To enable menu search in PeopleSoft Interaction Hub, you need to run the Remote Search Group Configuration plug-in in Automated Configuration Manager.
PeopleTools delivers the Remote Search Group Configuration plug-in, which is grouped under the Cluster_Template template. See Automated Configuration Management for information on running a template.
When you import remote search groups, you should consider the following items:
Source and target PeopleSoft environments have to be mapped to the same search instance. For example, if HCM is mapped to the ES1 search instance and FSCM is mapped to the ES2 search instance, and if Interaction Hub is mapped to the ES1 search instance, then importing search groups from HCM to Interaction Hub is supported, however importing search groups from FSCM to Interaction Hub is not supported.
Ensure that the Interaction Hub environment and the PeopleSoft application environments participating in Interaction Hub are on PeopleTools 8.55.11 release or later. However, it is not necessary that all the environments are on the same PeopleTools version, that is, while Interaction Hub is on the PeopleTools 8.55.11 release, HCM can be on 8.55.12 and FSCM can be on 8.55.13.
While you do not need to synchronize user profiles among multiple PeopleSoft systems, if the same user ID exists on multiple systems, it must be associated with the same, individual user. That is, a user ID must be unique for all of the systems sharing the search instance, not just a single PeopleSoft application.
Elasticsearch provides several REST APIs that can be used to obtain details of a cluster or index in the PeopleSoft implementation. In the absence of a default user interface to administer Elasticsearch, PeopleSoft provides a user interface (called Elasticsearch Interact) that enables you to choose the cluster and index level options on which you want to obtain information from the Elasticsearch search engine. Based on the selected options, PeopleSoft Search Framework generates a URL, which is submitted to Elasticsearch, and the response is displayed on the Elasticsearch Interact page. The Elasticsearch Interact page is accessible from the Search Instance Properties page, and it provides administration requests only for those cluster and index validations that are exposed by PeopleSoft.
Access the Elasticsearch Interact page (PeopleTools, Search Framework, Search Admin Activity Guide, Configuration, Search Instance) by selecting an Elasticsearch search instance, and then selecting the Elasticsearch Interact link on the Search Instance Properties page.
Image: Elasticsearch Interact page (initial)
This example illustrates the fields and controls on the Elasticsearch Interact page (initial). You can find definitions for the fields and controls later on this page.
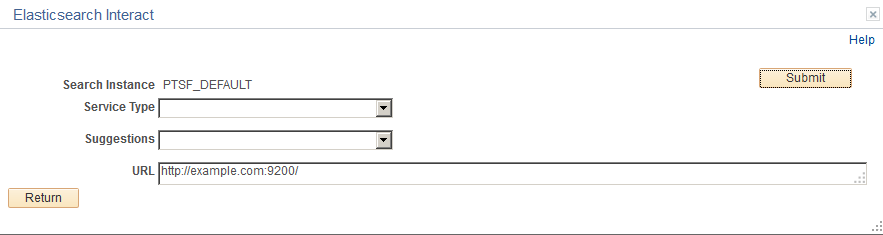
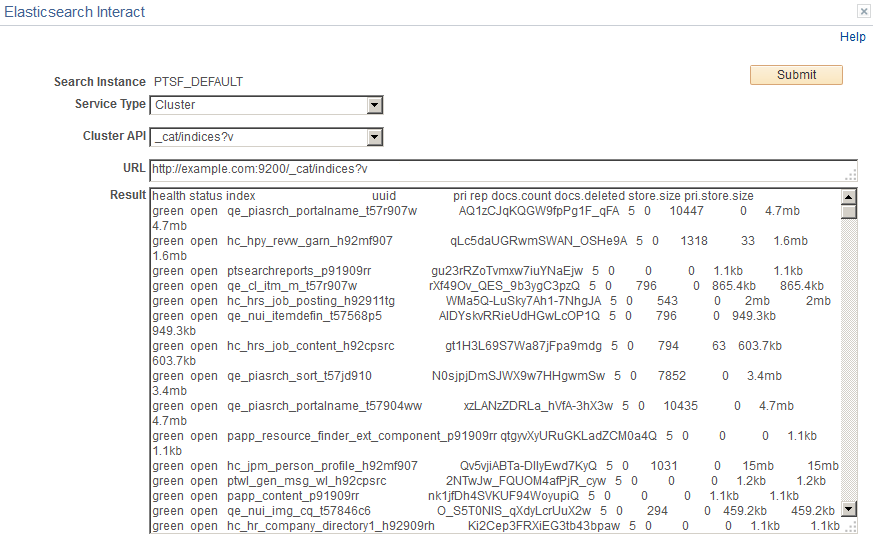
Image: Elasticsearch Interact page (after selecting an option from the Service Type drop-down list)
This example illustrates the fields and controls on the Elasticsearch Interact page after selecting an option from the Service Type drop-down list. You can find definitions for the fields and controls later on this page.
|
Field or Control |
Definition |
|---|---|
| Search Instance |
The search instance name. |
| Service Type |
Displays a list of service type groups. The following service type groups are available:
|
| Suggestions |
The Suggestions field displays on the initial Elasticsearch Interact page and it changes based on the service type you select. The Suggestions field changes to the following:
|
| Method |
The Method field is displayed when the service type is Search. Choose the type of HTTP request that needs to be issued to the Elasticsearch server. Valid options are:
|
| URL |
The URL is automatically formed based on the selected options. For example, if you select Cluster as service type and select cat/indices as the cluster API, the URL is automatically formed: http://example.com:9200/_cat/indices?v Note: The URL cannot be modified. To modify the URL, you need to change the options you have selected. |
| Body |
The Body field appears when you select POST as a method. This field must contain a JSON request. The contents of the Body field are passed along with the request to Elasticsearch. |
| Result |
The Result area displays the response from Elasticsearch for each request. PeopleSoft Search Framework displays the response from Elasticsearch as is. |
Namespace aliasing enables you to re-use an index or indices built on an environment (original environment) on another environment (which is referred to as “new environment” for purpose of differentiation), thus avoiding the necessity to re-index the same search definitions on the new environment. The namespace aliasing feature is handy when you need to clone environments or when the middle-tier changes.
When you need to clone an environment, for example, you clone a test FSCM environment (FSCMTEST), where all the search definitions in FSCMTEST are already indexed to a search server, as a staging FSCM environment (FSCMSTAGING), you can re-use the index or indices of FSCMTEST from the FSCMSTAGING environment that is connected to the same search server by setting up namespace aliasing.
When the Application server or Web server changes, but is connected to the same database, you can use namespace aliasing to map the new environment to the original environment and thus re-use the index or indices of the original environment.
The namespace aliasing feature enables you to map the database name, node name, and node URI of the new environment to the original environment where the indices are built. The new environment re-uses the indices on the original environment, so users can perform search in the new environment without having to wait for indices to be built. Also, you can perform incremental indexing to update the indices from the new environment.
You can use the Namespace Alias Settings page to set namespace aliasing or you can use the PTSFConfigureSearch plug-in in Automated Configuration Manager to set namespace aliasing.
Access the Namespace Alias Settings page by selecting . Then click the Set Namespace Aliases link.
Alternatively, access the Namespace Alias Settings page by selecting .
Image: Namespace Alias Settings page
This example illustrates the fields and controls on the Namespace Alias Settings page. You can find definitions for the fields and controls later on this page.

|
Field or Control |
Definition |
|---|---|
| Database Name |
The name of the database in the new environment. You may enter the same database name as in the original environment. |
| Database Alias Name |
The name of the database in the original environment. |
| Node Name |
The name of the node in the new environment. You may enter the same node name as in the original environment. |
| Node Alias Name |
The name of the node in the original environment. |
| Alias Node URI |
The node URI in the original environment. When you enter the URI, follow this syntax: http or https://<hostname>:<port>/psc/<sitename>/ Optionally, you can copy the URI entered for the node in the Content URI Text edit box on the Node Definitions page (Portal tab). |
| Clear Data |
Clears the data entered on the page and also removes it from the database. |
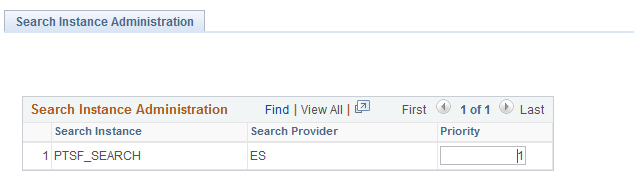
To administer search instances, access the Search Instance Administration page by selecting ,
Search administrators can use the Search Instance Administration page to specify the priority for each search instance.
Image: Search Instance Administration page
This example illustrates the fields and controls on the Search Instance Administration page. You can find definitions for the fields and controls later on this page.
|
Field or Control |
Definition |
|---|---|
| Search Instance |
Lists the search instances created in PeopleSoft Search Framework. |
| Search Provider |
Lists the search provider associated with a search instance. |
| Priority |
Allows Search administrators to set the sequence in which the available search instances are to be used when any of the search instances fail. The lowest number is 1 and it has the highest priority. The search instance with the priority set at the lowest number has the highest priority, and it will be set as the default search instance. When you create a search instance on the Search Instance Properties page, the new search instance is assigned a sequence number. You can use this page to specify the sequence that you want. |
When you deploy an index on a new search instance, you may want to validate or test the index before you roll out the index in a production environment. Search administrators can use the Search User Instance page to assign users to a search instance on which the deployed index needs to be validated or tested.
Note: When you assign a user to a search instance using the Search User Instance page, you override the priority setting specified on the Search Instance Administration page for the particular user.
To assign users to a search instance where a deployed index needs to be validated or tested, access the Search Instance Administration page by selecting .
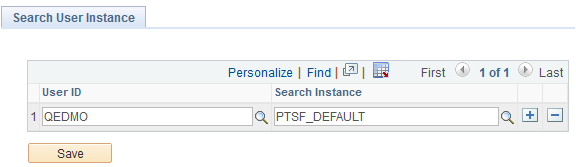
Image: Search User Instance page
This example illustrates the fields and controls on the Search User Instance page. You can find definitions for the fields and controls later on this page.
|
Field or Control |
Definition |
|---|---|
| User ID |
Select a user to whom you want to assign the task of validating or testing an index that is deployed. |
| Search Instance |
Select a search instance where you have deployed an index, which needs to be validated or tested before deploying the index to a production environment. |
Note: You would use this page to test new Elasticsearch instances as they come online. It doesn't not need to be specified for all users.
The Automated Configuration Manager (ACM) framework enables you to store environment configuration settings in a template stored in the database or an external template file, which you can reapply when needed. You can use SEARCH_TEMPLATE in ACM to configure an Elasticsearch search instance.
Using ACM allows you to automate the creating of search instance and deploying/indexing of search definitions. Though, you can create a search instance and deploy/index search definitions in a single execution of the template, PeopleSoft recommends to create the search instance first and then deploy/index the required search definitions.
Complete these steps to create a search instance and deploy/index search definitions:
Select PeopleTools, Automated Config Manager, ACM Templates, Template Definition.
Search for and open SEARCH_TEMPLATE.
On the Configuration Template Definition page, verify that the Configure Search Instance plugin is selected, and then select the Properties icon.
Specify the properties for the plug-in on the Configure Search Instance page.
For descriptions of each of the properties, see PTSFConfigureSrchInstance.
Ensure that the Configure Search Instance plug-in is selected and the Deploy Search Definition plug-in is not selected.
Save the template and click Execute to begin the program run.
If the program run is successful, the system displays a success message, that is, a search instance is created. After successfully creating a search instance, proceed with the steps of deploying/indexing the required search definitions.
To verify that the search instance has been configured for Elasticsearch, select PeopleTools, Search Framework, Search Admin Activity Guide, Configuration, Search Instance.
On the Configuration Template Definition page, verify that Deploy Search Definition is selected and click the Properties icon.
Specify the properties for the plug-in on the Deploy Search Definition page and click OK.
For description of each of the properties, see PTSFAdministerSearch.
Ensure that the Deploy Search Definition plug-in is selected and the Configure Search Instance plug-in is not selected.
Save the template and click Execute to begin the program run.
If the program run is successful, the system displays a success message.
To verify the required search definitions are deployed and indexed, select PeopleTools, Search Framework, Search Admin Activity Guide, Administration, Schedule Search Index.