Working with Application Designer Projects in PTF Client
The PTF client enables you to inspect and maintain the test contents of an Application Designer project, and complete the following tasks:
Create new Application Designer projects.
Open existing Application Designer projects.
Insert tests into Application Designer projects.
Remove tests from Application Designer projects.
Set the upgrade action type for the tests within Application Designer projects.
Access to this feature is limited to PTF Administrators. In addition, the appropriate PeopleTools security roles and permissions necessary to administer Application Designer projects are required. Only test-related data within a project is modified; any other content that exists within the project is not affected.
Note: This section assumes you are already familiar with Application Designer projects. For detailed information about Application Designer Projects, see Application Designer Developer’s Guide.
Use the Projects dialog box to manage Application Designer projects within the PTF client.
To access the Projects dialog box, select the menu command.
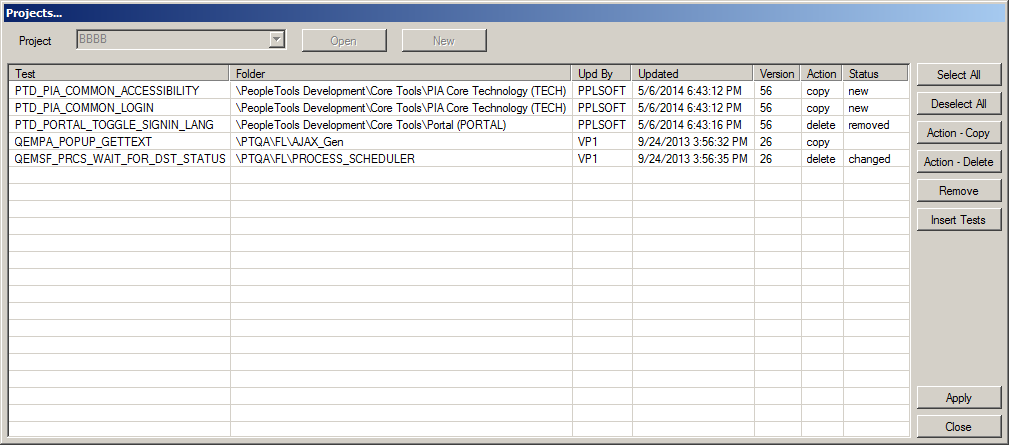
Image: Projects Dialog Box
This example illustrates the fields and controls in the Projects dialog box.
Use these fields and controls to open or create a project:
|
Field or Control |
Definition |
|---|---|
| Project |
Select a project. |
| Open |
Click to open the selected project. This option is not available if the Project field is blank, or a project with pending changes is open. |
| New |
Click to create a new project. At the prompt, enter a unique project name. This option is not available if a project with pending changes is open. Note: •New projects are not saved until a test object is inserted and you click the Apply button. |
The grid area serves as a worksheet that lists the following information about the project’s tests.
|
Field or Control |
Definition |
|---|---|
| Test |
The test name. |
| Folder |
The name of the folder the test belongs to. |
| Upd By |
The user ID of the person that last updated the test. |
| Updated |
The date and time the test was last modified. |
| Version |
The test version. |
| Action |
The upgrade action associated with this project test record, either Copy or Delete. By default, the action is set to Copy when the test is initially inserted into the project. To change the upgrade action, click the Action - Copy or Action - Delete button. |
| Status |
The status of the project test record. This updates automatically while you interact with the project using this dialog box to show the changes made during the current session. Once you apply the changes, the status resets. Values are:
|
Initially, when you open the Projects dialog box, the grid is empty. It populates when you:
Open a project that contains tests.
Add tests by using the Insert button.
Use these buttons to interact with the project worksheet.
|
Field or Control |
Definition |
|---|---|
| Select All |
Click to select all of the tests in the grid. |
| Deselect All |
Click to deselect all of the tests in the grid. |
| Action - Copy |
Click to set the upgrade action type to copy. |
| Action - Delete |
Click to set the upgrade action type to delete. |
| Remove |
Click to remove selected tests from the project. |
| Insert Tests |
Click to insert tests into the current project. A window appears that enables you to select the tests from to insert. Currently active filters are applied to the view. You can select multiple tests or folders. If a parent folder is selected, tests from its associated child folders are included. |
| Apply |
Click to commit all pending changes to the project. The Projects dialog box remains open. |
| Close |
Click to close the dialog box. If there are any pending changes, you are prompted to save. |
Important! Project content is not dynamic; it is a snapshot of the test data at the time it was inserted into the project. If you modify a test after you have included it in a project, you must re-insert that test into the project in order for the project to contain the revised test data.
Creating a New Project
To create a new project:
Select the menu command.
The Projects dialog box opens.
Click the New button.
At the prompt, enter a name for the new project, and click OK.
The Projects dialog box reappears. The Project field displays the new project name, and becomes unavailable. The Open and New buttons are disabled.
Opening an Existing Project
To open an existing project:
Select the menu command.
The Projects dialog box opens.
Select a project from the Projects list box.
Click the Open button.
If any tests are currently associated with the project, they appear in the grid.
Inserting Tests into a Project
To insert tests into a project:
Select the menu command.
The Projects dialog box opens.
Open an existing project, or create a new project.
Click the Insert button.
The PTF Explorer tree appears in the PTF Suite window.
Expand folders as needed to access and select the tests to insert (use Ctrl-Click to select multiple tests).
Click OK.
Click Apply to insert the tests into the project.
Removing Tests from a Project
To remove tests from a project:
Open an existing project.
Select one or more tests in the grid.
Click Remove.
Click Apply.
Setting the Upgrade Action Type for Test(s) in a Project
To set the upgrade action type for test(s) in a project:
Open an existing project.
Select one or more tests in the grid.
Click Action - Copy or Action - Delete to set the desired upgrade action type for the selected test(s).
Click Apply.