Sending and Receiving Notifications
This section discusses how to send and receive notifications.
The system sends notifications automatically as part of standard workflow routings. You can also send notifications from most PeopleSoft components by using the Notify toolbar button. This button picks up any available notification templates for that component.
In both cases, you can send notifications by way of worklist or by email.
Access the Send Notification page (click the Notify button at the bottom of any page).
Image: Send Notification page
This example illustrates the fields and controls on the Send Notification page.
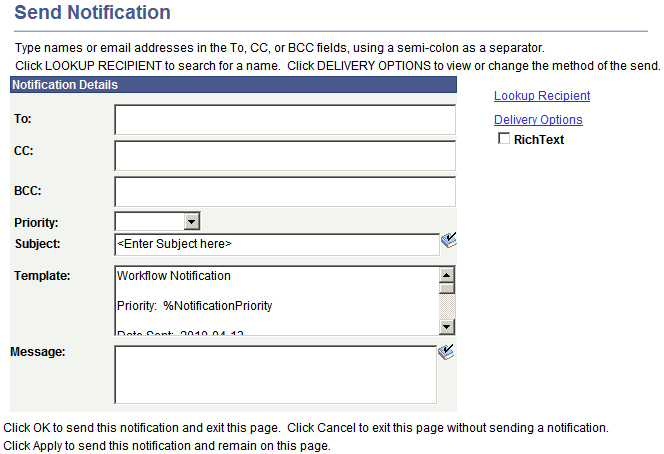
|
Field or Control |
Definition |
|---|---|
| To |
Enter the user names or email addresses of those who need to take action. This field can contain one or more email addresses or user names separated by a semicolon. |
| CC (carbon copy) |
Enter the names or email addresses of CC recipients, who are made aware of this notification publicly. |
| BCC (blind carbon copy) |
Enter the names or email addresses of BCC recipients, who are made aware of this notification privately. |
| Priority |
Select a priority level for the notification: low, medium, or high. This priority is reflected in the notification only if the %NotificationPriority variable is in the template text. |
| Subject |
Enter the topic or a brief description of the notification. The subject value may appear by default from a template, but you can edit it. |
| Template Text |
Displays the template text, which is based on a predefined notification template. The text in this field is sent in the language of the recipient. However, the notification template has to be defined with template text for each language. |
| Message |
Enter your own comments. The message text is sent in the language of the sender. |
| Rich Text |
Select this check box to enable rich text. |
| Lookup Recipient |
Click to access the Lookup Address page. Enter the first characters of a recipient's name and click Search to see a list of people who match your search. To use someone as a recipient, select the check box for the type of recipient (To, cc, bcc) and click Add to Recipient List. |
| Delivery Options |
The system populates the check boxes based on the delivery options that are defined in the recipient's user profile. The Worklist check box is unavailable for external email addresses. |
PeopleSoft offers two types of workflow notifications:
Email
Worklists
Working with Email Notifications
While many workflow-enabled applications use worklists to assign work, you may receive workflow notifications through email. When you receive an email notification, the notification typically includes a link to the PeopleSoft page where you will perform the necessary work. Depending on your business processes, you may need to notify a colleague or supervisor that you have completed the work.
Viewing a Worklist
When you use workflow-enabled applications, changes in your day-to-day tasks are reflected in a worklist. A worklist is an organized list of the work items awaiting your attention. Selecting items to work on from a worklist automatically returns the pages that you need, which enables you to bypass any other navigational structure and work directly from the worklist.
The Worklist page provides summary information about all items in your personal worklist. This page also provides links that enable you to:
View additional details about the work.
Perform the indicated work.
Reassign work items.
Access the Worklist page (Select ).
As with other grids, you can personalize the sorting and columns within the Worklist grid.
Image: Worklist page
This example illustrates the fields and controls on the Worklist page.
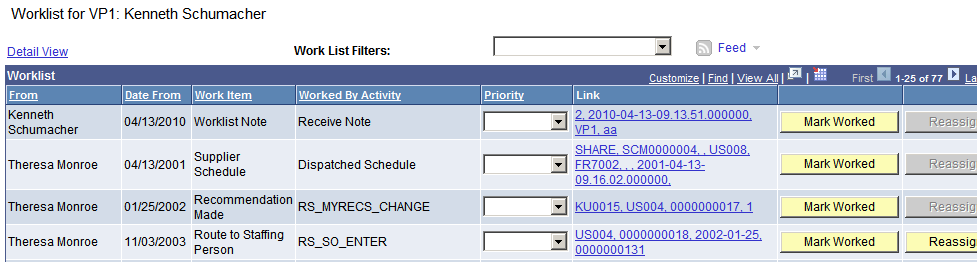
|
Field or Control |
Definition |
|---|---|
| Work List Filters |
Select a worklist to view. You can only view worklists to which you are assigned. The system maintains the filter you have selected until you sign out of the PeopleSoft system. Note: If you complete all of your work items in a worklist and mark them as worked during your current PeopleSoft session, the system displays Invalid Value because the worklist is empty; it contains no more work items. |
| From |
Displays who triggered the work item. |
| Date From |
Displays when the work item was triggered. |
| Work Item |
Displays the work items, which are the types of activities that you need to carry out. You can have multiple entries all with the same work item. For example, if you approve expense reports, you may have several entries with Expense Approval in the Work Item column. Each of these entries represents a different expense report that requires your attention. |
| Worked By Activity |
Displays the activity that needs to be worked by the worklist item. |
| Priority |
Ranks the worklist entry by importance. Priority values include: 1 for high, 2 for medium, and 3 for low. |
| Link |
Click a link to access the target page—the page where you work the item. The target page is specific to the type of work that you are doing. For example, the link for an expense approval item accesses the page where you can review and approve expense reports. Note: You cannot sort on this column. In addition, you cannot use the Find function for this column and you cannot use the Download to Excel function to download the information in this column. |
| Mark Worked |
Click to remove an item from your worklist without actually accessing the target page. You should not use this option unless the item is a simple notification and no additional work is required. |
| Reassign |
Click to forward the item to another user and remove it from your list. |
| Refresh |
As items are added to and removed from your worklist, click this button to update the page with the most recent changes. |
By default, all work items assigned to you are visible from the oldest to the newest. Click any of the column headings to sort work items according to the data in that column.
Performing Work
To work an item on its target page, click the link on the Worklist page for the item that you want to work. The system transfers you to the page where you can perform the required task. When you have worked the item, it automatically disappears from your worklist.
If you need to mark an item as worked manually, such as when an entry is a simple notification with no necessary follow-up, then select the Mark Worked button. The item disappears from your worklist.
Reassigning a Worklist
You can also reassign a worklist item to another user. Your organization can choose to prevent particular types of items from being reassigned.
Access the Worklist. (Click Worklist in the universal navigation header.)
Click the Reassign button.
The Reassign page appears.
Enter the user ID of the person to whom you are reassigning the item.
Click the Search button if you need help finding the appropriate user ID.
(Optional) Enter a comment.
The comment becomes part of the worklist item when it appears in the assignee’s worklist.
Click OK.
Viewing Worklist Details
Access the Worklist Details page (click the Detail View link from the Worklist page).
The Worklist Details page provides additional information about items in your worklist; it includes all of the information from the Worklist page along with the additional information described here.
|
Field or Control |
Definition |
|---|---|
| Timed Out Dttm (timed out date and time) |
Displays the date and time when the item will time out if it is not already worked. |
| Previous User |
Displays the user whose action triggered this item. |
| Selected Dttm (selected date and time) |
Displays the date and time when you first selected this item (to work the item). |
| Comment |
Displays the comment (if any) entered by the user if the item was forwarded from another user. |
| Timed Out |
Indicates whether the item has timed out. |
| Instance |
Displays a unique identifier for each item of the same type. |
| Transaction |
Displays a unique identifier for each item in the worklist. |