Using Data-Entry Fields
This section discusses how to use various data entry fields.
Move to and highlight an edit box by pressing the tab key or by double-clicking and highlighting the text. You can type over existing highlighted text. If the text is not highlighted, you are inserting rather than replacing text.
Image: Edit box
This example shows an edit box.

Some edit boxes are associated with database fields that have formatting attributes assigned to them. For example, most name fields are defined with the PeopleSoft name format that requires you to enter data in the following manner:
[Lastname],[Firstname] [Initial]This format is case sensitive. Also, note that there is no space between the comma after the last name and the first name. The complete PeopleSoft standard name convention is as follows:
[Lastname] [Suffix],[Prefix] [Firstname] [Middle name/Initial]If a field is not case sensitive, the system converts what you type to uppercase before writing it to the database.
Other types of formatting include:
Social security, social insurance, or other government ID numbers.
Dates.
ZIP codes or other postal codes.
International phone numbers.
For these types of formats, you generally type only the characters; the system inserts the appropriate dashes and slashes for you. For dates, enter the standard six-digit date format, such as mm/dd/yy (include zeroes); the system automatically changes the display to show a four-digit year.
Note: Number formatting may perform differently for users who have personalized their systems.
Note: PeopleSoft applications are equipped with a spell check feature that you can use on data entered in edit boxes.
In interactive mode, if you enter a field value incorrectly, the system highlights the field in which an invalid value was added, and a warning message appears with an explanation of the problem.
You use long edit boxes to enter anecdotal information such as comments or free form informational text.
Move to and highlight a long edit box by pressing the tab key or by double-clicking and highlighting the text. You can type over existing highlighted text. If the text is not highlighted, you are inserting rather than replacing text. If you enter data that extends beyond the visible area of the long edit box, a scroll bar appears for you to navigate through the data.
Image: Long edit box showing Display in Modal Window and Spell Check buttons
This example shows a long edit box with the Display in Modal Window and Spell Check buttons.

Note: PeopleSoft applications are equipped with a spell check feature that you can use on data entered in long edit boxes.
Note: You can zoom a long edit box to a modal window if the Display in Modal Window icon is visible to the right of the long edit box.
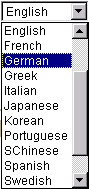
To select a single item from the list, click the down arrow to display the list, scroll through the list until your choice is visible, and then click the desired list item. The list closes and the selected value appears in the list box. You can also type the first letter of an item to select it. If there is more than one choice for a letter, type the letter repeatedly to cycle through the list. In the following example, first click the down arrow, then, if you want to select Greek, type the letter G twice. Alternatively, press the Down Arrow key to select the field entry that you want. Once your choice is highlighted, press Enter.
Image: Drop-down list box
This example shows a drop-down list box.
You can insert or update images in your PeopleSoft system. For example, the Employee Photo page enables you to store and maintain photos of your employees in your PeopleSoft database.
This section discusses how to:
Insert an image.
Delete an image.
Inserting an Image
You can insert photos into your PeopleSoft database. For example, you may want to store employee photos for company identification badges, or pictures of products for inventory purposes.
To insert an image at runtime:
Open the page in which you want to insert the photo.
Click the Add button.
A search page appears enabling you to search for the image that you want to insert. You can browse for the image from your desktop, your hard drive, or the network.
Click the Browse button to search for and select the image you want to insert.
Click the Upload button.
The upload page closes and your newly inserted image appears on the page.
Deleting an Image
To delete an image at runtime:
Open the page from which you want to delete the image.
Click the Delete button.
The system automatically deletes the image on the page without posting a warning message prior to deletion. However, if you exit the page without saving, the system does not delete the image from the database, and the image is present when you reopen the page.