Adding and Defining Email Routings
This section provides an overview of email routings.
With email routings, you can send email messages in response to business events. In some cases, you might want to define two routings for the same event: one that adds an item to someone’s worklist and one that sends an email message to tell that person about the new worklist item.
Email messages can be sent as plain text or rich text format. If you select to use rich text format, you can also include images in the email message. When using rich text format NOTETEXT can be mapped to any rich text enabled edit box field in your application to create a rich text email.
You can send an email routing to anyone to whom you can send email messages through the mail system. PeopleSoft applications support email routings to any email software that supports the Simple Mail Transfer Protocol (SMTP) standards.
To create an email routing:
Create the business event that triggers the email routing.
Click the Email button in the toolbar.
Click where you want the Email icon to appear on the map.
The Email icon appears.
Connect the email routing to the event that triggers it.
Click the Connector button in the palette.
Click the Event icon and then the Email icon.
An arrow connects the two icons.
Use the Link icon to connect a routing to an event.
If you use the Line icon, the system will not recognize the routing.
Double-click the Email icon, or right-click and select Item Properties.
The Email Definition dialog box appears.
Enter a name and description for the routing. By default, the routing name also appears as the display text under the icon on the map.
Note: The name can not contain any special characters, such as dash (-), dollar sign, number sign or question mark. Spaces and underscore are permitted.
Select any settings to apply to the email message.
The options in this dialog box correspond to the mailing options offered in most email software. If your email software does not support one or more of these options, the system ignores its setting.
See the documentation for your email software.
Click to return to the Email Definition dialog box.
Note: When designing workflow, consider the following behaviors of email routing:
Calling TriggerBusinessEvent PeopleCode in workflow is part of process of saving, so any failure of TriggerBusinessEvent results in a failure to save. If an email route exists and email failed, then the save process will fail and the database transaction will roll back. However, if TriggerBusinessEvent successfully sent the email but the saving process failed after the workflow event, then the sent email cannot be rolled back.
Map fields for your email routing in the Field Map dialog box.
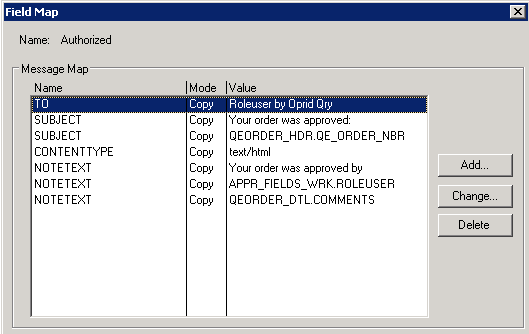
Image: Field Map dialog box
This example illustrates the fields and controls on the Field Map dialog box. You can find definitions for the fields and controls later on this page.
To map fields:
Select Field Mapping .
The Field Map dialog box appears.
Use this dialog box to tell the system where to find the data to create an email message. The Message Map group box lists the fields involved.
Field or Control
Definition
Name Displays the fields.
Value Indicates where the system finds the data to enter in the fields.
The fields that appear in this dialog box represent the two different types of data that are needed to create an email message: who and what. That is:
Who receives the email message?
The TO field holds the email address for this person.
What is the content of the email message?
This includes a SUBJECT line and any additional text that you add. You can also concatenate data into the message. When you first open the dialog box, the Name column displays the fields available for mapping. You must provide a value for the TO field.
Select the field into which you want to map a value.
Click the Change button or, to add a new field to the map, click Add.
Image: Map Field dialog box
This example illustrates the fields and controls on the Map Field dialog box.
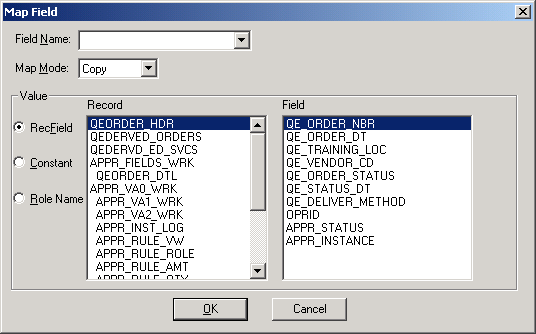
The Map Field dialog box appears. Use this dialog box to create the email message from the values provided by the step that triggers the routing:
Select the field into which you want to place routing data.
If you select the field from the message map, its name appears in the Field list box. If the correct name does not appear, you can select a field from the list box or enter a new name.
The following fields in an email routing’s message map have specific meanings to the email software to which the system forwards the email message.
Field or Control
Definition
TO Indicates the name of the person to whom you want to send the email message. The value can be an email name or a role. To send to more than one person, separate the names with semicolons. The values in the TO, CC, and BCC fields determine who receives the email message. The values that you map to these fields can be email addresses, role user IDs, or role names. The system automatically converts role user IDs and role names into the users’ email addresses.
Note: At least one TO Recipient is Required on all email sent.
FROM (Optional) Indicates the email address of the sender. Setting this value overrides the system SMTPSender value so that the recipient of the email message can reply to an individual, rather than to the system email address.
REPLYTO (Optional) Indicates the email address to which the sender recommends sending replies.
SENDER (Optional) Indicates the email address of the actual originator of the email if different from the address set in the FROM field.
CC and BCC (Optional) Indicates the names of other people to whom you want to send the message.
SUBJECT Indicates the subject line that appears in the receiver’s email inbox.
NOTETEXT Indicates the body of the message. The message can have multiple NOTETEXT fields. The system displays NOTETEXT fields in the order in which they appear in the Field Map dialog box.
CONTENTTYPE Indicates whether the message will be in plain text format or use rich text. Enter one of the following constants:
text/plain (default)
If you do not include CONTENTTYPE in the field map, the message will be in plain text.
text/html
Allows you to use the NOTETEXT to point to any rich text enabled edit box field.
FILEPATH (Optional) Indicates the completed qualified path and filename for a file to attach to the email message.
FILENAME (Optional) Indicates the name to display in the body of the email message, below the icon that represents the file attachment.
FILETYPE (Optional) Indicates the type of file being attached.
Note: When the PeopleSoft system constructs an email address to be used in email notifications, the system does so according to the following conditions: If the system detects an email address with a value enclosed in angle brackets, as in <email_address>, the system uses that enclosed value. If the system does not detect angle brackets in the email address, the system encloses the entire email value in angle brackets when transmitting the email message.
To add a new NOTETEXT line, click the Add button in the Field Map dialog box.
Select NOTETEXT in the Field Name box.
Identify the value for the selected field.
The value can be data from a record field, a specific constant value, or a role name.
Field or Control
Definition
Record Field Value To enter the value from a record field into the email message, select the RecField option. The Record box lists the record definitions that should be available when the event triggers this routing (according to the page and record definition associated with the event). Select the record name. The fields in that record appear in the Fields list box. Select the field whose value you want. When the event is triggered, the system completes the email field with the value of the record field in the current record.
Constant To assign a specific constant value to the field, select this option and enter the value in the text box to the right. Every email message will have this value in the selected field.
Role Name To assign a role name to the field, select this option and select a role from the drop-down list box that appears next to it. When the event is triggered, the system completes the field with a list of users who fill this role. If you select a user list role, each user who is assigned to that role receives a copy of the email message. If you select a query role, each user that the query returns receives a copy.
Although the role returns a list of role users, the system enters the user’s email address into the field. There must be an email address in each role user record.
If you map the field to a role name, provide values for any bind variables.
If you map the TO, CC, or BCC field to a query role that includes bind variables, the Specify Query Bind Variables button appears next to the Role Name option. When you click this button, a dialog box appears, enabling you to specify the value that each bind variable in the query should take.
The Query Bind Variable column displays the bind variables for the role query. (If nothing appears in this column, you defined the query without specifying any bind variables.) The Record column lists the record definitions associated with the component that triggers this routing. The Field column displays the fields in the selected record definition.
You can bind each variable with the value from a record field or with a constant:
To bind a variable with the value from a record field, select the Field option, select the bind variable for which you want to provide a value, and select the record field that will contain the value.
To bind a variable with a constant, select the Constant option, and enter the value into the text box.
When you have mapped bind values for all the variables, click OK to close the dialog box.
Note: If you are using route controls with Virtual Approver, the role that you assign to the TO field is one of the predefined route control query roles, and the bind variable values come from a work record that you need to add to the component that is triggering the routing.
If you map the field to a record field, specify whether the system copies the assigned value directly into the field or replaces the assigned value with a value from the translate table.
Select the appropriate option from the Map Mode drop-down list box. This list is available only if the selected field has associated translate table values. In most cases, leave the default value (Copy).
For example, suppose that you want to include a person’s employment status in the email message, so you associate the NOTETEXT field with the record field PERSONAL_DATA.STATUS. If the PERSONAL_DATA. STATUS field holds an abbreviation that translates to a value in the translate table, you can tell the system to populate the field with the abbreviation (Copy) or with the corresponding translate table value (Xlat-S for the short form or Xlat-L for the long form).
Click OK to add the field and its value to the routing dialog box.
Repeat steps for each field that you want to add to the routing.
Close all of the dialog boxes by clicking OK in each one.