Creating Approval Rule Sets
This section provides an overview of creating approval rule sets.
Except where specified, this process is the same, regardless of whether Virtual Approver or GetApprovers uses the approval rule set.
To create an approval rule set:
In PeopleSoft Application Designer, select File, New.
Select Approval Rule Set and click OK.
Save the rule set and assign an effective date.
Unless you specifically want to make the approval rule set effective at a particular time, use a standard effective date, such as 01/01/1900.
This section discusses how to specify approval rule properties.
Image: Approval Rule Properties dialog box
This example illustrates the fields and controls on the Approval Rule Properties dialog box.

To specify approval rule properties:
Open the Approval Rule Properties dialog box by selecting File, Definition Properties.
The Approval Rule Properties dialog box appears, displaying the General tab.
Enter descriptive information about the approval rule set.
Use the Icon Descr (icon description) field to specify a description that appears next to the rule set’s name in dialog boxes that list approval rule sets.
(Optional) Temporarily suspend the use of this approval rule set.
Clear the Approval Active check box to prevent Virtual Approver from checking the approval rules. Instead, it automatically approves all transactions.
Specify whether users can approve their own transactions.
Select Allow Self Approval if users are permitted to approve transactions that they entered. Selecting this option does not mean that transactions are automatically approved; self-approval is still subject to the person’s approval limits. For example, if managers can approve purchase requisitions up to 5000 USD, then a manager who submits a requisition for 7500 USD cannot self-approve that requisition, even if you allow self-approval.
This section describes how to specify additional approval rule properties.
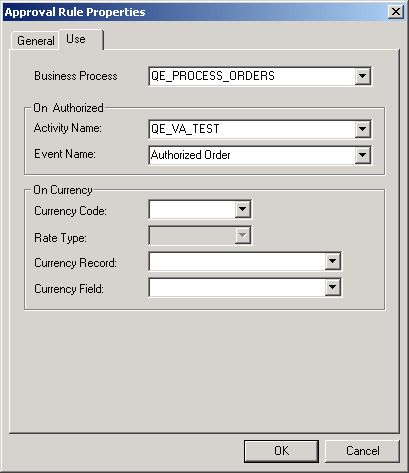
Image: Approval Rules Properties dialog box - Use tab
This example illustrates the fields and controls on the Approval Rules Properties dialog box - Use tab.
To specify additional approval rule properties:
Select the Use tab.
Enter the name of the business process that is associated with this rule set.
Although approval rule sets are not represented by physical icons on workflow maps (business processes and activities), the approval process that you’re defining is part of a workflow business process. Enter the name of that business process here. This information is required when you use Virtual Approver.
When you add PeopleCode to call Virtual Approver from the transaction page, this business process is one of the input parameters.
Specify the event to trigger when all required approvals have occurred.
Note: This information is for Virtual Approver only; the GetApprovers function disregards this information.
In the On Authorized group box, enter an activity name (associated with the business process that you’ve specified) and event name to specify which event should be triggered when the transaction is fully approved. Virtual Approver triggers this event when final approval occurs. For example, after a purchase requisition is approved, it is logical to trigger an event that notifies a buyer that the approved requisition is ready to be fulfilled.
PeopleSoft Application Designer enables you to deactivate individual business events. If you deactivate an event that Virtual Approver is supposed to trigger, the event isn’t triggered.
An On Authorized activity or event is optional. Try to avoid using the same activity or event as on the individual step's On Pre-Approved field.
Specify currency units for the approval rules.
Enter currency information only if the approval rules are based on monetary amounts in the transaction.
Enter the currency code and rate type that are used in your approval rules. For example, if a rule requires approvals for amounts over 1000 USD, enter USD.
Specify the currency unit for the transaction.
Specify the currency record and currency field name that store the currency code for the data to be evaluated. For example, to evaluate whether a requisition requires approval, you must know the amount of the requisition and the currency in which that amount is expressed.
Note: If the currency that is specified for the transaction being processed is different from the currency that is specified for the approval rule, Virtual Approver performs the appropriate currency conversion before making the comparison.
Click OK to close the properties dialog box.
Add approval steps to the rule set.
Save the approval rule set.
To make an effective-dated change to an approval rule set:
Open the approval rule set.
Select File, Save As.
Enter the new effective date.
Click OK.
Now, a new object with the same name exists, but it has a different effective date. The different effective-dated versions of the rule set appear separately in the dialog box.
Modify the rules, as needed.