Defining Approval Steps
This section provides an overview of approval steps.
Rule steps are the individual approval steps. Approval rule sets incorporate one rule step for each level of approval that might be required.
When the person who submits something for approval has no self-approval authority, you do not need to include a step for that person. However, you may include a step for that user so that your graphical map more clearly documents the entire process. As long as that user has no authorization authority, Virtual Approver bypasses that user anyway.
If users who submit items for approval have some level of authorization, for example, users can self-approve amounts up to 100 USD. Then, the first rule step must represent that approval level.
To add a rule step to a rule set:
Note: This process is the same, regardless of whether Virtual Approver or GetApprovers uses the approval rule set.
Click Approval Step on the toolbar.
Click the location on the approval rule set where you want the step to appear.
An Approval Step icon appears where you clicked.
This section discusses how to define a rule step:
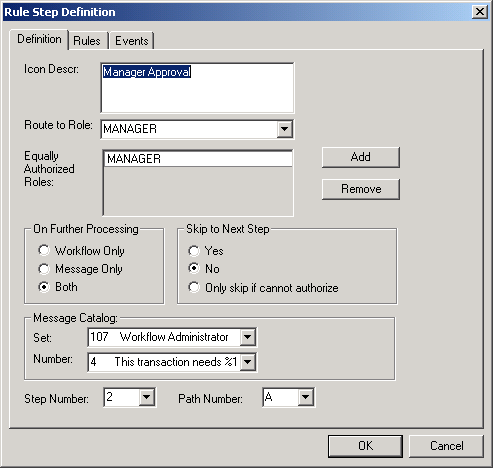
Image: Rule Step Definition dialog box - Definition tab
This example illustrates the fields and controls on the Rule Step Definition dialog box - Definition tab.
To define a rule step:
Double-click the rule step icon, or right-click it and select Item Properties.
The Rule Step Definition dialog box appears.
Enter an icon description.
Use the Icon Descr field to specify a description to appear in dialog box boxes that list this type of map. If you leave this field blank, the map name appears by default.
In the Route to Role list box, select the role that performs this step.
The role that you select is the role of the user who approves items at this step and path. The system verifies this role against the row-level rule that you set up in a previous step before routing items. Select a user list role that corresponds to a level within your organization. In approval processes, a person’s level typically determines the approval authority.
Note: The Virtual Router portion of Virtual Approver determines who should receive the work item based on the role that you specify here, with the query role that is assigned to the worklist in PeopleSoft Application Designer. The worklist's query role must accept a role name as a bind variable, as the standard route control roles do.
In the Equally Authorized Roles field, select all of the roles that are qualified to process the transaction at this step.
For example, consider a purchase request process in which managers can approve transactions up to 25,000 USD. If a manager enters a request for 25,000 USD or less, Virtual Approver automatically approves it. Now, suppose that you also want to allow system administrators to self-approve up to 25,000 USD (if you allow self-approval). All you do is add SYSTEM ADMINISTRATOR to the Equally Authorized Roles box. System administrators don’t receive transactions routed to them, but they are treated as managers for the requests that they submit.
You can also use this field for users who do not normally participate in the approval process, but who have the necessary authority to approve at this level. This can be useful for exception processing, for example, when the regular approver is unavailable or you need to approve a transaction outside the worklist. Be aware that even if an equally authorized user handles the approval, the worklist routing in the regular approver’s queue does not disappear.
GetApprovers does not return information about equally authorized roles, only about users who actually perform approvals.
Use the Add and Remove buttons to add users to or remove users from the Equally Authorized Roles box.
Specify what the user sees when a transaction requires further processing for approval.
When a transaction needs further approval, Virtual Approver can:
Trigger the specified event to forward the transaction to the next step.
Display a message to the user, indicating that further approval is required.
Specify which of these actions Virtual Approver should take by selecting one of the options in the On Further Processing box on the right-hand side of the page. The default is Both.
Field or Control
Definition
Workflow Only If a transaction needs further approval, Virtual Approver forwards it on to the next step without informing the user.
Message Only The user sees a message indicating that the transaction needs further approval, but the transaction does not enter the workflow.
Both Virtual Approver displays a message asking the user whether to add the transaction to the workflow.
If you select Message Only or Both, the message comes from the PeopleSoft Message Catalog. Use the Message Catalog setting to specify the set and number of the message that the user sees.
Specify whether the system can bypass this approval step if additional approval is required.
In the Skip to Next Step group box, select when, if ever, the current approver should be ignored:
Field or Control
Definition
Yes If additional approvals are needed, the system always bypasses this approver. Use this option only when role users can self-approve certain transactions but do not ever approve other people’s transactions.
No This approval step is not skipped and the routing occurs, regardless of whether additional approvals are required. This step is omitted only when a prior approver was able to give final authorization.
Only skip if cannot authorize If additional approvals are needed (that is, this approver does not have final approval authority), the system skips this approver.
In the Appr Step (approval step) and Appr Path (approval path) fields, specify which step you are defining.
Approval processes can have multiple steps (in sequence) and multiple paths (in parallel). The purchase request example following this procedure has several steps, but only one path. An example of a process with multiple paths is one in which requests must be approved by the department manager and an office manager before going to a vice president. Here is the sequence of steps and paths in this case:
Step
Path
Route to Role
1
A
MANAGER (DEPARTMENT)
1
B
MANAGER (OFFICE)
2
A
VICE PRESIDENT
In this example, the system sends two worklist entries when a new request comes in: one to the department manager and one to the office manager. When both of the managers approve the request, the system forwards it to a vice president.
Note: The easiest way to determine approval steps and paths is to consult the activity map for the business process for which you are defining approval rules.
Note: The approval step definition allows for up to 99 steps to be available when you are defining an approval process in Application Designer. However, you can enter any step number required.
Note: No mechanism in Virtual Approver exists by which the worklist entry is removed from other parallel approvers when using multiple steps in case of deny or recycle.
This section discusses how to specify rule step rules.
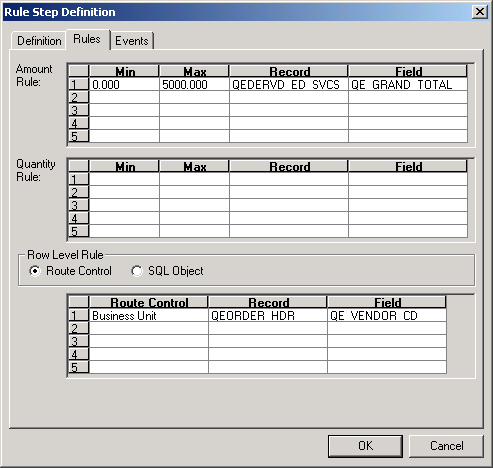
Image: Rule Step Definition dialog box - Rules tab
This example illustrates the fields and controls on the Rule Step Definition dialog box - Rules tab.
To specify rule step rules:
Select the Rules tab to specify the approval parameters.
Specify which transactions the specified role users have the authority to approve.
You can specify which transactions a user can authorize in the following three ways:
If approval requirements are based on a monetary amount, enter the criteria in the Amount Rule group box.
The user can authorize transactions whose monetary amount is between the values in the Min (minimum) and Max (maximum) fields. The associated record and field specify the record and field containing the amount in the original transaction.
If approval criteria are based on a (non-monetary) quantity, enter the criteria in the Quantity Rule group box.
The user can authorize transactions in which the (non-monetary) quantity is between the values in the Min and Max fields. The associated record and field specify the record and field containing the quantity in the original transaction.
If the approval criteria are based on the approver’s user data, enter the criteria in the Row Level Rule group box.
There are two methods of obtaining row level criteria: using a route control or a SQL object.
If you select Route Control, the range of transactions that the user can authorize is determined by the user’s route control profile. The system compares the value from the specified record and field with the user’s route control profile. If the value is in the range to which the route control profile gives the user access, the user can approve the transaction.
If you select SQL Object, the range of transactions that the user can authorize is based on other data in the database.
Evaluate the data using a SQL program that you create as an Application Designer SQL object. After you create the SQL object, enter its name next to the SQL Object option. Enter bind variables used in the SQL program in Record and Field. At most, five record and field binds can be used.
If SQL Object is selected, the worklist defined in the On Pre-Approved activity or event must be consistent with the Operator defined by the SQL Object. Be sure that the Route to Role matches the Operator rendered by the SQL Object.
For example, if you use the PeopleSoft HRMS applications, which store extensive data on reporting relationships within the organization, you can use a SQL object to specify that a manager is authorized to approve only requisitions submitted by people in that manager’s department. Using order_hdr.deptid as the bind variable, you can use the following SQL program:
Select a.oprid from psoperalias a, ps_dept_tbl b where a.emplid = b.emplid and b.deptid = :1Note: When using a SQL object as a row-level route control in an approval rule set, set the field map for worklist OPRID consistently.
You can specify more than one authorization rule for any rule other than SQL object. To add additional authorization rules, enter data in multiple grid rows. For example, you can base the routing on more than one route control field. The number in the Seq (sequence) field is changed incrementally for each rule that you add. You can also use multiple authorization types for a single step. In this case, the user can authorize only transactions that meet all of the specified rules for this step.
This section discusses how to specify rule step events.
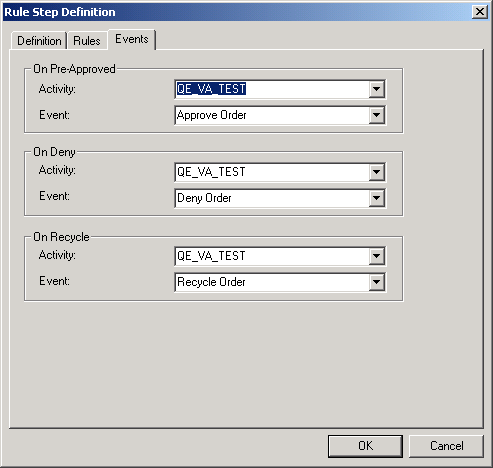
Image: Rule Step Definition dialog box, Events tab
This example illustrates the fields and controls on the Rule Step Definition dialog box, Events tab.
To specify rule step events:
Select the Events tab to specify which business events are triggered, depending on the action of the approver at this step.
At each step in an approval process, the person reviewing a transaction has three options: approve it, reject it, or send it back to the previous step (recycle). The Pre-Approved Activity/Event box specifies what happens when the person approves the request. You can also specify deny and recycle activities and events. For example, if a request is denied, you might trigger an event that sends an email message to the requester.
If you don’t select an event for these actions, the system changes the status of the transaction, but doesn’t route it anywhere.
In the Pre-Approved Activity/Event group box, select the business event to trigger when this approver approves the transaction.
For the first step in the process, this is the event to trigger when a user enters a new transaction. For subsequent steps, it is the event to trigger when the user who is performing the current step approves the transaction, but it requires further approval. In either case, the event must forward the transaction to the next step. These settings are required; you must identify a pre-approved activity and event.
Define each event as part of an activity in PeopleSoft Application Designer. Select the activity name in the Activity list box and the event name in the Event Name box.
Note: Virtual Approver triggers this event when the transaction requires further approval, that is, when the user who approves it does not have sufficient authority to make a final approval, according to the rules that you defined on the previous page. If the user has the authority to approve the transaction, Virtual Approver triggers the Approval Activity/Event for this approval rule set, which you specify in the properties for the overall approval rule set.
Specify which events to trigger if the user denies or recycles the transaction.
Repeat this entire procedure for each step in the approval process.
Click OK to close the properties.