Collecting and Processing Instrument Data
The Instrument Collections screen helps you to enter the details about the batch of instruments (Cheque) collected for clearing. The batch of these instruments may have been physically collected or received by courier. This screen allows you to enter details of such batch and details of various instruments therein such as total batch amount and deposit slip numbers, which will be validated at the time of saving the record to avoid any calculation error. You can also view the deposit slip details in the summary screen before confirming and sending the record for authorization.
Navigation Path: Collections > Instrument Collections
Basic Info tab
This screen helps you to input batch related information. The branch is defaulted as per login Id and can be changed to another branch based on access right. The batch amount currency selected here is defaulted at the time of deposit slip details and instrument details in next tab.
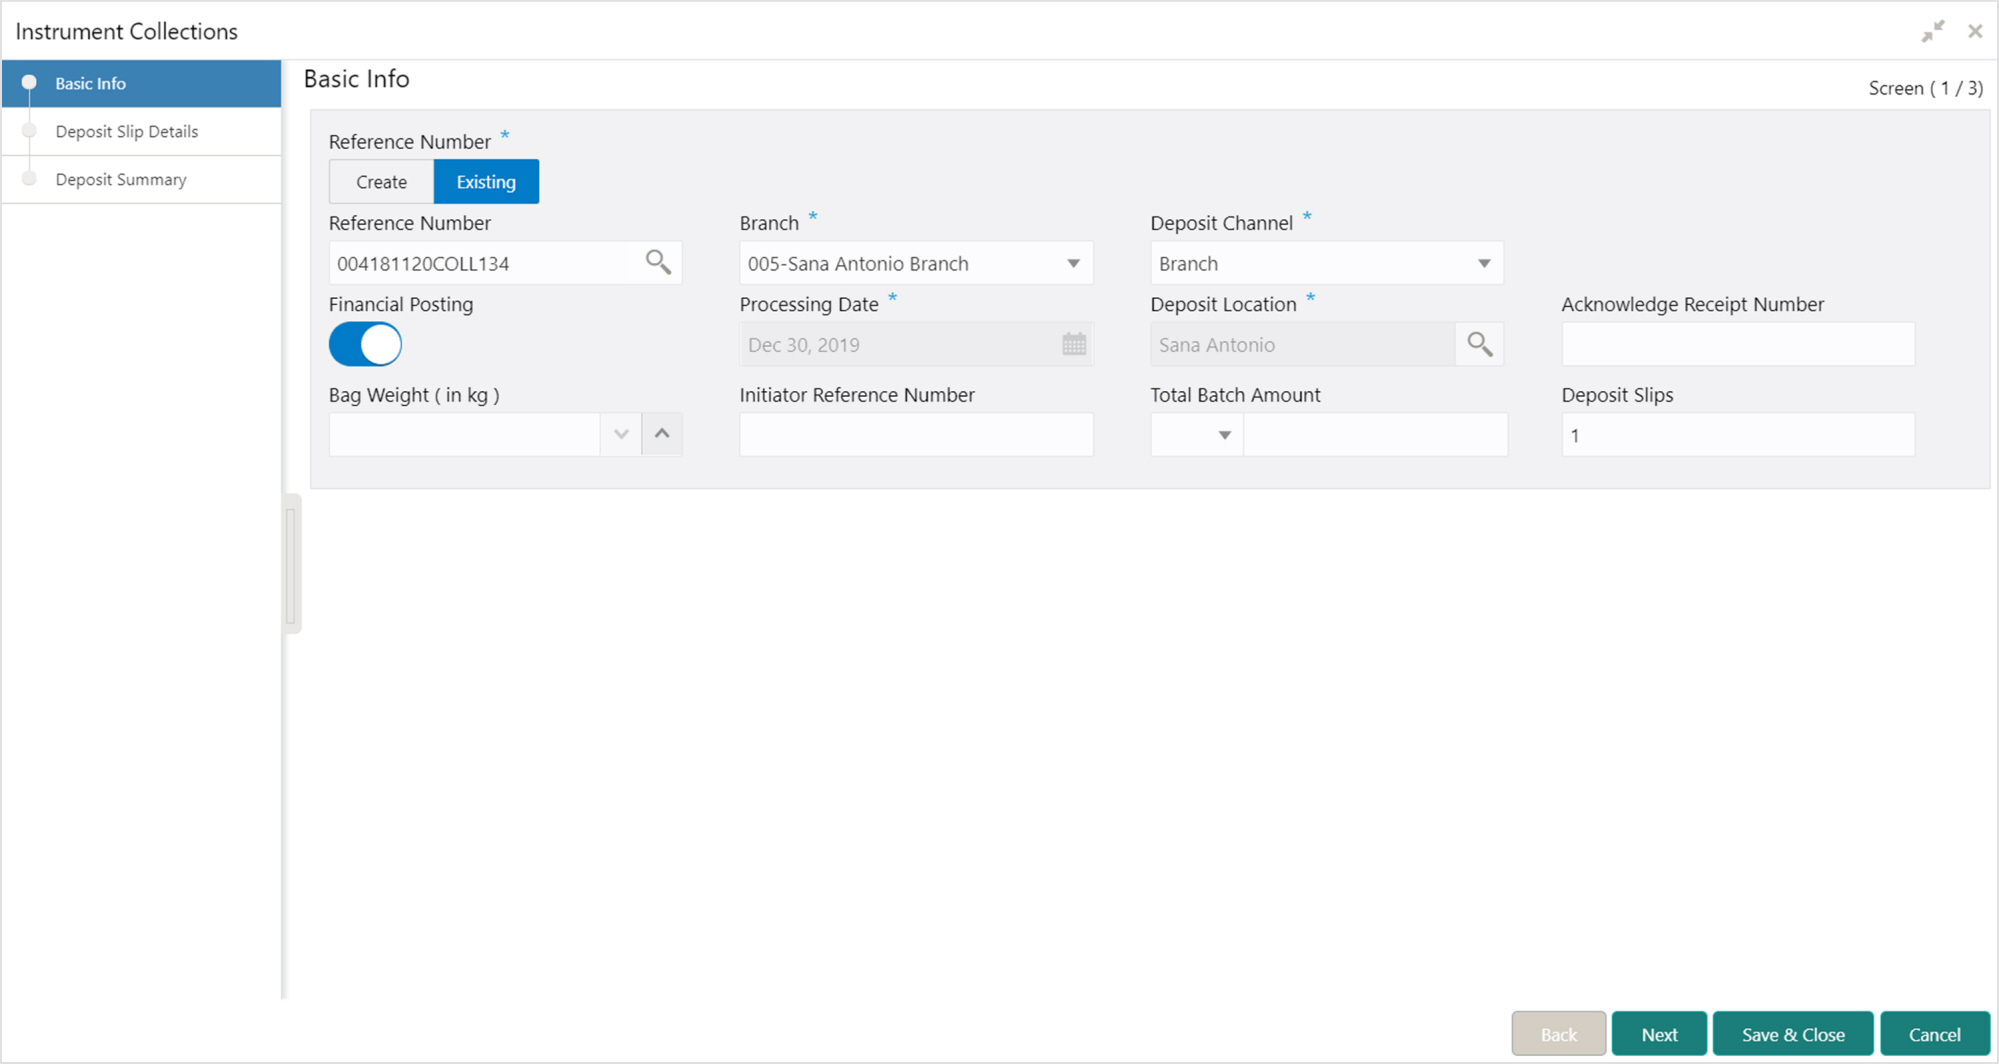
1. Refer to the following table for specifying details on the above screen:
Note: Fields marked with “*” are mandatory and “**” are conditionally mandatory.
|
Field Name |
Description |
|
Reference Number * |
Click ‘Create’ to auto-generate the reference number or click ‘Existing’ to select the existing reference number. |
|
Reference Number ** |
Click the Search icon to select an existing reference number. This field is displayed only when ‘Existing’ toggle is selected. |
|
Branch * |
Select the bank branch where the instrument is deposited. This field displays values based on your access rights. This field cannot be modified once authorized. |
|
Deposit Channel * |
Select the deposit channel i.e.; ‘Courier’ or ‘Branch’, this indicated whether the instrument is picked up by a courier agency or the corporate has deposited the instrument in branch. This field cannot be modified once authorized. |
|
Courier ** |
Click the Search icon to select the courier company. This field will be mandatory and appears only in case if ‘Deposit Channel’ is selected as ‘Courier’. |
|
Consignment Number |
Enter the consignment number allocated by the courier company. This field appears only in case if ‘Deposit Channel’ is selected as ‘Courier’. This field cannot be modified once authorized. |
|
Consignment Date |
Click the Calendar icon to select the date on which consignment is received. This field appears only in case if ‘Deposit Channel’ is selected as ‘Courier’. This field cannot be modified once authorized. |
|
Consignment Receipt Time |
Enter the time in HH:MM:SS format when consignment is received. This field appears only in case if ‘Deposit Channel’ is selected as ‘Courier’. This field cannot be modified once authorized. |
|
Financial Posting * |
Switch the toggle ON, if GL entries should be posted. The ‘Processing Date’ field will be disabled. This field cannot be modified once authorized. |
|
Processing Date * |
Click the Calendar icon to select the date on which the deposit slips are entered. This date cannot be beyond current branch date. This field cannot be modified once authorized. |
|
Deposit Location * |
Click the Search icon to select the location from where the instrument is deposited. This field cannot be modified once authorized. |
|
Acknowledgment Receipt Number |
Enter the acknowledgment number, if any. |
|
Bag Weight (in kg) |
Enter weight of the package in kilograms when it was received. |
|
Initiator Reference Number |
Enter the reference number assigned for receiving the package, if any. |
|
Total Batch Amount |
Select the currency and enter total amount of the deposit slips to be processed in a single batch. This field cannot be modified once authorized. |
|
Deposit Slips |
Enter the total number of deposit slips to be processed. This field cannot be modified once authorized. |
2. Optional: Click Save & Close to save the data and close the window. Click Cancel to close the window without saving the data.
3. Click Next to save the data and move to the Deposit Slip Details screen.
Deposit Slip Details tab
This screen helps you to input the information related to the deposit slip. When the record is sent for authorization, data in field such as ‘Deposit Slip Amount’ will be validated with ‘Batch Amount’ (if captured). ‘No. of Instruments’ and ‘Deposit Slip Amount’ is also checked before submission for authorization.
You can input default details such as ‘Corporate’, ‘Credit Account Number’, ‘’ and ‘Division’ which can be applied to all instruments for the said deposit slip.
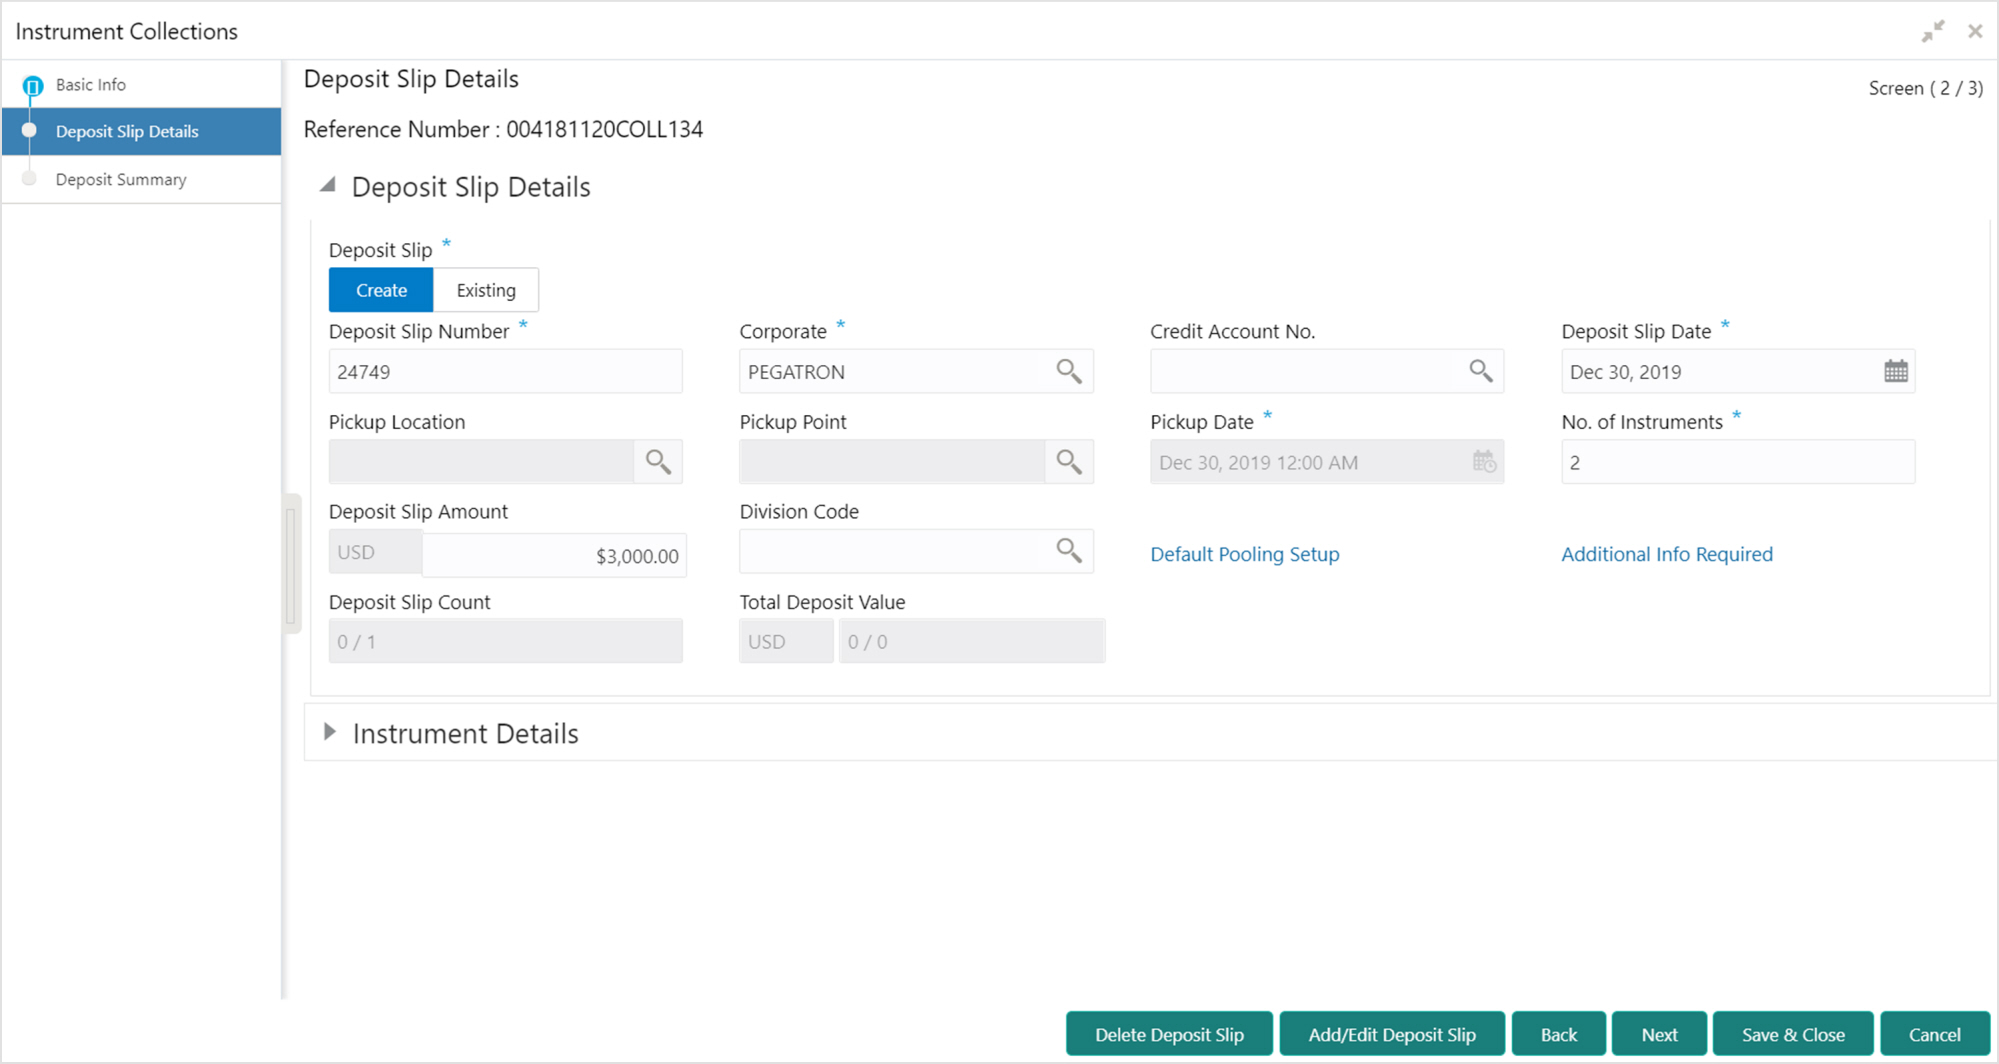
4. Refer to the following table for specifying details in the ‘Deposit Slip Details’ section of the above screen:
Note: Fields marked with “*” are mandatory and “**” are conditionally mandatory.
|
Field Name |
Description |
|
Deposit Slip * |
Click ‘Create’ to manually enter the deposit slip number or ‘Existing’ to select the one from the system. |
|
Deposit Slip Number * |
Enter new deposit slip number or click the Search icon to select an existing deposit slip number. The search result fetches the available and saved deposit slip(s) entered for the batch. This field cannot be modified once authorized. |
|
Corporate * |
Click the Search icon to select the corporate for whom the instrument collection entry is being made. This field cannot be modified once authorized. |
|
Credit Account No. |
Click the search icon to select the credit account number where the fund should be credited at deposit slip level. This field cannot be modified once authorized. |
|
Deposit Slip Date * |
Click the Calendar icon to select the date mentioned on deposit slip. This field cannot be modified once authorized. |
|
Pickup Location * |
Click the Search icon to select the location from where the deposit slip was collected by the courier agency or the branch location where the instrument is deposited by the corporate. This field cannot be modified once authorized. |
|
Pickup Point * |
Click the Search icon to select an exact pick-up point of the Corporate from where the deposit slip along with the physical instrument is being picked up by the courier agency. This field cannot be modified once authorized. |
|
Pickup Date * |
Click the Calendar icon to select the date on which the deposit slip or instrument was collected. This field cannot be modified once authorized. |
|
Pick up Time * |
Enter the time in HH:MM:SS format when deposit slip or instrument was collected. This field cannot be modified once authorized. |
|
No. of Instruments * |
Enter the total number of instruments collected with deposit slip. This field cannot be modified once authorized. |
|
Deposit Slip Amount |
Enter total amount of all the instruments attached to the deposit slip. The currency value is auto-populated as selected in the Basic Info tab. |
|
Division Code ** |
Click the Search icon to select the division code in case if the ‘Division Code’ is mandatory in Corporate Enrichment screen else leave blank. The selected division code can be used for MIS purpose or for pooling of funds to the specific Division code. This field cannot be modified once authorized. |
|
Pooling Account Details |
Click this link to view the pooling account details maintained for the corporate. |
|
Additional Info Required |
Click this link to add UDF (User Defined Field) for specifying additional information. Maximum 10 UDFs can be added. This field cannot be modified once authorized. |
|
Deposit Slip Count |
Displays the total number of deposit slips added. |
|
Total Deposit Value |
Displays the sum amount of all the deposit slips. |
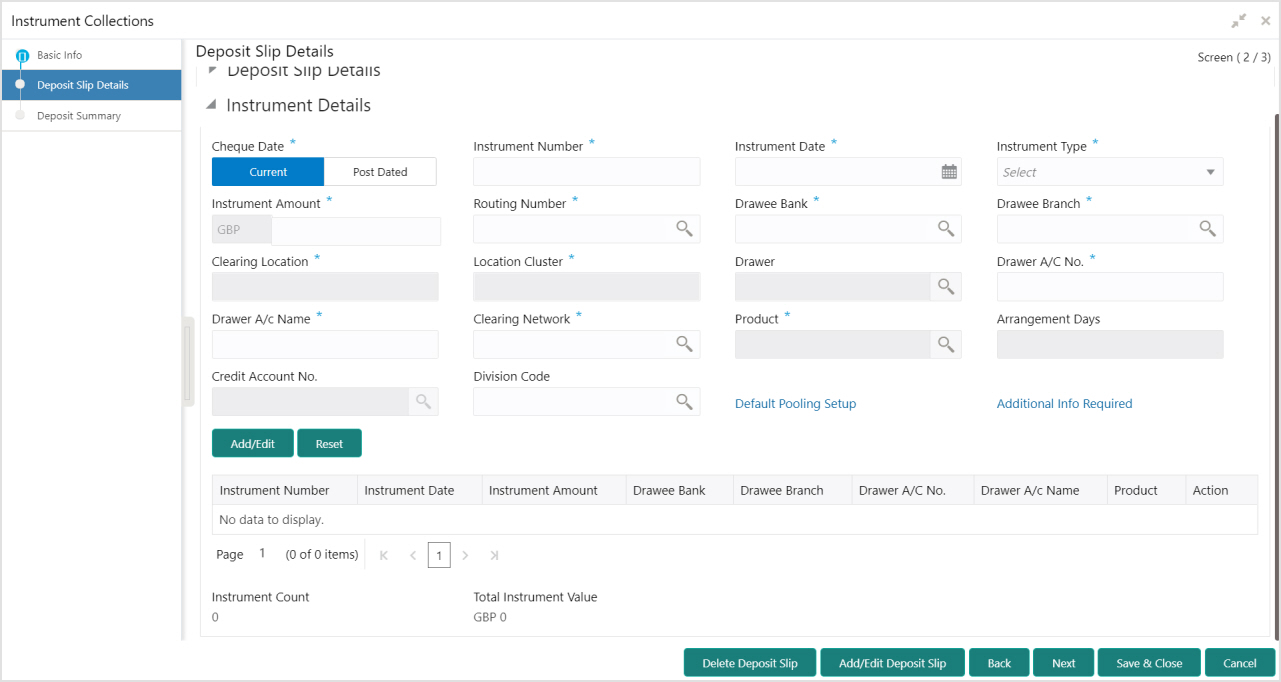
5. Refer to the following table for specifying details in the ‘Instrument Details’ section of the above screen:
Note: Fields marked with “*” are mandatory and “**” are conditionally mandatory.
|
Field Name |
Description |
|
Cheque Date * |
Click ‘Current’ or ‘Post Dated’ to specify the date of the cheque. |
|
Instrument Number * |
Enter the instrument reference number. For example: Cheque number. This field cannot be modified once authorized. |
|
Instrument Date * |
Click the Calendar icon to select the date mentioned on instrument. This field cannot be modified once authorized. |
|
Instrument Type * |
Select the type of Instrument added in the deposit slip. This field cannot be modified once authorized. |
|
Instrument Amount * |
Enter the amount mentioned on the instrument. Currency is defaulted to the one from Basic Info screen. This field cannot be modified once authorized. |
|
Routing Number * |
Click the Search icon to select the Routing number. Selecting this field auto-populates value for ‘Drawee Bank’ and ‘Drawee Branch’. This field cannot be modified once authorized. |
|
Drawee Bank * |
The name of bank on which instrument is drawn. This field cannot be modified once authorized. |
|
Drawee Branch * |
The branch name of the selected bank. This field cannot be modified once authorized. |
|
Clearing Location * |
Displays the clearing location maintained in the system based on selected drawee bank. This field cannot be modified once authorized. |
|
Location Cluster * |
Displays the location cluster associated with the clearing location. This field cannot be modified once authorized. |
|
Drawer ** |
This field is mandatory if the ‘Drawer Mandatory at Txn’ is enabled on Corporate Enrichment screen. Enter the drawer name or click the Search icon to select the same. This field cannot be modified once authorized. |
|
Drawer A/C No. * |
Enter the bank account number of the drawer. This field cannot be modified once authorized. |
|
Drawer A/C Name * |
Enter the drawer account’s name. This field cannot be modified once authorized. |
|
Clearing Network * |
Click the Search icon to select the network to be considered for clearing the instrument. This field cannot be modified once authorized. |
|
Product * |
Displays the applicable product based on selected instrument type, deposit location, payable at location, drawee bank, etc. If required, click the Search icon to select the product of your choice. This field cannot be modified once authorized. |
|
Arrangement Days |
Displays the number of days based on selected product and corporate. |
|
Vault Box Number * |
This field is displayed only for ‘Post Dated’ cheque. This vault box number associated with the branch for the selected instrument date is auto-populated. In case of multiple vault boxes maintained with same presentation date, click the Search icon to select the appropriate vault box number. |
|
Vault Box Description |
This field is displayed only for ‘Post Dated’ cheque. The description of the selected vault box number is auto-populated. |
|
Vault Branch |
This field is displayed only for ‘Post Dated’ cheque. The branch of the selected vault box number is auto-populated. |
|
Presentation Date |
This field is displayed only for ‘Post Dated’ cheque. The presentation date is auto-calculated based on the instrument date and the system parameter set for the activation date. |
|
Credit Account No. |
If required, select the account number in which amount should be credited else will be credited to the bank account number selected in the deposit slip details or to the default bank account. |
|
Division Code |
Click the Search icon to select the division code in case if the ‘Division Code’ is mandatory in Corporate Enrichment screen else leave blank. Selected division code can be used for MIS purpose or for pooling of funds to the specific division code. If the division code is available, the funds will be pooled and credited to the specific account mentioned for the division code else to the credit account number specified or default account. This field cannot be modified once authorized. |
|
Default Pooling Setup |
Click this link to view the pooling account details maintained for the corporate. |
|
Additional Info Required |
Click this link to add UDF (User Defined Field) for specifying additional information. Maximum 10 UDFs can be added. This field cannot be modified once authorized. |
|
Instrument Status * |
This field is enabled only if ‘Financial Posting’ is disabled (switched OFF) on Basic Info. In case if the status selected is ‘Return’ then a text box will be enabled to enter remarks/comments in the same. This field cannot be modified once authorized. |
|
Reject Reason |
This field is displayed only when ‘Instrument Status’ is selected as ‘Return’. Enter the reason for rejecting the instrument. |
6. Click Add/Edit to add instrument details in the grid or modify the selected records from the grid. If required, click Reset to clear the selected values.
7. Perform any of the following actions as per your requirement:
- Click Delete Deposit Slip to delete the selected deposit slip.
- Click Add/Edit Deposit Slip to add selected deposit slip details or modify the selected one.
- Click Back to move back to the Basic Info screen.
- Click Save & Close to save populated data and close the window.
- Click Next move to the Deposit Summary screen.
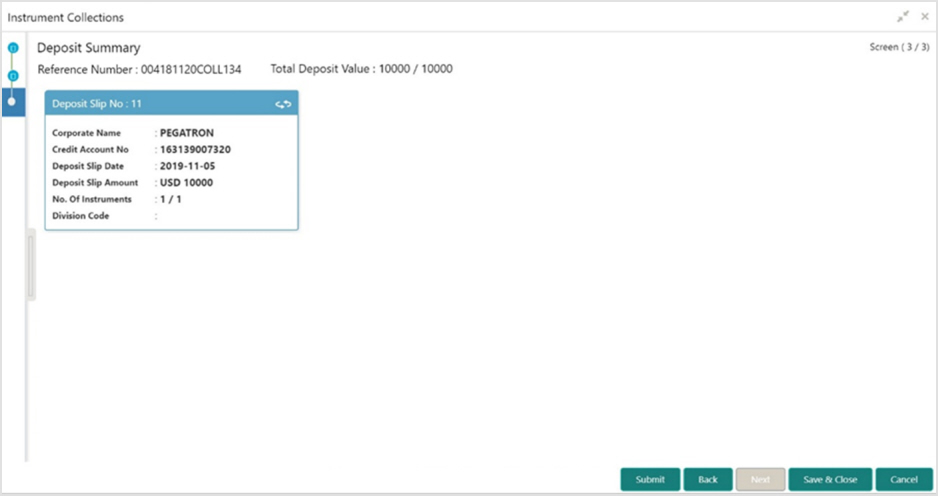
Deposit Summary
This screen displays the summary of details entered on the Basic Info and Deposit Slip Details screen. Double click on the tile to view the complete instrument details.