Instrument Management allows you to manage cheques received for collection basis the action to be performed on the instruments. You can search for the cheques by using several search criteria. Processing date is defaulted to the current business date. You can also take an action on multiple records at once.
Navigation Path: Collections > Instrument Management

You can manage both current as well as post-dated cheques in order to take various actions on them.
- Manage Current Dated Cheques
On the ‘Instrument Management’ screen, perform the following actions:
1. In the Branch list, select the branch for which the cheque is to be managed. By default, branch of the logged-in user is selected.
2. In the Cheque Date toggle, select the ‘Current’.
3. In the Action list, select any one of the following:
- Credit Advancement/Postponement
4. Click Proceed to view the search parameters.
Credit Advancement/Postponement
This action of instrument management can be used in case the customer requests for an early credit or to postpone the credit of the instrument. The advancement can be used to prepone the instrument credit date and postponement can be used to postpone the instrument credit date. Only those instrument which are due for arrangement credit for Guaranteed Arrangement Corporate will be displayed in search result.
Perform the following steps to apply credit advancement/postponement on instruments:
1. On clicking the Proceed, relevant cheque records are fetched under ‘List of Instruments’ section.
2. Optional: Click the Filter icon ( ) to filter the list of instruments.
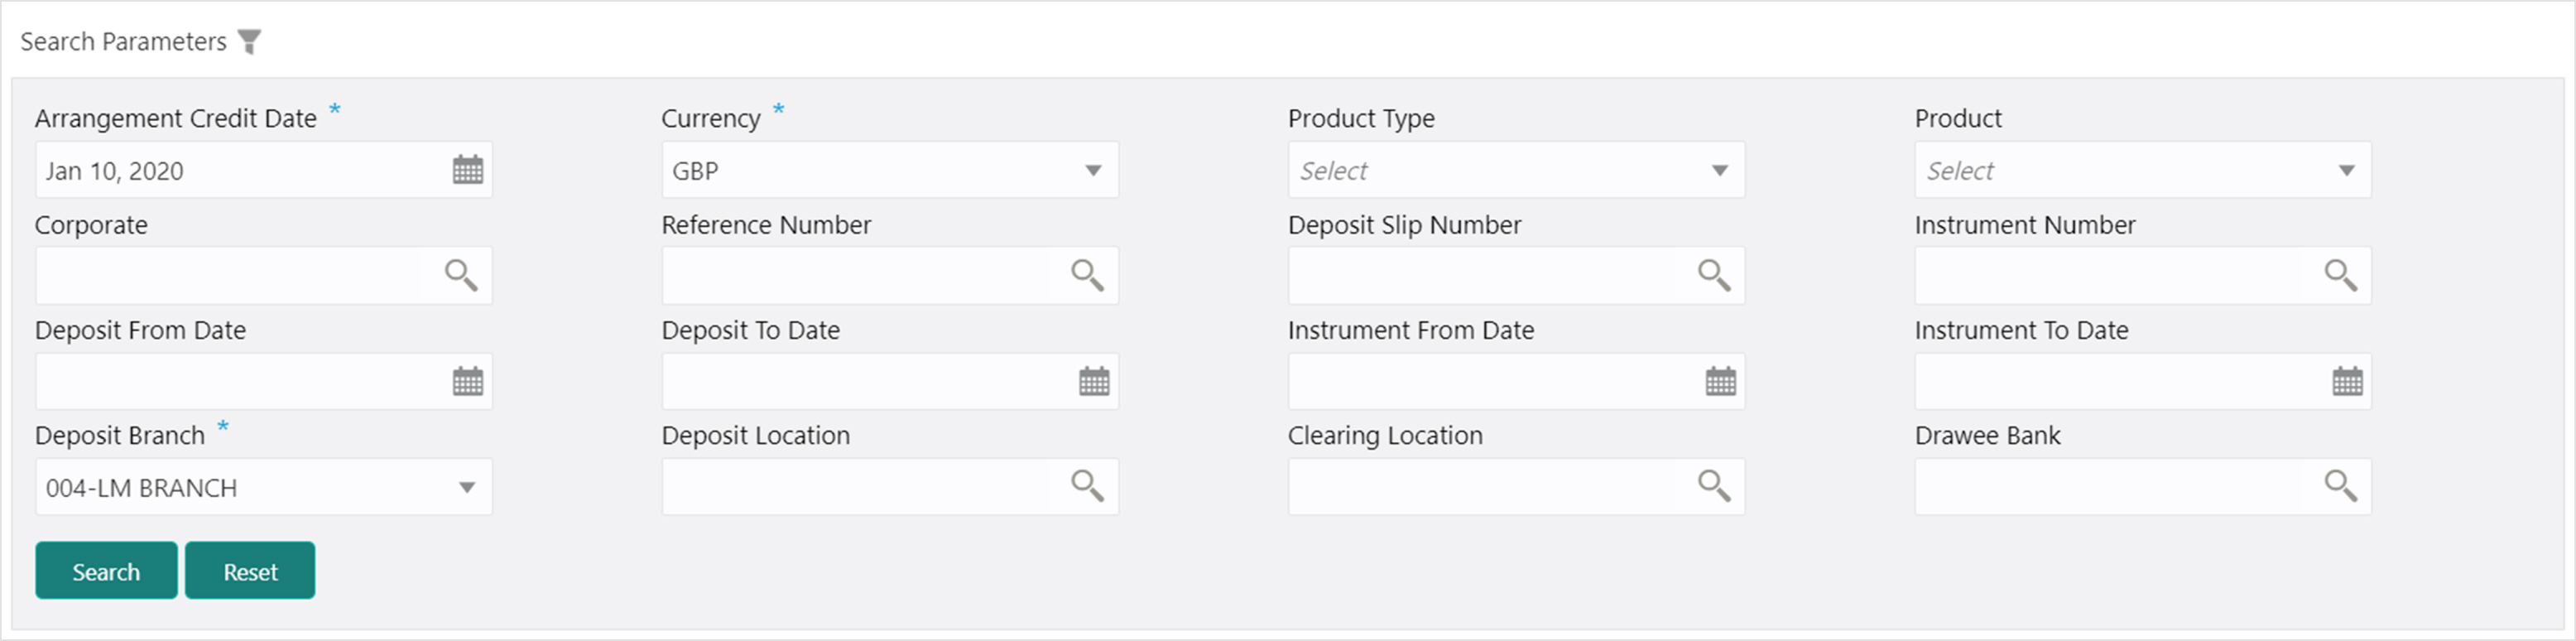
Refer to the following table for specifying search parameters to filter list of instruments:
Note: Fields marked with ‘*’ are mandatory.
|
Field Name |
Description |
|
Arrangement Credit Date * |
Click the Calendar icon and select the due date on which instrument amount is supposed to be credited to the customer’s account. |
|
Currency * |
Select the currency of the instrument. |
|
Product Type |
Select the product type to process the pooling credit details. |
|
Product |
Select the product code for which arrangement credit date needs to be preponed or postponed. |
|
Corporate |
Click the Search icon and select the corporate for which the instrument needs to be searched. |
|
Reference Number |
Click the Search icon and select the reference number to search the instrument by. |
|
Deposit Slip Number |
Click the Search icon and select the deposit slip number with which the instrument was deposited. |
|
Instrument Number |
Click the Search icon and select the instrument number to search the same. |
|
Deposit From Date |
Click the Calendar icon and select the start of the date range within which the instrument was deposited. |
|
Deposit To Date |
Click the Calendar icon and select the end of the date range within which the instrument was deposited. |
|
Instrument From Date |
Click the Calendar icon and select the starting-range of the date mentioned on the instrument. |
|
Instrument To Date |
Click the Calendar icon and select the range-ending of the date mentioned on the instrument. |
|
Deposit Branch * |
Select the branch in which the instrument was deposited. |
|
Deposit Location |
Click the Search icon and select the bank location where the instrument was deposited. |
|
Clearing Location |
Click the Search icon and select the bank where the instrument will be cleared. |
|
Drawee Bank |
Click the Search icon and select the bank that pays the amount mentioned on the instrument. |
3. Click Search to update the ‘List of Instruments’ section as per criteria.
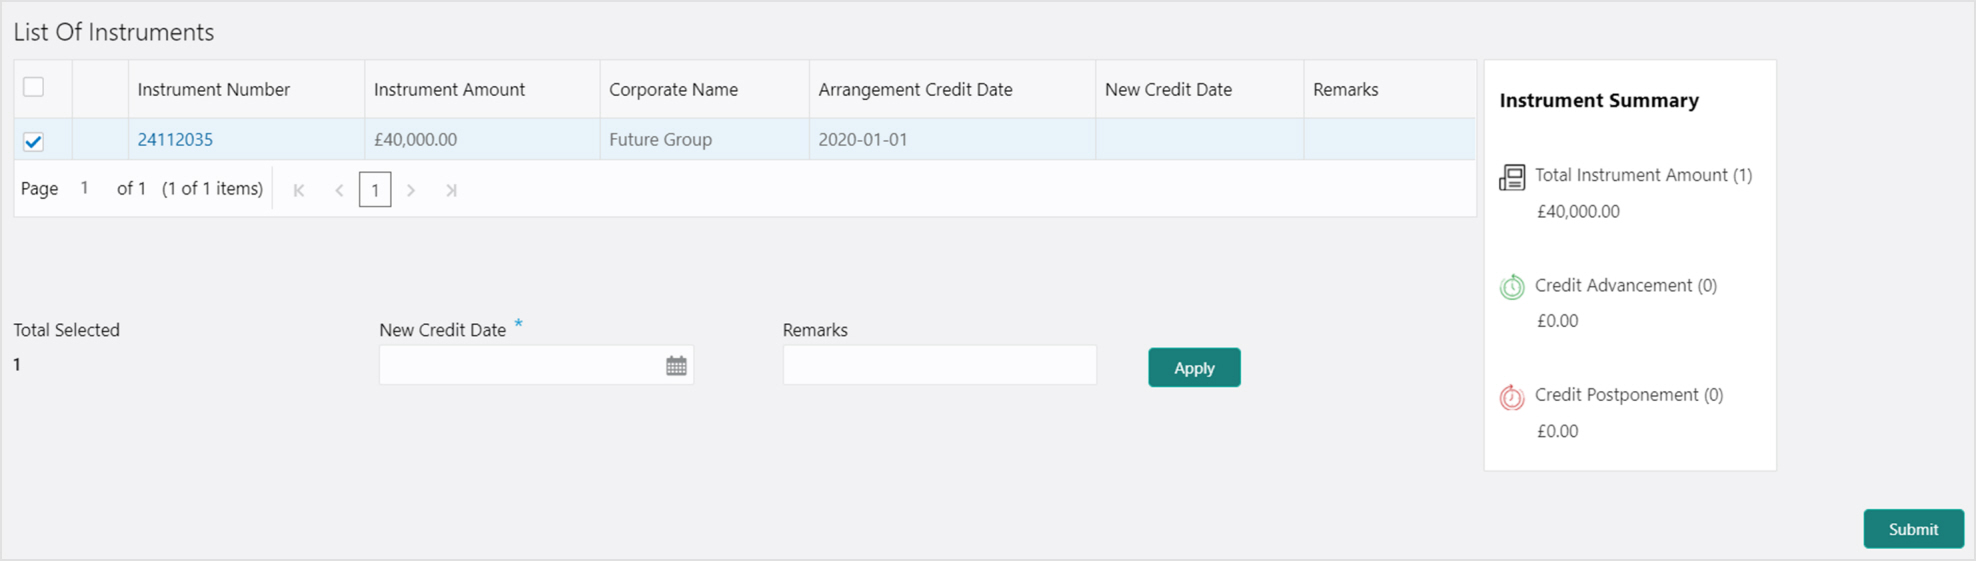
4. Select the instruments to be submitted for credit advancement/postponement.
5. In the New Credit Date field, click the Calendar icon and select the date on which instrument should be credited.
6. Optional: In the Remarks field, enter the remarks for the updated credit date.
7. Click Apply to update the new credit date in the grid.
8. If required, select the record and then click Undo to revert back the applied advancement/postponement.
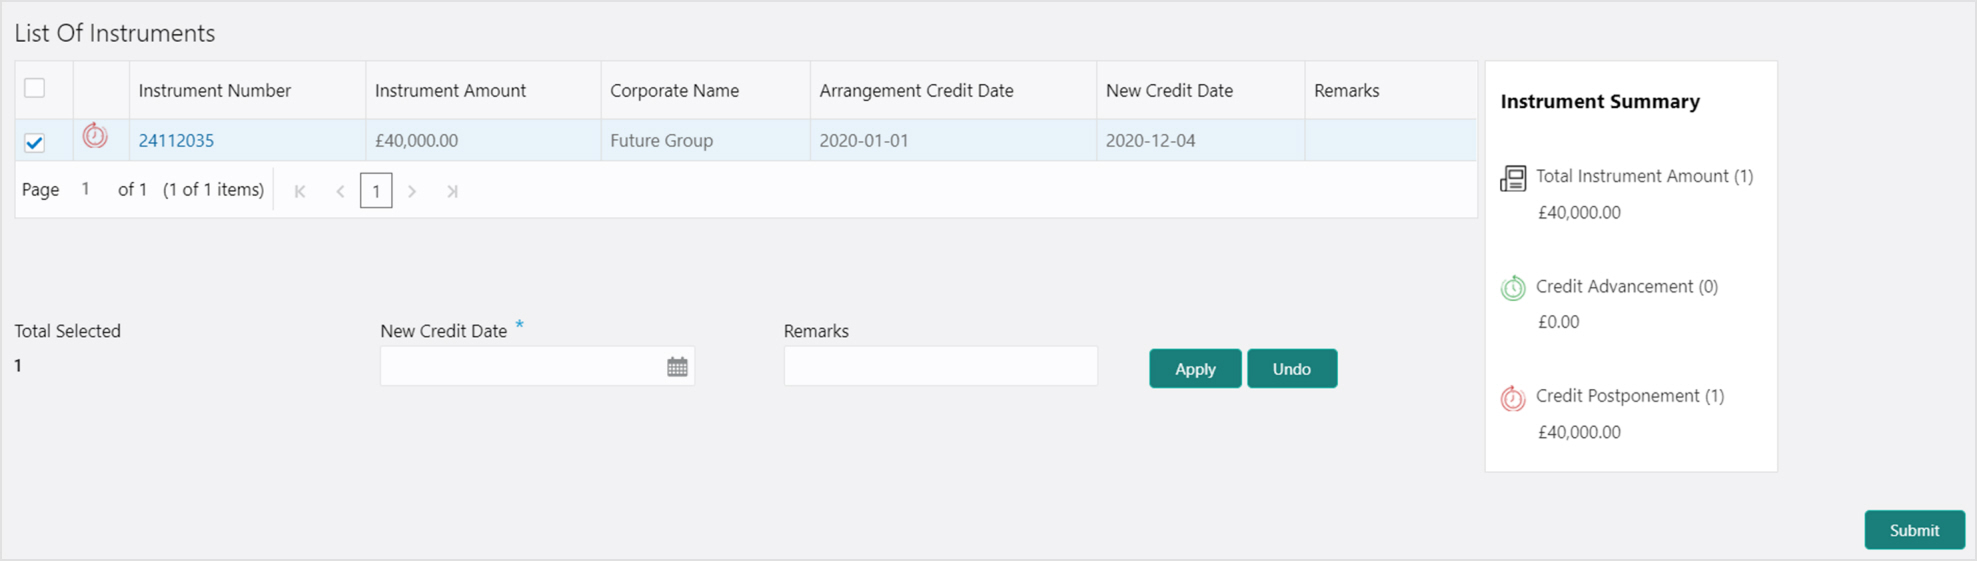
9. Click Submit to confirm the records of credit advancement/postponement and send for authorization.
Bank user need to generate a forwarding schedule in case where clearing is to be routed through partner banks or for upcountry clearing a schedule is to be generated for the instruments. A forwarding schedule is essentially a covering letter, which comprises the details of the instruments dispatched to the concerned bank’s branch for clearing. This covering letter is sent along with the physical instruments.
Perform the following steps to generate schedule for instruments:
1. On clicking the Proceed, the ‘Filter Parameters’ section is displayed.

Refer to the following table for specifying filter parameters to search the list of instruments:
Note: Fields marked with ‘*’ are mandatory.
|
Field Name |
Description |
|
Deposit Branch * |
Select the branch where instrument is deposited. By default, branch of the logged-in user is selected. |
|
Currency |
Select the currency of the instrument. |
|
Destination Bank |
Click the Search icon and select the bank where instrument will be cleared. |
|
Destination Branch |
Click the Search icon and select the branch of the selected destination bank. |
2. Click Search to view the result under ‘List of Instruments’ section.
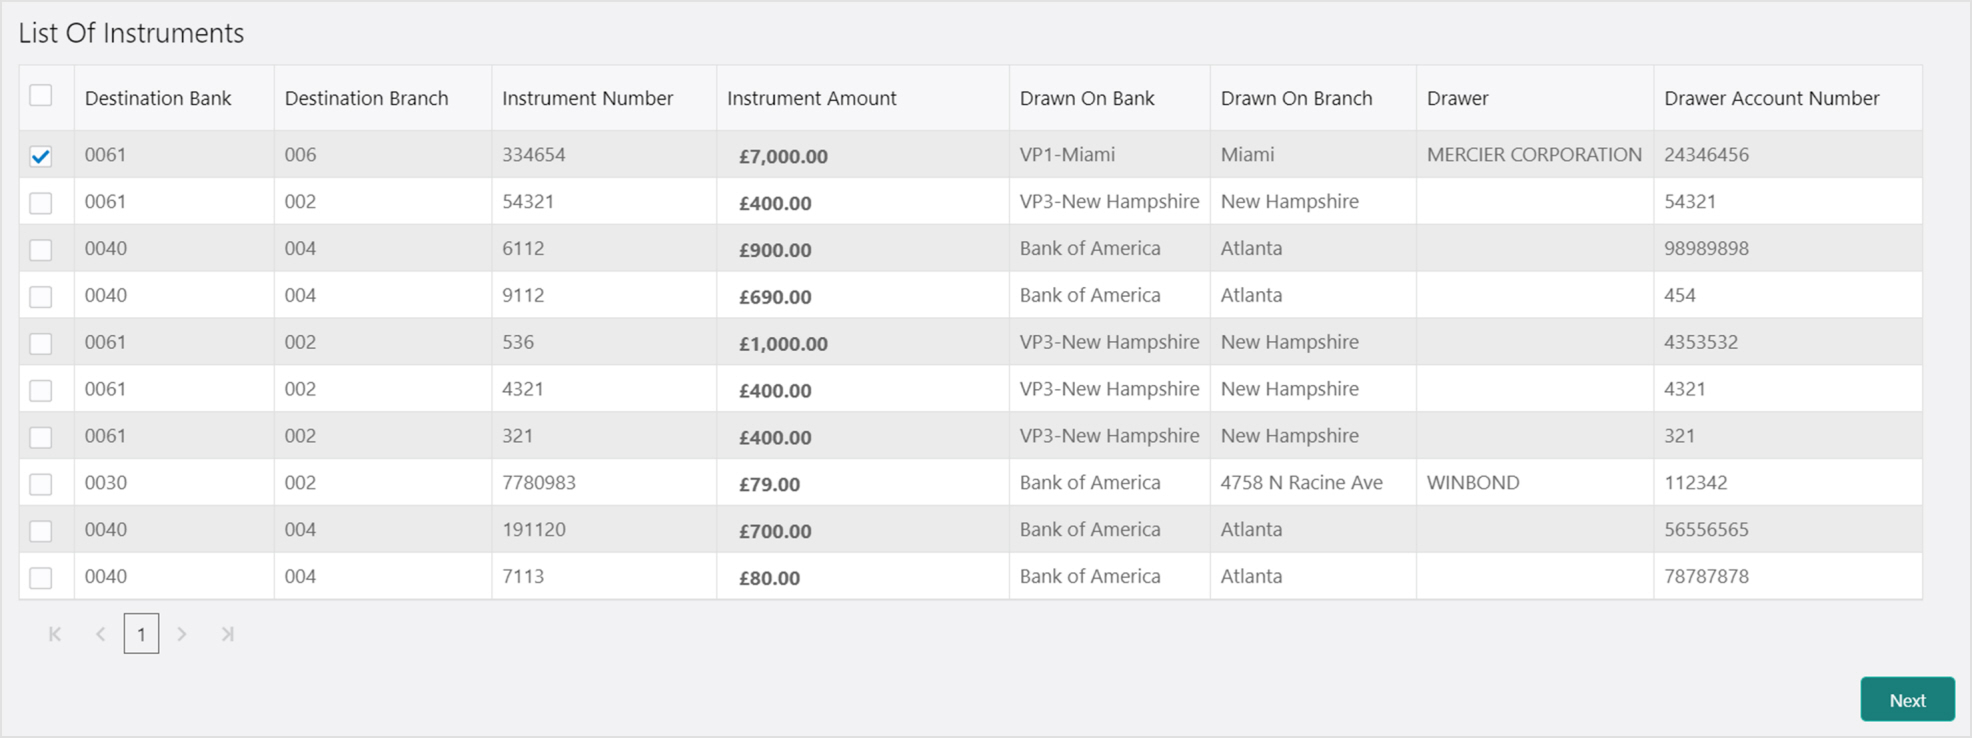
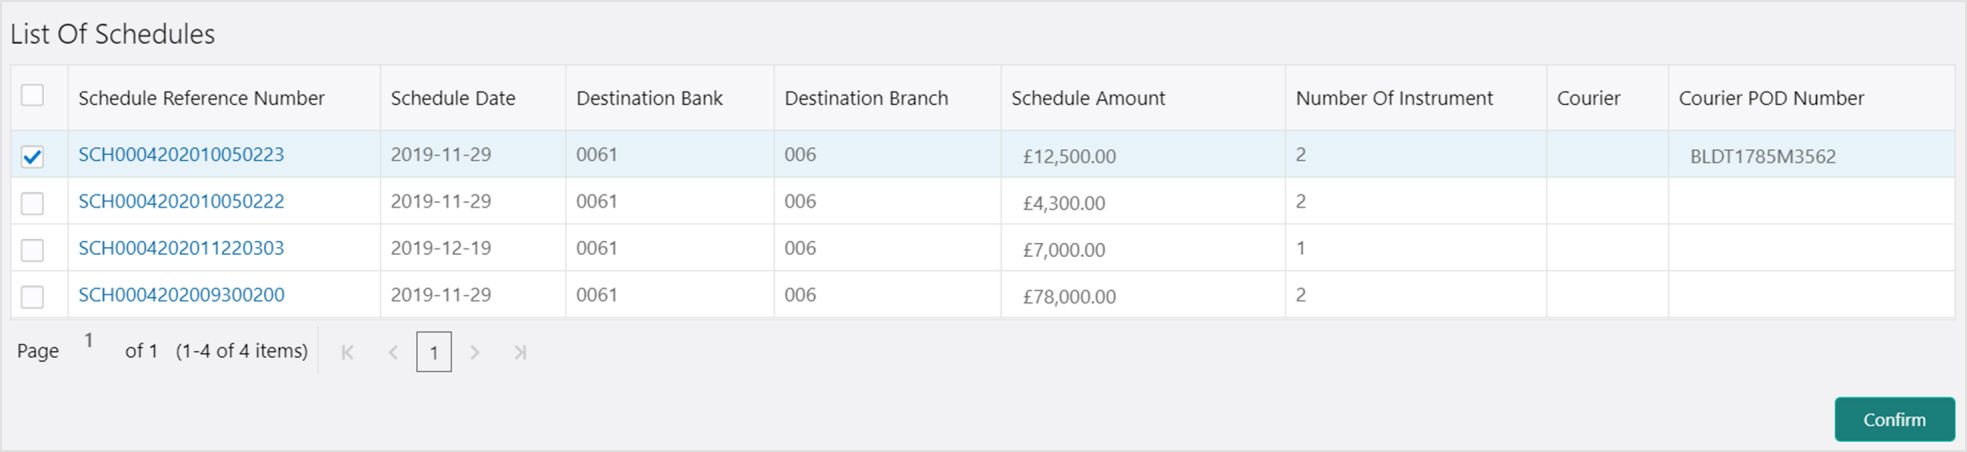
3. Select the instrument(s) for which the schedule needs to be generated and then click Next.

4. Under Courier column, click the Search icon to select the courier company.
5. Optional: Click the schedule reference number link to view more details about it.
6. Select the schedule reference number and then click on Confirm to generate the schedule and send for authorization.
Receipt of a schedule is to be marked whenever a schedule is drawn on a branch of the system bank. This typically is a branch at an outstation location. The destination branch in such a case must mark receipt of schedule for further processing.
Perform the following steps to mark schedule receipt for instruments:
1. On clicking the Proceed, the ‘Filter Parameters’ section is displayed.

Refer to the following table for specifying filter parameters to search the list of instruments:
Note: Fields marked with ‘*’ are mandatory.
|
Field Name |
Description |
|
Receipt Branch * |
Select the branch of receipt. By default, the branch of logged-in user is selected. |
|
Deposit Branch |
Click the Search icon to select the branch from where the instrument is dispatched. |
|
Schedule Reference Number |
Click the Search icon and select the schedule reference number to search the instrument by. |
|
Courier |
Click the Search icon and select the courier used for instrument. |
|
Dispatch Date From |
Click the Calendar icon and select the start of the date range within which the instrument is dispatched. |
|
Dispatch Date To |
Click the Calendar icon and select the end of the date range within which the instrument is dispatched. |
|
Currency |
Select the currency of the instrument. |
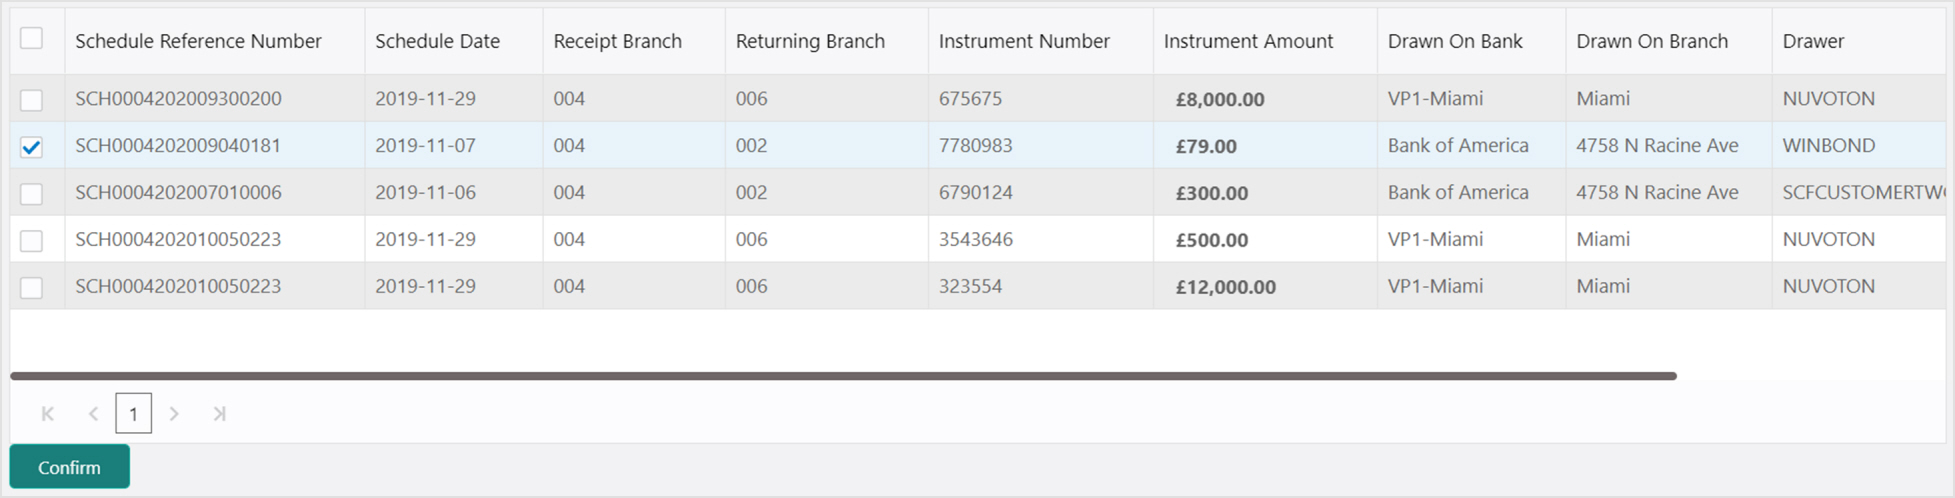
2. Click Search to view the list of instruments.
3. Select the instruments for which schedule receipts needs to be marked.
4. Click Confirm to mark the schedule receipt and send for authorization.
Return Receipt is marked for upcountry instruments returned by the collecting bank. It is marked by the branch, which dispatches the original schedule with upcountry instruments to a different bank when an upcountry instrument is returned by the destination bank’s branch. This constitutes to marking receipt of courier return and not actually marking the instrument as returned. The instrument can and must be marked as returned only after return receipt marking.
Perform the following steps to mark return receipt for instruments:
1. On clicking the Proceed, the ‘Filter Parameters’ section is displayed.

Refer to the following table for specifying filter parameters to search the list of instruments:
Note: Fields marked with ‘*’ are mandatory.
|
Field Name |
Description |
|
Dispatch Branch * |
Select the branch from where the instrument is dispatched. By default, the branch of the logged-in user is selected. |
|
Returning Bank |
Click the Search icon and select the bank that returned the instrument. |
|
Returning Branch |
Click the Search icon and select the bank branch that returned the instrument. |
|
Schedule Reference Number |
Click the Search icon and select the schedule reference number to search the instrument by. |
|
Courier |
Click the Search icon and select the courier by which the instrument is returned. |
|
Instrument Number |
Click the Search icon and select the instrument to search for. |
|
Schedule Dispatch Date From |
Click the Calendar icon and select starting-range of the schedule dispatch date. |
|
Schedule Dispatch Date To |
Click the Calendar icon and select range-ending of the schedule dispatch date. |
|
Currency |
Select the instrument currency. |
2. Click Search to view the list of instruments.
3. Select the records for which the return receipt needs to be marked.
4. Click Confirm to mark the return receipt and send for authorization.
Instrument Status is marked for an instrument as ‘Realized’, ‘Returned’, or ‘Hold’ when the payee bank gets the fate of the instrument from the drawee bank which was sent for clearing.
Perform the following steps to mark status of the instruments:
1. On clicking the Proceed, the ‘Filter Parameters’ section is displayed.
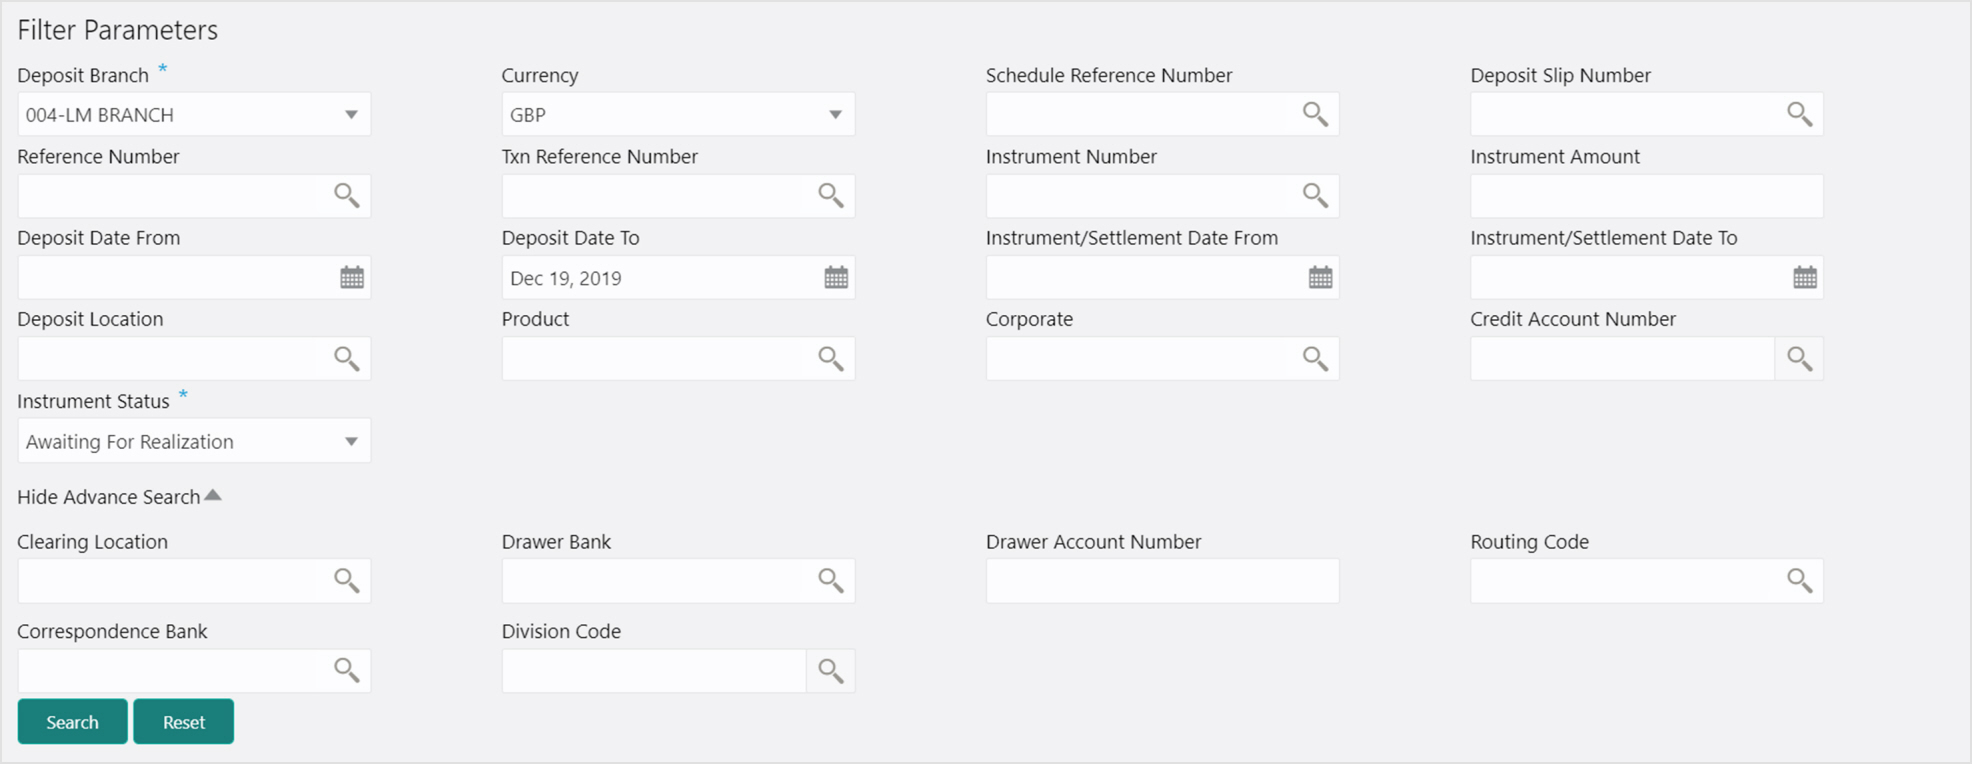
Refer to the following table for specifying filter parameters to search the list of instruments:
Note: Fields marked with ‘*’ are mandatory.
|
Field Name |
Description |
|
Deposit Branch * |
Select the branch where the instrument is deposited. By default, the branch of the logged-in user is selected. |
|
Currency |
Select the currency of the instrument. |
|
Schedule Reference Number |
Click the Search icon and select the schedule reference number to search the instrument by. |
|
Deposit Slip Number |
Click the Search icon and select the deposit slip number to search the instrument by. |
|
Reference Number |
Click the Search icon and select the reference number of the instrument. |
|
Txn Reference Number |
Click the Search icon and select the transaction reference number of the deposited instrument. |
|
Instrument Number |
Click the Search icon and select the instrument number to search for. |
|
Instrument Amount |
Enter the amount mentioned on the instrument. |
|
Deposit Date From |
Click the Calendar icon and select the start of the date range within which the instrument was deposited. |
|
Deposit Date To |
Click the Calendar icon and select the end of the date range within which the instrument was deposited. |
|
Instrument/Settlement Date From |
Click the Calendar icon and select the starting-range of the date mentioned on instrument or it was settled on. |
|
Instrument/Settlement Date To |
Click the Calendar icon and select the range-ending of the date mentioned on instrument or it was settled on. |
|
Deposit Location |
Click the Search icon and select the location where the instrument was deposited. |
|
Product |
Click the Search icon and select the product to search the instrument by. |
|
Corporate |
Click the Search icon and select the corporate for/by whom the instrument was deposited. |
|
Credit Account Number |
Click the Search icon and select the account number in which instrument amount is to be credited. |
|
Instrument Status |
Select the current status of the instrument to search by. |
|
Advance Search |
|
|
Clearing Location |
Click the Search icon and select the location where instrument will be cleared. |
|
Drawee Bank |
Click the Search icon and select the drawee bank of the instrument. |
|
Drawee Account Number |
Enter the account number of the drawee to search the instrument by. |
|
Routing Code |
Click the Search icon and select the routing code used for instrument. |
|
Correspondent Bank |
Click the Search icon and select the correspondent bank involved in the transaction. |
|
Division Code |
Click the Search icon and select the division code to search the instrument by. |
2. Click Search to view the list of instruments.
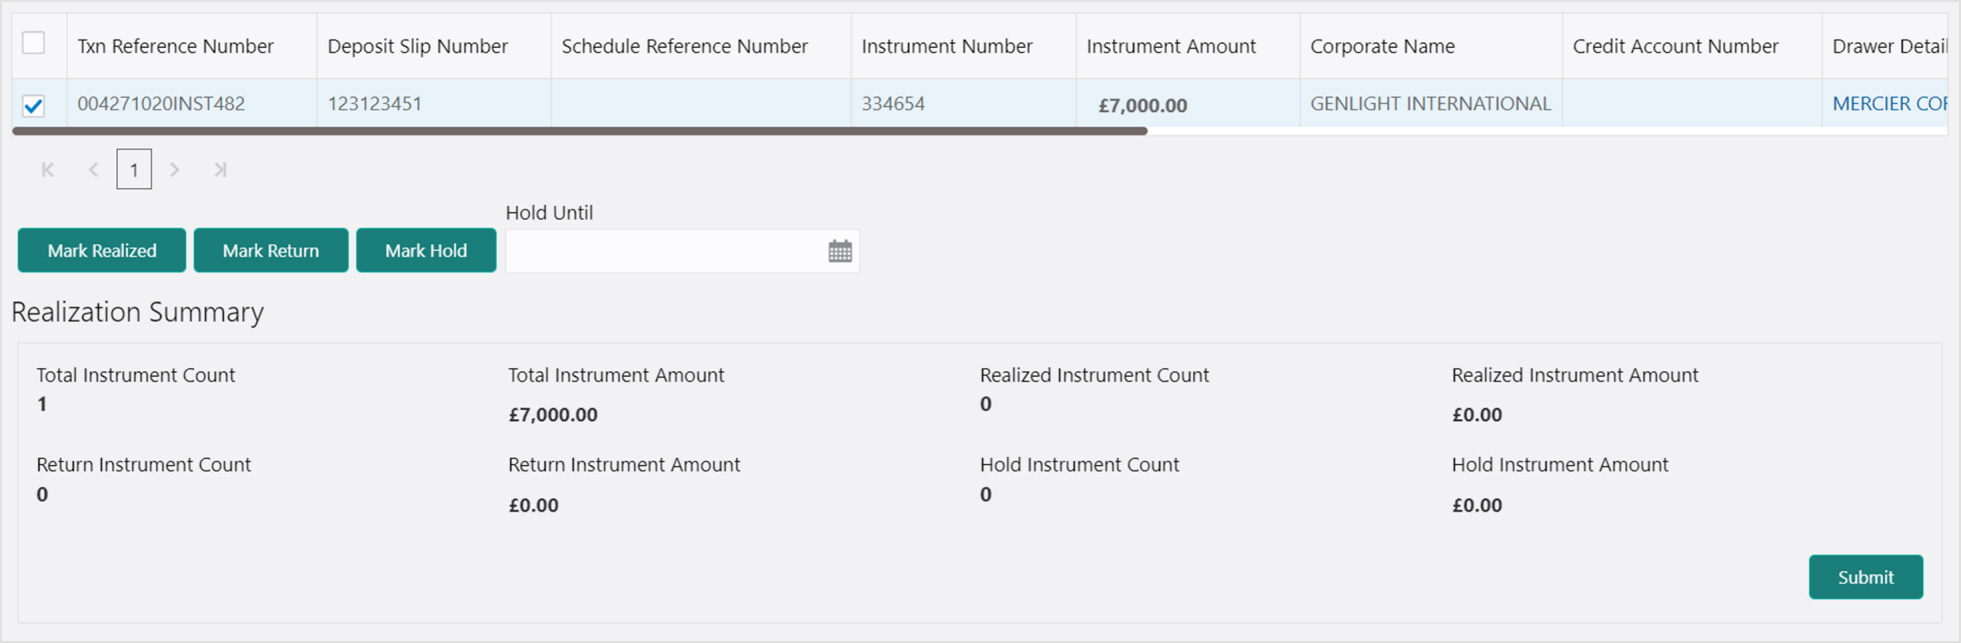
3. Select the records for which the status needs to be updated.
4. Perform any one of the below action to change the instrument status:
- Click Mark Realized, if the instrument is cleared.
- Click Mark Return, if the instrument is returned.
- Click Mark Hold, to hold the instrument and in the Hold Until field, click the Calendar icon to select the date until which the instrument should be on-hold.
5. Click Submit to update the instrument status and send for authorization.
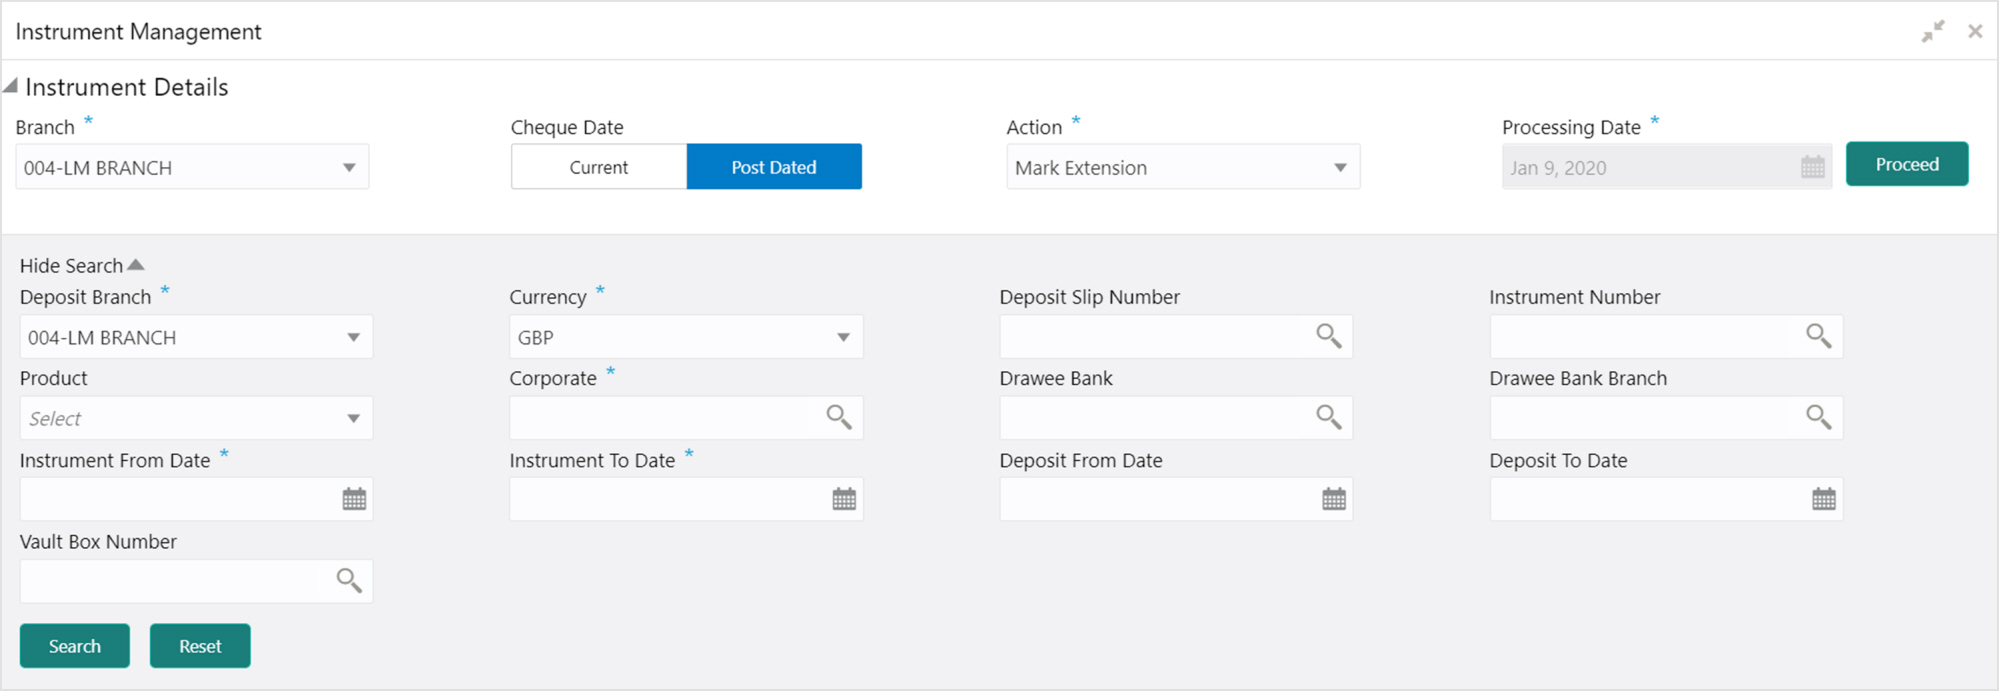
On the ‘Instrument Management’ screen, perform the following actions:
1. In the Branch list, select the branch for which the cheque is to be managed. By default, branch of the logged-in user is selected.
2. In the Cheque Date toggle, select the ‘Post Dated’.
3. In the Action list, select the action to be taken on post-dated cheques.
4. Click Proceed to view the search parameters.
Refer to the following table for specifying filter parameters to search the list of instruments:
Note: Fields marked with ‘*’ are mandatory.
|
Field Name |
Description |
|
Deposit Branch * |
Select the branch where the instrument is deposited. By default, the branch of the logged-in user is selected. |
|
Currency |
Select the currency of the instrument. |
|
Deposit Slip Number |
Click the Search icon and select the deposit slip number containing the instrument to be searched. |
|
Instrument Number |
Click the Search icon and select the instrument number to search for. |
|
Product |
Select the product for which the instrument is deposited. |
|
Corporate |
Click the Search icon and select the corporate for/by whom the instrument is deposited. |
|
Drawee Bank |
Click the Search icon and select the drawee bank of the instrument. |
|
Drawee Bank Branch |
Click the Search icon and select the branch of the drawee bank. |
|
Instrument From Date |
Click the Calendar icon and select the starting-range of the date mentioned on the instrument. |
|
Instrument To Date |
Click the Calendar icon and select the range-ending of the date mentioned on the instrument. |
|
Deposit From Date |
Click the Calendar icon and select the start of the date range within which the instrument was deposited. |
|
Deposit To Date |
Click the Calendar icon and select the end of the date range within which the instrument was deposited. |
|
Vault Box Number |
Click the Search icon and select the vault box number in which the instrument is stored. This field not displayed for the ‘Mark Extension’ action. |
5. Click Search to view the search results.
Further procedure differs based on the selected action to be taken on the instrument. Click on the action name to get redirected to the relevant procedure:
- Mark Replacement & Withdrawal
In case the Buyer/Drawer of the PDC does not have sufficient funds in debiting account, he may ask for an extension on certain PDC instrument to avoid cheque getting bounced. Only PDC instruments that are due for activation and not activated for presentation will be displayed in the search result.
Perform the following steps to mark extension for the instrument:
1. In the search result, select the instruments to mark extension for. On selecting the records the ‘Total Instrument Amount’ and ‘Total Instrument Count’ will be displayed in the summary box.
2. Optional: In the Instrument Number column, click the number to view more details about it.
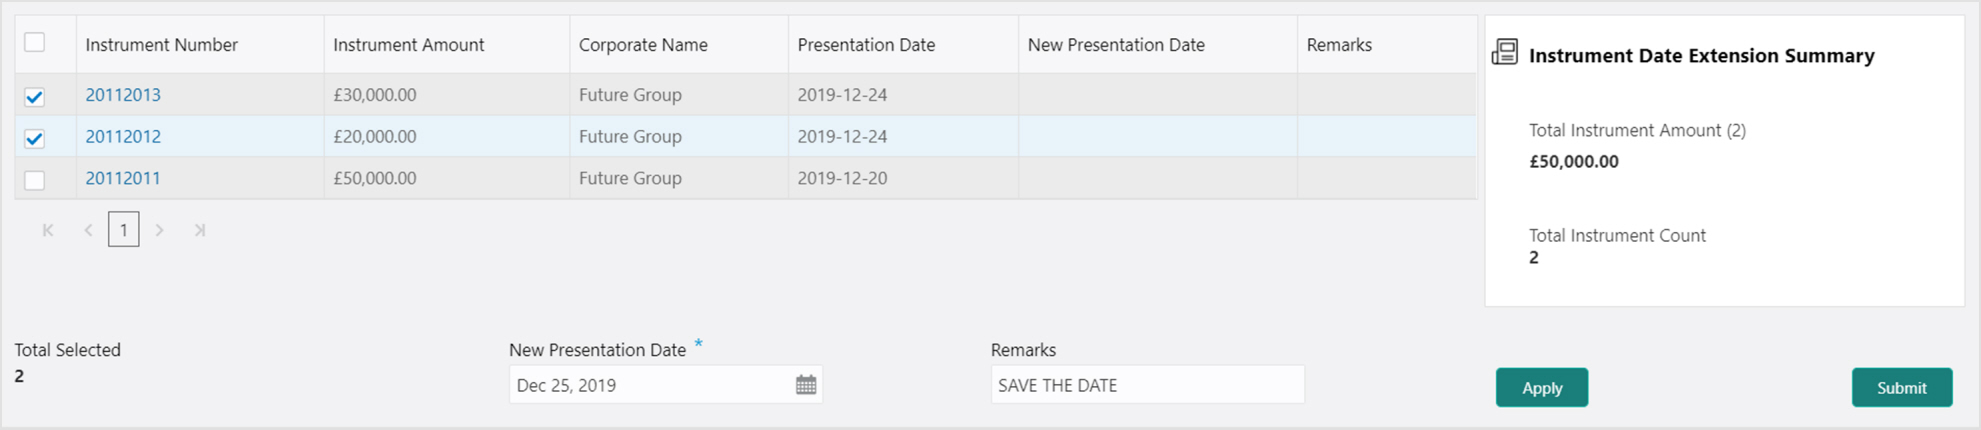
3. In the New Presentation Date field, click the Calendar icon and select the date on which the instrument should be presented.
4. In the Remarks field, enter the remarks for new presentation date.
5. Click Apply to update the grid with new details.
6. If required, click Undo to revert back the applied changes.
7. Select the updated records from the grid and then click Submit to send for authorization.
This action can be used when customer wants the PDC's not to be presented in clearing and be held in custody of the bank until further Notice. Only PDC instruments that are due for activation and not activated for presentation will be displayed in the search result.
Perform the following steps to mark the instrument on hold:
1. In the search result, select the instruments to be marked. On selecting the records the ‘Total Instrument Amount’ and ‘Total Instrument Count’ will be displayed in the summary box.
2. Optional: In the Instrument Number column, click the number to view more details about it.
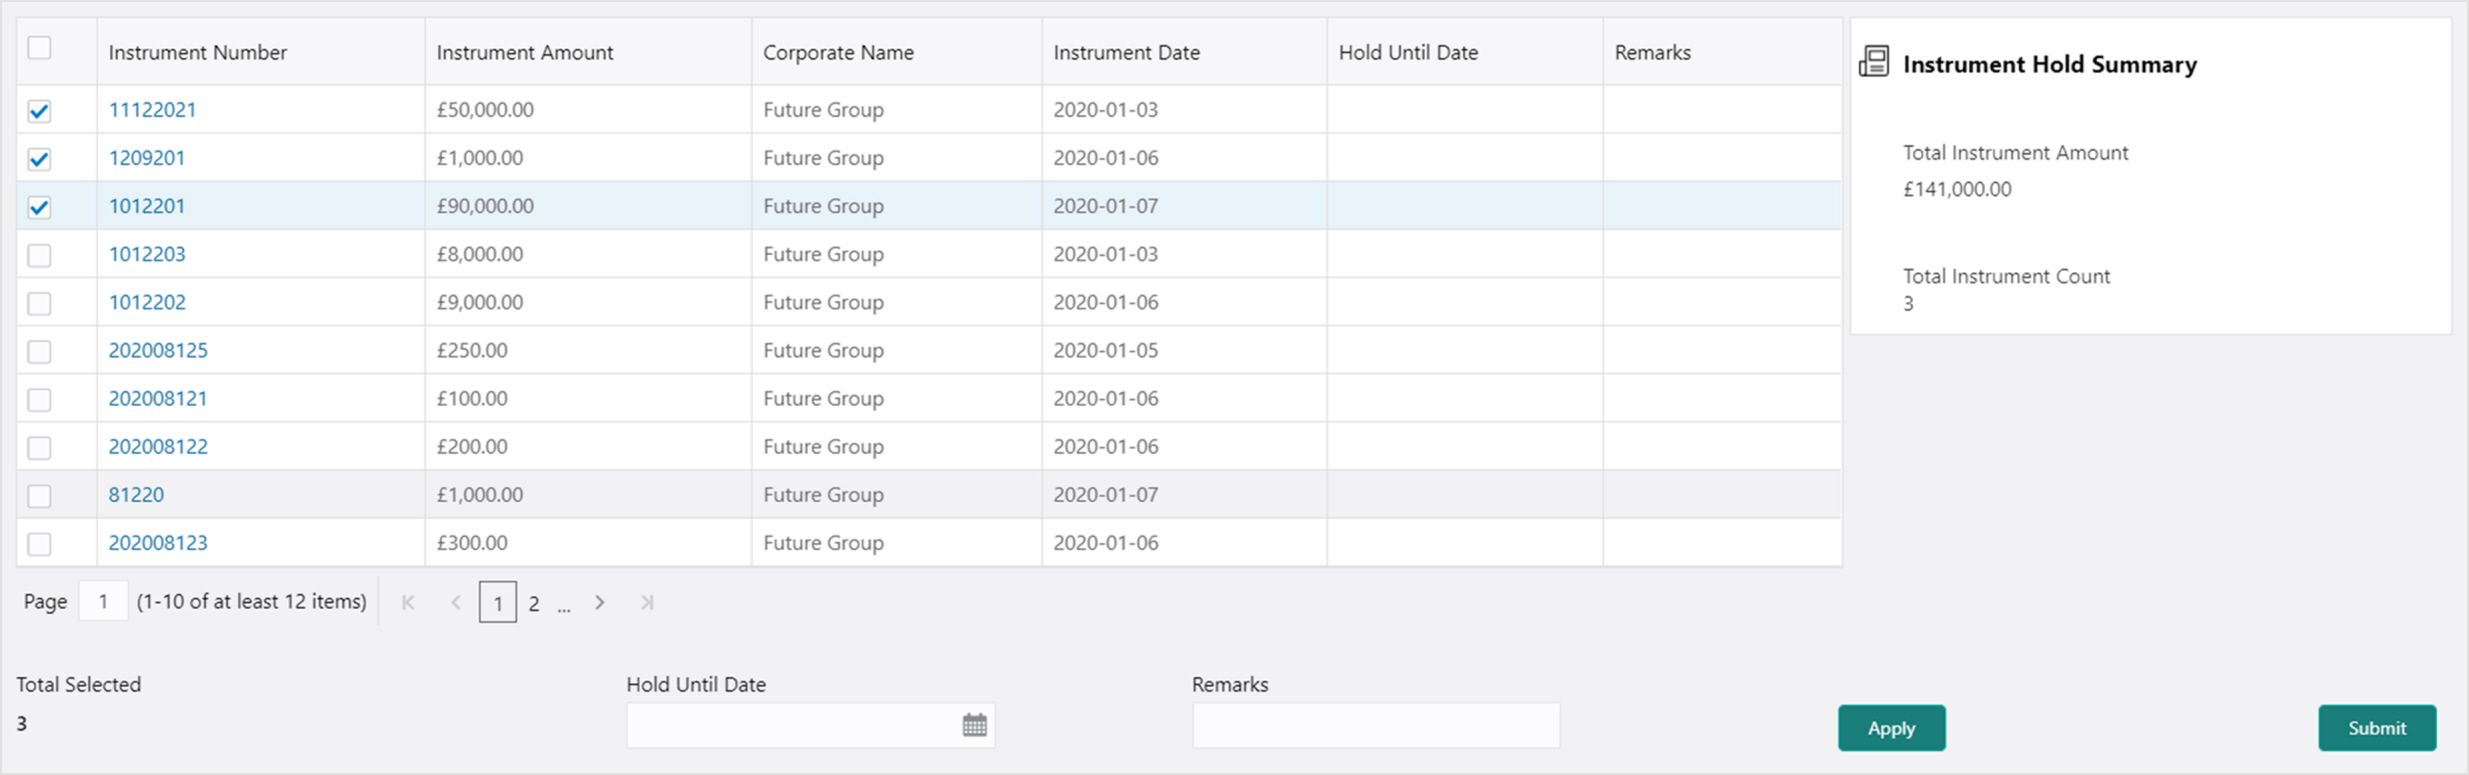
3. In the Hold Until Date field, click the Calendar icon and select the date upon which the instrument should be on hold. Keeping this date blank allows you to manually unhold the instrument whenever required.
4. In the Remarks field, enter the remarks for keeping instrument on hold.
5. Click Apply to update the grid with new details.
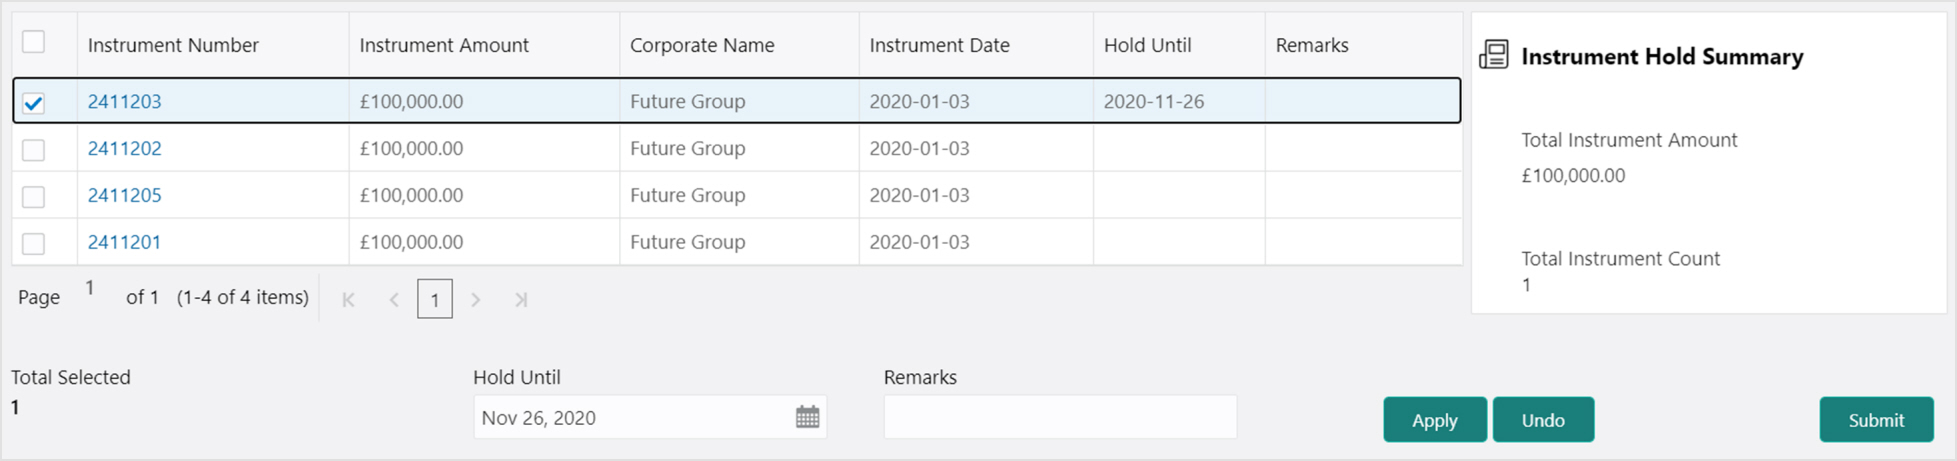
6. If required, click Undo to revert back the applied changes.
7. Select the updated records from the grid and then click Submit to send for authorization.
This action can be used to manually unhold the instrument that are currently on hold. Only PDC instrument that are on hold are displayed in the search result.
Perform the following steps to unhold the instrument:
1. In the search result, select the instruments to be marked. On selecting the records the ‘Total Instrument Amount’ and ‘Total Instrument Count’ will be displayed in the summary box.
2. Optional: In the Instrument Number column, click the number to view more details about it.
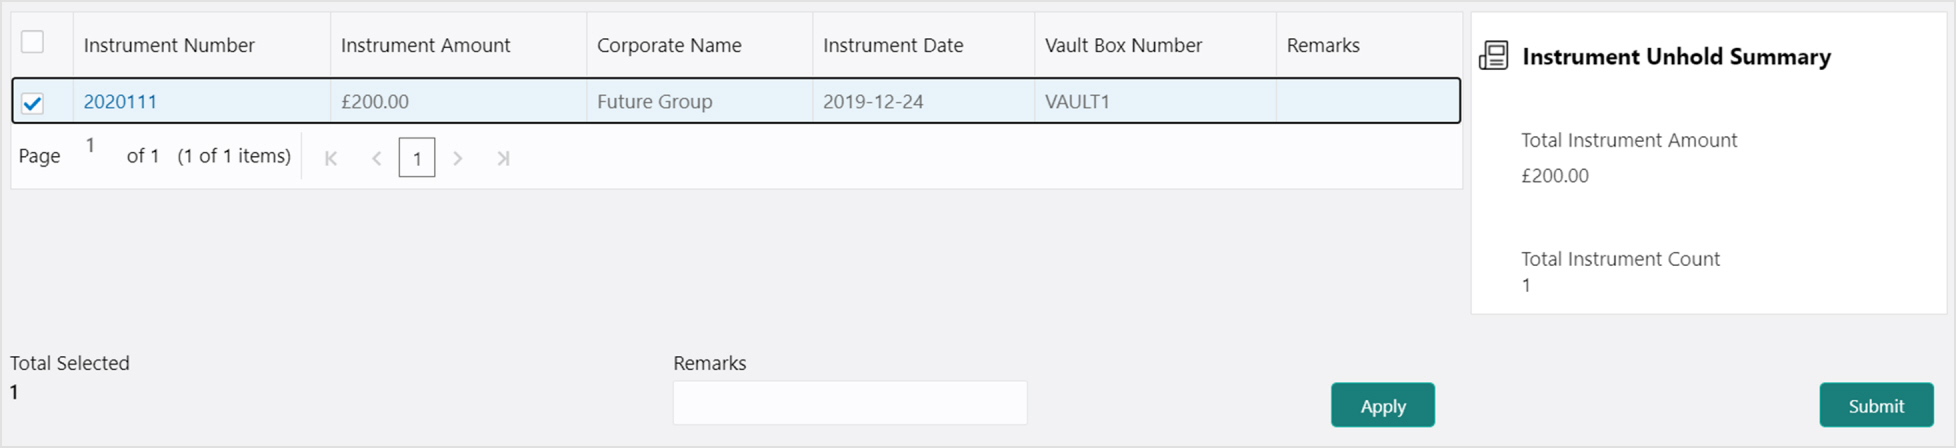
3. In the Remarks field, enter the remarks to un-hold the instrument.
4. Click Apply to update the grid with new details.

5. If required, click Undo to revert back the applied changes.
6. Select the updated records from the grid and then click Submit to send for authorization.
This action can be used in case the PDC is misplaced by bank or pick vendor. If the instrument is not recovered till the instrument date, it gets auto-cancelled. Only PDC instruments that are due for activation and not activated for presentation will be displayed in the search result.
Perform the following steps to mark the instrument as misplaced:
1. In the search result, select the instruments to be marked. On selecting the records the ‘Total Instrument Amount’ and ‘Total Instrument Count’ will be displayed in the summary box.
2. Optional: In the Instrument Number column, click the number to view more details about it.
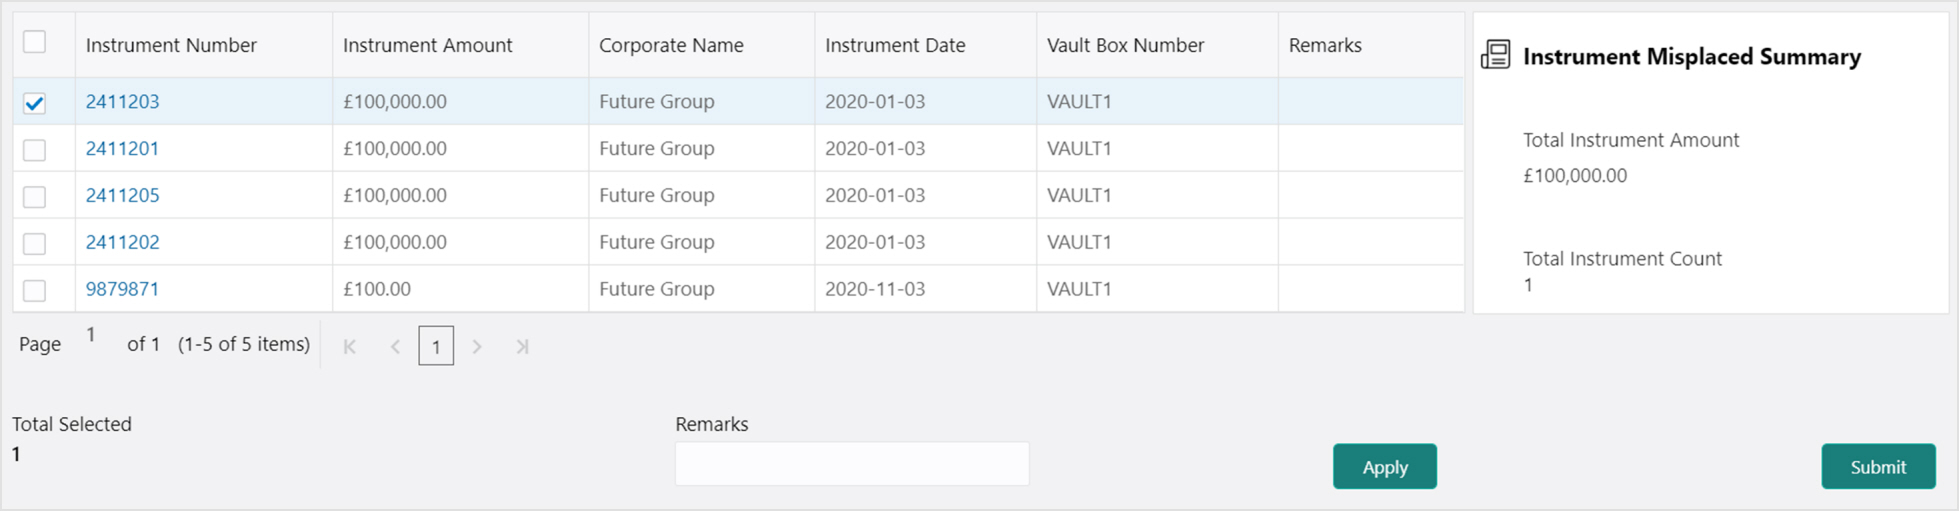
3. In the Remarks field, enter the remarks for marking instrument as misplaced.
4. Click Apply to update the grid with new details.
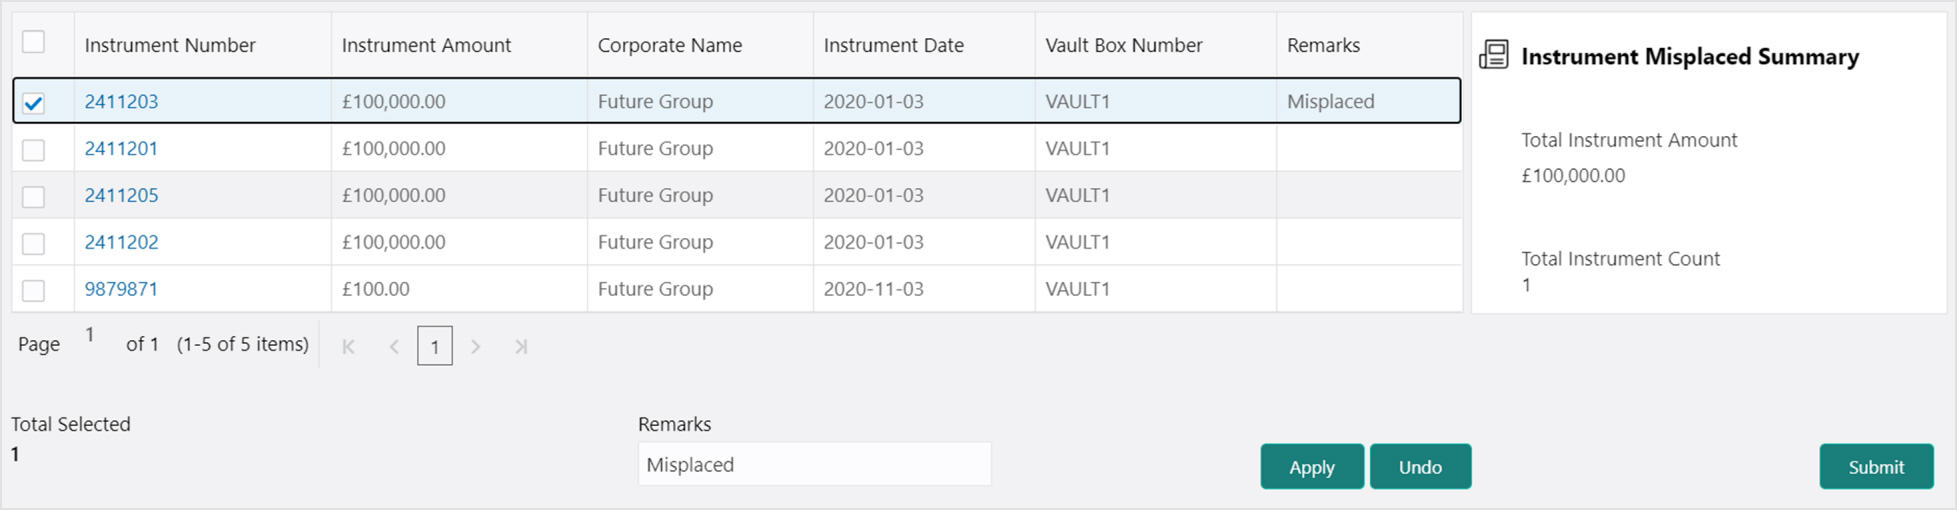
5. If required, click Undo to revert back the applied changes.
6. Select the updated records from the grid and then click Submit to send for authorization.
This action can be used in case the PDC is misplaced by the bank/vendor is found before its instrument date. Only PDC instruments with the status ‘Misplaced’ and whose instrument date is not arrived will be displayed in the search result.
Perform the following steps to mark the instrument as recovered:
1. In the search result, select the instruments to be marked. On selecting the records the ‘Total Instrument Amount’ and ‘Total Instrument Count’ will be displayed in the summary box.
2. Optional: In the Instrument Number column, click the number to view more details about it.

3. In the Remarks field, enter the remarks for new presentation date.
4. Click Apply to update the grid with new details.
5. If required, click Undo to revert back the applied changes.
6. Select the updated records from the grid and then click Submit to send for authorization.
This action can be used in below two scenarios:
• Replacement: When the buyer wants to provide fresh instruments in order to avoid the deteriorating physical condition of the provided cheques, which might have gone through wear and tear.
• Withdrawal: In case the buyer has provided PDCs for periodic payment of a loan and repays the entire loan amount before tenure ends. Hence, the PDCs of remaining tenure are required to be withdrawn from the system.
Only PDC instruments that are due for activation and not activated for presentation will reflect in the Mark Replacement screen
Perform the following steps to mark the instrument for replacement & withdrawal:
1. In the search result, select the instruments to be marked. On selecting the records the ‘Total Instrument Amount’ and ‘Total Instrument Count’ will be displayed in the summary box.
2. Optional: In the Instrument Number column, click the number to view more details about it.
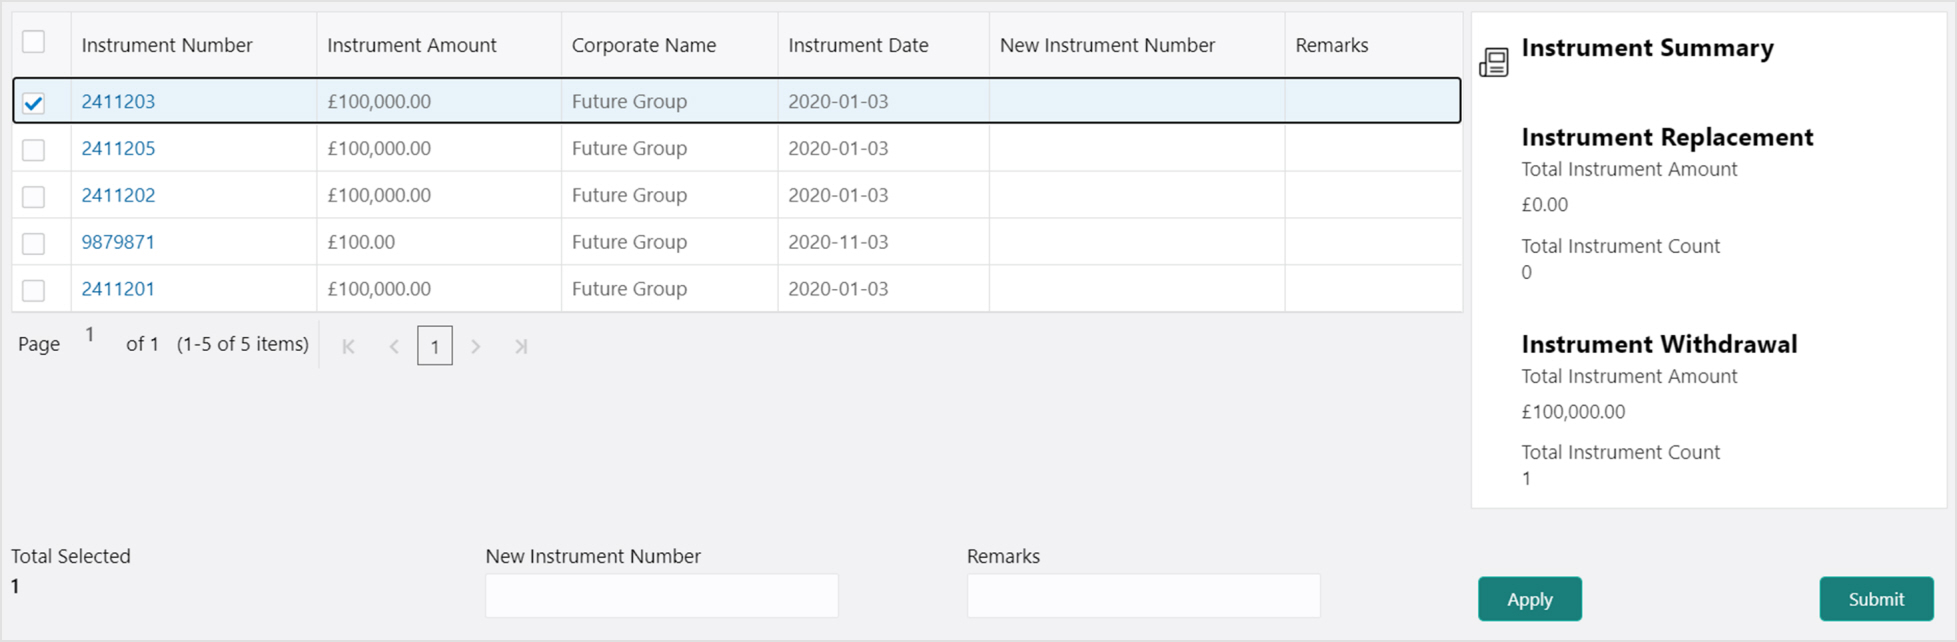
3. In the New Instrument Number field, enter the new instrument number to be replaced for the selected one.
4. In the Remarks field, enter the remarks for new replacement and withdrawal.
5. Click Apply to update the grid with new details.
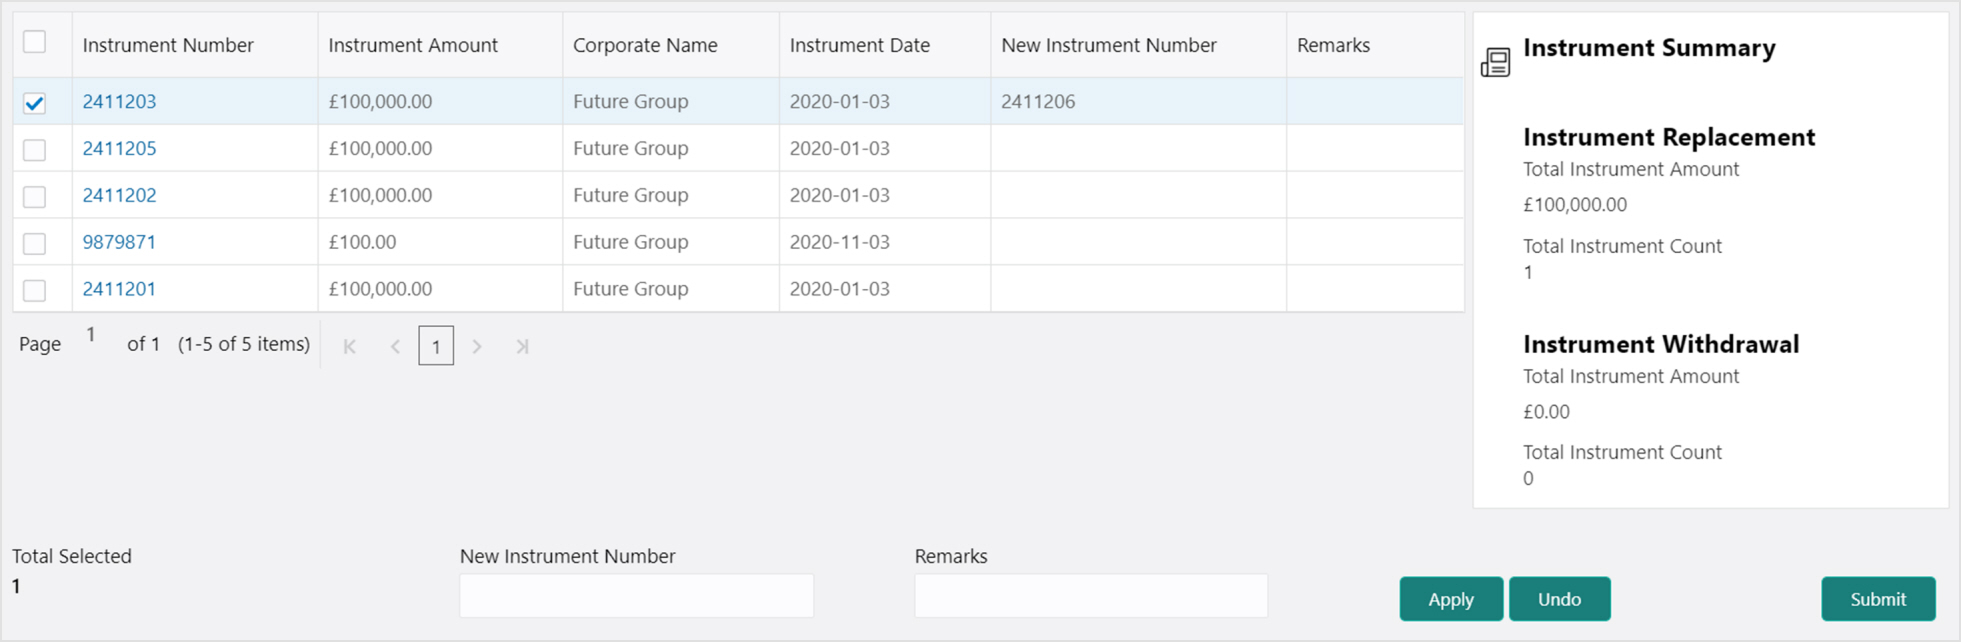
6. If required, click Undo to revert back the applied changes.
7. Select the updated records from the grid and then click Submit to send for authorization.