The Run feature in ALM helps you to combine various components and/or processes together and execute them with different underlying approaches. Further, run conditions and/or job conditions can be specified while defining a run.
Two types of runs can be defined namely Base Run and Simulation Run.
Base Run allows you to combine different rules and processes together as jobs and apply run conditions and job conditions.
Simulation Run allows you to compare the resultant performance/ calculations with respect to the baseline runs by replacing an existing job with a simulation job (a job can be a rule or a process). This comparison will provide useful insights on the effect of anticipated changes to the business.
The Roles mapped for Run module are: Run Access, Run Advanced, Run Authorize, Run Read Only, Run Write and Run Phantom. Based on the roles mapped to your user group, you can access various screens in Run module. For more information, refer to OFS AAI User Guide.
Run Management screen of the ALM application allows you to define, approve and execute Runs. All Runs except stress Runs are defined in the Run Management window of LRM application. The Run, once saved and approved, is registered in the Framework > Run in Oracle Financial Services Analytical Applications Infrastructure.
Creating Run
You can create run definitions using the existing metadata objects. The various components that can be used to form run definitions are mentioned in Process Hierarchy Members.
The following filter conditions can also be applied to a run definition:
Condition Type |
Description |
|---|---|
Run Condition |
When multiple components are selected, there is likelihood that the components may contain Rules / T2Ts whose target entities are across multiple datasets. When the selected components contain Rules, the target entities (hierarchies) which are common across the datasets are made available for defining Run Conditions. When the selected components contain T2Ts, the hierarchies that are based on the underlying destination tables which are common across the datasets are made available for defining the Run Condition. A Run Condition is defined as a filter on the available hierarchies. You can select up to 9 run conditions. |
Job Condition |
A further level of filter can be applied at the component level. This is achieved through a mapping process by which you can apply a job condition to the required jobs. |
|
You can select only one job condition and the hierarchy which you have already selected as a run condition cannot be selected as job condition again. |
To open the Run Management window, in Common Object Maintenance window choose, Manage ALM Runs > Run Management on the Left-Hand Side (LHS) menu.
The Run management summary window of the ALM application allows you to define, approve and execute Run/s.
To define a Run, perform the following steps:
1. Click New on the Run Management window. The Run Definition window is displayed where you can define a Run. The Run Management window allows you to define a new Run or create a new Run definition.
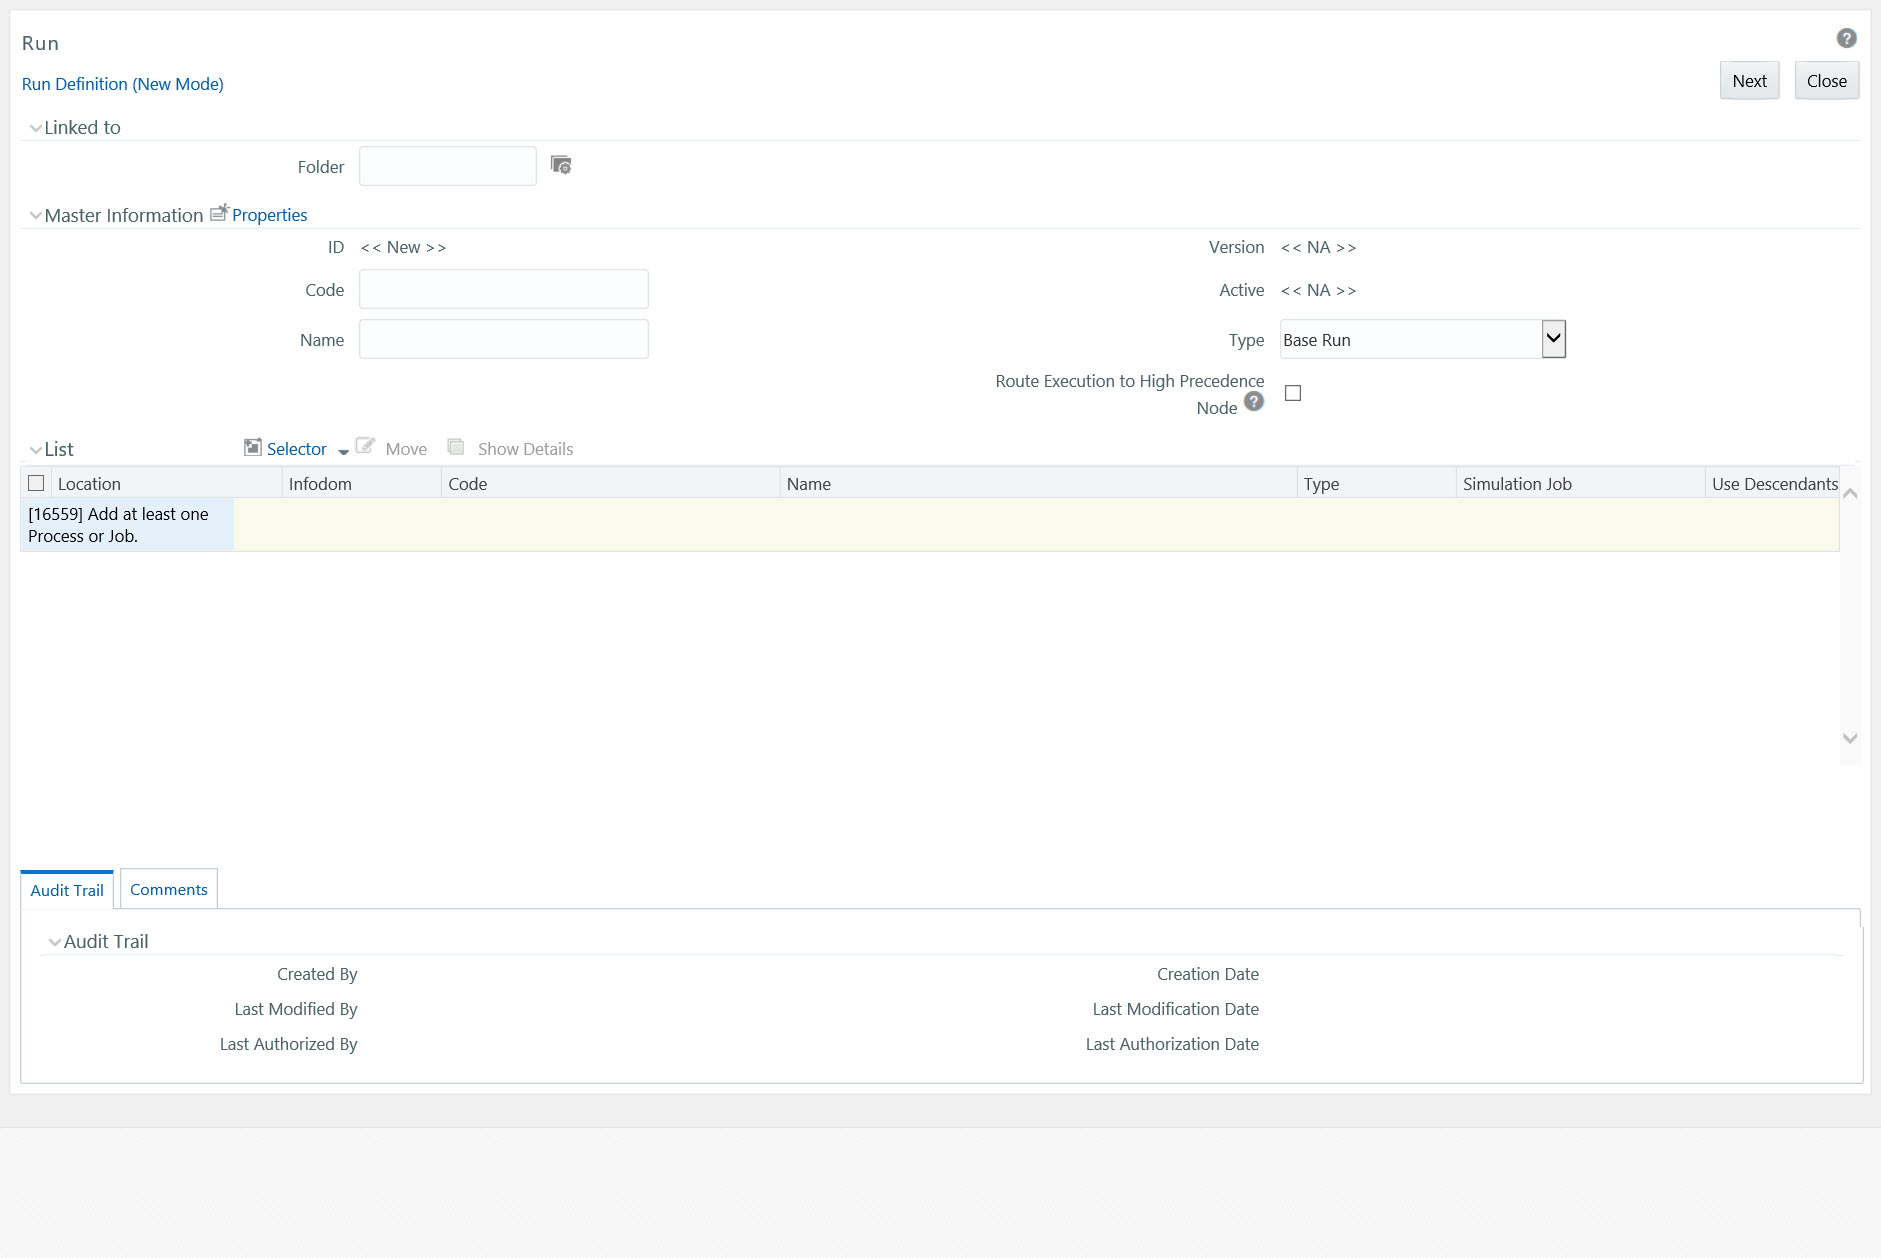
2. In Linked To section,
§ Select the Folder from the drop-down list, which is specific to the Run definition. The Run definitions are linked to a segment.
§ Select the Access Type. It is either Read/Write or Read Only option
3. Enter the details of the Master information grid as tabulated below:
Field Name |
Description |
|---|---|
ID |
Refers to system generated ID for a newly created run. When you create a rule, it is displayed as << New >>. |
Code |
Enter a valid code for the run. Ensure that the code value specified is of maximum 30 characters in length and does not contain any special characters except “_”. The code is unique and case sensitive. It is used to identify a run definition during execution. Note: You cannot use the same code of a rule which has been deleted from the UI. |
Name |
Enter a valid name for the run. Ensure that Run Name is alphanumeric and does not contain any of the following special characters: #, %, &, +, ", and ~. Note that the name needs not be unique. |
Version |
By default the version field is displayed as << NA >> for the new run being created. Once the run definition is saved, an appropriate version is assigned as either -1 or 0 depending on the authorization permissions. For more information, refer Run Definition Versioning. |
Active |
By default, the Active field is displayed as << NA >> for the new run being created. Once the run definition is saved, the status becomes Yes if you are an authorizer or No if the created Run needs to be authorized by an authorizer. |
Type |
Select the type of the run from the drop-down list. The available types are Base Run and Simulation Run. |
4. Click Add icon in the Master information grid. The Properties window is displayed.
5. You can edit the below tabulated details in the Properties window:
Field Name |
Description |
|---|---|
Effective Start Date |
Select the effective start date by clicking (Calendar) icon. |
Effective End Date |
Select the effective end date by clicking (Calendar) icon. |
Last operation Type |
By default, this field displays the last change done to the run definition. While creating a run, the field displays the operation type as Created. |
6. Click OK. The properties are saved for the current Run definition.
Select Run Condition for Run
You can select conditions to preset the initialization mechanism of a run definition.
To select a condition for a run in the Run Definition (New Mode) window:
1. Click Selector icon from the List grid and select Run Condition ( ). The Hierarchy Selector window is displayed. The LHS panel of the Hierarchy Selector window displays all the available hierarchies defined in the selected infodom.
2. Select the check box adjacent to the members you want to select and click . In the Hierarchy Selector window you can:
§ Search for a member by specifying the nearest keyword.
§ The Pagination option helps you to manage the view of existing Hierarchies within the system.
§ Select a hierarchy and click icon to view its metadata information.
§ Click Ascending or Descending icon to sort the selected list of hierarchies in the alphabetical ascending or descending order.
§ Click Up or Down icon to move up or move down the selected members.
NOTE |
The re-ordering of hierarchies does not affect the resulting SQL query. |
§ Click Delete icon to remove selected members from the Selected Hierarchies pane.
3. Click OK. The selected Hierarchies are listed in the Run Definition (New Mode) window
4. If the selected Run condition is a Parent Child hierarchy, the Use Descendants check box is displayed. If the check box is selected for a hierarchy, the descendants will be automatically applied and need not be selected in node selection from hierarchy browser window.
Select ALM Jobs for Run
You can select the required jobs for the run definition being created.
To select jobs for a run:
1. Click Add icon from the List grid and select Job. The Job Selector window is displayed. On the List panel, you can click Add icon to expand the members and view the job components
2. Select a job component and click Select to move the component to the Tasks pane.
In Job Selector window you can also:
§ Search for a component by specifying the nearest keyword and clicking search icon. It may not display search results if the branch of that component has not been expanded.
§ Click Ascending or Descending icon to sort the selected components in ascending or descending alphabetical order.
§ Click Up or Down icon to re-order the selected components.
§ Click Add icon to add parameters for the selected components.
§ Click Deselect icon to remove the selected components from the Tasks pane.
3. Click OK. The components are listed under the List pane in the Run Definition window.
Select Job Condition for Run
You can select only a single job condition for the execution of predefined jobs in a run. A hierarchy which is already selected as a run condition cannot be selected as a job condition.
To select the job condition for a run:
1. Click Add from the List pane and select Job Condition. The Hierarchy Selector window is displayed
2. Select the check box adjacent to the hierarchy that you want to select as job condition and click Select .
3. To know about the operations you can do in this window, refer to Hierarchy Selector window. Note: Ensure that you have selected only one Job Condition and the same hierarchy is not selected as both Run & Job conditions.
4. Click OK.
From the List grid in the Run Definition (New Mode) window, you can also:
§ Click Move icon to change a selected run condition to job condition and conversely.
§ Click Show Details icon to view the metadata information of the selected member.
§ If the selected Job condition is a Parent Child hierarchy, the Use Descendants check box is displayed. If the check box is selected for a hierarchy, the descendants will be automatically applied and need not be selected in node selection from hierarchy browser window.
Once all the necessary information in the first window of the Run Definition (New Mode) is populated, click the Next icon to navigate to the concurrent procedures of defining a Rule.
The second window of Run Definition (New Mode) window displays all the information you have provided in the Linked to and Master information grids. You can view the selected filters in the Run Condition grid and selected jobs along with the job condition in the Detail Information grid Expand a job which is a process, then the Object, Parent Object, Precedence and Type columns are populated.
You can view individual run definition details at any given point. To view the existing Run definition details in the Run window:
1. Select the check box adjacent to the Run Code whose details are to be viewed.
2. Click View.
The Run Definition (View Mode) window is displayed with all the details of the selected Run. Click Next and Back icons to navigate back and forth in the Run Definition (View Mode) window.
You can modify all the details except ID, Code, Version, Active status, and Type of a run definition. To modify an existing run definition in the Run window:
1. Select the check box adjacent to the Run Code whose details are to be updated.
2. Click Edit. Edit icon is disabled if you have selected multiple Runs. The Run Definition (Edit Mode) window is displayed.
3. Edit the Run details as required.
4. Click Save to save the changes.
For an authorizer:
When you create a new run, its version will be 0. When you edit an existing run and try to save, you are prompted whether to save it as a new version or not. If you click Yes, a new run is created with version as 0 and the run having version as 0 will be saved with version as maximum version +1. If you click No, the existing run is overwritten and the version will be as it is.
For a non-authorizer:
When you create a new run, its version will be -1. Once the run is approved by an authorizer, the version becomes 0. When you edit an existing run and try to save, you are prompted whether to save it as a new version or not. If you click Yes, a new run is created with version as -1. Once the run is approved, its version becomes 0 and the run having version as 0 will be saved with version as maximum version +1. If you click No, the existing run is overwritten, and the Active flag of the run becomes N (which you can view from the Summary window). The version remains the same. Once the run gets approved, its Active flag changes to Y.
Note the following:
The run with version 0 is the latest one and it can have many versions say 1 to n, where 1 is the oldest run and n is the next to latest.
A run with version -1 will always be in Inactive state.
You can view all the versions of a particular rule by providing the run's name or code and clicking Search in the Search and Filter grid. (Ensure the Version field is cleared since it is auto populated with 0).
This option facilitates you to quickly create a new run definition based on an existing run by updating the values of the required fields.
To copy an existing Run Definition in the Run window:
1. Select the check box adjacent to the Run Code whose details are to be duplicated.
2. Click the Copy icon to copy a selected Run definition. The Run Definition (Copy Mode) window is displayed. Copy icon is disabled if you have selected multiple Runs.
In the Run Definition (Copy Mode) window you can:
§ Create new Run definition with existing variables. Specify a new Run Code and Folder. Click Save.
§ Create new Run definition by updating the required variables. Specify a new Run Code, Folder, and update other required details. Click Save.
The new Run definition details are displayed in the Run window. By default, version 0 is set if you have authorization rights, else the version is set to -1.
All the actions in a run definition should be approved by an authorizer. An authorizer can approve a pre-defined run definition for further execution or reject an inappropriate run definition listed within the Run window. To approve/ reject run definitions in the Process window, you need to have the Authorize role mapped to your user group. If you are an authorizer, the run definition is auto approved as you save it and the Active status is set to Yes. Otherwise, the Active status is set to No and an authorizer needs to approve it to change the Active status to Yes.
To approve/reject runs:
· Select the check box adjacent to the required Run Codes.
· Do one of the following:
To approve the selected run definitions, click Approve icon.
To reject the selected run definitions, click Reject icon.
A run is made available for use only after the approval. For a rejected definition a comment with the rejection details will be added.
This option allows you to export multiple run definitions to a PDF file. You have the option to export only the rules or processes in the run definition to PDF by selecting the required Trace Options.
To export the run definitions in the Run window:
1. Select the check box adjacent to the required Run Codes.
2. Click Export icon in the List tool bar and click the PDF icon. The Export window is displayed.
The Export window displays the Export Format, Definition Type, the names of the Selected Definitions, and the Trace Options.
§ Select the check box adjacent to Rule or Process if you want to export only the rule details or Process details respectively. If you do not select any check box, all details of the selected run definitions will be exported.
§ Click Select icon. The selected options are displayed in the Selected Trace Options pane. You can also select a trace option and click Select icon to deselect it from the Selected Trace Options pane.
3. Click Export. The process is initiated and is displayed in a pop-up specific to the current download. Once the PDF is generated, you can open or save the file from the File Download dialog.
You can either save the file on the local machine or view the file contents in a PDF viewer. The downloaded PDF displays all the details such as Linked to, Properties, Master info, Audit Trail, List, and Comments of all the Run definitions selected.
This feature facilitates you to execute a previously created Run. You can execute the run definition as a batch from the Operations module.
To execute a run definition:
1. Select the check box adjacent to the Run Code which you want to execute and click Execute icon. The Fire Run window is displayed.
2. Enter the field details as tabulated below:
Field Name |
Description |
|---|---|
Name |
This field displays the name of the selected run. |
Request Type |
Select the request type either as Single or as Multiple from the drop-down list. |
|
Single Request - You need to provide the MIS Date during Batch execution from the Operations module. |
|
Multiple Request - You can run the batch with the same MIS date multiple times from the Operations module. |
Batch |
Select the Batch either as Create or as Create & Execute from the drop-down list |
|
Create- The batch will be created and needs to be executed from the Operations module. |
|
Create & Execute- The batch will be created and executed. You can monitor it from the Operations module. |
MIS Date |
Click Calendar icon and the Calendar is displayed. Select the MIS Date from the calendar. This field is displayed only if you have selected Request Type as Multiple with any of the Batch mode or Request Type as Single with Batch mode as Create & Execute. |
Wait |
Select Yes and provide the Duration in seconds after which the run definition should be executed. |
|
Select No to execute it immediately. |
Parameters |
Enter the required parameters in the field provided. The parameter provided in this field is considered for Run execution. |
Filters |
Enter the filter details in the field provided. The filters provided in this field are considered for Run execution. |
3. Click OK. The details are saved and the run definition is executed as per the Fire Run details.
You can remove Run definition which are no longer required in the system by deleting from Run window. However, it is a soft deletion only. An authorizer has to approve the deletion.
1. Select the check box adjacent to the Run Codes whose details are to be removed.
2. Click Delete.
3. Click OK in the information dialog to confirm deletion.
An information dialog is displayed confirming the deletion of the Run definitions and asking the authorization of the same.
Manage Run execution enables you to have a work flow for Run execution. The pre defined Run definitions can be executed in a unique batch depending on the Type of the Manage Run Execution defined. These batches can then be executed from the Operations module.
You can access Manage Run Execution window by expanding Rule Run Framework within the LHS menu and selecting Manage Run Execution.
The Manage Run Execution window displays the Run Execution requests created in the current Information Domain with the metadata details such as Run name, Run Execution Description, Run Execution ID, Type, MIS Date, and Request Status.
You can also make use of Search and Filter option to search for specific Runs based on Run Name, Run Execution Description, MIS Date, Run Execution ID, Type, or Request Status. The Pagination option helps you to manage the view of existing Rules within the system.
You can create the Manage Run Definitions from the Manage Run Execution window. The Write role should be mapped to your user group, from the User Group Role Map window.
To create a Manage Run Definition:
1. Click Add. The Manage Run Definition (New Mode) window is displayed.
2. Click Expand icon in the Run field. The Run Selector window is displayed
3. In the Run Selector window, click View icon to view the details of the selected Run. The Pagination option helps you to manage the view of existing Runs within the system.
4. Click OK. The selected Run is displayed in the Run field, along with the Run ID.
5. Click View icon to display the adjacent to the Expand icon to view the details of the selected Run.
6. Enter the details in the Master Info and Execution Details pane as tabulated:
Field Name |
Description |
|---|---|
Master Information pane |
|
Run Execution ID |
The default ID of a newly created Run Execution is << New >> |
Run Execution Code |
Enter a valid Run Execution Code. Ensure that the Run Execution Code specified is of maximum 30 characters in length and does not contain any special characters except “_”. |
Run Execution Name |
Enter the Name of the Run Execution. Ensure that Run Execution Name is alphanumeric and does not contain any of the following special characters: #, %, &, +, ", ~, and '. |
Type |
Select the type of the Run Execution either as Single Request or as Multiple Request. § Single Request - You need to provide the MIS Date during Batch execution from the Operations module. § Multiple Request - You can run the batch with the same MIS date multiple times from the Operations module. |
Execution Details pane |
|
Execution ID |
The default Execution ID of a newly created Run Execution is << NA >> |
Request Status |
Select the request status either as Open or as Closed. § Status Open creates a Manage Run definition. § Status Closed creates a Manage Run definition along with a Batch. |
MISDate |
MIS Date refers to the date with which the data for the execution would be filtered. Click icon and the Calendar is displayed. You can select the MIS Date from the calendar. This field is displayed only if you have selected Type as Multiple Request. |
Execution Status |
The default Execution status of a newly created Run Execution is << NA >> |
7. Click Save. The Run Execution is saved and a confirmation dialog is appeared.
8. The Audit Trail pane at the bottom of Manage Run Definition (New Mode) window displays metadata information about the Manage Run definition created. The User Comments tab facilitates you to add or update additional information as comments.
You can view individual Manage Run definition details at any given point. To view the existing Manage Run definition details in the Manage Run Execution window:
1. Select the check box adjacent to the Run Name whose details are to be viewed.
2. Click View icon.
The Manage Run Execution Definition (View Mode) window is displayed with all the details of the selected Manage Run Definition.
You can modify the Run Execution Description and Request Status details of a Manage Run definition. To modify an existing Manage Run definition in the Manage Run Execution window:
1. Select the check box adjacent to the Manage Run Definition name whose details are to be updated.
2. Click Edit icon. Edit icon is disabled if you have selected multiple Manage Run Definitions. The Manage Run Definition (Edit Mode) window is displayed.
3. Edit the Manage Run definition details as required.
You can select the Request Status as Open, Closed, To be Deleted, or Final depending on the current status of the definition:
§ Status Open creates/updates a Manage Run definition.
§ Status Closed creates a Manage Run definition along with a Batch.
§ Status To be Deleted indicates the Manage Run definition is marked for deletion.
§ Status Final indicates the Manage Run definition is successfully executed with expected results.
The Execution Status field displays the current execution status of a triggered Run as Success, Failure, or Ongoing and << NA >> for a non-executed Run
4. Click Save .