
Data Aggregation and Stratification enables you to summarize large volumes of financial instruments to a manageable scale for processing purposes. The engine that does the aggregation and stratification processing is the Data Stratification Rule. This application enables you to perform mathematically intensive calculations on a relatively small number of instrument pools that are proxies for a much larger number of individual instrument records. Using this feature is a multi-step process, which includes:
· Understanding what you want and how you want to aggregate and stratify data
· Optionally defining balance or rate tiers to be used for grouping data
· Configuring the Data Map metadata for the source and target data maps that are to be used on the Stratification Definition page
· Setting up stratification definitions and rules in the Stratification Rule pages
· Testing the rules that you create
When creating pools of instruments, you need to identify the operation for each of the attributes. You have the following choices in terms of how to populate each attribute in the instrument pool from the instrument data:
· Discrete: Directs the Aggregation and Stratification engine to populate the instrument pool with discrete values.
This option populates the pool with discrete values for an attribute if there is no logical or mathematical way to group instruments with different values, and the attribute is significant for processing purposes. Choosing the discrete action for an attribute ensures that only instruments with matching values are grouped together in a pool. The discrete action may be the correct choice for important code fields. Be careful when using the discrete action on amount, date, or rate fields. These types of fields tend to have many discrete values. A typical value for a discrete group by is a dimension ID field or a yes/no flag.
· Group by: Use for dimensions or other attributes that you want to use to group the detailed data.
This option allows you to select columns that you want to use to group the instrument data. This will typically be used for dimension columns like Product, Org Unit or Currency or any other dimensions that are needed for grouping the data.
· Tier: If you want to group the data by ranges of values, you can define the ranges using Stratification Tiers.
Tiers are typically used for balance and rate fields to assist in grouping similar data into tranches or pools. Tiers should be defined on columns that impact the way assumptions are made, such as prepayments, interest rate margins or other meaningful assumptions.
The following are the default aggregation action operations:
· Average: Calculates the average value of an attribute for all instruments in the pool.
· Weighted Average: Calculates the average weighted value for an attribute by the current balance.
Examples of attributes for which you may want to calculate the weighted average are interest rate fields: interest rates, cap rates, floor rates and interest rate margins for floating rates. Other possibilities include remaining term, original term, loan to value and so forth.
· Min, Max (minimum, maximum): Select one of these operators to populate the pool with the minimum or maximum value of a given attribute for all the instruments that are part of the pool.
· Median: Applies the Median Date value for all date values in the pool.
· Sum (The sum action calculates the total sum value for a numeric attribute.
The most common attributes that you want to calculate the sum for are the balance and payment amount fields. By calculating the total of the balance and payment amounts, the total of all pool balances should reconcile to and represent the totals of all instruments that are in the portfolio.
· Default: Applies a specified default value.
Here are some criteria to keep in mind when evaluating how you want to stratify data:
· When identifying attributes that you want to include as part of the instrument pools, keep in mind the primary use of the stratified data you are creating.
For example, the ALM engine uses only the current balance amount fields for its calculations. As far as the ALM engine is concerned, designing a stratification rule that populates other balance or amount fields is optional.
· You need to identify the stratification criteria for the attributes.
This step is simplified by the fact that any attributes that you identify as needing to maintain discrete values for, or that are going to be dropped or defaulted by definition, cannot be used as grouping criteria for pools.
· Maximize efficient processing by designing rules to summarize the instruments into as few pools as possible, while at the same time only grouping instruments that generate the same or similar cash flows.
In other words, all of the instruments that are grouped together into a pool should share common and pertinent financial characteristics.
This section discusses how to setup stratification configurations.
To set up the Stratification Configurations, select Common Object Maintenance, select Stratification, and then select Stratification Definition. You can define the aggregation process at any level of complexity.
To define the aggregation process at any level of detail of complexity, follow these steps:
1. Navigate to Common Object Maintenance, select Stratification, select Stratification Definition, and then select New or Edit.
This example illustrates the fields and controls on the Stratification Definition page. You can find definitions for the fields and controls later in this section.
Figure 1:
2. Establish how you want the Stratification engine to process amounts, rates, dates and integers by assigning a stratification action to each.
Default input apply a default value into the action settings on the Definition page.
3. Select a source and target instrument table, Default Values, Aggregation Actions and Stratification Actions to complete the definition for each instrument table that you want to aggregate.
An alternative to incremental grouping is to group according to tiers. You can use tiers on numbers, amounts and rate fields. The main difference between using tiers versus other aggregation actions is that you can define the specific tiers that you want to stratify the data into to match business logic, reporting requirements or both. Tiers also give you more control in terms of limiting the number of strata created for any given attribute to only ranges that are pertinent for processing or reporting purpose. For example, you could define a tier rule that groups the initial balance amounts in increments of 10,000. However, this could result in hundreds of strata if the balance amounts range anywhere from 1 to 100,000,000. A more efficient and logical way to group balance amounts may be to setup tiers so that the first tier contains records with amounts between 1 and 50,000; the second tier contains records with amounts between 50,000 and 1,000,000; and the third tier contains records with amounts between 1,000,000 and 100,000,000. Tiers are ideal for handling balance amounts.
To set up Tier Structure, follow these steps:
1. Navigate to Common Object Maintenance, select Stratification, and then select Stratification Tier.
Stratify source data into a finite number of pools that are used by the Stratification Definition under Stratification Action.
Use the Tier Definition page to define stratification criteria for creating a finite number of pools that are used by the Stratification Definition - Group by page.
Figure 2:
This example illustrates the fields and controls on the Tier Structures page. You can find definitions for the fields and controls later on this page.
Input the lower and upper boundary amounts for each tier and then add to the definition. The lower bound range must be greater than the prior upper bound amount. These values cannot be equal and do not overlap. The initial lower bound and last upper bound should small enough and large enough to capture all possible values.
Note that under Tier Type, "Discrete" is also available to select. This option populates the pool with discrete values for an attribute if there is no logical or mathematical way to group instruments with different values, and the attribute is significant for processing purposes. Choosing the discrete action for an attribute ensures that only instruments with matching values are grouped together in a pool. The discrete action may be the correct choice for important code fields. Be careful when using the discrete action on amount, date, or rate fields. These types of fields tend to have many discrete values. A typical value for a discrete group by is a dimension ID field, code field or a yes/no flag.
This section discusses how to setup stratification definitions.
|
Page Name |
Navigation |
Usage |
|---|---|---|
|
Stratification Rules Definition - Definition |
Common Object Maintenance > Data Stratification > Stratification Definition> Definitions |
Specify rule name, description, source data and target data tables |
|
Stratification Rules Definition - Defaults |
Common Object Maintenance > Data Stratification > Stratification Definition> Defaults |
Specify default values for each column type |
|
Stratification Rules Definition - Aggregation |
Common Object Maintenance > Data Stratification > Stratification Definition> Aggregation |
Define aggregation actions (or use the default values) for each column in the data map |
|
Stratification Rules Definition - Stratification |
Common Object Maintenance > Data Stratification > Stratification Definition> Stratification |
Define how to group or pool the data |
Use the Stratification Rules - Tabs to define Stratification Definition.
To define Stratification Definition, follow these steps:
1. Navigate to Common Object Maintenance, select Stratification, and then select Stratification Definition.
This example illustrates the fields and controls on the Stratification Rules - Definition page. You can find definitions for the fields and controls later on this page.
Figure 3:

2. Provide a unique name and description for the Stratification Definition rule.
3. Select a source instrument table. The list of values will include all seeded and properly registered instrument tables which contain account level data records.
4. Select a target aggregate instrument table. This is the table that will be populated with the results of the Stratification.
5. Specify whether or not to include a catch all bucket in the process. This will ensure that all records from the source table are accounted for in the target table.
6. Select Apply to save your inputs and navigate to the next tab.
This example illustrates the fields and controls on the Stratification Rules - Defaults Page.
Figure 4:

To define Stratification Defaults, follow these steps:
1. Select the Amount default. Possible selections are MAX, MIN, SUM, AVG. Recommended selection is SUM.
2. Select the Date default. Possible selections are MAX, MIN, MEDIAN. Recommended selection is MEDIAN.
3. Select the AlphaNumeric default. Possible selections are MAX, MIN. Recommended selection is MAX.
4. Select the Rate default. Possible selections are MAX, MIN, SUM, AVG and Weighted Average. Recommended selection is Weighted Average. If Weighted Average is selected, then additionally select the balance column to use for weighting.
5. Select the Integer default. Possible selections are MAX, MIN. Recommended selection is MAX.
6. Select Apply to save you inputs and navigate to the next tab.
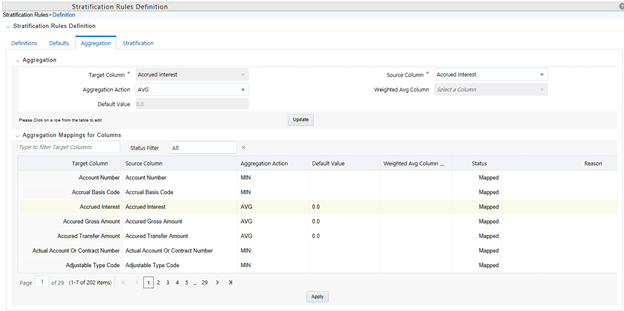
This example illustrates the fields and controls on the Stratification Rules - Aggregation Page.
Figure 5:

To define Stratification Aggregation details, follow these steps:
1. Select the specific row you want to define from the bottom half of the page.
You have the option to use the default values previously input on the Defaults tab or you can input a different Aggregation Action at the top of the page.
2. Use the pagination selections at the bottom of the page to address / review all columns or alternatively type the column name or a portion of the column name to navigate directly to a specific column.
3. Select Apply to save your inputs and navigate to the next page.
This example illustrates the fields and controls on the Stratification Rules - Stratification Page.
Figure 6:
To define Stratification/Group by details, follow these steps:
1. Select the Column(s) and Stratification Action that you want to use for grouping the detailed records into aggregate/pooled records. Typical columns used for grouping will be dimension columns, balance or rate columns or any other meaningful columns that you want to be unique for each pool record.
2. For each Stratification column, select the Stratification Action. Options are Tier, Discrete and Group by. Both the Tier and Discrete options require an additional Stratification Tier definition to be selected.
3. Select Apply to save your inputs and remain in the rule or select Save to save your inputs and close the rule.
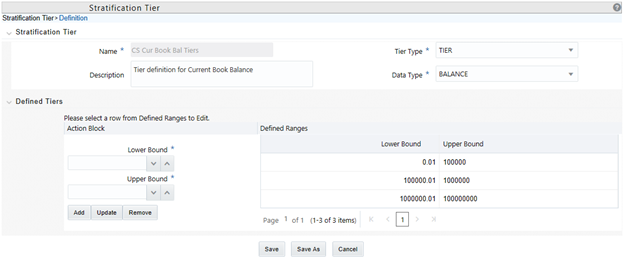
To define stratification tiers, follow these steps:
1. Navigation to Common Object Maintenance, select Stratification, and then select Stratification Tier.
Figure 7: Stratification Tiers: This screen illustrates the fields and controls

2. Provide a unique Name and Description for the Stratification Tier.
3. Select the Tier Type, for example, Tier or Discrete.
4. Select the column Data Type that this definition will apply to. This selection will limit the columns where this Tier rule will be available for selection in the Stratification Definition rule.
5. Define each individual tier with lower and upper bounds and add as a defined range. Click the Add button to add the tier. Additionally use the Update or Remove buttons to manage the individual tier definitions.
6. After all tiers ranges have been defined, select the Save button save the assumptions and exit the Tier screen.
The tier definitions created in this step are mapped to the individual columns in the Stratification Definition rule on the Stratification tab.
To execute a stratification rule, follow these steps:
1. Navigate to the Stratification Rule Summary Page.
Figure 8:

2. Select the Stratification Rule you want to process.
3. Select the Run icon.
4. Select the as of date for the instrument data you want to aggregate.
5. Select OK to begin the process.
You can also execute stratification rule either from SQL*Plus or from within a PL/SQL block OR from ICC Batch UI within OFSAAI framework.
To run the procedure from SQL*Plus, login to SQL*Plus as the Schema Owner. The function requires four parameters. Following is the syntax for calling the procedure:
declare
result number;
begin
---- Call the function
result := fn_insert_into_data_strat_tab(batch_id => :batch_id,
mis_date => :mis_date,
stratification_id => :stratification_id,
user_name => :user_name);
end;
batch_id: any string to identify the executed batch
mis_date: in the format YYYYMMDD
stratification_id: numeric system id of stratification rule
user_name: OFSAA user id of the user executing the function
Example:
declare
result number;
begin
---- Call the function
result := fn_insert_into_data_strat_tab(batch_id => 'abc',
mis_date => '20180601',
stratification_id => 123,
user_name => AUTOUSER);
end;
To execute the procedure from OFSAAI ICC framework, create a new Batch with task as TRANSFORM DATA and specify the following parameters for the task:
· Datastore Type: Select appropriate datastore from list
· Datastore Name: Select appropriate name from the list
· IP address: Select the IP address from the list
· Rule Name: Data_Stratification
· Parameter List: stratification_id, user_name
Figure 9:

After the Stratification rule execution is complete, you can compare balances from the source table and target table to ensure all data has been accounted for, i.e. the sum of current balance from source table should equal sum of current balance in the target table.
Once data has been populated and verified in the aggregation tables, it is ready for processing by the ALM and/or FTP applications. You can select either regular instrument tables or aggregate instrument tables in the ALM and TP Processes under Source Selection. You should select one or the other. Selecting both in the same process will lead to double counting of the balances.
The following aggregate tables are seeded with application data model:
|
# |
Logical name |
Physical table name |
|---|---|---|
|
1 |
Annuity Contracts Aggregate |
FSI_D_ANNUITY_CONTRACTS_AGGR |
|
2 |
Borrowings Aggregate |
FSI_D_BORROWINGS_AGGR |
|
3 |
Checking And Savings Accounts Aggregate |
FSI_D_CASA_AGGR |
|
4 |
Credit Cards Aggregate |
FSI_D_CREDIT_CARDS_AGGR |
|
5 |
Credit Lines Aggregate |
FSI_D_CREDIT_LINES_AGGR |
|
6 |
Guarantees Aggregate |
FSI_D_GUARANTEES_AGGR |
|
7 |
Investments Aggregate |
FSI_D_INVESTMENTS_AGGR |
|
8 |
Leases Aggregate |
FSI_D_LEASES_AGGR |
|
9 |
Loan Contracts Aggregate |
FSI_D_LOAN_CONTRACTS_AGGR |
|
10 |
Money Market Contracts Aggregate |
FSI_D_MM_CONTRACTS_AGGR |
|
11 |
Mortgages Aggregate |
FSI_D_MORTGAGES_AGGR |
|
12 |
Retirement Accounts Aggregate |
FSI_D_RETIREMENT_ACCOUNTS_AGGR |
|
13 |
Term Deposits Aggregate |
FSI_D_TERM_DEPOSITS_AGGR |
If you want to create a new aggregate table then, apart from basic instrument and leaf columns, the following mappings must be done in data model:
· Super-type
§ INSTRUMENT_AGGREGATE
§ INSTRUMENT_AGGREGATE_BASIC
· Table classification
§ EPM Aggregation (701)
This may be required when you create a custom instrument table and want to use stratification for it.