
Rate card functionality allows the user to select standard products for viewing in their daily FTP Rate report. Administrators schedule a daily FTP run for the selected set of standard products and end users can view daily rates for relevant standard products by defining their Daily rate card reports.
Rate cards are used for informational purposes only. They are used to give an idea of the prevailing transfer rates as per the current market scenario, before actual transactions take place unlike a Standard Transfer Pricing Process where a bank generally runs at the end of each month to generate Transfer Rates for each booked instrument record.
To understand the use case better, we can think of a situation where a user (Bank Personnel, Account officer etc.) wants to refer to the current cost of funds rate before the transaction rate is quoted. Having access to this up to date information allows the banker to be pro-active with their pricing decisions having full knowledge of the cost of funds and prospective rate spread before quoting a rate to the customer.
Topics:
· Setting up Batch Execution of Rate Card
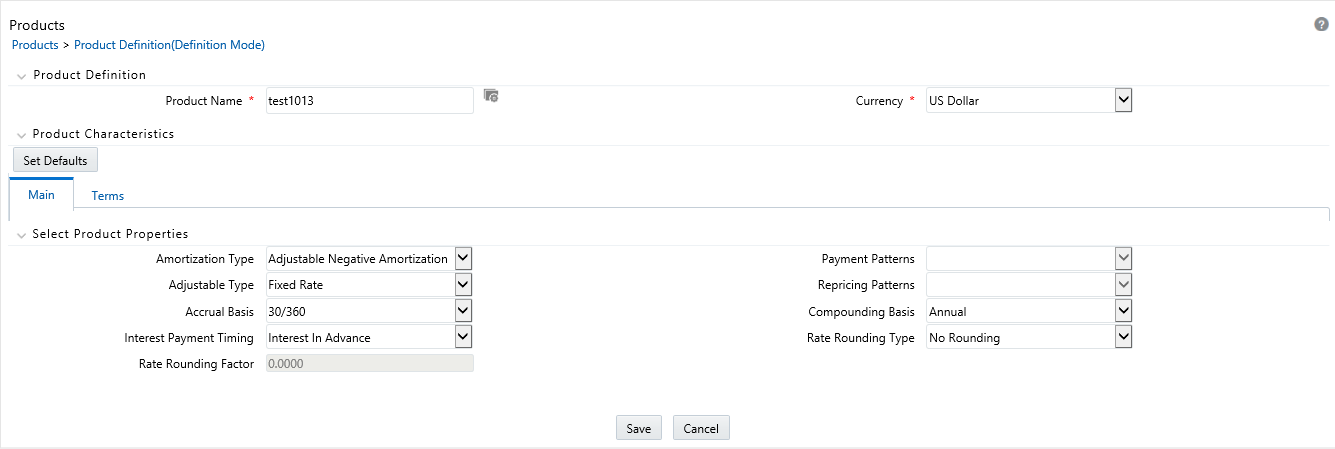
Product setup allows Administrators to define the default Product Characteristics for standard products. These assumptions will be defined for Products by the Administrator during the application setup through the provided user interface.
The Products window shows the list of default Product Characteristics for standard products and you can define the properties for them.
The procedure for working with and managing Products is similar to that of other Oracle Funds Transfer Pricing business rules. It includes the following steps:
· Searching for Products
· Creating a Product definition
· Viewing and Editing Product definitions
· Copying Product definitions
· Deleting Product definitions
As part of creating and editing Product definitions, the user defines the properties for applicable products.
Figure 1:
1. Navigate to FTP Rate Card> Products to access the Products window.
2. Click the Add icon to create a new Product definition.
The definition of Product is a part of the Create or Edit Product Definition page. When you click Apply or Save in the Create Product Definition page, the product definition is saved and the Product will be displayed in Product summary page.
|
NOTE |
Only those Products which are defined by the Administrator will be included in the daily FTP Rate Card Process and similarly, only defined products will be available to end users for Rate Card reporting. |
Figure 2:
Prerequisites
Performing basic steps for creating or editing a Product.
Procedure
This table describes the key terms used for this procedure.
|
Term |
Definition |
|---|---|
|
Product |
Provides a list of the “leaf” dimension members for the Product dimension selected in Application Preferences |
|
Currency |
The corresponding currency of the instrument to be priced. |
|
Set Defaults |
Select Set Defaults option, to restore default Product Characteristics |
|
Main Tab |
|
|
Amortization Type |
Select the Amortization Type. This defines the method by which an account's principal and interest will be amortized. The Default Amortization Type is "Non-Amortizing". |
|
Payment Patterns |
Optionally, select the Payment Pattern. This list is defined through Payment Pattern user interface. |
|
Adjustment Type |
Select the Adjustment Type. This selection indicates if the product is fixed rate or adjustable rate. The Default Adjustment Type is "Fixed Rate". |
|
Repricing Patterns |
Optionally, select the Repricing Pattern. This list is defined through the Repricing Pattern user interface. |
|
Accrual Basis |
Select the Accrual Basis. This is the basis on which the interest accrual is calculated. The default value is "Actual/Actual". |
|
Compounding Basis |
Select the Compounding basis. This selection indicates the compounding frequency used to calculate the interest income. The compounding basis for the interest payments can be monthly, annually, simple and so on. The default value is "Simple". |
|
Interest Payment Timing |
Define the Interest Payment Timing. You can pay the interest in Advance, Arrears. The default value is "Interest in Arrears". |
|
Rate Rounding Type |
Select the Rate Rounding Type to round off the Interest Rate. This selection indicates how the rate assigned to the product will be rounded. The default value is "No Rounding". |
|
Rate Rounding Factor |
Enter the rate rounding factor. If the Rate Rounding Type is Round Up, Round Down or Round Nearest, then rate rounding factor determines the precision of the rounding. The possible range of values for this is 0.0000 – 9.9999. The default value is 0.0000. This option is not applicable if Rate Rounding Type is selected as No Rounding. |
|
Term Tab |
|
|
Original Term |
Enter the Original Term to define the contractual term from the origination date. Note that it is possible to define more than one term for the selected product/currency. If more than one term is defined, then multiple records will be created for pricing, i.e. one corresponding to each Product/Currency and Term. |
|
Payment Frequency |
Enter the payment frequency. This allows you to define the frequency of payment. |
|
Repricing Frequency |
Enter the Repricing Frequency to define the frequency of rate change of a product. |
|
Amortization Term |
Define the assumed term used for payment calculation purposes. Typically, this will be equal to the Original Term of the instrument. It should only be different in cases where the instrument does not fully amortize over the life of the product. i.e. there is lump sum payment due on the maturity date. |
|
Interest Rate Code |
Enter the Interest Rate Code to be used for finding the coupon rate on the product. |
|
Margin |
Enter the margin that is the contractual spread, which is added to the pricing index and results in the financial institution's retention (net) rate. |
|
Rate Set Lag |
Define the period by which repricing lags the current interest rate changes. The default value is 0 Months. |
|
Tease Period |
Define the Tease Date, that is when the tease rate (introductory rate) ends and the normal product rate begins. The default value is 0 Months. This entry will be disabled if the Adjustable Type (defined from Main Tab) is a Repricing pattern or fixed. |
|
Tease Discount |
Enter the Tease Discount. The default value for tease discount is 0.0000. This entry will be disabled if the Adjustable Type is a repricing pattern or fixed rate or if the tease period is zero |
|
Commitment Start Date |
Commitment start date is defaulted to the system date. |
|
Commitment Term |
Enter the commitment period term in Days. Based on this input the commitment end date will be calculated. |
|
Commitment End Date |
Commitment end date is calculated automatically based on commitment start date and commitment term. |
1. Select a stand4ard Product using the hierarchy Browser.
Figure 3:

2. Select the corresponding currency.
3. Define the properties of the Product in the Main tab.
Figure 4:

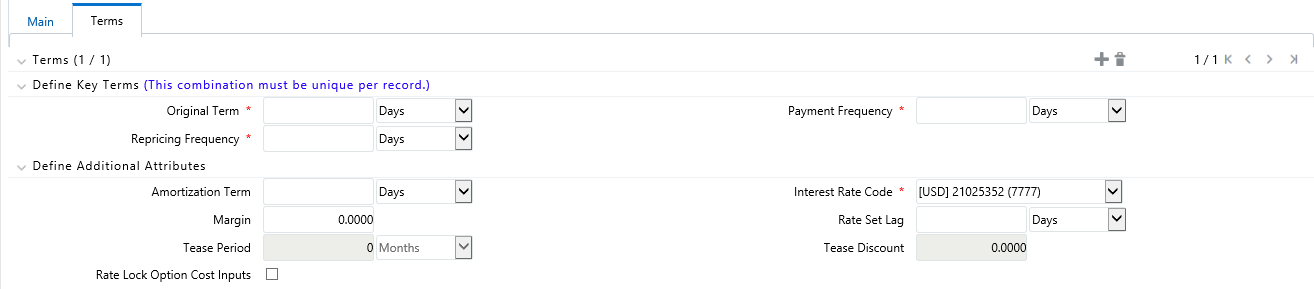
4. Define the properties of the Product in Terms tab.
Figure 5:
|
NOTE |
Under a single product/currency selection, users may define multiple combinations of Original Term, Payment Frequency and Repricing Frequency. This is done by adding records using the "+" icon. Multiple records are useful when generating daily pricing sheets, where the standard product has multiple terms. For example, the product could be "Term Deposits", but users may want to view the daily FTP Rates for each available term, for example, 3 month, 6 month, 12 month, 18 month, and 60 month. This example is possible by adding and defining 5 records under a single product/currency selection. For more information on the meaning of each of these fields, refer to Cash Flow Engine Reference Guide. |
5. Check Rate Lock Option Cost Inputs to setup and calculate Rate Lock Option Costs.
Figure 6:

6. Click Save.
|
NOTE |
On save of each Product (Main and Terms), one or more record(s) will be inserted in fsi_m_prod_characteristics table. When Multiple terms are defined for each product, multiple entries will be inserted into the fsi_m_prod_characteristics table. After the completion of first task tpol.sh run, fsi_pm_generated_instrmts table will be populated. |
In order for the defined Products to become “dummy” instrument records and for these records to be Transfer Priced, a Batch process is required. The following steps describe how to create the required batch process.
Create a Batch for running the daily FTP process against standard products. This process should be scheduled to run each day (or at any required frequency) by the Administrator after the daily FTP reference rates have been loaded.
1. Click the Batch Maintenance option under Operations.
Figure 7:
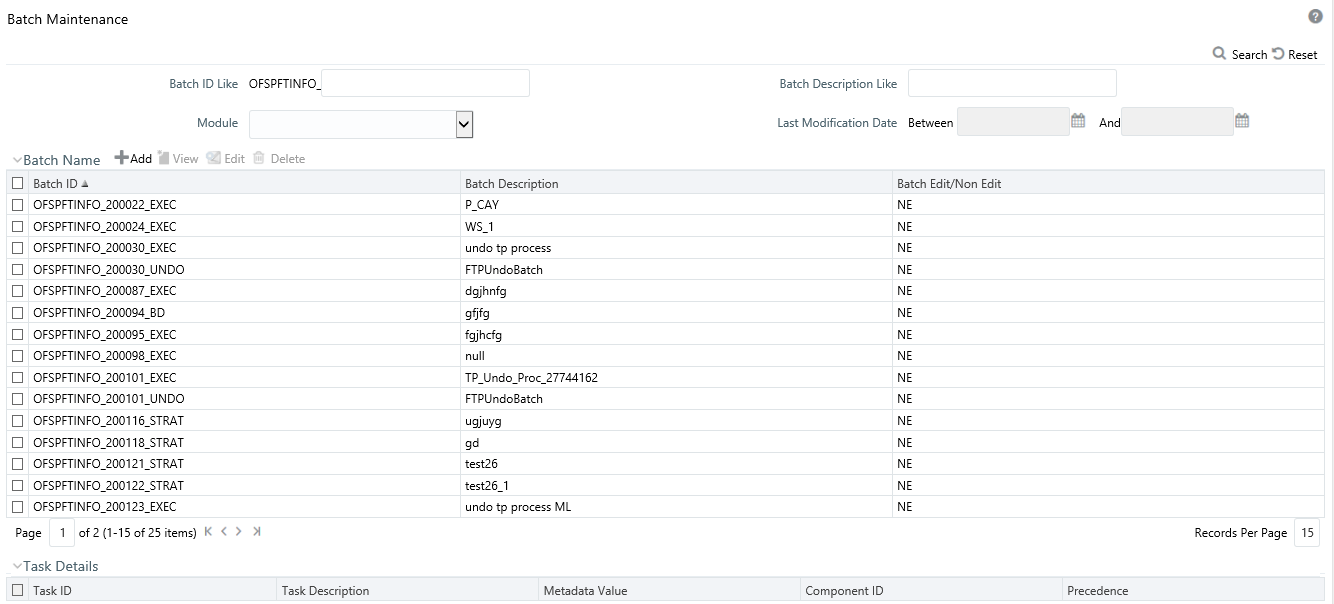
2. Click the Add icon to create a Batch for running the daily FTP process against standard products.
3. Enter the Batch Name and description. Select the Duplicate Batch and/or Sequential Batch option(s) if required. Click Save to save a Batch details.
Figure 8:

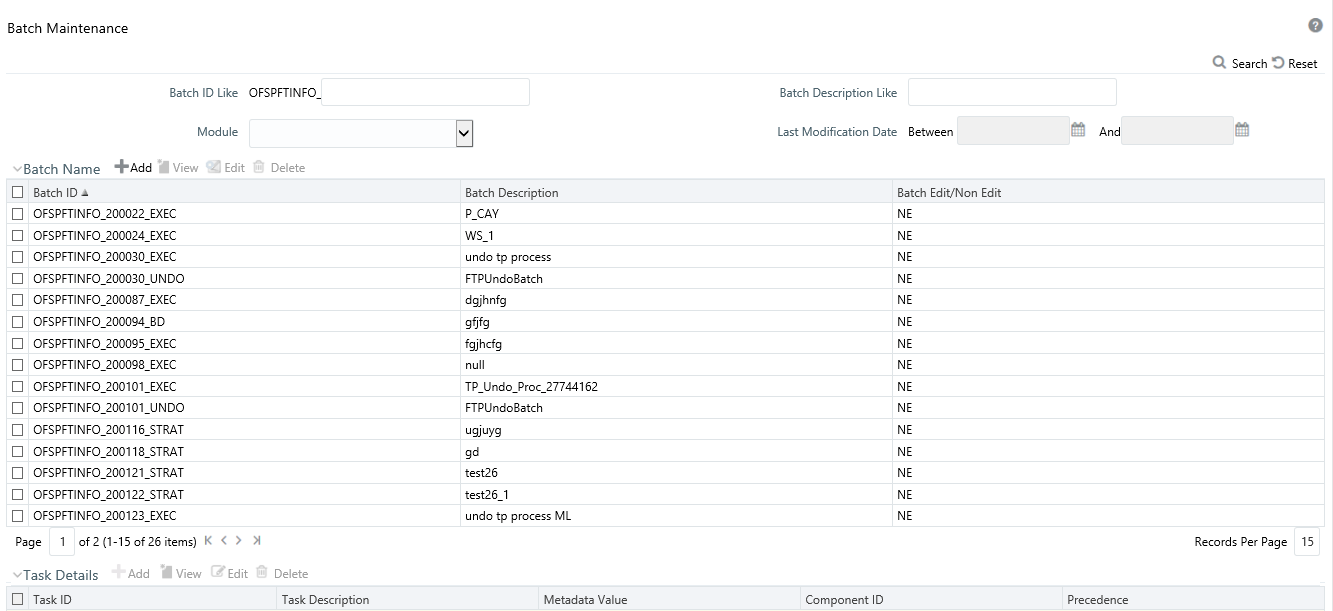
4. Search the created Batch using the Search criteria if required. Searched Batch will be displayed. Select the Batch to add the corresponding tasks to it.
Figure 9:
5. Click Add to add the first task to the Batch, and enter the task description for first Task in Task Definition box. Select the component "RUN EXECUTABLE".
Figure 10:

6. Enter the required parameters as follows:
|
Term |
Description |
|---|---|
|
Datastore Type |
Leave the default value of “EDW” |
|
Datastore Name |
Leave the default value |
|
IP Address |
Leave the default value |
|
Executable |
Input appropriate values for the following required parameters, tpol.sh, Product dimension number, System ID number for the TP process (for example, tpol.sh,3,300052) “tpol.sh” is the executable file for the first task. It takes process id and product dimension type as the input parameters. “tpol.sh” internally calls a java program which takes data from the UI tables and populates the FSI_PM_GENERATED_INSTRMTS table. Process_id parameter usage in the tpol.sh task: The Process ID is used to identify the instrument table (i.e. the PM Generated Instruments table) and fires a delete on this table prior to processing. This process will work only for FSI_PM_GENERATED_INSTRMTS table, as it uses an explicit request_id which is null. This column is available only in the FSI_PM_GENERATED_INSTRMTS table. While generating the “dummy” instrument records, the tpol.sh process picks up data from Product Characteristic table but also joins to the process. It generates the instruments only if a TP rule is attached to the Process. |
|
Wait |
Y |
|
Batch Parameter |
Y |
Here, the name of Executable file is "tpol.sh". Following Product Dimension types are supported here:
§ 2 – General Ledger
§ 3- Common COA
§ 4- Product
7. Click Add to add the second task to selected Batch, and enter the description for second task in Task Definition page. Select the component of task as "Transfer Pricing Engine". This process will execute a TP engine run, reading the instrument data from the FSI_PM_GENERATED_INSTRMTS table and will update the Transfer Rate column with the calculated result.
|
NOTE |
Users must first create a Standard TP Process for selection in this batch. The TP Process should include the “PM Generated Instruments” table under Source Selection. The calculated items should include all relevant rate calculations, such as Transfer Rate and Adjustment Rates. |
8. Enter the required parameters as:
§ Folder: Select the folder in which the definition of the process that has to be scheduled for execution is lying.
§ Process Type: The Process type can be Standard or stochastic
§ Process Name: The Process Name should be defined for process metadata value (system ID of process) which is defined in Task 1 under Executable parameter.
§ Optional Parameters
9. Click Add to add the third task to selected Batch, and enter the description for third task in Task Definition page. Select the component of task as "Transform Data". This process will populate the FTP rate from fsi_pm_generated_instrmts table to the FSI_M_PROD_TRANSFER_RATE table, which is the source table for Rate Card reporting.
Figure 11:

10. Enter the required parameter details as:
§ Rule Name: DT_POPULATE_PM_TRANS_RATE_T_1
§ Parameter List
11. Define the precedence of the tasks. That is, Task 2 should be executed after Task 1, and Task 3 should be executed after Task 2.
Figure 12:

12. Click the Batch Execution option under Operations, to execute the Batch, Select the Batch which you want to execute using search criteria. Select the Batch using the corresponding check-box.
Figure 13:

13. You can also use the Schedule option if you want to schedule a Batch for later or recurring processing. Click Execute Batch. A message will be displayed: Batch Triggered Successfully.
14. Click Ok.
15. To view the Batch Processing Report, click the Batch Processing Report option under Operations. Expand the Execution Date.
Figure 14:

At this point, “dummy” instrument records will have been generated, the records will have been transfer priced, inclusive of both base TP Rates and any Add-on Rates defined through an Adjustment Rule, and the results will have been moved into the Rate Card reporting table and will be available for reporting.
The Rate Card window allows users to select the set of standard products and the relevant historical date range to include in their report.
The Rate Card contains a Rate report definition page and a Report page. The Rate report definition includes the name of the Rate report, the historical time horizon for reporting and the set of standard products for which the user wants to fetch the rates.
The report contains eight columns including the calculated base Transfer Rate and remaining term Transfer Rate, as well as relevant product characteristics defined for the respective standard products.
The procedure for working with and managing Rate Report is similar to that of other Oracle Funds Transfer Pricing business rules. It includes the following steps:
· Searching for Rate Reports
· Creating Rate Report
· Viewing and Editing Rate Report
· Copying Rate Report
· Deleting Rate Report
As part of creating and editing a Daily Rate Report, the user defines the products and historical date range.
Figure 15:

To create a new Rate card, do the following:
1. Navigate to FTP Rate Card-> Rate Report.
2. Click the Add icon.
Figure 16:
Prerequisites
Performing basic steps for creating or editing a Rate Card
Procedure
This table describes key terms used for this procedure.
|
Term |
Definition |
|---|---|
|
Rate Report Definition |
Enter the Rate Report name |
|
Description |
Enter the description of Rate Report |
|
Folder |
Select the Folder name |
|
Access Type |
Select the Access type of Rate Report as Read/Write or Read Only |
|
Date Range |
Select the date range for which you want to view the daily FTP rates. Here, you can give the specific date range also. The FROM and TO options will be enabled once you select the Specific Date Range option from Date Range drop-down list. |
|
Product Selection |
Click Product Mapping button to select the relevant standard products to be included in your pricing report. |
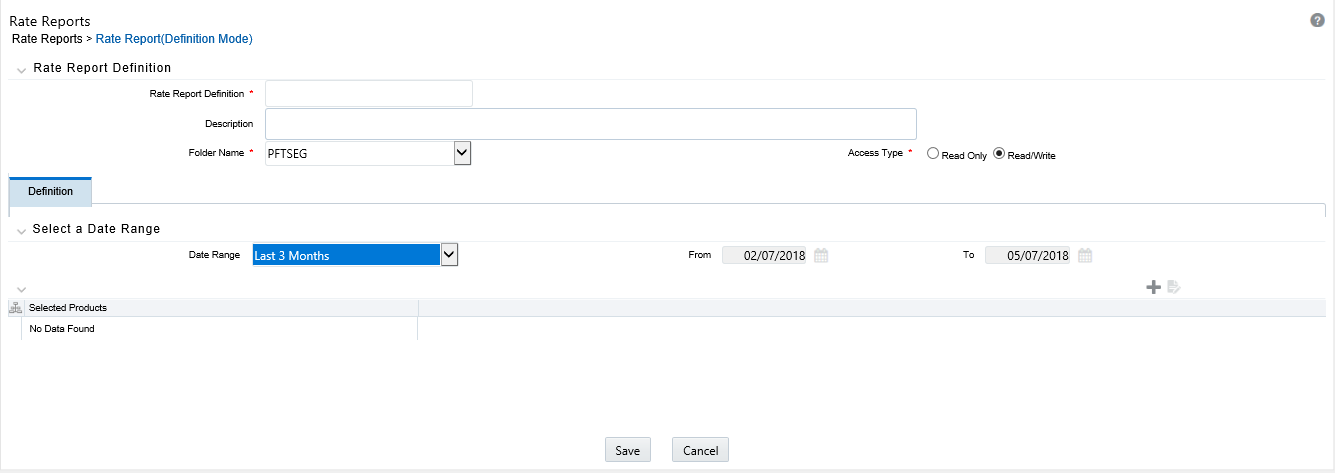
1. Enter the Rate Report name and Description.
2. Select the Folder Name and Access Type details.
Figure 17:

3. Select the Date Range.
4. Select the Product(s) from hierarchy browser using the Add icon. This hierarchy browser will have the list of defined standard products (as setup by the Administrator).
Figure 18:

5. Click Save.
You will be directed back to Rate Report Summary page and defined Rate Report will be displayed in Rate Report Summary page.
Rate Card report is available upon successful completion of the pricing run. To access a Rate Card Report, follow the steps given below:
1. Select the Rate Report Name using the corresponding check box and click the  icon.
icon.
Figure 19:

Rate Card report is displayed.
Figure 20:
