When all the required assumptions are defined, BSP Processing generates a result set for the current position forecast based on your account-level detail data. Once a BSP System Administrator has generated a current position result set, that data can be passed into any Forecast Set on Initialization. For details on Forecast Sets and Initialization, see the BSP Planning Administrator and Planning Analyst User Guide.
The OFSAA Cash Flow Engine can generate four different kinds of process rules to support four different types of forecasting.
NOTE: Static Deterministic Process: Static Deterministic Simulation of the current book of business.
· Dynamic Deterministic Process: Dynamic Deterministic Simulation of the current book of business and a new business forecast.
· Static Stochastic Process: Static Stochastic (probabilistic) Simulation of the current book of business.
· Dynamic Stochastic Process: Dynamic Stochastic (probabilistic) Simulation of the current book of business and a new business forecast.
Of these four types, BSP only supports Static Deterministic Processes.
In BSP, Dynamic Deterministic Simulation is provided whenever a Planning Administrator or a Planning User requests Cash Flow processing of a BSP forecast so there is no UI provided that allows a BSP System Administrator to build a Dynamic Deterministic Rule. Stochastic Processes are not included because they are inherently probabilistic.
·
All the above four kinds of simulation are included with OFSAA Asset Liability Management.
This chapter covers the following topics:
NOTE: Overview of BSP Processes
BSP Processes allow you to perform the following tasks:
· Determine the data that you want to process (Product Hierarchy block).
For BSP processing, you must select the Product Hierarchy method and you must use the Product-Instrument Map.
· Submit to the BSP Processing Engine the financial element results you want to calculate: (Calculation Elements).
· Specify to the BSP Processing Engine the product characteristics, prepayments, and forecast assumptions to be used in the process (Rule Selection blocks).
· Specify the Forecast Rate Scenario you want to include.
·
BSP does not support Stochastic processing and so does not utilize Rate Index Rules.
NOTE: Define the output dimension and what additional attributes you want to be updated at the instrument level (Output Preferences Block).
·
For BSP, you must select Product/Org/Currency. Additionally, note that BSP does not support instrument-level outputs.
NOTE: Enable the output of Detailed Cash Flows or Forecast Interest Rates for audit purposes (Audit Options block).
· Define the processing parameters for a reprocess on an existing run or an entirely new process (Processing Parameters Block).
· Formulate and execute the BSP Processing request and generate results (BSP Process Summary Page).
Following icons are available on the Process Summary Grid:
· Add: Click Add to begin the process of building a new BSP Process Rule. The Add icon is disabled if any rows in the summary table are selected.
· View: Select a single row in the summary table to enable the View icon. The View control allows you to view the contents of a Process on a read-only basis. The View control is only enabled when a single Process Rule has been selected.
· Edit: Select a single row in the Summary Table that enables the Edit icon. Click Edit to modify an existing Process rule. The Edit icon is only enabled when a Single Process Rule is selected.
· Copy: Select a single row in the Summary Table to enable the Copy icon. Click Copy to create a copy of an existing Process Rule. The Copy icon is only enabled when a single Simplified Batch is selected.
· Check Dependencies: Select a Process rule and then click Check Dependencies to generate a report on all rules that utilize your selected Interest Rate Curve.
The Check Dependencies icon is only enabled when a process is selected.
· Delete: Select one or more rows in the Summary Table to enable the Delete icon. Click Delete to deletes the process rules that are selected.
· Execute: Select a single row in the summary table to enable the Execute icon. Click Execute to execute the selected process. The Execute icon is only enabled when a single Process rule is selected.
· Refresh: Click Refresh to refresh the Process Rule Summary Page.
To define a BSP Process Rule, complete the following steps:
· Navigate to Balance Sheet Planning > BSP Processing > Static Deterministic Process.
1. From the Summary Page, click the “Add New” icon.
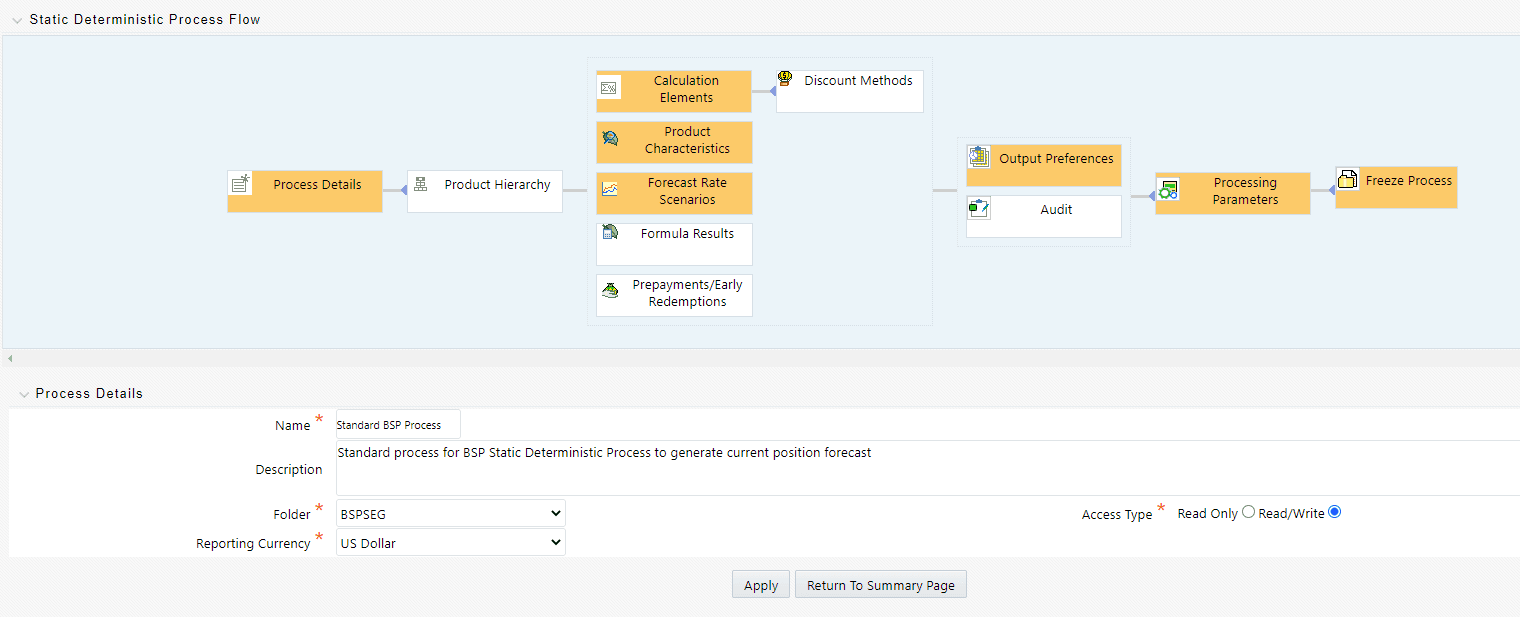
2. The process will take you through a series of required steps to define the flow depending upon what type of process you selected. For each of the blue highlighted boxes in the process flow area, you are required to make a selection.
3.
The gray boxes are optional but will affect the result set if defined.
BSP Static Deterministic Processes operate on instrument-level data to generate outputs based on a set of User-defined Forecast Rate Scenarios. BSP Static Deterministic Processes only generate information about current position instrument data; they do not generate any forecast data related to new business. In BSP, new business forecast outputs are generated within Dynamic Deterministic Processes that are executed from BSP's Planning User Interfaces.
NOTE: Fill in the necessary details in the Process Details Block:
1. Name
§ Folder and Reporting Currency from respective drop-down menus
§ Click “Apply”. The process will take you to the Product Hierarchy selection options.
§ In the product Hierarchy Block:
2. Select a Product Hierarchy and select nodes from the hierarchy corresponding to data you want to include in the process,
OR
Select a Product Hierarchy and select nodes from the hierarchy corresponding to data you want to include in the process. For BSP, you generally will want to select the root or "Total Rollup" of your chosen Product Hierarchy. If you select lower-level nodes within the hierarchy, you will be filtering out some data and so will not be processing 100% of your current position data.
a.
You must use the Product Hierarchy Method of selection and you must utilize the Product/Instrument Map approach. For BSP, the Source Selection Button which allows you to select named instrument tables is not supported.
NOTE: Select a Filter (optional), to further constrain the data to be included in the process. Filters work as a secondary constraint, applied after the data set is determined based on Product Hierarchy Member Selection. For BSP, you generally will not want to add any filters to the process.
b.
Do not use Default Product Member (value of -1) within a Product Hierarchy, for Processing. For example, if the process is running on Product Hierarchy of Common Chart of Account, do not use the default chart of Account Member of -1.
There are four types of filters:
NOTE: Data Element Filter
— Hierarchy Filter
— Group Filter
— Attribute Filter
—
Before using the Product Hierarchy approach for selecting data to include in your process, there is a procedure that must be run ("PRODUCT TO INSTRUMENT MAPPING"). This procedure can be executed from the Batch Scheduler – Run - interface.
The purpose of the Product to Instrument Mapping Procedure is to scan all instrument tables (FSI_D_xxx) and populate the mapping table ( "FSI_M_PROD_INST_TABLE_MAP" ) with a listing of the Product Dimension Members that exist within each instrument table. When you select Products (parents or children) within an ALM or FTP Process Definition, the process refers to this mapping table to identify the instrument tables to include in the process.
It is recommended that you establish an internal process whereby this procedure is executed after every data load to ensure that mappings are up to date.
Related Topics: For more information on the Product to Instrument Mapping Procedure, see Oracle Financial Services Analytical Applications Data Model Utilities User Guide.
NOTE: Select Apply.

c. Calculation Elements – The boxes in blue with the yellow highlight are required for the definition of the process.
3. In the Calculations Elements Block, select either the Generated aggregated cash flow results or Stop at the Process cash flows option. By default, the Generated aggregated Cash Flow option is selected and required for most BSP Results Processing. The Stop at the Process Cash Flows option is only used when you do not require the aggregated results and wish to only compute detailed cash flows in the FSI_O_PROCESS_CASH_FLOWS Table. This is used by users who integrate with Liquidity Risk Management and need to create cash detailed flow output for a large number of instrument records. In this case, the aggregate output is not needed. The Stop at Process Cash Flows option does not write to the Result Detail or Result Master tables that BSP requires.

a. Choose the optional transfer pricing calculation elements to include in the Process Run: Transfer Pricing folder and rule plus TP Adjustments Folder and Rule.
Market Value, YTD, Duration, DV01/PV01, Repricing Gap, Liquidity Gap, and Average Life calculations are not supported in BSP. These options should not be selected.
b. Repricing GAP is not supported in BSP
c. Liquidity Gap and Average Life options are not supported in BSP.
d. Embedded Option Decisioning is not supported in BSP.
e. The Calculate Option Market Value option is not supported in BSP.
f.
For details on the options not supported by BSP, see the OFSAA ALM User Guide.
NOTE: Click Apply.
g. Click the Prepayments/Early Redemptions box and choose the defined prepayment rule (see Prepayment Rules ). This is an optional step.
h. Product Characteristics: From the Product Characteristics bar, select the desired definition and click Apply (see Product Characteristics, for rule definition). The process flow will now take you to Forecast Rate Scenarios.

4. Forecast Rate Scenarios
5. Select the Forecast Rates rule you want to be applied to the process (see Forecast Rate Scenarios for details on setting up Rate Scenarios).
a.
Including Prepayments Rules and Prepayment Runoff in your process is optional but is standard for most BSP implementations.
NOTE: Click Apply. If you have chosen Runoff Components among your Calculation Elements in step (3) above, the flow will now take you to Prepayments/Early Redemptions.
If you have not chosen Runoff Components among your Calculation Elements in step (3) above, the flow will take you to step (8): Output Preferences.

b. Formula Results: Formula Results are not supported in BSP.
6. Prepayments/Early Redemptions:
7. Choose a defined prepayment rule (see Prepayment Rules for details). Note that the prepayments are optional.
a. Click Apply.

b. Output Preferences:
8. Select the Output Dimension from the drop-down list (Options include Product, Product/Currency, Organization/Product, Organization/Product/Currency). For BSP, you must select Organization/Product/Currency.
a. You may select to update your instrument data with Macaulay Duration and/or Modified Duration. If you update your instrument data with these calculations, BSP will never utilize them directly.
b. BSP does support any of the other Output Preference Items.
c. Click Apply. The process will take you to the Processing Parameters Section or you can optionally click the Audit Box. If no audit options are required, skip to step #10, Processing Parameters.

d. Audit Preferences
9. Detailed Cash Flows:
Check the box to record the Cash Flows and repricing events occurring for the desired number of records processed. For each record, daily results are written to the FSI_O_PROCESS_CASH_FLOWS table. The data in this table uses the RESULT_SYS_ID, which identifies the Process used. Select from the options below:
If you have selected Detailed Cash Flow outputs, then you must select either ‘Number of Records to be Output’ or ‘All Records’.
In the financial elements tab below, you have the option to select the FE's you want to output in the detail cash flows table. Highlight the items in the available section and move the selection over to the selected section.
a. Tiered Balance Cash Flows:
BSP does not support Tiered Balance Cash Flows.
b. Forecast Rates
Select Forecast Rates to write forecast exchange, interest rates, or economic indicator results to the following tables: FSI_EXCHANGE_RATES_AUDIT, FSI_INTEREST_RATES_AUDIT, and/or FSI_ECONOMIC_INDICATORS_AUDIT. For more information on the table structures, see the Oracle Financial Services Analytical Applications Data Model Data Dictionary.
Highlight items from the available code section for the desired forecast type (Interest Rate, Exchange Rate, or Economic Indicator) and move selection (or all) to the selected items box.
c. Click Apply. The process flow will take you to Processing Parameters.
d. Processing Parameters
10. The processing parameters allow you to run an entire process or re-process a portion of an existing run. For BSP, you will generally want to Run the Entire Process. From the drop-down list, select Entire Process or Selective Reprocess.
a. If Selective Reprocess is selected, you can click the box “Current Position Data” to reprocess that particular data set. With selective reprocessing, you can run a subset of the process to replace invalid products and to add new products. With Selective Reprocess, the Reprocessing components are enabled to selected components for reprocessing. When the Process Rule is executed, the data in the result tables are not immediately deleted. The data for the selected subset is replaced, but the rest of the results remain intact.
b. Select the desired product Hierarchy Filter from the drop-down list to indicate which products should be re-processed.
c. Click Apply and the screen will take you to the Freeze Process Section.

d. Freeze Process
11. Select Freeze to complete the process.
a. Select Reset to erase all selections made previously within the process definition flow.
b. Select Confirm.

To run a Process ID, follow these steps:
c. Choose Process/Run from the list under the process bar.
1. Click the Run icon to execute the process.
2. A popup window will appear including the execution ID. Click OK.
3. When a process is running the status bar will show one of the following three values: success, failure, and processing.
4.
The process must be defined completely.
NOTE: When the Status "View Log" appears, the run is complete.
5.
Click the refresh grid button to see the change in status.
NOTE: Click the "View Log" status to ensure the Run was complete.
6. To view the error log, click the "Task ID" number on the View Log Page.