This section contains information about the Hedge Management Effectiveness Process
Topics
Overview of Effectiveness Process
HM Effective Processes allow you to perform the following tasks:
· Determine the name, location, and access type of process rule that you want to perform (Process block).
· To select the Hedge definition (Hedges block).
· Submit to the HM engine the prospective and retrospective processing types.
· Formulate and execute the HM processing request and generate results (HM Process Summary Page).
The hedge Creation process consists of the Hedge Definition UI in the OFS HM application. This UI component are detailed in the following sections.
Topics
Checking Dependencies of a Hedge Definition
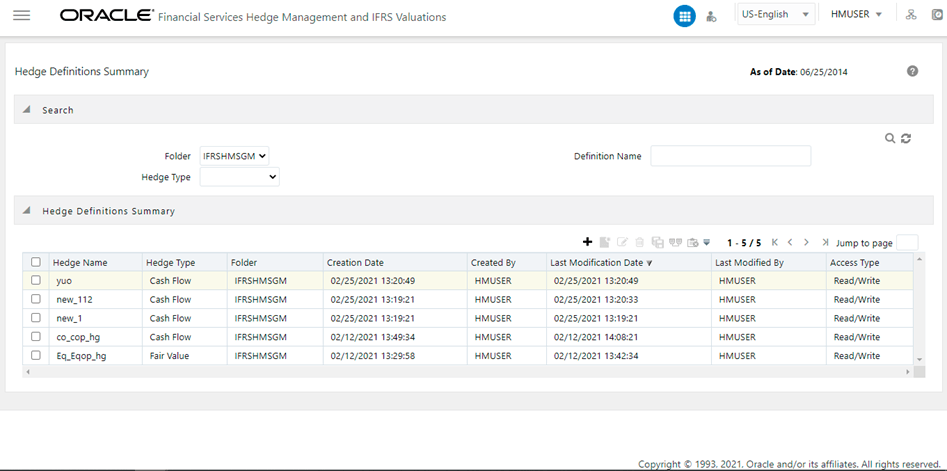
You can access the Hedge Definitions section by clicking the Hedge Definitions link present under the Hedge Management menu in the LHS of the OFS HM application. Upon clicking this link, the Hedge Definitions Summary page is displayed with a list of all the existing definitions.
Figure 11: The Hedge Definition Summary pane
These definitions are listed with the details such as Hedge Name, Hedge Type, Folder, Creation Date, Created By, Last Modification Date, and Last Modified By.
You can search for existing definitions using the search parameters such as Folder, Definition Name, or Hedge Type and by clicking the Search button. On performing a search operation, only those definitions that match with the search criteria are displayed in the Hedge Definitions grid.
To create a Hedge Definition, perform the following procedure:
1. Click the Add button from the Hedge Definitions pane to open the Hedge Definition window.
Figure 12: The Hedge Definition window
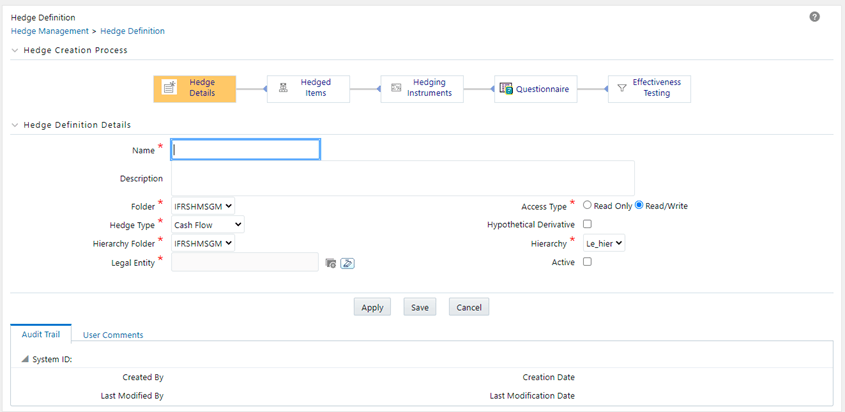
2. Enter the details in the Hedge Definition Details pane, as tabulated:
Field |
Description |
|---|---|
Name* |
Enter the name of the Hedge Definition. |
Description |
Enter the description of the Hedge Definition. |
Folder* |
Select the folder from the drop-down list. Folders are segments present in the selected Information Domain. |
Access Type* |
Select the access type as either Read Only or Read/Write by selecting an appropriate radio button. This selection determines whether the definition should be made available for edit at a later point in time. |
Hedge Type |
Select the hedge type from the drop-down list. The Available values are the following: · Cash Flow · Fair Value · Net Investment Choose the Hedge Type appropriately, that is in line with the accounting policies of the financial institution. Note: These options influence the computation logic. And the accounting adjustments are based on the selection made here. |
Hypothetical Derivative |
Select the checkbox adjacent to this field, if Hypothetical Derivative is a part of the hedge. If this option is checked, then the definition is created for a Hypothetical Hedge. |
Hierarchy Folder |
Click the drop-down list adjacent to this field and select the folder. |
Hierarchy |
Click the drop-down list adjacent to this field and select the hierarchy. |
Legal Entity |
Click the Browse button adjacent to this field and select a legal entity from the Hierarchy Browser window. List of Hedge Segments in Hedged Items selection process and Hedge Instruments in Hedged Instruments selection process are displayed according to the selected Legal Entity. |
Active |
Select the checkbox adjacent to this field to mark the Hedge Definition as active. This field is used for Batching/Scheduling. The Hedge definition Batching functionality considers only 'Active' Hedge definitions. |
3. Click the Apply button to save the changes.
4. Click the Save button to save the definition and close the window.
5. Click the Hedged Items process from the Hedge Creation Process grid.
6. Select the Definition Type as either Hedge Segment or Hedge Instruments.
This allows you to create a hedge either on a Segment (Portfolio) basis or on an Instrument basis.
Depending on this selection, the Hedged Items or Hedged Instruments grids are displayed.
7. Enter the percentage to be hedged in the text field adjacent to the Percentage to be Hedged field.
Permitted values are numeral from 1 to 100 without any decimals. If this field is not specified, upon Effectiveness Testing execution, this is treated as 100% and not as NULL.
Depending on the definition type you have selected, fields in Hedged Items or Hedged Instruments grids are displayed.
To add Hedge Items to the definition, perform the following procedure:
1. Click the Add button from the Hedged Items grid to open the Hedge Segments window appears with the list of existing Hedge Segments. Here you can search for segments using ID, Name, and/or Type.
Figure 13: The Segments window

2. Select the checkbox adjacent to the Segment ID of the Hedge Segment you want to select and click the Apply button.
The selected segments are displayed with the details such as Segment ID, Segment Name, and Segment Type.
The available Instrument Types are Annuity Contracts, Bonds, Borrowings, Commodity, Credit Lines, Currency, Deposits, Equity, Leases, Loan Contracts, Money Market Contracts, and Retirement Accounts.
To add Hedge Instruments to the definition, perform the following procedure:
3. Click the Add button from the Hedged Instruments pane.
You have to select an instrument type that you want to search for. Depending on the selection, the search parameters are disabled if they are not relevant for the selected Instrument Type. To use the Time to Maturity search option, you need to specify the band from the drop-down list and the date as to which the application has to bucket records into the selected maturity band.
The Hedge Instruments window is displayed with the list of existing Instruments available for Hedging.
You can search for Instruments using Instrument Type, Product, Instrument ID, Party Type, Instrument Name, and Account ID.
You can also use the Advanced Search feature by clicking the Advanced Search button and entering the details such as Issuer Type, Issuer, Party, Country, Instrument Rating, Counterparty Rating, Restructured, Currency, Benchmark Ref, Time to Maturity, Folder, and Filter Type.
The results are displayed in Select Instruments to be Hedged pane with the details such as Instrument Id, Account ID, Instrument Name, Product, Currency, and Benchmark Ref.
4. Select the checkbox adjacent to the Instrument ID of the Hedge Instrument you want to select and click the Apply button.
The selected Instruments are displayed with the details such as Account ID or No, Product, Party, Instrument Name, and Currency.
Note: If you switch between the Hedge Segments and Hedge Instruments tab, then contents in the pane will be reset.
5. Click the Hedging Instruments process from the Hedge Creation Process grid.
6. Click the Add button from the Hedging Instruments grid.
The Hedge Instruments window is displayed with the list of existing Hedge Instruments.
You can search for Instruments using Instrument Type, Product, Instrument ID, Party Type, Instrument Name, and Account ID, Issuer Type, Issuer, Party, Country, Instrument Rating, Counterparty Rating, Restructured, Currency, Benchmark Ref, Time to Maturity, Folder, and Filter Type.
The results are displayed in the Select Instruments to be Hedged pane with the details such as Instrument Id, Account ID, Instrument Name, Product, Currency, and Benchmark Ref.
The available Instrument Types are Bonds Futures, Bonds Options, Commodity Futures, Commodity Option, Cross Currency Swap, Currency Forwards, Currency Futures, Currency Option, Equity Futures, Equity Option, and Interest Rate Swap.
7. Select the checkbox adjacent to the Account ID/No of the Hedge Instrument that you want to select and click the Apply button.
The selected Instrument is displayed with the details such as Account ID/No, Instrument Name, Maturity, Underlying Quantity, Currency, Benchmark Ref, and an option to select the Risk Type.
Note:
§ Hedge Risk Type selection is used only for reporting purposes.
§ You cannot select multiple Risk Types for an Instrument Type. The only exception is Cross Currency Swap Instrument Type, where multiple Risk Types can be added in a single definition.
§ On a subsequent date, it is advisable not to include a Hedging Instrument that is already part of another Hedge definition designated on an earlier date unless you want to terminate the former Hedge definition.
8. Click the drop-down list in the Risk Type column and select the type of risk that is being covered in the hedge relationship. Available options are the following:
§ Currency Risk
§ Interest Rate Risk
§ Credit Risk
§ Liquidity Risk
§ Price Risk
§ Volatility Risk
Note:
§ Some instruments may appear in the Search grids of both Hedged Items and Instrument Types windows, to be potentially picked up for inclusion in the definitions. This is due to Segments that the application does not read into individual instruments for the mutual exclusive logic to work. However, if such a scenario exists, Effectiveness Testing logic will enforce mutual exclusivity by excluding such common instruments/accounts from the Hedged Items, during processing.
§ Hedge Risk Type is a new Dimension type. You can define new Members to this Dimension type through Dimension Management > Members module.
9. Select the checkbox adjacent to a Hedging Instrument and click the Hedge Recommendation icon to select the recommended hedge.
The Hedge Recommendation window is displayed. This window displays Hedged Instruments and Hedging Instruments.
10. Click the drop-down list adjacent to the Risk Type field and select the type of risk. Available options are:
§ Currency Risk
§ Interest Rate Risk
§ Price Risk
11. Click the Search button to view the Hedged Instruments and corresponding Hedging Instruments.
You can use the Next and Previous buttons to move back and forth between Hedged Instruments.
12. Select the required Hedged Instruments and Hedging Instruments before clicking the Apply button.
13. Click the Questionnaire process from the Hedge Creation Process grid.
The Generic Questions are displayed under the Credit Risk Dominance Assessment grid.
14. Select the answers as either Yes or No by clicking appropriate radio buttons.
15. Click the Apply button.
The Questionnaire is saved.
16. Click the Save button to save the definition and close the window.
17. Click the Effectiveness Testing process from the Hedge Creation Process grid.
18. Populate the form under Choose Effectiveness Testing Parameters grid, as tabulated:
Field |
Description |
|---|---|
Fair Value Determination Run Definition Folder |
Click the drop-down list and select the required folder from the list of folders. |
Fair Value Determination Run Definition |
This field displays the definitions, depending on the folder you have selected in the Fair Value Determination Run Definition Folder field. Click the drop-down list and select the required definition from the list of definitions. |
Qualitative Parameters |
|
Credit Risk Dominance Assessment |
Select the checkbox adjacent to this field if you want to perform a Credit Risk Dominance Assessment. |
Critical Terms Match |
Select the checkbox adjacent to this field if you want to perform Critical Terms Match. |
Quantitative Parameters |
|
Measurement Methodology |
Select the checkbox adjacent to the required measurement methodology. Available values are the following: · Prospective Cash Flow Based · Retrospective · Scenario-Based |
Base value to be used for Options |
Select the radio button adjacent to Intrinsic Value or Fair Value. Note: This option is available only for instrument type Options. The Intrinsic Value is the difference between the price of the underlying (for example, the underlying stock or commodity) and the strike price of the Option. Any premium that is more than the option's intrinsic value is referred to as its time value. |
Base value to be used for Currency Forwards |
Select the radio button adjacent to Spot Element Value or Fair Value. Note: This option is available only for instrument type Currency Forwards. |
Hedge Ratios |
The following needs to be selected to calculate Hedge Ratio. Hedge Ratios are mandatory. |
Computation Type |
Click the drop-down list and select the required computation type from the list. Available values are the following: · Cumulative · Net |
Prospective Hedge Ratio Methodology |
This field is enabled only if you have selected Prospective as the measurement methodology. Click the drop-down list and select the required Prospective Hedge Ratio Methodology from the list. Available values are the following: · Dollar Offset · Regression If you select Regression as the Hedge Ratio Methodology, you have the option to select the checkbox adjacent to the Make intercept zero fields to compute the Hedge Ratio from the line of best fit (slope) by forcing the intercept to be Zero. Also, select the Confidence Level from the drop-down list. Confidence Levels are required to perform the F-Test. Available values are the following: — 1 % — 2.5 % — 5 % — 10 % To include more confidence levels, reach out to Oracle support. · Variability Reduction |
Retrospective Hedge Ratio Methodology |
This field is enabled only if you have selected Retrospective as the measurement methodology. Click the drop-down list and select the required Retrospective Hedge Ratio Methodology from the list. Available values are the following: · Dollar Offset · Regression If you select Regression as the Hedge Ratio Methodology, you have the option to select the checkbox adjacent to the Make intercept zero fields to compute the Hedge Ratio from the line of best fit (slope) by forcing the intercept to be Zero. Also, select the Confidence Level from the drop-down list. Confidence Levels are required to perform the F-Test. Available values are the following: — 1 % — 2.5 % — 5 % — 10 % To include more confidence levels, reach out to Oracle support. · Variability Reduction |
Scenario Hedge Ratio Methodology |
This field is enabled only if you have selected Scenario Based as the measurement methodology. Click the drop-down list and select the required Scenario Hedge Ratio Methodology from the list. Available values are the following: · Correlation · R Square |
Economic Relationship |
Select the checkbox adjacent to the Economic Relationship field, if you want to calculate the economic relationship using Prospective, Retrospective, Scenario-Based, or all three methods. |
19. Click the Apply button to apply the changes. The Apply function saves the data and retains the window open for further operations.
20. .Click the Save button to save the changes. Once saved, the definition is displayed in the Hedge Definitions grid of the Hedge Definitions Summary window.
The Audit Trail section at the bottom of the Hedge Definition window displays the metadata related to the definition such as Created By, Creation Date, Last Modified By, and Last Modification Date with a System ID. The User Comments section facilitates you to add or update additional information as comments.
For more information on Segmentation Run, see the Segmentation Run chapter.
The View feature enables you to view the details of an existing Hedge definition. To view the definition details, perform the following procedure:
1. Select the checkbox adjacent to the Hedge definition name, which you want to view, in the Hedge Definitions grid.
2. Click the View button.
The Hedge Definition window is displayed in view mode with the definition details.
In View mode, you cannot add or edit any of the fields.
The edit feature enables you to update the details of an existing Hedge definition. To edit an existing Hedge definition, perform the following procedure:
1. Select the checkbox adjacent to the Hedge definition name, which you want to edit, in the Hedge Definitions grid.
2. Click the Edit button.
The Hedge Definition window is displayed in edit mode with the definition details.
3. Update the required fields of the definition.
4. Click the Save button to save the definition details.
The saved definition is displayed under the Hedge Definitions grid in the Hedge Definitions Summary window.
You can copy the details of an existing Hedge definition and create a new definition by changing the Name and Description, from the Hedge Definitions Summary window.
To copy the details of an existing Hedge definition, perform the following procedure:
1. Select the checkbox adjacent to the Hedge definition you want to copy.
2. Click the Copy button from the Hedge Definitions grid.
The Save As window is displayed.
3. Enter a name for the Hedge definition in the text area adjacent to the Name field.
4. Enter description for the Hedge definition in the text area adjacent to the Description field.
5. Select the folder from the drop-down list adjacent to the Folder field. The Folders are Segments defined under the current Information Domain.
6. Select the required radio button adjacent to the Access Type field to make the definition Read Only or Read/Write.
7. Click the Save button to save the definition details.
The saved definition is displayed under the Hedge Definitions grid in the Hedge Definitions Summary window.
All the definition details except the Name, Description, Folder, and Access Type remain the same as that of the parent definition. You can edit the definition to update any details of the definition.
You can check the dependency information of individual Hedge definition from the Hedge Definitions Summary window.
To check the dependency information of an existing Hedge definition, perform the following procedure:
1. Select the checkbox adjacent to the Hedge definition of which you want to check the dependency information.
2. Click the Check Dependency button from the Hedge Definitions grid.
The dependency information of the selected definition is displayed in the Dependency Information window with the details such as Child Object Name, Child Object Type, Folder, Parent Object Name, Parent Object Type, and Folder.
You can delete an existing Hedge definition from the Hedge Definitions Summary window.
To delete one or more existing Hedge definitions, perform the following procedure:
1. Select the checkbox(s) adjacent to the Hedge definitions you want to delete.
2. Click the Delete button from the Hedge Definitions grid.
A warning dialog is displayed.
3. Click the Yes button.
The selected definitions are removed from the Hedge Definitions Summary window.
The Hedge Lifecycle feature enables you to manage the Hedge definitions, based on multiple scenarios. In any scenario, for a hedge to be designated on day 1, it should be effective. On subsequent FIC MIS dates, the hedge need not be effective for it to be finalized. While executing through the batch, the hedge is finalized automatically (irrespective of whether the hedge is effective or ineffective). In a manual process, you need to finalize the hedge through the application UI.
Finalize indicates that a given hedge and its effectiveness test results are valid to be reported on any given date.
Following are the scenarios possible in Hedge Effectiveness:
1. The hedge is designated on Day 1. On a subsequent day, while the hedge is still not finalized (remains un-finalized), the user can perform effectiveness testing via the UI, and irrespective of the result (effective/ineffective), the hedge is (marked as) finalized. There is no re-balancing in this scenario.
2. The hedge gets Designated on Day 1. On a subsequent day, when a batch is triggered, the effectiveness tests are performed and all (previously) designated hedges are finalized, irrespective of the result. The user may view the results via the UI and if required re-execute the effectiveness. Again in this scenario, no re-balancing is made.
3. The hedge gets Designated on Day 1. On a subsequent day, while the hedge is still not finalized (remains un-finalized), the user can modify the hedge composition (it is advised to modify only the hedge composition to modify the number of hedging instruments and not the instruments themselves - it is not allowed in IFRS 9) and test the modified hedge for its effectiveness. If the hedge effectiveness test results are unsatisfactory, the user may revert the modifications. Upon revert, the hedge composition (that was valid) as of the last FIC MIS DATE (the last finalized hedge composition) is selected. The user may make such modifications and reversion any number of times. If the user finalizes a modified hedge, then the steps of scenario 4 are followed.
4. The hedge gets Designated on day 1. On the subsequent day, while the hedge is still not finalized (remains un-finalized), the user can modify the hedge composition (it is advised to modify only the hedge composition to modify the number of hedging instruments and not the instruments themselves - it is not allowed in IFRS 9) and test the modified hedge for its effectiveness. If the hedge effectiveness test results are satisfactory, the user may finalize the hedge. Upon finalize, the hedge is marked as "Rebalanced".
The user may make such modifications and finalize any number of times. If the user modifies an already finalized hedge, then the steps of scenario 6 are followed. If the user reverts changes made on a finalized hedge, the steps of scenario 5 are followed.
5. The hedge gets Designated on day 1. On the subsequent day, post the hedge being finalized (maybe via a batch process - refer scenario 2), the user may choose to modify the composition of the hedge (it is advised to modify only the hedge composition to modify the quantity of hedging instruments and not the instruments themselves - it is not allowed in IFRS 9) and test the modified hedge for its effectiveness. If the hedge effectiveness test results are unsatisfactory, the user may revert the modifications. Upon revert, the hedge composition (that was valid) prior to the modification; as of that FIC MIS DATE/current date (the last finalized hedge composition) is considered. The user may make such modifications and reversion any number of times. If the user finalizes a modified hedge, then the steps of scenario 6 are followed.
6. The hedge gets Designated on day 1. On the subsequent day, post the hedge being finalized (maybe via a batch process - refer scenario 2), the user may choose to modify the composition of the hedge (it is advised to modify only the hedge composition to modify the quantity of hedging instruments and not the instruments themselves - it is not allowed in IFRS 9) and test the modified hedge for its effectiveness. If the hedge effectiveness test results are satisfactory, the user may finalize the hedge. Upon finalize, the hedge is marked as "Rebalanced". The user may make such modifications and finalize any number of times. If the user modifies an already finalized hedge, then the same steps (of this scenario) are followed. If the user reverts changes made on a finalized hedge, the steps of scenario 5 are followed.
Note: It is important to understand that, on revert, across any scenario, the last finalized hedge composition will be selected. The hedge could have been finalized on that FIC MIS DATE or the previous FIC MIS DATE.
Note: Whenever a hedge is Rebalanced, the gain/loss computation (from last date to current FIC MIS date) considers the composition of the hedge as per the previous finalized/designated date. The re-balancing of the hedge affects the gain/loss computation only from the subsequent date.
Hedge Effectiveness testing consists of four criteria. Effectiveness testing is triggered by selecting the appropriate fair value definition run and the required date. While Hedge Ratio is mandatory, the user can choose between Economic Relationship, Credit Risk Dominance, or Critical Terms Match, or combination of any of these.
Hedge Effectiveness Testing calculates the fair values for all Hedged Items and Hedging Instruments.
For a hedge to be effective, each of the three or four parameters based on the user selection have to be effective. If any one of the parameters is ineffective, then the entire hedge is ineffective.
The net Fair Value of all participating Hedged Items is calculated to perform Hedge Effectiveness Testing. The following available account types: Non-Interest Income, Taxes, None, Interest Income (Unallocated), Interest Expense (Unallocated), Equity, Dividends, Statistical, Taxes, and Use Detail Leaves, are not considered for the purpose of netting.
Topics
Economic Relationship: This attribute tests if economic relationship exists between the hedged item and the hedging instrument. The process requires the fair values of both the hedged item and hedging instrument for set of dates. The system compares the fair values of both the hedged item and hedging instrument and calculates the correlation factor for the same. The correlation range that is acceptable to the entity is stored in the system and is compared with the correlation factor of the specific hedge.
If the correlation value of the hedge is within the range, then economic relationship exists and the hedge is effective, else it is considered ineffective. If there are multiple hedging instruments present, then multiple correlation values are calculated as output. Economic Relationship can be computed using Retrospective, Prospective, or Scenario-Based methods. Prospective testing is possible only if the hedge consists entirely of Level 3 accounts. If the hedge consists of Level 1 or Level 2 instruments, then only retrospective testing is possible.
Hedge Ratio: This is computed using one of the three methods.
· Dollar Offset Method
· Variability Reduction Method
· Regression and F-Test
The entity can choose to select one of the methods to compute the Hedge Ratio. Hedge Ratio can be computed either retrospectively or prospectively. Prospective testing is possible only if the hedge consists entirely of Level 3 accounts. If the hedge consists of Level 1 or Level 2 instruments, then only retrospective testing is possible.
Hedge Ratio can be computed using cumulative period or net period. If a Cumulative period is selected, then fair values of multiple dates are considered for the calculation. For the retrospective method, if the period selected is Net, then fair values of only the hedge effectiveness date and previous date should be considered for calculation. For Prospective if the period selected is Net, then for the execution date, fair values between the start date index zero and one are considered.
The resulting value is compared with the range present in the system stored earlier. If the value is within the specified range, then the hedge is effective, else it is considered ineffective.
Fair Values of different Scenarios are considered for Scenario-based Hedge Effectiveness Testing. Hedge Ratio is computed by considering Fair Values across all Scenarios. Scenario-Based Hedge Effectiveness Testing requires at least 30 Scenarios to be defined.
In Hedge Effectiveness Testing and Economic Relationship processes, where the application computes Hedge Ratio and Correlation respectively, if there are instruments with different currencies, the Fair Values are converted to a common reporting currency (as defined through the application UI) using the exchange rates as of the corresponding dates/start date indices.
Note: For historical dates, the Exchange Rates as provided as a download on those as of dates are used. For forward or prospective start date indices, the exchange rates computed through ALM are used.
If the exchange rate is not provided, the default value will be taken as 1.
In the case where a Hedge Definition has both Assets and Liabilities as part of its Hedged Item, the Fair Value of Liabilities is deducted while doing the aggregation.
Credit Risk Dominance is one of the qualitative criteria of Hedge Effectiveness. This criteria tests if there is the effect of credit risk which dominates the value changes that result from the economic relationship between the hedged item and hedging instrument. This is tested in the form of a questionnaire which is divided into two sections as Logic Based questions and Generic questions.
The criteria for Credit Risk Dominance to be effective is detailed in the Criteria for Credit Risk Dominance to be Effective Appendix.
The Logic Based questions consist of questions for which answers will be auto-populated, based on the data derived from the hedging relationship. This set of questions are based on a seeded logic that retrieves a YES/NO answer from parsing through available data in various tables/columns. Currently, the application seeds a limited set of questions and the logic theretoo, without the capability for the users to modify any of them or even create them.
Example: One of the Logic-Based questions is to determine whether Credit Value Adjustment (CVA) was computed, which itself determines the Credit Risk dominates the equation.
The second section consists of questions that the user has to respond to. Once the user responds to the questions, the response is compared with the score set by the administrator, and a final score is arrived at.
These questions are not particular to any one instrument type and are intended to capture management's attitude or outlook towards hedge management as of the assessment date. These questions also reflect a degree of judgment with which they will have to be responded to by the user and therefore cannot be set to be answered through the application of logic.
The administrative user assigns a score to each option of all questions. The administrative user also sets the threshold score beyond which it is considered that credit risk is not dominant. For example, if the Aggregate threshold value set by the administrative user is 80%, and the user's response gets a score of 85%, then it is determined that Credit risk is Not Dominant. If the user's response is less than 80%, then Credit Risk is determined to be Dominant.
The critical terms or attributes between the hedged item and hedging instruments are compared, and if all the critical terms match, then the Hedge is considered effective. If any of the terms do not match, then the hedge is considered ineffective. Examples of critical terms/attributes that matches are Notional Amount, Maturity Period, and Underlying Risk.
Critical Terms are dimensional or measure parameters to a Hedging Instrument that when matches those of Hedged Items a Hedging relationship is said to have met Critical Terms of the hedging instrument.
The application looks for the availability of permissible instruments on the Hedged Items to Hedging Instruments within the relationship definition before proceeding to look for matching critical terms. You do not have to key in any inputs for matching. Because the critical terms per instrument type are known to the application and the process is automatically sequenced upon the trigger of effectiveness test.
If there are instruments with different currencies, the Notional Amount is converted to a common reporting currency (as defined through the application UI) using the exchange rates as of the FIC MIS Date.
Note: In case the Exchange Rates are not available, the default value is considered as "1".
Once a Hedge Definition details are saved and Effectiveness Testing Parameters are applied, you can test the effectiveness using the Test Effectiveness functionality from the Choose Effectiveness Testing Parameters grid. To test Hedge Effectiveness, perform the following procedure:
7. Click the Test Effectiveness button from the Choose Effectiveness Testing Parameters grid.
8. Select the Run Date by clicking the calendar icon present in the Run Date field.
9. Click the Go button.
The Effectiveness Testing is triggered and a confirmation message is displayed.
The Effectiveness Testing for all the active Hedges can be performed simultaneously using the Batch Execution functionality. For this, select RUN EXECUTABLE as the Component and enter HedgeEffectivenessTest.sh as the Executable in Task Definition screen. For more information, see the Batch Maintenance section under the Operation chapter in Oracle Financial Services Advanced Analytical Applications Infrastructure User Guide.
If the Hedge is effective after performing the Effectiveness Testing, then those hedge definitions will be auto-designated.
The Hedge Effectiveness execution result displays the details such as Hedge Summary, Quantitative Parameters, Critical Terms Match, and Credit Risk Dominance Assessment in various tabs.
The Hedge Summary tab displays Hedge Name, Percentage Hedged, Hedge Type, Fair Value Run Definition, Effectiveness Test Result, Status, Hedge Ratio effectiveness, Economic Relationship effectiveness, Critical Terms Match effectiveness, Credit Risk Dominance effectiveness. Hedged Items count and fair value, and Hedging Instruments count and fair value.
The Quantitative Parameters tab displays Hedge Ratio details such as Measures, Value, Lower, Upper, and Result along with Economic Relationship details such as Account No, Methodology, Value, Lower, Upper, and Result.
The Critical Terms Match tab displays the critical terms with the detail such as Instrument Type, Parameters, and Result.
The Credit Risk Dominance Assessment tab displays the Logic Based Questions and Generic Questions as answered in the definition.
You can click the Designate button to designate Hedging Instruments.
Note: Multiple Hedging Instruments cannot be designated for a single date.
The output table used to handle the result of this process is FSI_M_HEDGE_EFF_TEST_SUMMARY.
For more information, see Oracle Financial Services Hedge Management and IFRS Valuations Run Chart and List of Tables in MOS Document.