4 Resolve Merchandise Invoice Discrepancies
ReIM has an automatic match program which initially attempts to match invoices to receipts at the summary level. If, after enough time passes, an invoice has still not matched at the header level the auto-matching program attempts to match the detail items on the invoice. If cost or quantity discrepancies are discovered at the item level and they cannot be automatically resolved within the pre-defined tolerance levels, they are sent to the Discrepancy Review List.
Invoices with items on the Discrepancy Review List may still be resolved by the match engine. The only time an invoice is skipped by the match engine is if an item on that invoice is partially matched. Partially matched in this context means that the item is either Cost Match but has a Quantity Discrepancy, or is Quantity Matched but has a Cost Discrepancy. If either of these conditions occur, the Auto match batch skips the invoice and the user must either manually match the invoice or resolve the discrepancy from the Discrepancy Review List. Please note, it is also possible that discrepant items may appear on the Discrepancy Review List after a user has taken some action on the item from the manual match screen. The resolution process is the same regardless of what caused the discrepant items to appear on the Discrepancy Review List.
This chapter describes the functionality around resolving discrepancies using the Discrepancy Review List.
Discrepancy Search
The Discrepancy Review List window provides a way in which to search for, review, and resolve cost and quantity discrepancies.
The standard basic/advanced search screen is used for finding entries from the Discrepancy Review List. The user is then allowed to filter and select one or more discrepancies to resolve.
Navigate: From the Tasks menu, select Invoice Matching > Discrepancy Review List. The Discrepancy Review List window opens.
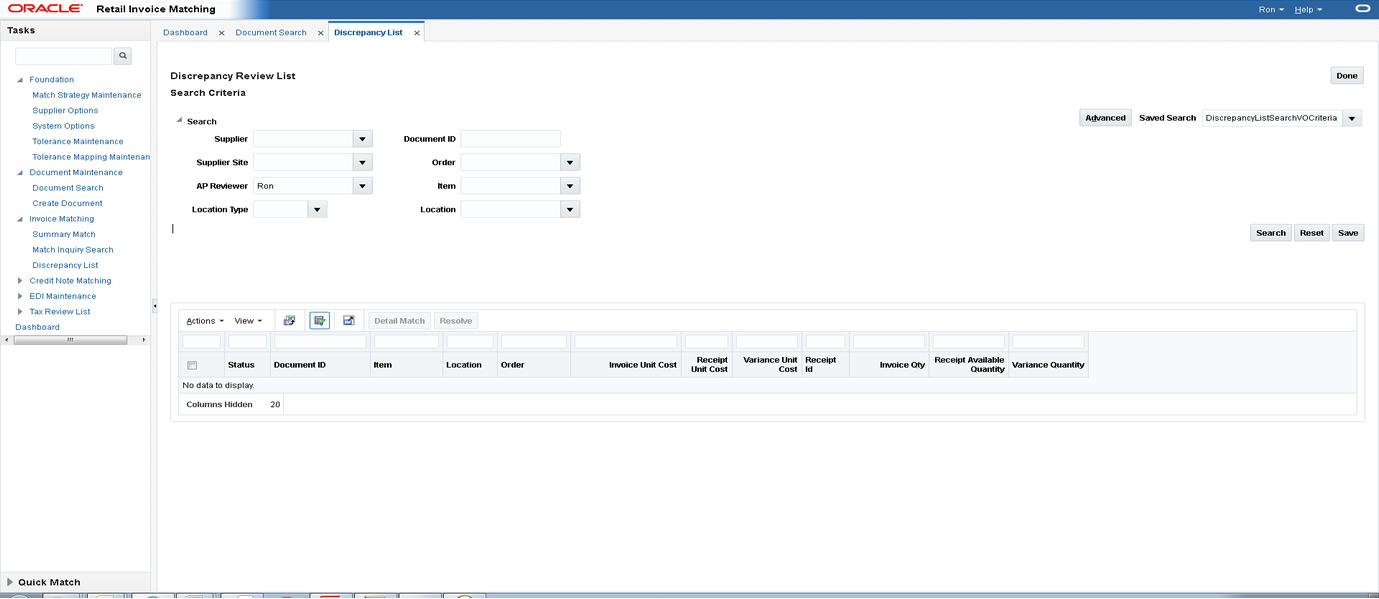
The following criteria are available to search on from the Discrepancy Review List window.
Table 4-1 Discrepancy Review Search Options
| Field | Description |
|---|---|
|
Supplier |
The Supplier that is entered or selected is validated against the supplier master in RMS. |
|
Supplier Site |
Supplier Site is validated against the supplier site master in RMS. |
|
AP Reviewer |
The AP Reviewer that is entered is validated against the list of ReIM users. |
|
Location Type |
Location type can be either a physical warehouse or a store. |
|
Document ID |
The valid document ID of the invoice. |
|
Order |
This is the purchase order number. |
|
Item |
This is the item ID. The Item is validated against the item master |
|
Location |
Location is validated against the RMS Store and Warehouse tables. |
|
Department |
Department is validated against the RMS department table. |
|
Class |
Class can only be selected if a department is specified. When department is selected, the class LOV is narrowed down to include only classes within the selected department. Class is validated against the RMS Class table. |
|
Subclass |
Subclass can only be selected if a class is specified. When class is selected, the subclass LOV is narrowed down to include only subclasses within the selected class. Additionally, the 'validation' for subclass only allows for subclasses within the entered class. Subclass is validated against the RMS subclass table. |
|
Start Resolve by Date |
The Start Resolve by Date date allows users to exclude discrepancies which have a Resolve by Date earlier than the date specified. If End Resolve by date is not specified, then all discrepancies with a resolve by date equal to or later than the start date specified are shown. |
|
End Resolve by Date |
The End Resolve by Date allows users to exclude discrepancies which have a 'Resolve by Date' later than the date specified. If Start Resolve by date is not specified, then all discrepancies with a resolve by date equal to or earlier than the end date specified are shown. |
At least one of the following fields is required as a search criterion:
-
Supplier
-
Supplier Site
-
AP Reviewer
-
Document ID
-
Order
-
Item
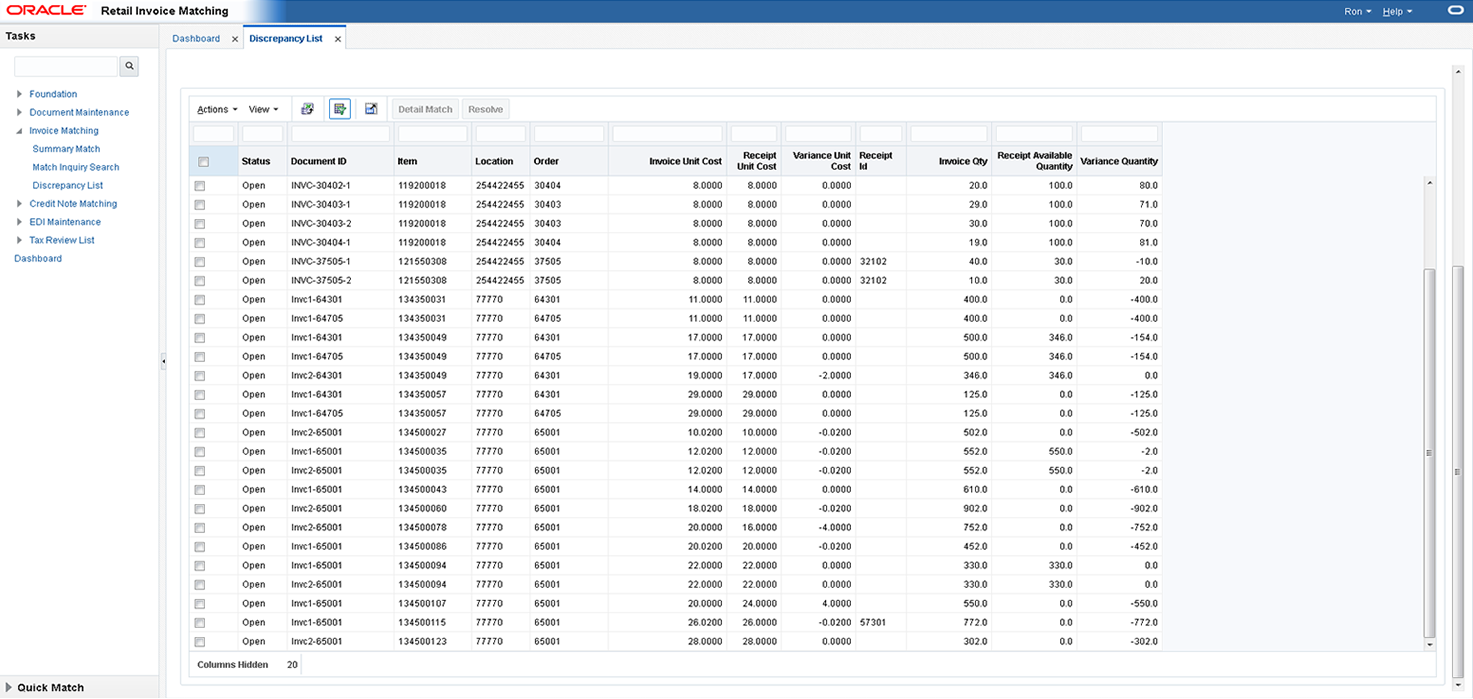
Discrepancy Review List
The Discrepancy Review List allows for two ways in which to resolve discrepancies:
-
Resolve a Simple Discrepancy – The user selects one or more rows from the Discrepancy Review List and selects the Resolve action which allows them to select the reason code they wish to use to resolve the discrepancy.
-
Resolve Complex Discrepancies – The user selects one discrepancy and selects the Detail Match option to navigate to the Detail Match screen where they can resolve more complicated discrepancies.
Resolve a Simple Discrepancy
Simple discrepancies are those which can be resolved directly from the Discrepancy review list with the summary information shown on the sku row. They can be quantity discrepancies, cost discrepancies or both, as long as the user does not need to see more details related to multiple receipts include in the match pool. A cost discrepancy is the difference between the receipt unit cost and the invoice unit cost. A quantity discrepancy is the difference between the receipt quantity and the invoice quantity.
When a cost or quantity discrepancy is identified, you must review and reconcile the discrepancy. The cost discrepancy is based on a comparison between the invoice and the receipt. A quantity discrepancy is based on a comparison between the invoice and the receipt. If a receipt is not available, the invoice cost can be compared to the purchase order cost.
Resolve Cost and Quantity Discrepancies
Navigate: From the Tasks menu, select Invoice Matching > Discrepancy Review List. The Discrepancy Review List window opens.
-
Enter your search criteria to locate your cost discrepancies. See "Discrepancy Search" for additional information. Your search results are displayed in the lower pane of the Discrepancy List window.
-
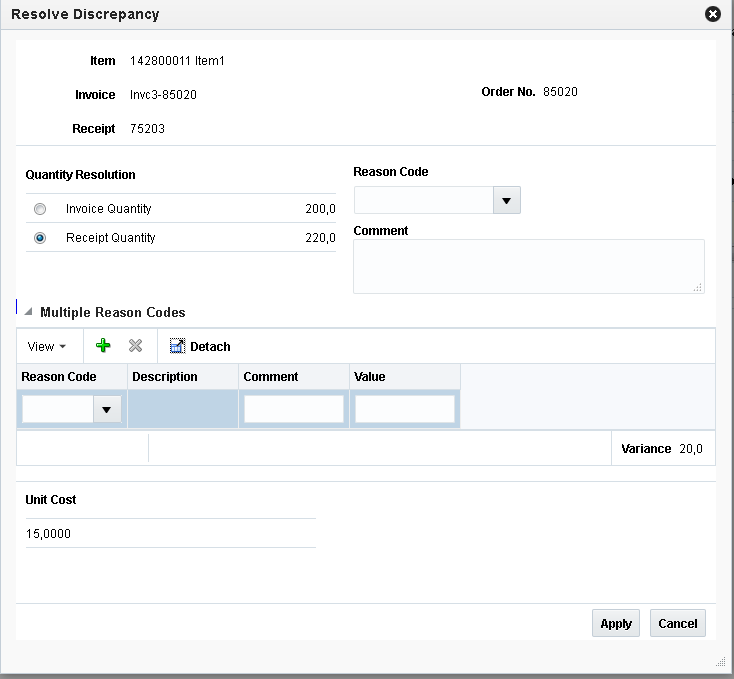
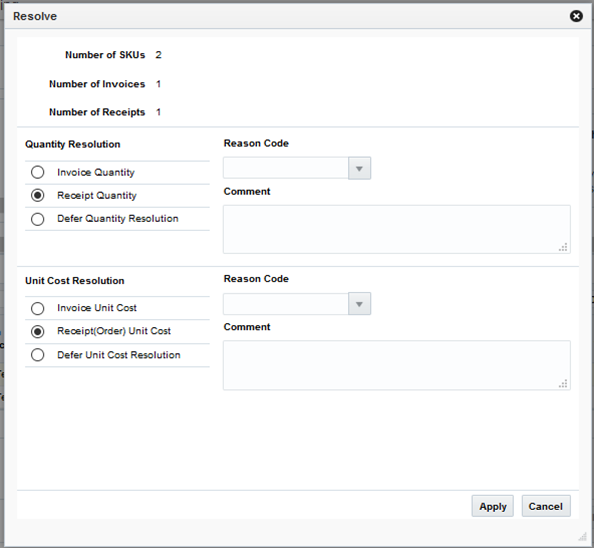
In the Discrepancy Review List, use the check boxes in the first column to select the cost or quantity discrepancies that you want to resolve and click the Resolve button. The Resolve Discrepancy dialog opens.
-
For a quantity discrepancy, select either the invoice quantity or the receipt quantity as correct (the default is the receipt quantity).
For a cost discrepancy, select either the invoice cost or the receipt cost as correct (the default is the receipt cost).
-
If you only wish to resolve the cost discrepancy, select Defer Quantity Resolution. This allows the cost discrepancy to be resolved without affecting the quantity discrepancy.
-
Enter or select (from LOV) a reason code to resolve the discrepancy.
-
Optionally, enter a comment with the reason code. In some cases, a reason code requires that a comment be entered. When a comment is required, the word Required appears to the right of the Comment heading after the reason code is selected.
-
Click Apply to save your changes and close the window.

Resolve Discrepancies with Multiple Reason Codes
Occasionally, there is a need to resolve either a cost or a quantity discrepancy using multiple reason codes. This is only supported when a single item is selected for resolution.
Navigate: From the Tasks menu, select Invoice Matching > Discrepancy Review List. The Discrepancy Review List window opens.
-
Enter your search criteria to locate your cost or quantity discrepancies. See "Discrepancy Search" for additional information. Your search results are displayed in the lower pane of the Discrepancy List window.
-
Select the item you want to resolve and click the Resolve button. The Resolve Discrepancy dialog is displayed.
-
Expand the Multiple Reason Codes panel of the Results popup for the type of discrepancy you which to resolve with multiple reason codes. A Reason code table is displayed and you are able to select the 'Plus' key to add multiple reason codes to resolve the discrepancy.
-
Optionally, enter a comment with the reason code. In some cases, a reason code requires that a comment be entered. When a comment is required, the word Required appears to the right of the Comment heading after the reason code is selected.
-
Each reason code entered requires a value to be entered as well. The sum of the values for all the reason codes must match the discrepancy.
-
Click Apply to resolve the discrepancy and return to the Discrepancy Review List screen.
Security
The simple discrepancy resolution process has three levels of security:
User Privileges
User privileges can be used to limit which discrepancies a user is allowed to resolve.
Cost Discrepancies Only
If a user only has the privilege to resolve cost discrepancies, then when the search criteria is entered, only items with cost discrepancies are returned. These items might also have a quantity discrepancy, but while the user may see the quantity associated with the item, they are not allowed to resolve the quantity discrepancies. When the Resolve button is clicked, only the cost discrepancy and reason code for the cost discrepancy is enabled in the Resolve Discrepancy dialog. The quantity information can be displayed in the Resolve Discrepancy dialog, but selection of reason code to resolve quantity discrepancies is disabled.
Quantity Discrepancies Only
If a user only has the privilege to resolve quantity discrepancies, then when the search criteria is entered, only items with quantity discrepancies are returned. These items might also have a cost discrepancy, but while the user may see the cost associated with the item, they are not allowed to resolve the cost discrepancies. When the Resolve button is clicked, only the quantity discrepancy and reason code for the quantity discrepancy is enabled in the Resolve Discrepancy dialog. The cost information can be displayed in the Resolve Discrepancy dialog, but selection of the reason code to resolve cost discrepancies is disabled.
Data Security
Location data security is a primary driver for users to have access to discrepancies on the Discrepancy Review List. A user must have Location Level Security for the location on the invoice in order to see either a cost or quantity discrepancy on the Discrepancy Review List.
Department Security
Department level security is used as a secondary level of security, part of which functions as a pre-filtering device for items where there are only cost discrepancies. If an Item has only a cost discrepancy, and there is no quantity discrepancy, then the cost discrepancy does not appear on the cost review list if the user does not have department level security for the department of the item. If an item has both a cost and a quantity discrepancy, then the user sees the item and both the cost and quantity discrepancy on the review list. However, if the user does not have department level security for the item, then when the item is selected for resolution, the cost resolution process is hidden and only the quantity resolution is allowed.
If multiple cost discrepancies are selected, the user must have security for all departments of the selected discrepancies, or the Resolve button is not enabled.
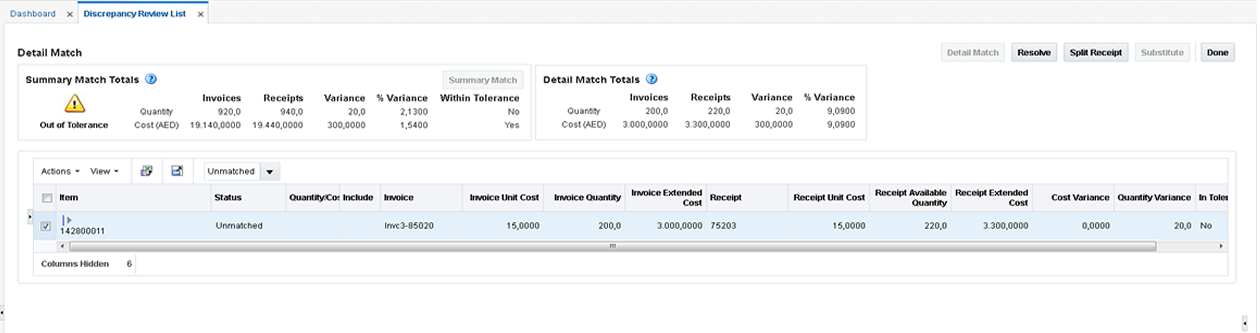
Resolve Complex Discrepancies
The discrepancy review list Resolve Popup will handle many types of discrepancies in a quick efficient manner. There will be occasions where the resolution process is a bit more complicated than the Resolve popup allows. The Discrepancy Review List – Detail Match Screen can be used to resolve more complicated discrepancies. This screen is only supported when a single item is selected for resolution.
Navigate: From the Tasks menu, select Invoice Matching > Discrepancy Review List. The Discrepancy Review List window opens.
-
Enter your search criteria to locate your quantity or cost discrepancies. See "Discrepancy Search" for additional information. Your search results are displayed in the lower pane of the Discrepancy List window.
-
In the Discrepancy Review List, use the check box in the first column to select the discrepancy that you want to resolve and click the Detail Match button. The Detail Match window is displayed.
-
From here, you have all the same matching and resolution capabilities that you have from the regular Detail Match screen. Therefore, you are able to do the following:
-
Expand the hierarchical sku table to show the invoice and receipt rows. If there are multiple receipt rows, you can optionally remove one or more rows by unchecking the Include column.
-
If a there is an overbill on quantity, you can select the overbill receipt and do a split receipt.
-
If one of these changes puts your item within tolerance, the Detail Match button is enabled allowing you to match the item.
-
The Resolution button will be enabled as appropriate to the rules of the detail match screen.
-
-
When you are finished on the Detail Match screen, click Done to return to the Discrepancy Review List.
Use Mass Discrepancy Resolution
Multiple discrepancies that are similar can be resolved at once from the discrepancy review screen. This is similar to the mass resolution process supported as part of the detail match process.
The Resolve button on the Discrepancy Review List screen is also enabled when there are multiple, unmatched items selected that are valid to be resolved together. However, if multiple unmatched items are selected that cannot be resolved together, the Resolve button will be disabled.
For example, if one SKU is selected with a quantity overbill, and another SKU is selected with a quantity underbill, the Resolve button is disabled. This is because resolving a quantity overbill with a quantity underbill is not allowed: it is typically resolved with a different type of reason code action.
When multiple items with similar discrepancies are selected, the Resolve button is enabled. Clicking it opens the Resolve Discrepancy dialog, which allows the discrepancy resolution process to proceed on all selected items.
Note:
Both cost and quantity discrepancies can be resolved with the same Resolve Discrepancy dialog.To Mass Resolve Discrepancies from the Discrepancy Review List, do the following:
Navigate: From the Tasks menu, select Invoice Matching > Discrepancy Review List. The Discrepancy Review List screen opens.
-
Perform a search for invoices with discrepancies. See Discrepancy Search for additional details.
-
In the search results, select the discrepancies you want to resolve from your search results and click the Resolve button. The Discrepancy Resolution screen opens.
Note:
The 'Query by Example' feature can be used to find all the discrepancies that are either overbills or underbills. As an example, enter '<0' (less than 0) in the query by example field above Quantity Variance to find all the items with a quantity overbill. When the query is executed, the search results are filtered to show only quantity overbill discrepancies.The discrepancy resolution screen shows the number of SKUs to be resolved along with the number of invoices and receipts which will be affected.
-
If there is a quantity discrepancy, select whether the Invoice or Receipt quantity is correct, then select the reason code for the resolution.
Note:
The Reason Codes available to be used will vary based on whether invoice or receipt is selected as correct. -
If there is a cost discrepancy, select whether the Invoice or Receipt cost is correct, then select the reason code for the resolution.
Note:
The Reason Codes available to be used will vary based on whether invoice or receipt is selected as correct. -
Click the Apply button to resolve the discrepancies.