As the standard Oracle tool for data extraction, loading, and transformation, ODI is employed by DIH to perform data movements based on EDS, EDD, ADI, and Connector definitions. Details of the ODI instance to be used are captured as detailed in the section Setting up ODI Connectivity. This section details how definitions are processed, published and registered in ODI by DIH in preparation for executing data movement.
Topics:
· Publishing Connectors and Underlying Metadata
The first step in this sequence is to Refresh Target Datastore, as follows:
It represents underlying physical tables of every available ADI as a data store in ODI. This process also works incrementally.
Post data model upload, if the changes are to be made available in DIH, then first perform Refresh ADI. Once Refresh ADI is done, perform Refresh Target Datastore.
To refresh the Target Datastore list, follow these steps:
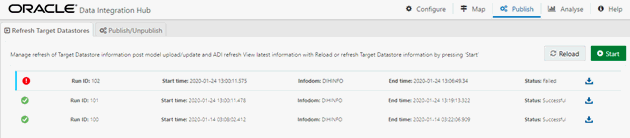
1. From the Data Integration Hub Designer window, select Publish and then select Refresh Target Datastores. The Refresh Target Datastore Interface summary is displayed.
Figure 76: Refresh Target Datastore
2. Click Start to start the refresh of the Target Datastore. The ongoing Target Datastore refresh is displayed as follows:
Figure 77: Target Datastore Refresh Confirmation
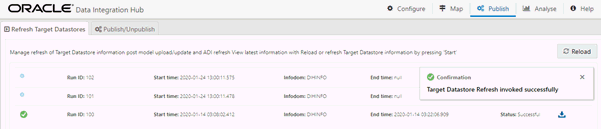
3. On successful invocation of TDS refresh, a message is displayed.

4. If you need
a detailed running log, click download
the log.
download
the log.
5. A zip file is downloaded containing the detailed log for the execution.
6. To view the log details, extract the log file from the zip folder.
NOTE:
At any given time, click Reload to check if the execution is complete or still in progress.
NOTE:
This is not a day-to-day activity.
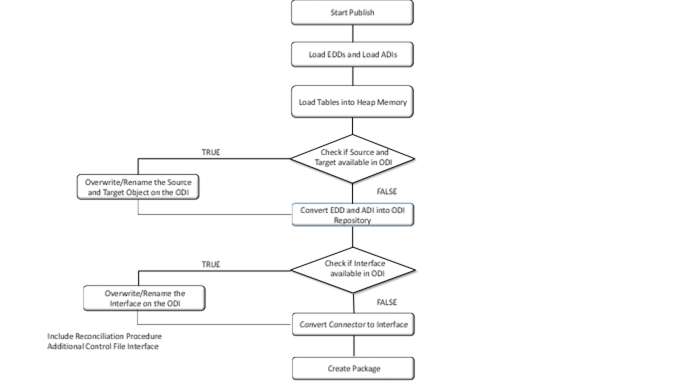
Publishing is a process of transferring the DIH metadata to Oracle Data Integrator (ODI). It converts the DIH metadata into ODI metadata by creating required ODI objects such as DataServer, Logical/Physical Schema, Datastores, Interface, Package, and Scenario. You cannot edit any DIH object after publishing. To edit, you need to unpublish, make the necessary changes, and then re- Publish.
NOTE:
The flow diagram represents the activities undertaken upon publication. No action is required apart from triggering the Publish task.
Figure 78: Publish Connectors
You can batch publish/unpublish the selected connectors to ODI at any given point. You can also unpublish all the objects using this option.
To publish, follow these steps:
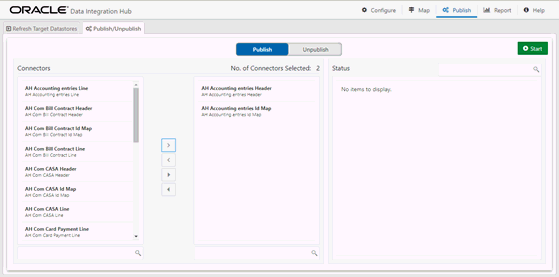
1. From the Data Integration Hub Designer window, select Publish and then select Publish/Unpublish. The Publish/Unpublish window is displayed.
2. When you select the option Publish, all the saved and unpublished connectors are displayed.
3. Double-click
the connectors or press Ctrl to select multiple connectors and click  to
move it to the next column.
to
move it to the next column.
NOTE:
To deselect a connector click .
.
Figure 79: Publish/ Unpublish Window
4. Click  and
select all the connectors.
and
select all the connectors.
NOTE:
To deselect all the connectors click .
.
5. Click Start after the items are selected. The status of the published connects are displayed. You can view the connectors, which are successfully connected or failed, under the Status field.
6. When you select the option as Unpublish, all the published connectors are displayed.
7. Double-click
the connectors or press Ctrl to select multiple connectors and click to
move it to the next column.
NOTE:
To deselect a connector click.
8. Click and
select all the connectors.
NOTE: To deselect all
the connectors click.
9. If you select All Objects, then by default all the connectors and their corresponding EDD, EDS and parameters are unpublished.
10. Click Start after the items are selected. The status of the selected connectors is displayed. You can view the connectors, which are successfully published/unpublished or failed under the Status section.
11. Search  the
connector to check the status of the publish/unpublished process.
the
connector to check the status of the publish/unpublished process.