5 Inventory Adjustments
This chapter is divided into two sections:
Inventory Adjustments Mobile
Inventory Adjustments allow a user to change the number of units in stock or mark them as non-sellable due to damage and other reasons:
The following features are available:
-
Search for inventory adjustments
-
Create a new inventory adjustment
-
Copy an existing inventory adjustment
-
View or edit an existing inventory adjustment
-
Delete In Progress adjustments
-
Print inventory adjustments
-
Enter values for CFAs (Custom Flexible Attributes)
The following topics are described in this section:
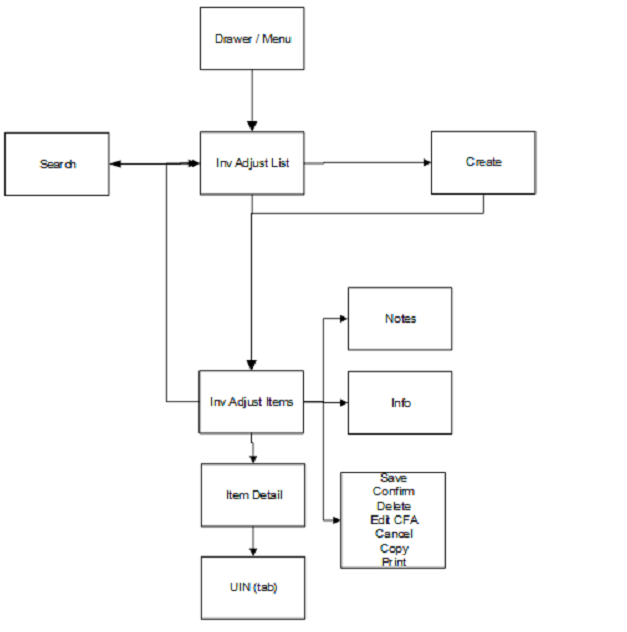
Inventory Adjustments are accessed through the Inventory Adjustment menu within the drawer. Selecting the menu option takes you to the Inv Adjust List screen. On this screen, you have the option to search for adjustment records that are presented on the Inv Adjust List screen. You can create an inventory adjustment, edit, or view an adjustment. When creating, editing, or viewing an inventory adjustment, you are first directed to the list of items on the Inv Adjust Items screen. You can add, view, and edit the details of the items on the Item Detail screen. You can specify values for CFAs (Custom Flexible Attributes) set up for inventory adjustments via the Edit CFAs screen.
Inv Adjust List
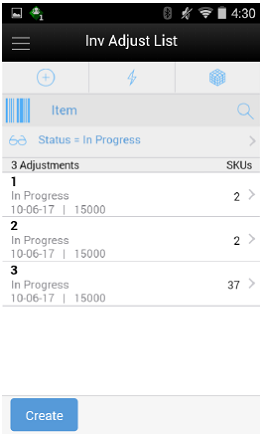
When navigating to Inventory Adjustments, the Inv Adjust List screen displays the 'In Progress' adjustments as the default list. All manually created inventory adjustments as well as those created by an external system, such as through the web service, appear in the list screen.
You can use the search criteria eye glasses to navigate to the Search Criteria (Inventory Adjustment) screen to enter search criteria for inventory adjustments. When scanning/entering an item in the scan bar, the system adds the item to the entered search criteria and narrows down the current list of adjustments.
Creating a new adjustment directs you to the Inv Adjust Items screen with no details (items) to build a new inventory adjustment. Selecting an adjustment from the list navigates you to the details for that adjustment.
Search Criteria (Inventory Adjustment)
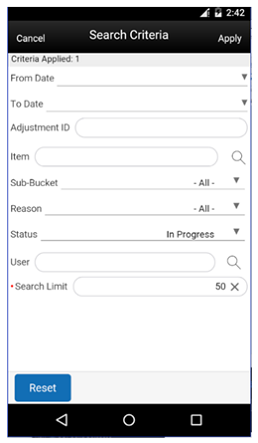
The Inventory Adjustment Search Criteria Screen is accessed by the eye glasses on the Inventory Adjustment List (Inv Adjust List) screen. After applying the search criteria, the results are listed on the Inv Adjust List screen and the criteria applied is shown.
Inv Adjust Items
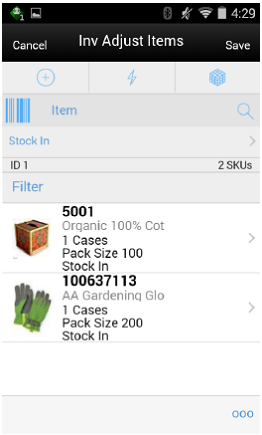
The Inv Adjust Items screen is where a new adjustment is created. Initially, this screen will not have any items. The items screen is also displayed when selecting an existing adjustment, as well as from applying a template to the Inv Adjust List screen. The items are listed for the adjustment. The item image for the line items is displayed per configuration.
Line items appear in a list and selecting a line item navigates to the item details of that item. If an item has been changed in the current session, it is indicated by a bar on the left of the item. Scrolling in the list of items displays a filter. The filter can be used to narrow down the list of items. Filtering can occur by item ID, description, reason, and unit of measure.
A reason code must be selected before being able to add or edit an item on the adjustment. The reason code selected is at the header level and is applied to all newly added items until it is changed to a different reason in which the newly changed reason is added to the items. The reason codes have a disposition associated to them which determines stock movement of the item. See Inventory Adjustments Process.
Scanning or entering an item in the scan bar navigates you to the Item Detail screen for that item. The quantity may be updated depending on the scan mode.
The item must be unique on the adjustment.
The ellipsis in the lower right hand corner accesses the footer menu which contains all of the functions that can be performed on an inventory adjustment.
The footer menu is accessed from the ellipsis footer menu on the Inv Adjust Items screen. The menu functions include the following:
-
Info: Accesses the Info popup.
-
Notes: Accesses the notes dialog to capture notes.
-
Edit CFA: Lets the user enter values for the CFAs that are set up for inventory adjustments.
-
Confirm: Confirms and completes the adjustment. All stock on hand updates are made and the adjustment is published out.
-
Save: Saves the adjustment in 'In Progress' status to be completed later.
Saving an adjustment does not publish the adjustment nor does it reserve any inventory; it simply saves it. The Save button can be used to implement a Save and Approval process.
-
Delete: Marks the inventory adjustment to 'Canceled' status.
-
Cancel: Exits the adjustment; changes made in that session are not saved.
-
Print: Displays the common print dialog to print the inventory adjustment report.
-
Copy: The copy function is only available for those adjustments in a 'Completed' status. It takes the current adjustment, copies the items, reasons and quantities, and creates a new editable adjustment with a new ID. It references the copied adjustment's ID.
Item Detail
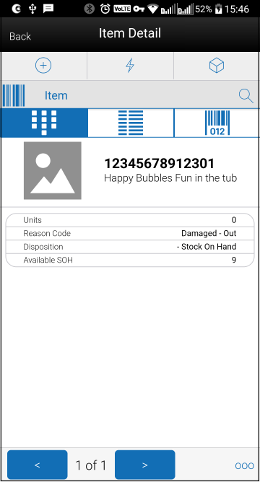
The Item Detail screen is used for selecting or scanning an item from the Inv Adjust Items screen. Scanning or entering an item on this screen in the scan bar, updates the quantity per the scan mode and refreshes the Item Detail screen for the item and quantity scanned.
The quantity can be edited and updated manually if permissions allow. The system validates the inventory bucket based upon the disposition associated to the reason code. A reduction adjustment in inventory may exceed available inventory, bringing total available as a negative value. However, an unavailable inventory adjustment can never make the non-sellable unavailable bucket go negative. The same is true for sub-buckets, when sub-buckets are used, the reduction of a sub-bucket must be less than or equal to total quantity of such a sub-bucket. Increases for available, or non-sellable unavailable have no restriction.
The item information including the image (which is system configured) displays in the header. The bottom portion of the screen contains information fields for reason code, disposition, sub-bucket (if system configured), and the stock on hand pertaining to the bucket in which the stock is coming from.
The footer menu, ellipsis button, contains a reset function as well as remove and restore functions. You can page through existing items on the adjustment using the arrows on the bottom.
The Item Detail screen has an UIN tab to take user to the UIN screen to add/remove UINs for UIN items (if system is configured to use UINs and if the item is a UIN item).
-
All non-AGSN (Auto Generated Serial Numbers) UINs require UINs to be captured, regardless of the disposition of stock movement. The quantity field cannot be entered for non AGSN UIN items. It gets updated as the UINs get added and removed from the adjustment.
-
For AGSN items, if a reason code has a disposition of anything except Out of Stock to In Stock (+Stock on Hand), a UIN is required to be captured. This is because the UIN already exists in the system and the system needs to know which AGSN UIN is being adjusted. In this case, the quantity field cannot be entered; it is updated as the AGSN is added/removed.
-
For AGSNs being adjusted from Out of Stock to In Stock (+ Stock on Hand), the system auto generates the AGSN number and print upon completion of the adjustment. This means that capturing of the AGSN is not required and the quantity can be entered. However, you may still capture the serial number if one exists. In this case, the system auto-generates the serial numbers and print for those where the quantity entered exceeds the UINs captured.
-
The Extended Attributes tab enables the user to view/capture Extended Attributes for the item. If the item is not configured to capture extended attributes or there are no extended attributes captured, the list will be empty.
Edit CFAs
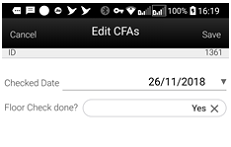
The Edit CFAs screen displays the list of CFAs (flexible attributes) that have been set up for Inventory Adjustments in EICS, and lets you enter values for them. The CFAs that are set up as 'Required' must have a value entered for it before confirming the inventory adjustment. The value can be one of the following: Date, Text, Decimal, Long depending on the 'data type' set up for the CFAs, while creating them in EICS. Appropriate security permission is needed for entering CFA values.
Info Screen (Inv Adjust Items)
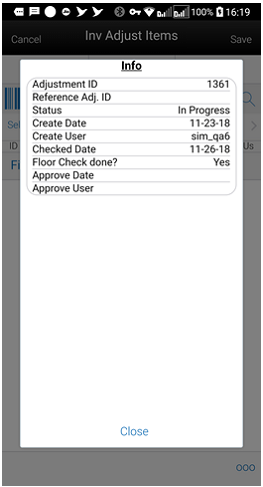
The Info screen is an informational popup that contains read-only information about the header level of the adjustment. Details include adjustment ID, reference adjustment ID, status, create date, create user, approve date, approval user, and all the CFAs setup for inventory adjustments irrespective of whether a value has been captured or not. The value captured for the CFAs will also be displayed. If value has not been captured, it will display blank.
Inventory Adjustments Desktop
Inventory Adjustments allow a user to change the number of units in stock or mark them as non-sellable due to damage and other reasons.
The following features are available:
-
Search for inventory adjustments
-
Create a new inventory adjustment
-
View or edit an existing inventory adjustment
-
Delete In Progress adjustments
-
Copy an existing inventory adjustment
-
Download reports for inventory adjustments
-
Capture values for CFAs (Custom Flexible Attributes)
The following topics are described in this section:
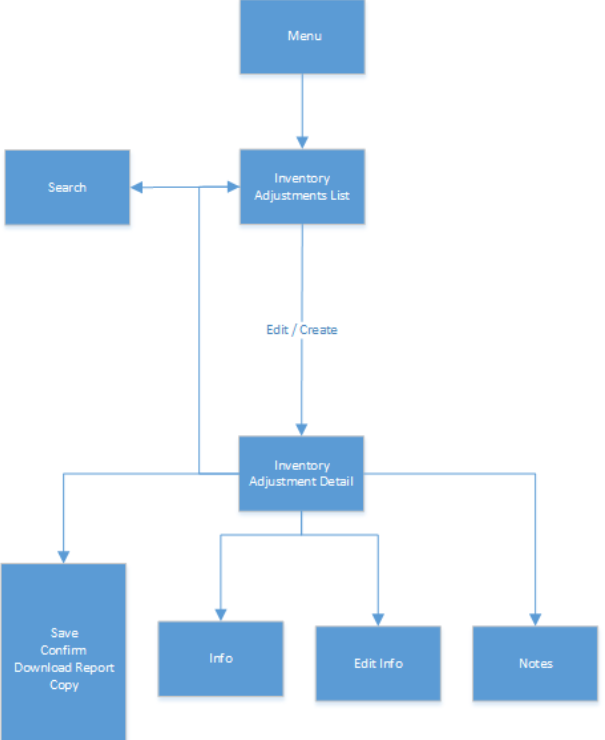
Inventory Adjustments are accessed through the Inventory Adjustment menu within the Main Menu\Inventory Management. Selecting the menu option takes you to the Inventory Adjustment List screen. This screen lists the inventory adjustments available for the store. On this screen, you can search for adjustment records. You can create an inventory adjustment, edit, or view an adjustment through this screen. When creating, editing, or viewing an inventory adjustment, you are directed to the Inventory Adjustment Detail screen where the list of items on the inventory adjustment are displayed. You can add items, view, and edit the details of the items on the Inventory Adjustment Detail screen. You can specify values for CFAs (Custom Flexible Attributes) set up for inventory adjustments. You can copy a completed inventory adjustment. An option to download reports is also available. Also, you will be able to capture UINs for the serialized items.
Inventory Adjustment List
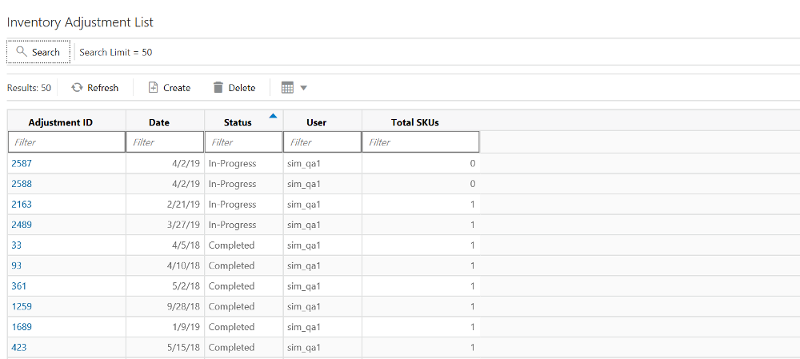
The Inventory Adjustment List screen enables you to view the list of inventory adjustments available for the current store. All manually created inventory adjustments as well as those created by an external system, such as through the web service, appear in the list screen. The inventory adjustments are listed in the form of a grid. The screen displays the 'In Progress' adjustments as the default list. This list will be updated when a search is performed. The list is sortable and filterable.
Use the Search button to navigate to the Inventory Adjustment Search Criteria dialogue where you can enter search criteria to lookup inventory adjustments.
Clicking on Create button directs you to the Inventory Adjustment Detail screen with no details (items) to build a new inventory adjustment. You must have proper security permission for this button. Selecting an adjustment from the list navigates you to the details for that adjustment.
The Delete button enables you to delete an 'In progress' inventory adjustment. Appropriate security permission is needed.
Inventory Adjustment Search Criteria
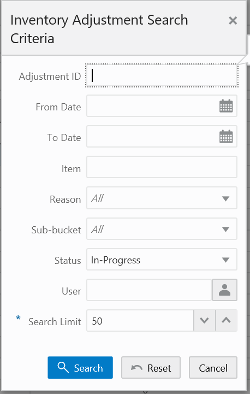
The Inventory Adjustment Search Criteria Screen is accessed by clicking on Search on the Inventory Adjustment List screen. After applying the search criteria, the results are listed on the Inventory Adjustment List screen and the criteria applied is shown.
Inventory Adjustment Detail
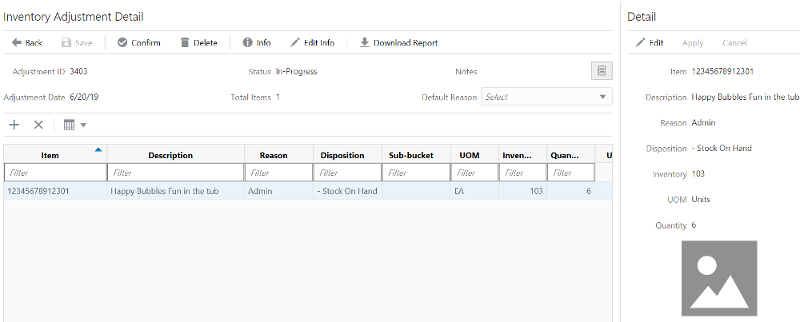
The Inventory Adjustment Detail screen is where a new adjustment is created. Initially, this screen will not have any items.
The screen is also displayed when selecting an existing adjustment. The items displayed in this screen are for the adjustment. Line items appear in a grid and selecting a line item displays the item details of that item in the Detail Block which is on the right side of the screen. You can edit 'In progress' inventory adjustments. 'Completed' and 'Cancelled' adjustments will be View Only.
A reason code must be selected before being able to add or edit an item on the adjustment. The reason code selected is at the header level and is applied to all newly added items until it is changed to a different reason in which the newly changed reason is added to the items. The reason codes have a disposition associated to them which determines stock movement of the item.
The line items are displayed in the grid with information like item id, description, reason code, UOM, quantity and so on. The grid is filterable and sortable.
To add a new item to the adjustment, click on '+' button and it enables the Detail Block in order to enter the item and the necessary details.
To delete an item from the adjustment, select the item and click on X button. Upon deletion of an item, UINs (if any) are deleted.
All the details of a line item are displayed in this block. When a new item is added, this block will be empty. Enter the item id in the Item field. Press Enter or press the arrow button, and the item's detail get displayed. Enter quantity as required. The item must be unique on the adjustment.
Clicking on an existing line item enables the detail block and the details of the item such as item id, description, reason code, disposition, sub-bucket, UOM, quantity, and so on, will be displayed.
Click Edit in this block in order to edit the details of an item. Reason code and quantity/UIN are editable.
The quantity can be updated manually if permissions allow. The system validates the inventory bucket based upon the disposition associated to the reason code. See Inventory Adjustments Process. A reduction adjustment in inventory may exceed available inventory, bringing total available as a negative value. However, an unavailable inventory adjustment can never make the non-sellable unavailable bucket go negative. The same is true for sub-buckets, when sub-buckets are used, the reduction of a sub-bucket must be less than or equal to total quantity of such a sub-bucket. Increases for available, or non-sellable unavailable have no restriction.
The item information including the image (which is system configured) displays in the detail block.
Click Apply to apply the changes to the adjustment and the grid will be refreshed to display the new details of the item.
There are several buttons on the header of this screen which enables you to perform various actions on the adjustment:
-
Info: Accesses the Info popup which will display the details of the adjustment. View only.
-
Notes: Accesses the notes dialog to capture notes.
-
Edit Info: Accesses the Edit Info popup and lets you enter values for the CFAs (Custom Flexible Attributes) that are set up for inventory adjustments and also any other editable fields of the adjustment like Adjustment Date.
-
Confirm: Confirms and completes the adjustment. All stock on hand updates are made and the adjustment is published out.
-
Save: Saves the adjustment in 'In Progress' status to be completed later.
-
Saving an adjustment does not publish the adjustment nor does it reserve any inventory; it simply saves it. The Save button can be used to implement a Save and Approval process.
-
-
Delete: Marks the inventory adjustment to 'Canceled' status.
-
Back: Exits the adjustment; changes made in that session are not saved. If a new adjustment is being created, the adjustment (header) will remain saved in the database (as it was committed upon initial creation), however any items, modifications, and so on, will not be saved.
-
Download Report: Will download the Inventory Adjustment operational report for the current inventory adjustment.
-
Copy: The copy function is only available for those adjustments in a 'Completed' status. It takes the current adjustment, copies the items, reasons and quantities, and creates a new editable adjustment with a new ID. It references the copied adjustment's ID.
Inventory Adjustment - UIN

Clicking on the UIN icon on the Detail Block brings up the UIN tab to add/remove UINs for UIN items (if system is configured to use UINs and if the item is a UIN item).
-
All non-AGSN (Auto Generated Serial Numbers) UIN items require UINs to be captured, regardless of the disposition of stock movement. The quantity field cannot be entered for non AGSN UIN items. It gets updated as the UINs get added and removed from the adjustment.
-
For AGSN items, if a reason code has a disposition of anything except Out of Stock to In Stock (+Stock on Hand), a UIN is required to be captured. This is because the UIN already exists in the system and the system needs to know which AGSN UIN is being adjusted. In this case, the quantity field cannot be entered; it is updated as the AGSN is added/removed.
-
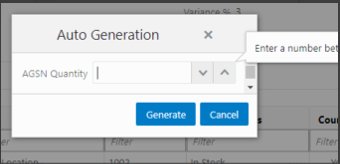
For AGSNs being adjusted from Out of Stock to In Stock (+ Stock on Hand), the system auto generates the AGSN number and print upon completion of the adjustment. This means that capturing of the AGSN is not required and the quantity can be entered. However, you may still capture the serial number if one exists. In this case, the system auto-generates the serial numbers and print for those where the quantity entered exceeds the UINs captured.
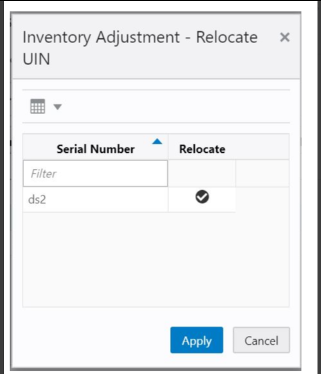
The Inventory Adjustment - Relocate UIN popup is used when a UIN is added that is for another store. This enables you to choose the UINs to relocate. System admin Allow Store UIN Relocation should be set to Yes.
Inventory Adjustment - Extended Attributes
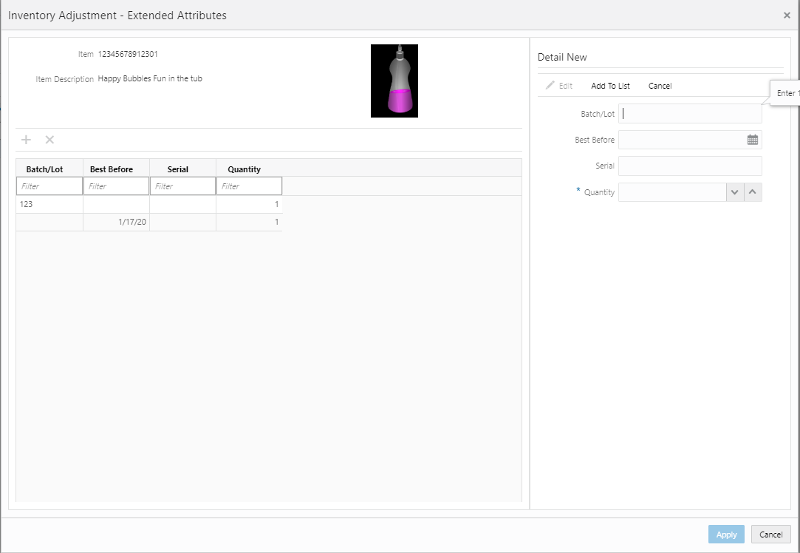
The user will navigate to the Inventory Adjustment Extended Attributes screen upon clicking on the Extended Attributes icon on the Inventory Adjustment Detail screen. This screen is only available for items that are part of merchandise hierarchies that are configured/setup for extended attributes. Also, the store must be configured to capture Extended Attributes. This screen will display all extended attributes that get auto captured from a GS1 barcode (per system configuration). The user is also able to enter extended attributes manually for the item here.
Edit Info Popup
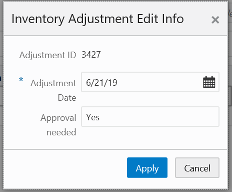
The Edit Info popup is accessed from Inventory Adjustment Detail screen by selecting Edit Info and can be accessed for editable Inventory Adjustments. Appropriate security permission is needed to access the popup.
You will be able to edit the Adjustment date as well via this popup. The adjustment date is an alternative date that allows you to identify when the inventory transaction happened if different from the time the transaction is created. The date has no impact on when the transaction is applied, the transaction will always be applied immediately when approved, regardless of this date. This is the date communicated to external systems.
The popup displays the list of CFAs (custom flexible attributes) that have been set up for Inventory Adjustments, in EICS and lets you enter values for them. The CFAs that are set up as 'Required' must have a value entered for it before confirming the inventory adjustment. The value can be one of the following: Date, Text, Decimal, Long depending on the 'data type' set up for the CFAs, while creating them in EICS. Appropriate security permission is needed for entering CFA values.
Info Popup
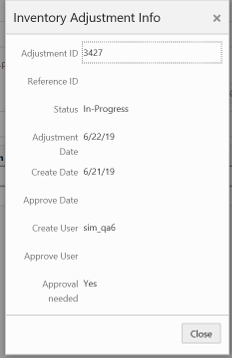
The Info screen is an informational popup that contains read-only information about the header level of the adjustment. Details include adjustment ID, reference adjustment ID, status, create date, create user, approve date, approval user, and the CFAs.
Download Reports Popup
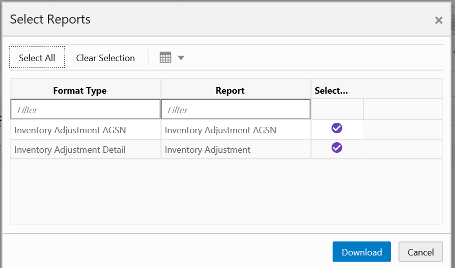
This popup can be accessed by clicking on Download Report from the Inventory Adjustment Detail screen. Selecting a format and clicking on Download will download the Inventory Adjustment operational report for the current inventory adjustment.
Inventory Adjustments Process
Reason codes are defined on the desktop. When creating a reason code a disposition is assigned to the reason code and it defines how the stock will be moved. So adjustments are made to different buckets depending on the reason code's disposition. For example: a reason code of Stock - In has a disposition of + Stock on Hand which moves inventory from Out of the store to Available inventory where as a Reason if Damaged - Hold has a disposition of + Unavailable that moves inventory from Available to Unavailable.
The system will display the inventory value for the bucket in which inventory is being removed from.
Table 5-1 Inventory Adjustment Dependent on Reason Code Disposition
| Reason Code Disposition | Adjustment |
|---|---|
|
If the reason code disposition is taking inventory out of the available bucket, then the Inventory field will display the available stock for the item at the store. |
|
|
If the reason code disposition is taking out of the unavailable bucket, and sub-buckets are not turned on, then the Inventory field will be display the unavailable stock for the item at the store. |
|
|
If the reason code disposition is taking out of unavailable stock and the system is configured to use sub-buckets, then the Inventory field will display the stock for the item/store's sub-bucket. |
|
|
If the reason code disposition is taking from Customer Order Reserved, the Inventory field will display the Customer Order Reserved qty. |
|
|
If the reason code disposition is taking from "Out", meaning outside the store, the Inventory field will be not displayed, as there is not a way to know what "out" contains. |
|