3 Open Transactions and Notifications
The Open Transactions dialog lists all the open transactions for your store. Transactions include: Transfer, Transfer Shipment, Transfer Receiving, RTV, RTV Shipment, DSD Receiving, Inventory Adjustment, Item Basket, Stock Count, Item Request, Shelf Replenishment List, Customer Order, Customer Order Pick, Customer Order Delivery, and Customer Order Reverse Pick.
Features:
-
View list of open transactions
-
Search for open transactions Show details of transactions
-
Send notifications
-
Access and view notifications
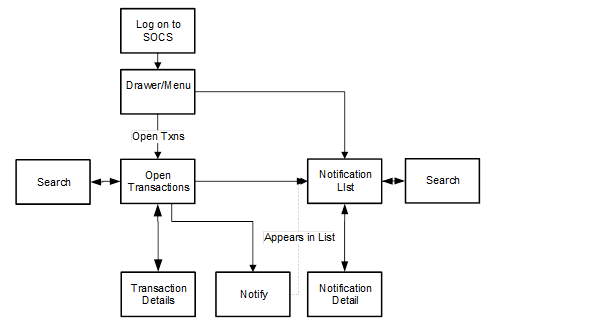
This is the screen flow for Open Transactions and Notifications. Initially upon logging on, the Open Transactions screen is displayed which is also accessible via the menu drawer. The Open Transactions screen lists all of the Open status transactions within the system. From here, you can filter the open transactions, view transaction details, and send out notifications for the open transactions.
The Notification dialog is accessed from the drawer menu as well as from Open Transactions. It lists all of the notifications and allows for further filtering of the notifications or viewing of the details of the notifications.
Open Transactions

The Open Transactions screen is accessed upon logon as well as by selecting Open Transactions from the menu drawer. The Open Transactions screen lists all the open transactions for the store you have permission to access. Selecting one of these transactions navigates you to the details for that transaction. The transaction can be viewed, edited, deleted, and so on, just as it would be had you navigated directly into that specific functional area. Once leaving the transaction you navigate back to Open Transactions.
Each transaction has a transaction ID and transaction type such as inventory adjustment, stock counts, and so on, for identification. The status, last update date, user, SKUs and not after date for the transactions will be displayed.
Open transactions are sorted based upon the Sort button. The sort defaults to oldest first and tapping on Sort allows you to change the sort to newest first.
The search eye glasses icon opens up a search criteria screen that can be used to further narrow down the list of open transactions. All applied search criteria will be displayed in this field. The Open Transactions list screen does not have any default search criteria initially when entering the screen.
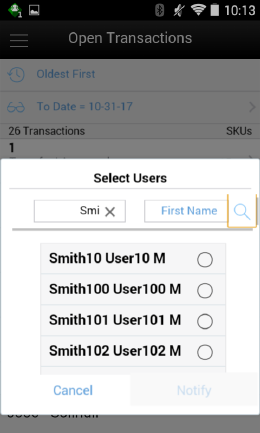
The Select Users popup is displayed by swiping a transaction on Open Transactions and selecting the Notify button. The select users popup is initially an empty list and you must enter in either a full or partial (at least two characters) first or last name to search on. The system will return a list of valid user names (Last Name, First Name, and Middle Initial) for the store you are logged in to.
Note:
This popup is used to find user names and not roles.Select a name from the list of results and the system will create an ad hoc notification for the open transaction to that user. The manually created ad hoc notification appears in the notification list screen of the selected user that was notified, upon logging in to that store. Open transactions can have more than one notification sent.
Ad Hoc Notifications
Ad hoc notifications are notifications that are created in an ad hoc basis by notifying one or more users about an open transaction from the Open Transactions screen.
They are sent on one user at a time and each message is treated individually.
The notification will get updated to 'read' and 'unread' on an individual user/message basis as they are read or marked to 'unread'.
Ad hoc notifications can be created for each of the transaction types from the Open Transactions.
-
The notification ID will be system generated.
-
The notification name will be set to 'Fwd: < transaction type>'.
-
The transaction type will be set based upon the transaction that the notification was created from.
-
Status will be 'Unread' for all users. Status will be updated for individual users as they get read.
-
Create Date will be defaulted to the date/time the notification was generated.
-
Description: 'Please look at this open transaction'.
-
User: The user that generated the notification clicked the 'Notify' button on the open transaction.
System Notifications
For notifications that are created via the system, they are associated to a group (role) and as one user for that notification's role/store reads the notification (or unreads) it, it will update it for the entire group. The idea is that if you send out a notification to all store clerks you do not want to make them all read it.
The details of the notification will be populated as follows:
-
The notification ID will be system generated.
-
The notification name will be the Subject Line from the actual notification.
-
The transaction type will be based on transaction that is associated with the notification.
-
Transaction ID will be the actual transaction ID for the transaction.
-
Status will be 'Unread' for all users of the role. Status will be updated for all of the role users as they get read (or Unread).
-
Create Date will be defaulted to the date/time the notification was generated.
-
Description: Body per the email alert notification. Note this is restricted to 2000 characters, so it may get truncated.
-
User: The user that generated the notification, since these are system generated it may be a user who triggered it, a batch user, or a system user, and so on.
Search Criteria (Open Transaction)
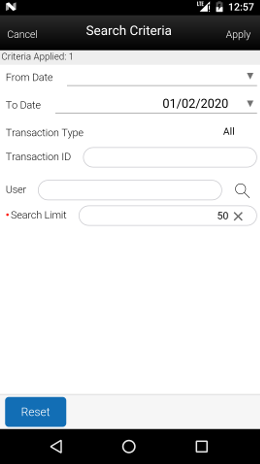
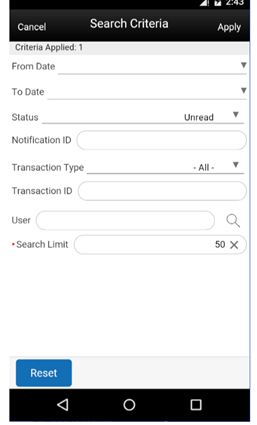
From the Open Transactions screen, selecting the search criteria button, which looks like a pair of eye glasses, takes you to the Search Criteria screen. This screen is used to narrow down the open transactions further and search for open transactions with specific criteria.
The header shows the number of criteria that have been applied. The Home Page of open transactions displays all open transactions for the user's store by default and there will be no initial criteria applied. Open status is represented by an array of statuses and they can be different depending on the transaction. Open status will represent any status which is not completed, canceled or closed, in other words actions can still be taken.
Criteria include From and To Date which look at the last updated date on the transaction if one exists, otherwise the create date. The transaction type is the type of the transaction such as inventory adjustment, stock count, DSD receiving, and so on. The transaction ID will be the actual ID associated with the transaction, thus multiple transaction types may have the same transaction ID. The user allows for searching on the User ID, this may be the last updated user ID or the create user ID depending on the transaction. The search limit field is defaulted per the system admin setting and is used to determine the maximum number of records returned in the search.
Once search criteria have been selected and applied, you will navigate back to the Open Transactions screen with the list narrowed down per the entered criteria. The Reset button will clear out all entered search criteria and reset it back to the default criteria. Search criteria will be retained until being either reset or leaving the Open Transactions dialog.
Notification List
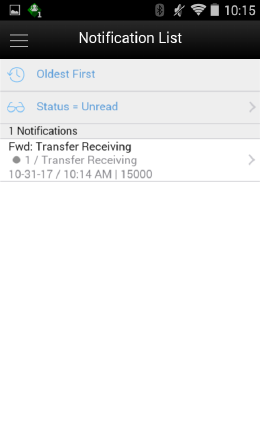
The Notification List screen is accessed by tapping the notification (bell) icon, in the Drawer Menu. The Notification List defaults to display all unread notifications for the user at the user's store. The notification may be system generated or manually created (ad hoc).
By default, the screen will display the notifications with the unread notifications first. The sort can be changed to newest first or oldest first. Notifications can be in a read or unread state with unread being denoted with a dot in front. The notification names, transaction ID, transaction type, create date, and user will be displayed for the notifications in the list.
Swiping a read notification will display a Mark As Unread button. Selecting Mark As Unread will set the status of the notification from read back to unread. The Mark As Unread button will only be available for notifications that have been flagged. Selecting a notification will navigate the user to the details for that notification.
The search eye glass icon will open up a search criteria screen for the notifications which can be used to further narrow down the list of notifications. All applied search criteria will be displayed in this field. The default search criteria for the notifications will be for the unread status of notifications.
Search Criteria (Notification)
Selecting the search criteria button (eye glasses) from the Notification List screen, will take you to the Notification Search Criteria screen. This screen is used to search for notifications for the user's store with specific criteria. The header will show the number of criteria that have been applied. The Notifications search criteria will default to the status of unread.
Criteria include Create From and Create To Date, status, notification ID and type, transaction ID and type, user, and search limit. The search limit is defaulted per the system admin setting and is used to determine the maximum number of records returned in the search.
Once search criteria have been selected and applied, you will navigate back to the Notification List screen with the notifications narrowed down per the entered criteria. The search criteria will be retained until they are reset or when leaving the notifications dialog.
Notification Detail
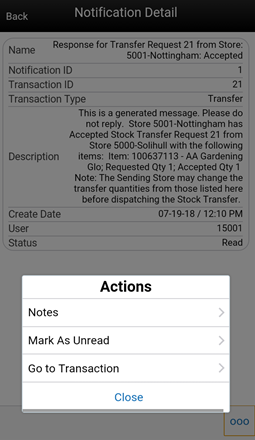
The Notification detail screen is accessed when selecting a notification from the Notification List screen. This screen displays the details of the notification.
The notification ID is a system-generated ID. The notification name is either 'Forward' with the transaction type for ad hoc notifications, or the subject line of the system-generated email notifications. The transaction ID and transaction type are from the transaction of the notification. The create date is the date the notification was generated. The user is the user who created the notification; for system-generated notifications, the user is the user who triggered the notification such as the system or batch user. The status will either be read or unread.
When entering the notification, the status of the notification will automatically be marked to Read and the Mark As Unread option will be available within the footer menu. Selecting Mark as Unread will set the status back to Unread. Once the notification is in Unread status, the footer menu option will change to Mark As Read. The user can set the status back to Read by selecting this option.
Also within the footer will be a Notes option which navigates to the standard notes dialog for entering in notes about the notification. Lastly, in the footer is a Go to Transaction option which allows the user to jump into the transaction associated with the notification for the user's store. This option is only available to users that have access permission for the functional area. Once in the truncation transaction the user will be able to view, edit, delete, and so on, the transaction as they would had they entered it directly assuming the user has proper permissions. Once leaving the transaction the user will return back to the Notification Detail screen.
Notification Warning Display
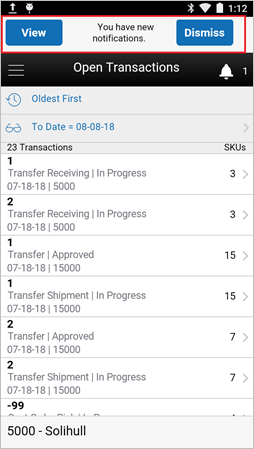
A notification warning bar is displayed at the top of the application on every screen within SOCS whenever a new notification comes into the system and is saved. The system checks every 'x' seconds for a new notification, where 'x' is a system configured amount of time. If a new notification exists for the user logged into the system, and if the user has the permission to display the notification warning, then the notification will be displayed. The user can access the details for the notification from the notification warning. The notification warning bar will be displayed until the user views or dismisses the notification or the user logs into a new session.