Using Page and Field Configurator
Page and Field Configurator gives users the flexibility to configure fields and pages in any component without having to customize delivered application pages or fields.
To configure any component using Page and Field Configurator, use the Page Configuration (EOCC_CONFIGURE), User Lists (EOCC_CONFIG_USER) and Map to Portal registry (EOCC_MAP_EVENT) pages.
|
Page Name |
Definition Name |
Usage |
|---|---|---|
|
EOCC_CONFIGURE |
Use this page to capture the page and field configuration and criteria. |
|
|
EOCC_CONFIG_USER |
Use this page to capture the list of users and/or roles to which the configuration defined in the Page Configuration page should be applied to. |
|
|
EOCC_MAP_EVENT |
Use this page to map the configuration to the Portal Registry. |
|
|
EOCC_CONFIG |
Use this page to verify the validity of the configurations defined using the Page Configuration page. |
Understanding How to Configure a Page using Page and Field Configurator
As a user, there are three steps to be completed to configure a page using Page and Field Configurator:
Define the page and field changes to be made in the selected component using the Define Configuration page.
Define the list of users and/or roles to whom the configuration needs to be applied using the User List page.
Map the configurations to the corresponding portal registry entries using the Map Configuration to Portal Registry page.
First step is to select the page to be configured, identify the specific field and capture the criteria. Next is to define the user list which identifies the users to which the new configuration is applicable. The final step is to map the configuration to the portal registry. The configuration defined in this component will become effective only if the services defined by the utility are mapped to the corresponding portal registry entries.
Define the Page and Field Configuration
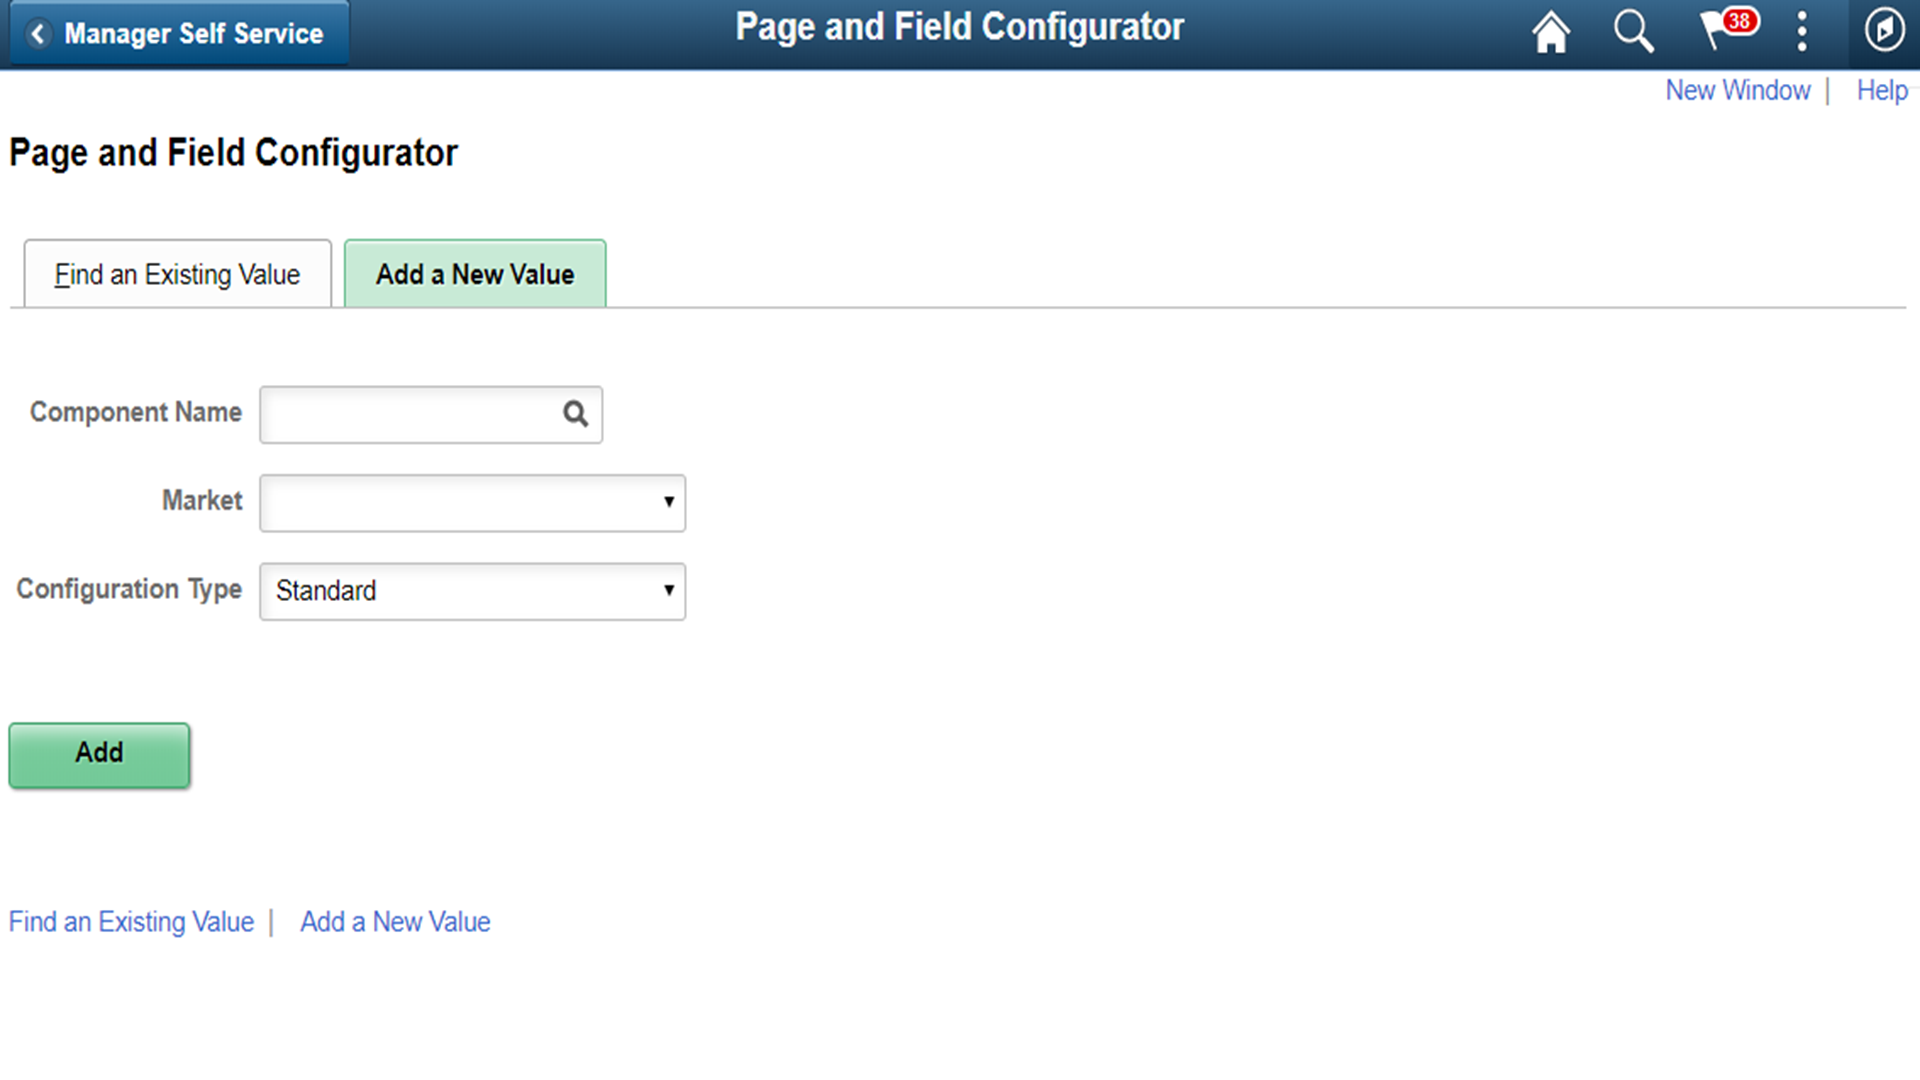
To define the page and field configuration, from the Page and Field Configuration search page, choose the Add New Value tab.
Navigation
Image: Add New Value for Page and Field Configuration
Add New Value for Page and Field Configuration
|
Field or Control |
Definition |
|---|---|
| Component Name |
Choose the component for which a new configuration needs to be done. |
| Market |
Choose the component market. |
| Configuration Type |
Choose the configuration type for the component. Available values are Standard and Masking Note: Only users with the role PFC Data Masking Admin can see the configuration type. The PeopleTools version needs to be 8.57.11 or higher. |
To configure the component for Standard Configuration Type, see Page Configuration Page
To configure the component for Masking Configuration Type, see Masking Data in Page and Field Configurator
Use the Page Configuration page (EOCC_CONFIGURE) to define the changes needed for the component.
Navigation
Image: Page Configuration page
This example illustrates the fields and controls on the Page Configuration page.

|
Field or Control |
Definition |
|---|---|
| Component Name |
Displays the name of the component as selected by the user. |
| Description |
Enter an appropriate description. |
| Market |
Displays the market for which the configuration is defined as selected by the user. |
| Status |
Select the status of the configuration. |
| Configuration Type |
Displays whether this is a Standard or Masking configuration. |
| Validate Configuration |
You can use the Validate Configuration button to verify the configuration against the underlying page metadata and identify if any errors exist. For more details, see |
Criteria
You can associate criteria with each configuration. In this section, you can capture the criteria for the component with sequence number.
|
Field or Control |
Definition |
|---|---|
| Sequence Number |
Enter the Sequence number for the configuration. Multiple configurations can be defined for same component and the sequence number is given to distinguish these configurations. Note: At the application run time, if the transactions satisfies more than one criteria defined in the configuration, then the criteria with lowest sequence number is selected for execution and the rest of the criteria and related configuration are ignored. However it works differently if Apply Additively check box is selected. For more information, see the Apply Additively section in this page. Please do not use sequence numbers from 81 to 99. These are reserved by Oracle. |
| Description |
Enter an appropriate description. |
| Status |
Select the Status of the Sequence. |
| Criteria |
Displays the criteria defined by the user using the Define Criteria or Edit Criteria hyperlink in a readable format. |
When you create a new configuration, Define Criteria link will be displayed on the page. On clicking the link you can select the fields available on the level zero of the component, an operator, and enter a value to be compared at the run time, per Sequence Number.
Image: Define Criteria page
This example illustrates the Define Criteria page.

For existing record, Edit Criteria link will appear where you can edit the criteria details. You can add a new row to add more than one condition (Field, Criteria and Value combination) for the same sequence level using the Select Fields button.
You can define criteria based on page name and field name. Once you select the page field, select the condition and enter the required value.
Note: While defining the criteria, the selected field should contain a value either from defaults or from existing transaction data. If criteria is configured on work record fields where data is populated dynamically, then at the time of criteria evaluation (Post Build event) if the system does not finds a value for the field, the criteria would fail and the configuration will not get applied.
At the run time of the component, the criteria will be evaluated only once at the time of component load. Any change in the field values selected for criteria evaluation thereafter will not result in re-evaluation of criteria.
|
Field or Control |
Definition |
|---|---|
| Copy Criteria From |
You can use this link and select a sequence number from which you can copy the criteria. |
| User List |
Click the link to open the User List page. Use this page to quickly create corresponding sequence level user list for the configuration. For more information see,User List Page. |
Apply Additively
Use the Apply Additively check box when you want to apply multiple sequences. When the Apply Additively check box is selected the component configuration is evaluated as follows:
The system evaluates sequences in ascending order starting with sequence 1. Once the criteria for a non-additive sequence (e.g. apply additively is not selected), the system proceeds to evaluate only the later sequences marked as Apply Additively.
As an example, assume sequences 1 through 4 are not applied additively, but sequences 5 through 10 are selected to apply additively. The system starts evaluation with sequence 1 and proceeds in ascending order. Assume sequence 1 and 2 criteria are not met, but sequence 3 criteria is met. The system would apply sequence 3 configuration then move to evaluating any subsequent sequences marked as Apply Additively. Sequence 5 would be evaluated next and if criteria is met, would be applied in addition to sequence 3. Sequence 4 would not be evaluated. Sequences 6-10 would also be evaluated for criteria since all are marked as Apply Additively. The display shown to the user would include all the sequences where criteria was satisfied.
If the same field is being modified in multiple sequences then both sequences will be applied. For example if a field in a sequence is marked as Disable Entry in one sequence and in another sequence which is applied additively it is marked as Modify label, then on applying the configuration that field will have the label modified as well as its text area disabled.
If a property of a field is modified on multiple sequences, then the property in the highest sequence gets applied. For example if for a field in sequence 1 you modify the label as abc and for the same field in sequence 6 you modify the label as xyz, then on applying the configuration, the label xyz will take effect.
Note: once a field has been set as disabled for entry, required for entry or hidden, then it cannot be undone in a subsequent sequence. Only labels and default values can be changed in subsequent sequences.
Masking configurations are applied after standard configurations. Masking configurations are applied additively.
Configure Field Properties
The Configure Field Properties section is used to capture the field level changes that need to be made for a component.
|
Field or Control |
Definition |
|---|---|
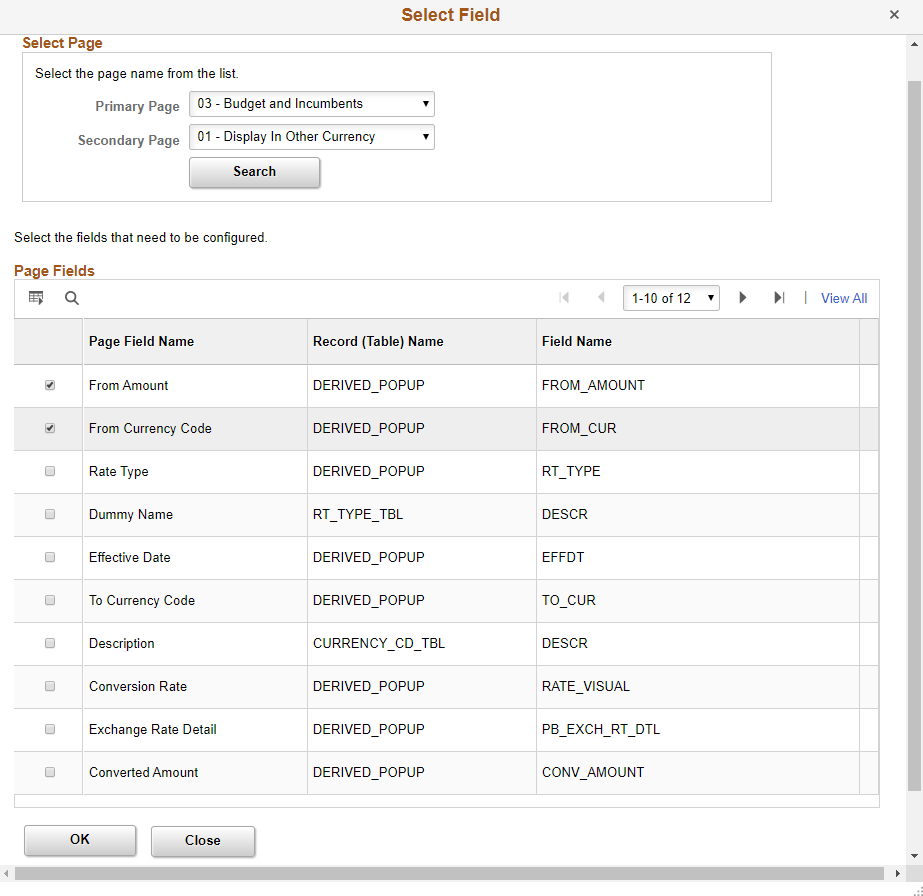
| Select Fields |
Click the Select Fields button to open Select Field page. You can use this page to select an existing field from the component. Note: Radio buttons and non-data entry fields will not be available for selection in the list. Be cautious while selecting fields on a grid or scroll area which can contain large volume of data as it could result in the performance degradation of the component. You can select multiple fields from a primary page or from the secondary page of a primary page. |
Image: Select Field page
Select Field page
|
Field or Control |
Definition |
|---|---|
| Field Name |
Based on the selected field, name of field is displayed. |
| Label Text |
Label of the field is displayed based on your selection. Note: This field is enabled only if ‘Modify Label’ check box is selected. |
| Modify Label |
Select the check box if you need to modify the label. |
| Hide Field |
Select the check box if you need to hide the field. Note: You can only hide the fields which are made visible in the application designer. The fields made invisible in application designer cannot be made visible via configuration. |
| Disable Entry |
Select the check box if you need to make the field as read-only. Note: You can disable a field only if it is by default editable in the application designer. The field which is already disabled in application designer or people code could not be made editable using the configuration. |
| Required Field |
Select the check box if you need to make the field as mandatory. Note: You can make a field mandatory which is not configured as required in the application designer. The field which is made as required in application designer or people code could not be made Not-Required by using the configuration. |
| Default Value |
Enter a value if you need to add a default value for the field. Note: The default value will be applied only when the component is open in Add mode or when a new row is inserted. The system will not do any check on the value entered on this field except for the basic format check. Be cautious while entering the default value as a non-acceptable value throws an error at run time of the selected component. You should not default a value for a field that already has additional processing associated it such as field change. |
| Copy Field Properties From |
You can use this link and select a sequence number from which you can copy the field properties. |
Configure Secondary Page
Use the Select link under Configure Field Properties to configure fields in secondary pages.
Image: Configure Secondary Page
Configure Secondary Page.

|
Field or Control |
Definition |
|---|---|
| Primary Page |
Choose the main page. |
| Secondary page |
Choose the secondary page listed under the selected primary page. |
Choose the field to be configured from the list of page field results.
Configure Page Visibility
The Configure Page Visibility section is used to hide or show the page as a whole in the component. It also has the capability to make a page as display only.
|
Field or Control |
Definition |
|---|---|
| Page Name |
Select the page that needs to be configured. |
| Visible |
Select from the following options:
Note: If all the pages of a component are selected as invisible either via the configuration or via the Application Designer or through a combination of both, then the system may behave unexpectedly as there should be at least one page visible for the component. |
| Display Only |
Select the check box to make the selected page as read only at the component run time. Note: A page which is already Display Only in Application Designer or PeopleCode could not be made editable by using the configuration. System prompts you with a warning, if you have made any field as Required Field in the configuration and if the page where the field appears is configured as Display Only or Invisible. |
Page Visibility feature is supported for all classic components and selected fluid components. Only the fluid components with left panel and side page with group box of type” Page Tab” are supported. For more information on side pages, refer the product information PeopleTools: Providing Left Navigation Using PT_SIDE_PAGETABS
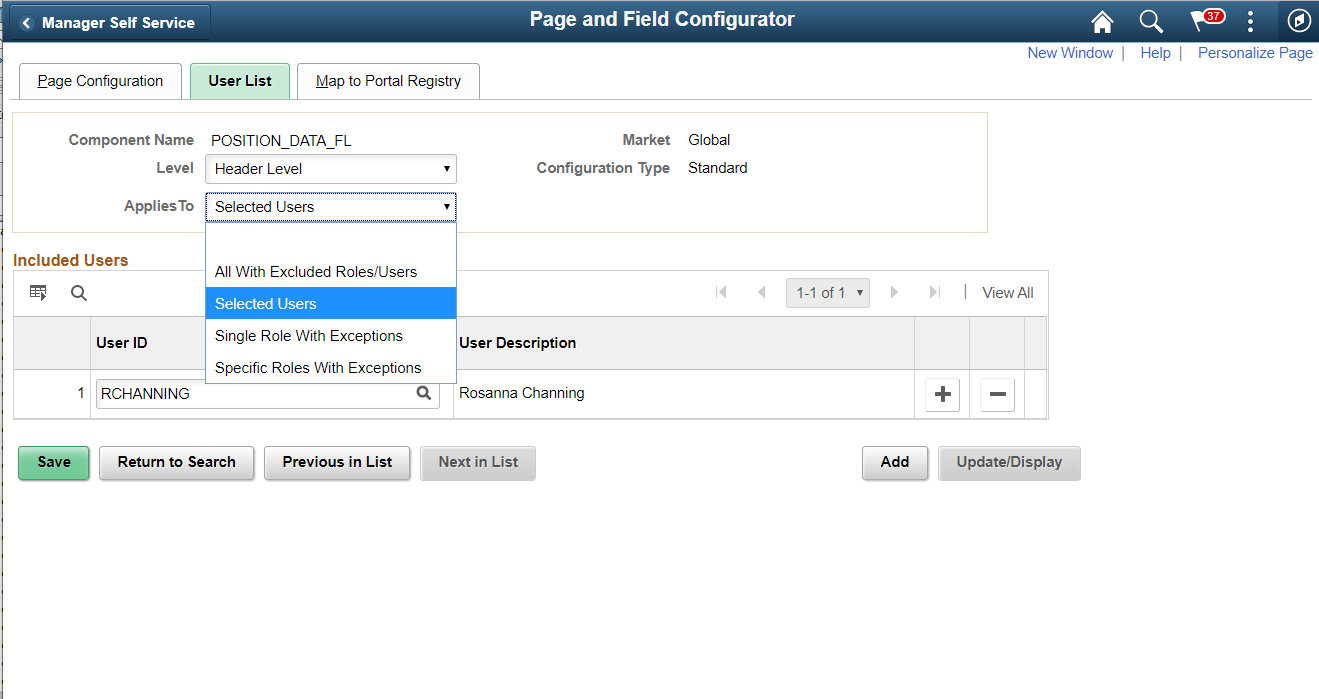
Use the User List page (EOCC_CONFIG_USER) to define the list of users to whom the configuration needs to be applied. You can create user list at Header Level where one user list covers the entire component or, at Sequence Level, where separate user list is defined for each sequence number.
Navigation
Enterprise Components, Page and Field Configuration, Page and Field Configurator, User List
Image: User List page
This example illustrates the fields and controls on the User List page.
|
Field or Control |
Definition |
|---|---|
| Level |
The user list can be applied either on the Header Level or on the Sequence Level.
|
| Applies To |
Select from the following options:
|
| Role |
Select the role to which the configuration needs to be applied. |
| User ID |
Select the User ID of the users to which the configuration needs to be applied if ‘Applies To’ is selected as ‘Selected Users’. When the ‘Applies To’ is selected as ‘All Users with Exception’ or ‘Selected Role with Exception’, the User ID will correspond to the User to which this configuration need not be applied to. Note: When the ‘Applies To’ is selected as ‘Selected Users’, the grid Excluded Users will be replaced with User List grid. |
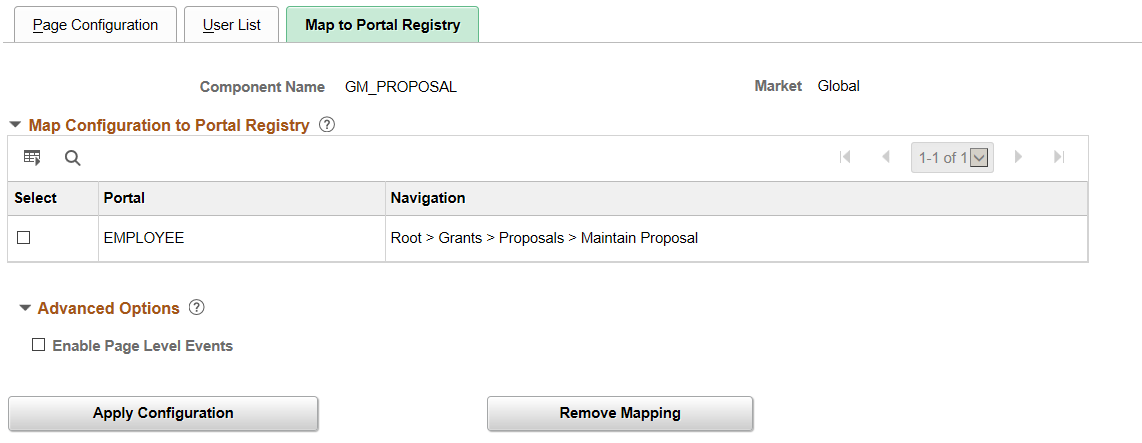
Use the Map to Portal Registry page (EOCC_MAP_EVENT) to map the configurations to Portal Registry. The defined configuration will be effective only when the Services defined by the utility is mapped to the corresponding portal registry entries.
Note: Access to this page is restricted based on the access to People Tools Events Mapping component.
Navigation
Enterprise Components, Page and Field Configuration, Page and Field Configurator, Map to Portal Registry
Image: Map to Portal Registry
This example illustrates the fields and controls on the Map to Portal Registry page.
|
Field or Control |
Definition |
|---|---|
| Select |
Select the required portal registry entries to map the configuration. |
| Enable Page Level Events |
Select this checkbox to enable mapping of Page and Field Configurator to Page Activate people code events. Once the page level events are enabled, the field configurations defined in the Page Configuration tab will preside over any application delivered Page Activate event people code. Note: By default this will be enabled for fluid components. |
| Apply Configuration |
Once you have selected the portal registry for mapping, click Apply Configuration button. If it is an existing configuration, system re- creates the configuration after removing the existing one. The system issues appropriate warning message to notify the user about the same. |
| Remove Mapping |
Use this button to clear the Event Mapping configurations defined earlier. |
| Review/Editing Mapping |
Click this link to review/edit the mappings generated by the Page and Field Configurator in the Event Mapping page delivered by People Tools. For more information on Editing the Event Mapping, see Configuring the Event Mapping Manually Note: The Review/Editing Mapping link will be visible only if the Page and Field Configurator services are mapped to the corresponding portal entry. |
At the time of page save, if any potential errors in configurations are detected, the system will issue a warning message to the user stating the reason. However it is left to the user to take the final action to proceed with the configuration.
Note: During the process of mapping the configurations, if the system faces any exceptions, the system prompts the user to generate the Event Mapping manually.
If any changes are made to the configuration, the Page and Field Configurator services need to be mapped again to the portal entry using the Apply Configuration push button.
Use the Validate Page Configurations page (EOCC_CONFIG) to verify the validity of the configurations defined using the Page Configuration page. This component can be used to verify the validity of the configurations after any system update or application of fix or patch. Any changes to the page or page field meta data of the fields and pages selected in Page and Field Configuration will be reported as validation error.
Navigation
Enterprise Components, Page and Field Configuration, Validate Page Configurations
Image: Validate Page Configurations page
This example illustrates the Validate Page Configurations page.
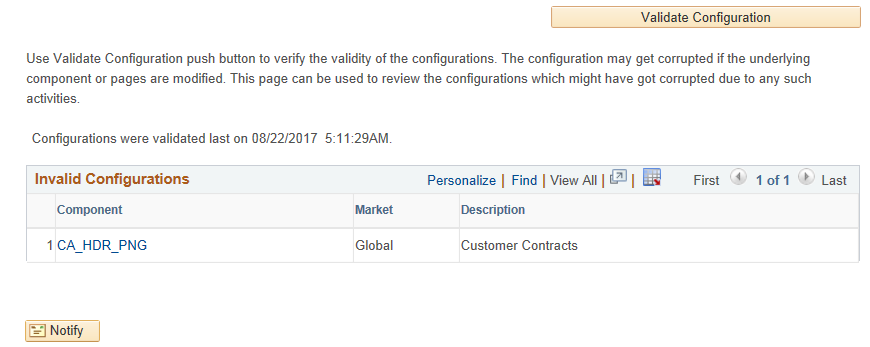
The Component listed in the Invalid Configuration section is a hyper link. Click the link to directly open the corresponding configuration.
The page and field configuration can be exported as ADS (Application Data Set) zip files and can be imported back to the desired database. The data set definition EOCC_CONFIGURATION can be used to export the configuration defined in one environment to another.
Note: The Data Set EOCC_CONFIGURATION will contain only the Page and Field related configurations. Any Event Mapping related configurations needs to be exported/imported separately using the corresponding ADS definitions. Alternatively, users can use the Apply Configuration push button on the "Map to Portal Registry" page to generate the Event Mapping configuration on the target environment."
See the product documentation for:
PeopleTools: Copying and Comparing ADS Projects
PeopleTools: Upgrading or Copying Related Content Data Using ADS Definitions
This topic discuss on configuring the event mapping manually if the Apply Configuration push button on the Map to Portal Registry fails to map the events automatically.
The configuration can be mapped to each of the registered entity of the component using the “Event mapping” page (Main Menu> PeopleTools> Portal> Related Content Service> Manage Related Content Service). For more information on the fields and controls on the Event Mapping page, see Mapping Application Class PeopleCode to Component Events in PeopleTools documentation.
Note: You may need to map the services manually only if you have other Services already mapped to the Component or if the system prompts you to do so. In all other cases you could map the services for the configuration using the “Apply Configuration” push button.
To map the events manually, follow the below guidelines:
Map the service EOCC_POSTBUILD to the PostBuild event (Component Level Event Mapping grid) of the component.
Map the service EOCC_SAVEPRECHANGE to the SavePreChange event (Component Level Event Mapping grid) of the component.
For all the fields selected in the configuration residing on a scroll level greater than zero of the component ( the fields on the grids and scroll areas), map the services EOCC_ROWINIT and EOCC_ROWINSERT to the Component Records (Component Record Level Event Mapping grid) RowInt and RowInsert events respectively.
For fields residing on scroll levels greater than 1 of the component, map the service EOCC_ROWINIT to the RowInit event on the Component Record (Component Record Level Event Mapping grid) for the primary records of its parent level up to level 1.
For example, if there is a component with four levels having primary records Record0, Record1, Record2, and Record3 respectively. For a configuration of any field on the Level 3, the RowInit events of its parent record Record2 and Record1 needs to be configured in addition to the RowInit and RowInsert events of the Record3.
The RowInit and RowInsert events should be mapped to the primary record of the scroll area. For example if the related display field in a grid is configured in the utility, the services need to be mapped to the grid’s primary record. It should not be mapped to the related field’s record.
If the PeopleTools version is 8.55 instead of using the services EOCC_ROWINIT and EOCC_ROWINSERT directly, the services should be cloned for each instance and the cloned instance should be used. The services can be cloned from the Define Related Content Service (Main Menu> PeopleTools> Portal> Related Content Service). The services can be cloned to any new names such as EOCC_ROWINIT_1, EOCC_ROWINIT_2 etc.
To override the page level PeopleCode, map the service EOCC_PAGEACTIVATE to the Page Activate Event (Component Page Level Event Mapping grid) for the required pages.
Select the Processing Sequence as “Post Process” for all the service configurations.