Using the PeopleSoft Fluid User Interface to Review and Update Personal Information
This topic discusses how employees use the PeopleSoft Fluid User Interface to view and update their personal information. The fluid pages discussed in this topic have classic equivalents that are discussed in the topic Reviewing and Updating Personal Information.
This video provides an overview of the PeopleSoft Fluid user interface experience:
For general information about Fluid pages in PeopleSoft HCM, see Understanding PeopleSoft Fluid User Interface Home Pages
|
Page Name |
Definition Name |
Usage |
|---|---|---|
|
HC_HR_PDTL_LAUNCH_FL_GBL (this is the cref for the tile) |
Access a group of fluid pages that are used to view and maintain your personal information. |
|
|
HC_HR_PERS_DTLS_FL_GBL (cref for the Personal Details dashboard) |
View dynamic data for personal data using tiles. |
|
|
N/A |
View and update personal details within the context of a multi-panel layout. When using a medium to large form factor device, the application displays a left panel navigation, which consists of page category tabs from which you select to view contextual data in the main panel. When using a small form factor, such as a smartphone, the page category items will display by default when you select the Personal Details tile. Select a page list item to access that page. |
|
|
HRCD_USER_PICS_SCF |
Upload or select an employee photo to display in self-service and throughout the system. |
|
|
HR_EE_ADDR_FL |
View your home address and mailing address. |
|
|
ADDRESS_DFT_SCF |
Update address information and view or add attachments that may support the update. |
|
|
HR_EE_CONTACTS_FL |
Review your phone numbers, email addresses, and instant messaging IDs. |
|
|
HR_CNCT_PHONE_SCF |
Add, update, or delete a phone number. |
|
|
HR_EMAIL_ADDRS_SCF |
Add, update, or delete an email address. |
|
|
HR_IM_CHAT_SCF |
Add, update, or delete an instant messaging ID. |
|
|
HR_EE_SOC_MEDIA_FL |
Review your social media accounts. |
|
|
HR_SOC_MEDIA_SCF |
Add, update, or delete social media accounts on your personal profile. |
|
|
W3EB_SEL_EVNT_FLU (if eBenefits is active) HR_EE_MARITAL_FL (if eBenefits is not active) |
Enter a marital status change. |
|
|
HR_EE_NAME_FL |
View your current name and any pending name change requests |
|
|
NAME_DFT_SCF |
Enter name change information and view or add attachments that may support the update. |
|
|
HR_ETHNIC_GRP_FL |
View your ethnic group data. |
|
|
HR_ETHNIC_GRP2_SCF |
Enter ethnicity information when the system is configured to collect the information using the two-question format. |
|
|
HR_ETHNIC_GRP_SCF |
Add, update, or delete an ethnic group from your personal data. |
|
|
HR_EMERG_CNTCT_FL |
View a list of your emergency contacts. |
|
|
HR_EMERG_CNTCT_SCF |
Add, update, or delete an emergency contact. |
|
|
HR_EMERG_ADDR_SCF |
Add, update, or delete an address for an emergency contact. |
|
|
HR_EMERG_PHONE_SCF |
Add, update, or delete a phone number for an emergency contact. |
|
|
HR_ADDTL_INFO_FL |
Review miscellaneous personal information. |
|
|
HR_EE_BUS_PRTNR_FL |
View your business partners and their contact information. |
|
|
Disability - Voluntary Self-Identification of Disability Page |
HR_DISABILITY_FL |
Complete and file Form CC-305 disability data electronically. |
|
HR_VET_STATUS_FL |
Enter and update self-identification veteran information. |
|
|
HR_I9_EE_FL |
Access the I-9 instructions PDF, access the Form I-9 page (HR_I9_EE) where you enter personal employee eligibility information, and review the date on which you submitted your Form I-9, |
|
|
Employment Eligibility Verification Page, Section 1 |
HR_I9_EE |
Complete the employer sections (2 and 3) of the Form I-9. See Employment Eligibility Verification Page, Section 1 (HR_I9_EE) and Employment Eligibility Verification Page, Section 2 and Section 3 (HR_I9_ADMIN_SEC2) in your Human Resources Administer Workforce product documentation. |
|
USCIS Form I-9 - Submit Confirmation Page |
EO_SUBMIT_CONFIRM |
View a confirmation that you have successfully submitted the Form I-9. See (USA) Managing I-9 Information in your Human Resources Administer Workforce product documentation. |
Use the Personal Details tile to access a group of fluid pages that are used to view and maintain your personal information.
Navigation
Select Fluid Home under the main menu. On the page that appears, select Employee Self Service. The Personal Details tile is available on the Employee Self Service landing page.
As an employee, you can add the tile, through personalization, to a system-delivered homepage or a homepage that you create.
Image: Personal Details tile
This example illustrates the Personal Details tile.

Image: (USA) Personal Details tile displaying the Action Required message
This example illustrates the Personal Details tile displaying the Action Required message. This message appears when an employee working in the U.S. needs to submit I-9 form information.
Depending upon the system setup and personal preferences, the picture may display a default photo.
Select the Personal Details tile to access a collection of frequently-used employee transactions easily without using traditional menu navigations. These self-service transaction pages may include:
Accessing Personal Details Transaction Pages
The layout and how you access the self-service transaction pages within the Personal Details component will vary based on your role security. The PeopleSoft application provides you with two Personal Details navigation methods based on user role:
Personal Details Dashboard: This access method displays tiles on the Personal Details dashboard. The tiles contain live data that can help indicate to users if they need to perform actions. When accessing the transaction pages through the dashboard tiles, the title of the page will appear in the banner at the top of the page.
To view this dashboard and tiles, you must be assigned the Fluid Dashboard - Person Dtls role.
Personal Details Navigation Collection: This access method displays the fluid navigation collection folders and links in the left panel. When accessing the transaction pages through the navigation collection, the title of the page will appear on the content page.
To view the navigation collection, you should not be assigned the Fluid Dashboard - Person Dtls role.
Note: Throughout this topic, the page illustrations show the individual transaction pages as it appears when accessing the pages through the navigation collection (with the page title on the page). Keep in mind that:
—When accessing the transaction pages through the dashboard, the title of the transaction does not appear on the page but rather in the banner above the page.
—When accessing the transaction pages through the navigation collection, even though the left navigation panel is not illustrated, remember that the navigation panel appears within the framework of the medium and large form factor pages.
Use the Personal Details dashboard (cref HC_HR_PERS_DTLS_FL_GBL) to view dynamic data for personal details using tiles.
Navigation
Select the Personal Details tile.
Note: The Personal Details dashboard is displayed if the logged-in user is a member of the Fluid Dashboard - Person Dtls user role.
The Personal Details dashboard displays in a multi-tile layout and provides a two-step process to view and update personal information. This navigation type consists of the following pages and sections:
Dashboard Tiles
Displays self-service transaction tiles. Each tile lists pertinent data of the corresponding transaction for quick reference and indicates to the user if he or she needs to perform an action or the last time he or she updated the information. For example, many of the tiles display the last time a user updated the information, the number of details the user has recorded for the transaction, or if action needs to be or has been taken. Users can add, delete, or move tiles as needed using the Personalize Dashboard actions menu option. If a user does not have access to a transaction, then the tile will display a message indicating that he or she does not have access to this information.
Image: Personal Details Dashboard
This example illustrates Personal Details dashboard.
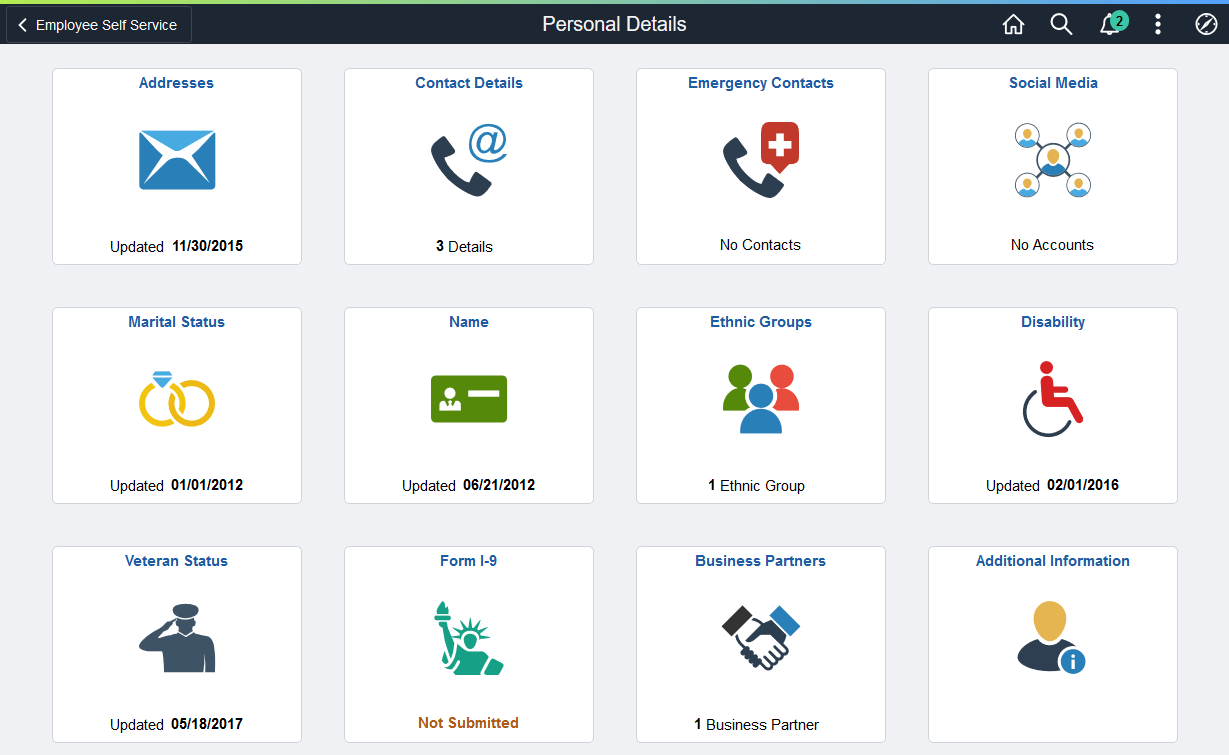
Image Highlights, PeopleSoft HCM Update Image 34: Self-Service Navigation Updates
Select a tile to access the transaction page and view more details or potentially update transactional details.
Transaction Page
The Personal Details transaction pages display the employee content that corresponds to the transaction tile you selected on the dashboard and consists of the following sections:
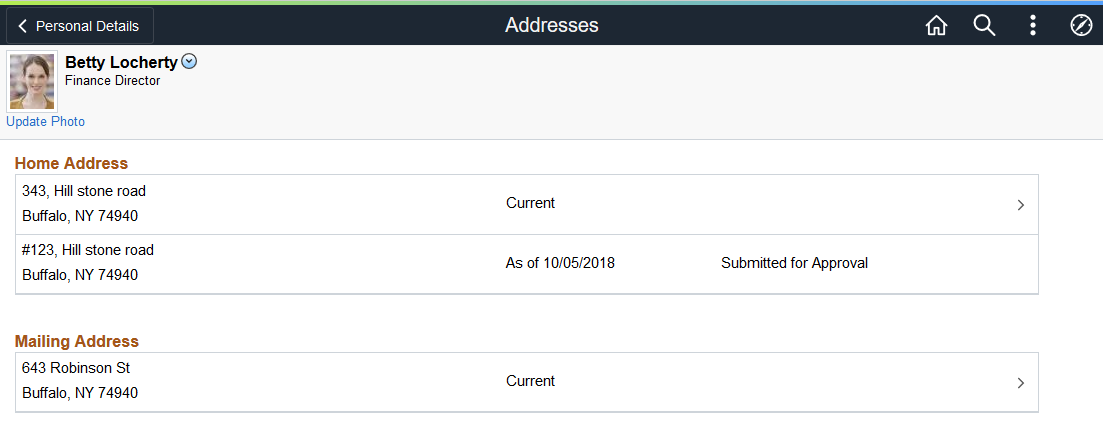
Image: Example of the Addresses Transaction Page Accessed from the Personal Details Dashboard
This example illustrates the Personal Details - Addresses page accessed from the Personal Details dashboard.
Banner and Page Title
The application displays the name of the transaction in the banner above the page after you select the tile.
|
Field or Control |
Definition |
|---|---|
 Personal
Details Back button Personal
Details Back button |
Click the back button to return to the Personal Details dashboard and access other transaction tiles. |
Header (Sub-Banner)
Below the banner, above the transaction content page, is the header and it includes the employee’s name, job title, the Update Photo link if enabled on the Installation Table (Select Photo Page), and the Related Actions menu icon. The related actions icon provides access to additional self-service transactions, if applicable.
See Common Header for Employee Self-Service Pages
Content
The page displays the employee content that corresponds to the transaction tile you selected on the dashboard.
Use the Personal Details dashboard to view or update personal details within the context of a multi-panel layout.
Navigation
Select the Personal Details tile.
Note: The Personal Details navigation collection is displayed if the logged-in user is NOT a member of the Fluid Dashboard - Person Dtls user role.
Image: (Desktop or Tablet) Personal Details Navigation Collection and Page Layout
This example illustrates the Personal Details page layout for a larger device. The left panel navigation shows a list of pages and the content that corresponds to the current category appears in the right panel.
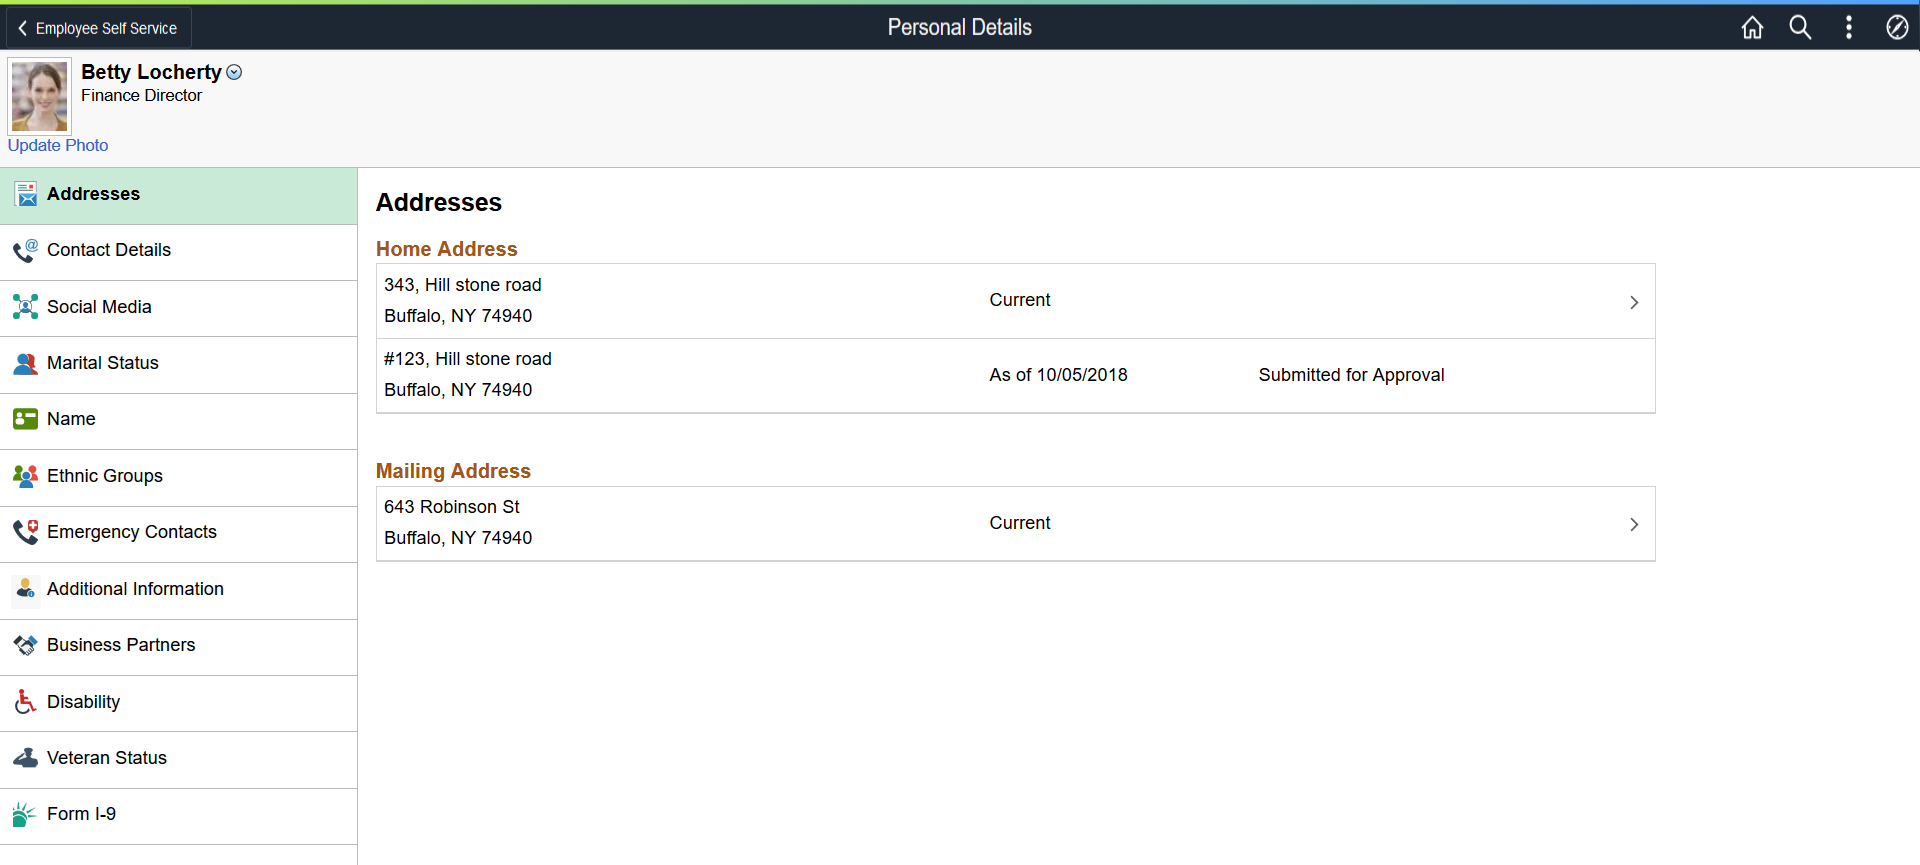
Image: (Smartphone) Personal Details Navigation Collection and Page Layout
This example illustrates the Personal Details page layout on a small form factor device. In the first image, the left panel is hidden, which is the default when you first access the Personal Details pages. In the second image, the left panel is exposed by clicking the navigation tab, which enables you to select other pages.
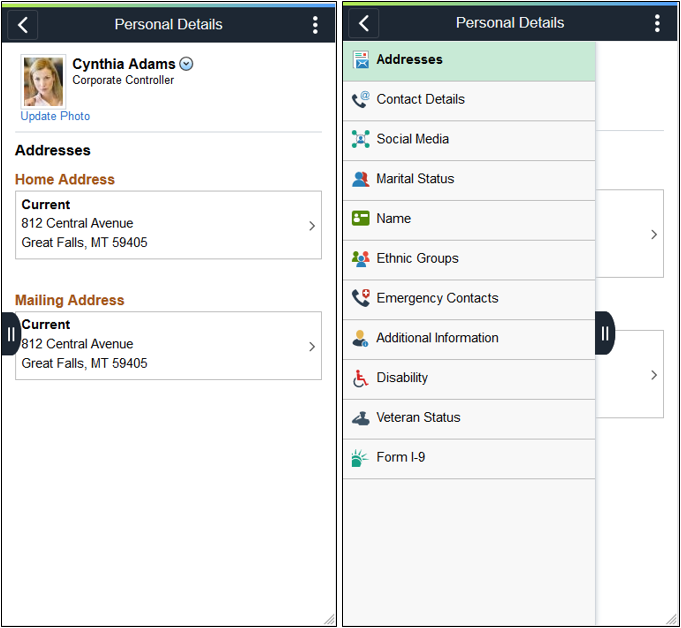
The Personal Details navigation collection page consists of the following panels and sections:
Header (Sub-Banner)
The top panel displays the header and includes the employee’s name, job title, if enabled on the Installation Table the Update Photo link (Select Photo Page), and the Related Actions menu icon. The related actions icon provides access to additional self-service transactions, if applicable.
Content Navigation
You will access the panel navigation slightly differently when using a large or small form factor device:
(Tablet or Desktop) Left panel navigation: When using a large form factor device, like a tablet or workstation, the Personal Details pages display a left navigation panel. This left panel lists the various page categories that make up the employee personal data. Select the navigation collection page name in the left panel to display the content in the right, or main panel. By default, the system displays the transaction page of the first navigation collection page.
(Smartphone) Hidden panel navigation: When using a small form factor device, like a smartphone, select the show panel navigation tab in the middle, left of the page to expand the panel and select other Personal Details pages. The small form factor devices also show the page name in the banner. By default, the system displays the transaction page of the first navigation collection page.
Field or Control
Definition
 (show or hide panel navigation) tab
Select the left tab to display the navigation collection and access transaction pages.
Content Panel
The main panel displays the employee content that corresponds to the category, or transaction, you selected in the navigation panel. It is the default display when using a small device.
Use the Select Photo page to upload or select an employee photo to display in self-service and throughout the system.
Navigation
Select the Update Photo link beneath the photo within the header of any of the Personal Details transaction pages.
Note: The Update Photo link is available only when the Allow Employee to Upload Photo option is enabled on the Installation Table - HCM Options Page
Image: Select Photo page
This example illustrates the Select Photo page.
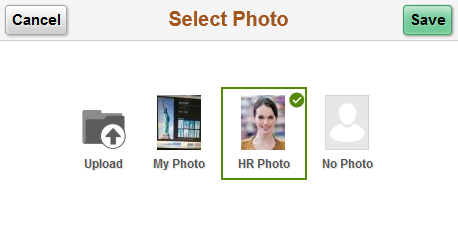
Use these option to choose the photo for pages that display an employee photo throughout the system:
|
Field or Control |
Definition |
|---|---|
| Upload |
Select to upload your own photo image. This image becomes the My Photo image. The photo must be a JPEG. The system will re-size photos to not exceed 256KB. |
| My Photo |
Select this option to have the pages that display an employee photo show the latest photo image that you have uploaded. If you have not uploaded an image for yourself, this option is not available. |
| HR Photo |
Select this option to have the pages that display an employee photo show the official HR photo image of yourself. |
| No Photo |
Select this option to have the pages that display an employee photo show a dummy photo image. |
Use the Addresses (Summary) page (HR_EE_ADDR_FL) to view your home address and mailing address.
Navigation
Select the Personal Details tile on a PeopleSoft Fluid Employee Self Service home page.
If you are already on a Personal Details fluid page, select the Addresses tab or tile.
Image: Addresses (summary) page
This example illustrates the Addresses (summary) page.
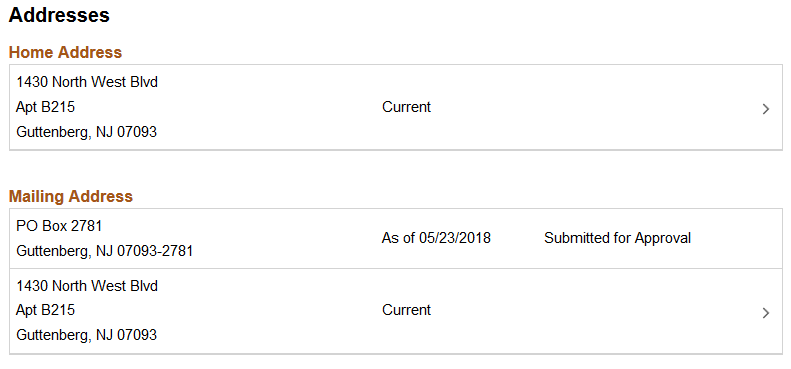
Note: The page display may vary by device and access method. For example, the transaction name appears on the content page when accessing the information from the navigation collection. When accessing the page from the Personal Details dashboard, the title of the page appears in the banner.
Select an address to view details on the Address (Detail) Page and make changes.
When using approvals (AWE) and the user submits a change request for this transaction, the row will show the current row and the proposed change request row. The change request row will show the as of date and the status that it has been sent for approval. You cannot access the address details for pending requests. If the request is approved, the new address will become the current row on the as of date, at which point the earlier address will no longer appear on the page.
For information on where to approve a request, see Using Fluid Approvals to Approve Self Service Transaction Requests.
Use the Address (detail) page (ADDRESS_DFT_SCF) to update address information and view or add attachments that may support the update.
Navigation
Select an address on the Addresses (summary) page to update an existing address.
Select the Add Address button or icon to add a new address. This option is available for an address type (home or mailing address) only if no address currently exists.
Image: Address (detail) page
This example illustrates the Address (detail) page.
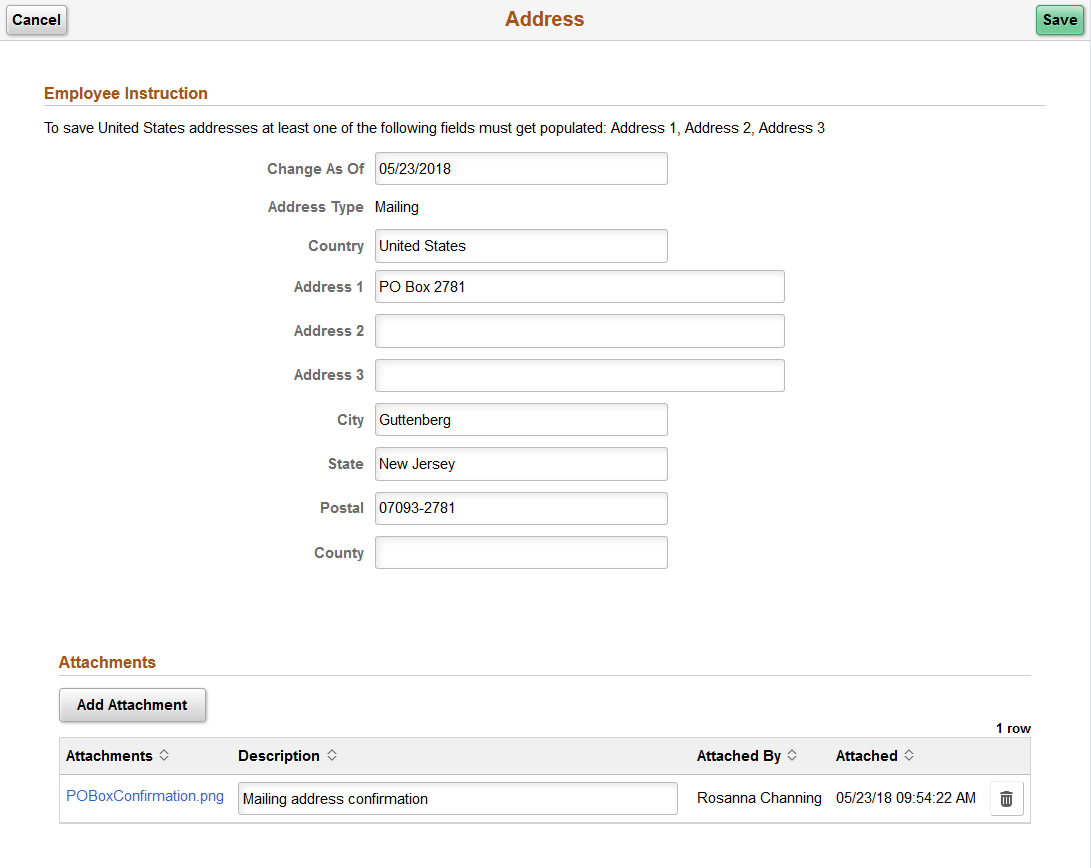
The address format varies depending on the value in the Country field.
When approvals workflow has been set up for this transaction and you select Save, the top of the page will display a confirmation that the transaction request has been sent for approval.
Attachments
Use this section to manage attachments by uploading, deleting, or updating attachments using fluid. Attachments are not accessible from the classic pages. Attachments are saved in the PS_HR_ESS_ADDR_ATT table. When a user submits an address change for approval, all attachments on this page will be sent with the request. To send an address change request without an attachment, remove the items from this section.
|
Field or Control |
Definition |
|---|---|
| Add Attachment |
Select this button to access the File Attachment page and upload files. |
| Attachments and Description |
Select the link to download and view the attachment. Enter a description, or the field will use the attachment file name as the description upon saving the page, which you can overwrite. |
 (Delete) button (Delete) button |
Select this button to remove an attachment from your personal details address page. |
Managers use fluid Approvals to view attachments for an Address Change transaction request using the Attachments Page.
The following videos provide an overview and demonstration of the Fluid Attachment framework:
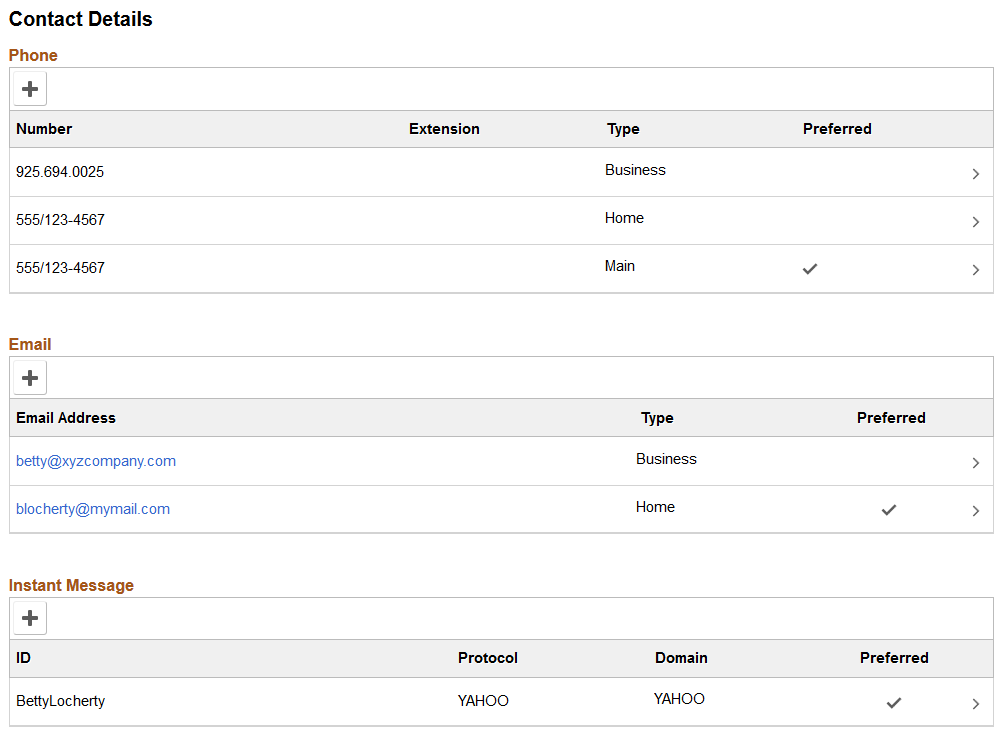
Use the Contact Details page (HR_EE_CONTACTS_FL) to review your phone numbers, email addresses, and instant messaging IDs.
Navigation
Select the Personal Details tile on a PeopleSoft Fluid Employee Self Service home page, then select the Contact Details tab or tile on the Personal Details page.
Image: Contact Details page
This example illustrates the Contact Details page.
Note: The page display may vary by device and access method. For example, the transaction name appears on the content page when accessing the information from the navigation collection. When accessing the page from the Personal Details dashboard, the title of the page appears in the banner.
Select a row to update or delete a contact type or select the Add button for a section to add a contact. This will take you to one of the following pages:
Use the Phone Number page (HR_CNCT_PHONE_SCF) to add, update, or delete a phone number
Navigation
Select a phone number row on the Contact Details page to update or delete an existing phone number.
Select the Add Phone Number button or icon to create a new phone number.
Image: Phone Number page
This example illustrates the Phone Number page.

Only one phone number can be preferred, so selecting the Preferred check box removes the preferred status from any other phone number.
Select the Delete button to remove the phone number. If you delete a preferred phone number, the system displays a confirmation message. If the delete is confirmed, the system automatically marks the first remaining phone number as preferred.
Use the Email Address page (HR_EMAIL_ADDRS_SCF) to add, update, or delete an email address.
Navigation
Select an email address row on the Contact Details page to update or delete an existing email address.
Select the Add Email Address button or icon to create a new email address.
Image: Email Address page
This example illustrates the Email Address page.

Only one email address can be preferred, so selecting the Preferred check box removes the preferred status from any other email address.
Select the Delete button to remove the email address. If you delete a preferred email address, the system automatically marks the first remaining email address as preferred.
Use the Instant Message page (HR_IM_CHAT_SCF) to add, update, or delete an instant messaging ID.
Navigation
Select an instant message ID row on the Contact Details page to update or delete an existing instant message ID.
Select the Add Instant Message button or icon to create a new instant message ID.
Image: Instant Message page
This example illustrates the Instant Message page.

Only one instant message ID can be preferred, so selecting the Preferred check box removes the preferred status from any other instant message ID.
Select the Delete button to remove the phone number. If you delete a preferred instant message ID, the system displays a confirmation message. If the delete is confirmed, the system automatically marks the first remaining instant message ID as preferred.
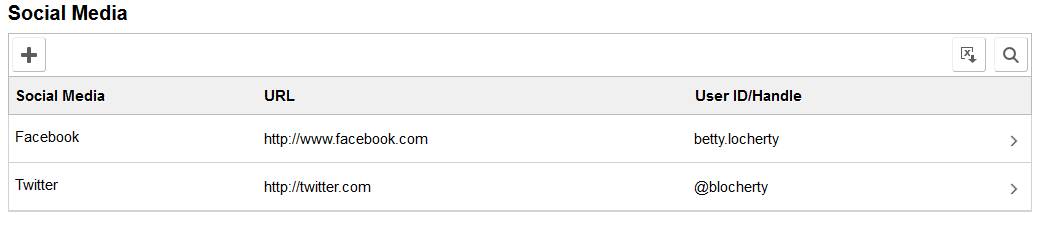
Use the Social Media (Summary) page (HR_EE_SOC_MEDIA_FL) to review your social media accounts.
Navigation
Select the Personal Details tile on a PeopleSoft Fluid Employee Self Service home page, then select the Social Media tab or tile on the Personal Details page.
Image: Social Media (summary) page
This example illustrates the Social Media (summary) page.
Note: The page display may vary by device and access method. For example, the transaction name appears on the content page when accessing the information from the navigation collection. When accessing the page from the Personal Details dashboard, the title of the page appears in the banner.
Select the Add (+) button to add a social media account or select a row to update or delete a social media account. Perform either of these actions to access the Social Media (Detail) Page where you maintain social media account information.
|
Field or Control |
Definition |
|---|---|
 Download to Excel Social Media button Download to Excel Social Media button |
Select this button to export the data to an Excel spreadsheet. |
 Find Social Media button Find Social Media button |
Select this button to enter a search string and quickly locate a row of information. |
Use the Social Media (Detail) page (HR_SOC_MEDIA_SCF) to add, update, or delete social media accounts on your personal profile.
Navigation
Select a social media row on the Social Media (Summary) page to update or delete an existing social media account.
Select the Add Social Media button to create a new social media account.
Image: Social Media (detail) page
This example illustrates the Social Media (detail) page.
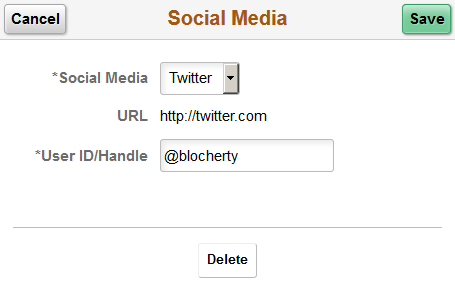
Use this page to add, update, or delete your social media accounts. Unlike other pages in the Personal Details pages, this does not update information stored in HR Personal Data pages.
|
Field or Control |
Definition |
|---|---|
| Social Media and URL |
Select a social media type. When you select a social medial type, the URL field displays. Valid social media types and their URLs are defined on the Social Media Type Page. You can add only one account per social media type. After you have entered information for a social media type, that type no longer appears in the drop-down list. |
| User ID/Handle |
Enter the user ID or handle for the social media account. |
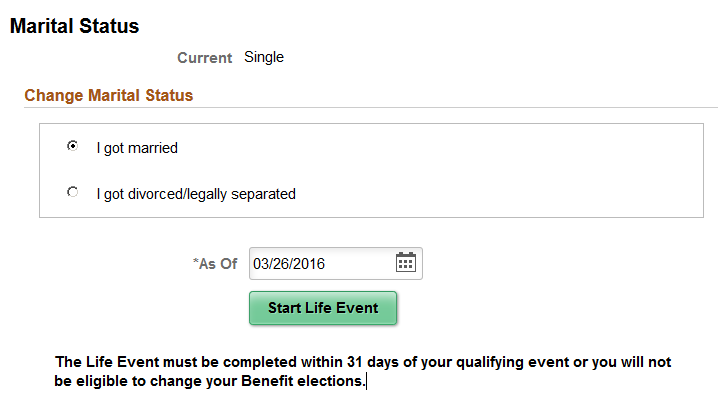
Use the Marital Status page (W3EB_SEL_EVNT_FLU) to initiate a marital status change life event.
Navigation
Select the Personal Details tile on a PeopleSoft Fluid Employee Self Service home page, then select the Marital Status tab or tile on the Personal Details page.
Image: Marital Status page with eBenefits
This example illustrates the Marital Status page as it appears when PeopleSoft eBenefits is selected on the Installation Table - Products Page.
Note: The page display may vary by device and access method. For example, the transaction name appears on the content page when accessing the information from the navigation collection. When accessing the page from the Personal Details dashboard, the title of the page appears in the banner.
When PeopleSoft eBenefits is installed, the Marital Status page lists your organization’s life event options that relate to marital status changes. As delivered, this includes the “I got married” event and the “I got divorced/legally separated event,” but these are configurable.
When you select the type of marital status change, the page displays a message with information about the time period within which the life event information must be submitted (for example, within 31 days of the event).
Next you enter the event date in the As Of field and select the Start Life Event button. The system then displays the life event pages where you complete the transaction.
For information about the pages used for the two delivered marital status change events, see the following topics:
For information on where to approve a request, see Using Fluid Approvals to Approve Self Service Transaction Requests and Pages Used to Approve Self Service Transaction Requests Using Fluid Approvals.
Image: Marital Status page without eBenefits
This example illustrates the Marital Status page as it appears when PeopleSoft eBenefits is not installed.
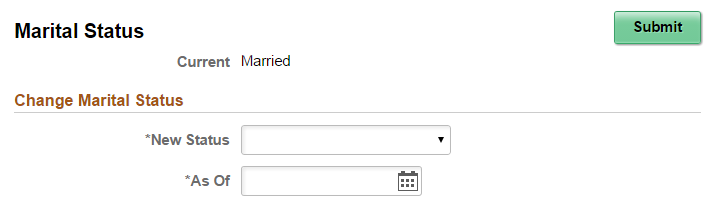
When PeopleSoft eBenefits is not installed, enter marital status change information and submit the changes directly on the Marital Status page.
Use the Name (summary) page (HR_EE_NAME_FL) to view your current name and any pending name change requests.
Navigation
Select the Personal Details tile on a PeopleSoft Fluid Employee Self Service home page, then select the Name tab or tile on the Personal Details page.
Image: Name (summary) page
This example illustrates the Name (summary) page.

Note: The page display may vary by device and access method. For example, the transaction name appears on the content page when accessing the information from the navigation collection. When accessing the page from the Personal Details dashboard, the title of the page appears in the banner.
In this example, the employee has submitted a name change request. If the request is approved, the new name will become the current name on the As Of date, at which point the earlier name will no longer appear on the page.
For information on where to approve a request, see Using Fluid Approvals to Approve Self Service Transaction Requests.
Because there is a pending name change request, selecting the names does not display the name details. When there is no pending name change request, selecting the current name displays the Name (Detail) Page.
Use the Name (detail) page (NAME_DFT_SCF) to enter name change information and view or add attachments to support the change.
Navigation
Select your name on the Name (summary) page.
Image: Name (detail) page
This example illustrates the Name (detail) page.

The fields on this page vary depending on the value in the Name Format field.
If approvals are required for name changes, submitting a name change request starts the approval process, and no further name changes requests are permitted until the active request is approved or denied.
Managers can use fluid Approvals to take action on a Name Change transaction request using the Pending Approvals - <Transaction Name> Page.
Attachments
Use this section to manage attachments by uploading, deleting, or updating attachments. When a user submits a name change for approval, all attachments on this page will be sent with the request. To send a name change request without an attachment, remove the items from this section.
|
Field or Control |
Definition |
|---|---|
| Add Attachment |
Select this button to access the File Attachment page and upload files. |
| Attachments |
Select the link to download and view the attachment. Enter a description, or the field will use the attachment file name as the description upon saving the page, which you can overwrite. |
| (Delete) button |
Select this button to remove an attachment from your personal details name page. |
Managers use fluid Approvals to view attachments for a Name Change transaction request using the Attachments Page.
The following videos provide an overview and demonstration of the Fluid Attachment framework:
PeopleSoft Fluid HCM Attachments
Image Highlights, PeopleSoft HCM Update Image 26: Fluid Attachments -- HR Core
Use the Ethnic Groups page (HR_ETHNIC_GRP_FL) to view your ethnic group data.
Navigation
Select the Personal Details tile on a PeopleSoft Fluid Employee Self Service home page, then select the Ethnic Groups tab or tile on the Personal Details page.
Image: Ethnic Groups page: two-question format
This example illustrates the Ethnic Groups page as it appears when two-question format is activated on the USA section on the Installation Table - Country Specific Page.
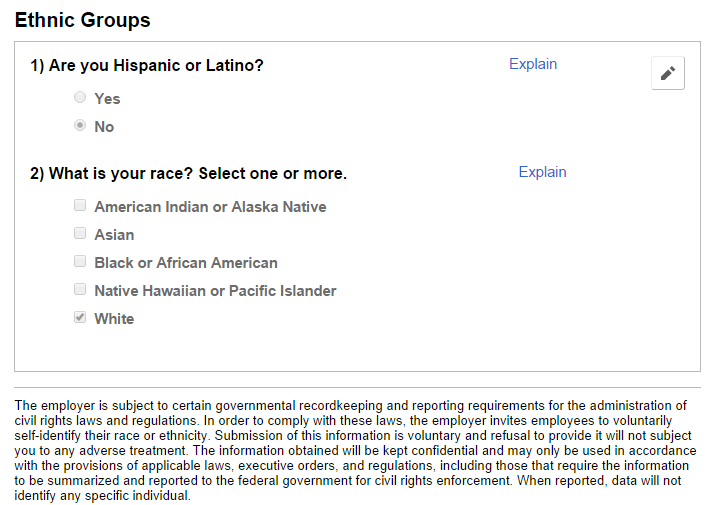
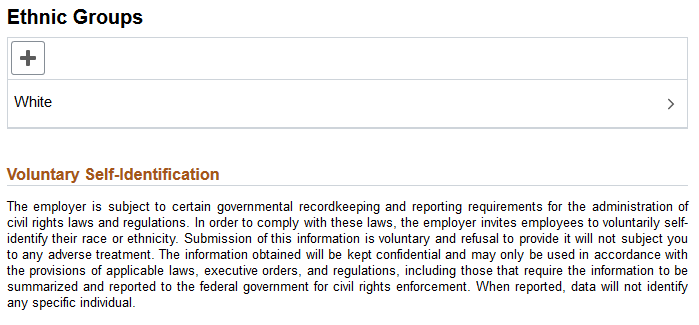
Image: Ethnic Groups page: list of ethnic groups
This example illustrates the Ethnic Groups page as it appears when the two-question format is not used. In this mode, the page lists specific ethnic groups.
Note: The page display may vary by device and access method. For example, the transaction name appears on the content page when accessing the information from the navigation collection. When accessing the page from the Personal Details dashboard, the title of the page appears in the banner.
To edit ethnicity information:
When the page is in two-question mode, select the Edit icon (or select the questions anywhere except on the Explain links) to access the Ethnicity page.
Select the Explain links to view definitions of the terms used in the questions.
When the page is not in two-question mode, select an existing ethnic group to view and update it, or select the Add an Ethnic Group button or icon to add an additional ethnic group.
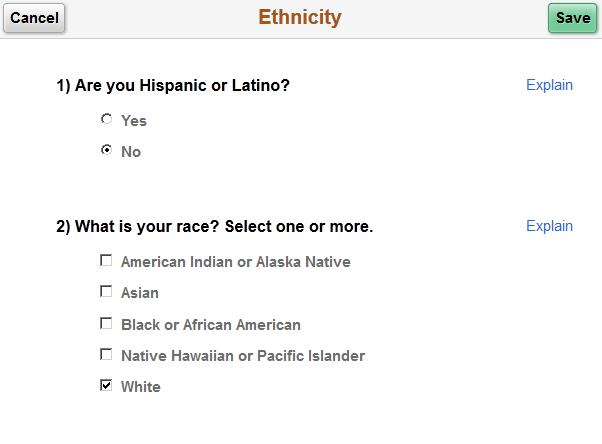
Use the Ethnicity page (HR_ETHNIC_GRP2_SCF) to enter ethnicity information when the system is configured to collect the information using the two-question format.
Navigation
Select the ethnicity information on the Ethnic Groups page when the page displays information in the two-question format.
Image: Ethnicity page
This example illustrates the Ethnicity page.
Use the Ethnic Group page (HR_ETHNIC_GRP_SCF) to add, update, or remove an ethnic group from your personal data.
Navigation
Select an ethnic group on the Ethnic Groups page to modify or delete an existing ethnic group.
Select the Add an Ethnic Group button or icon to add a new ethnic group.
Image: Ethnic Group page
This example illustrates the Ethnic Group page.

Select the Delete button to remove the ethnic group.
Use the Emergency Contacts (summary) page (HR_EMERG_CNTCT_FL) to view a list of your emergency contacts.
Navigation
Select the Personal Details tile on a PeopleSoft Fluid Employee Self Service home page, then select the Emergency Contacts tab or tile on the Personal Details page.
Image: Emergency Contacts (summary) page
This example illustrates the Emergency Contacts (summary) page.
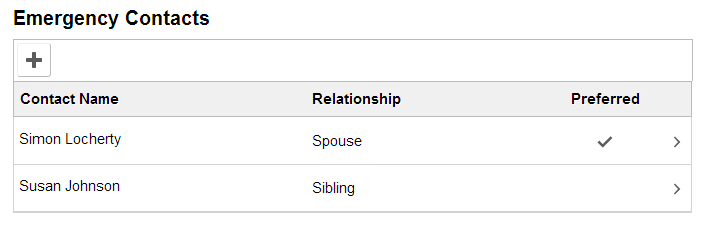
Note: The page display may vary by device and access method. For example, the transaction name appears on the content page when accessing the information from the navigation collection. When accessing the page from the Personal Details dashboard, the title of the page appears in the banner.
Select an existing emergency contact to view and update the contact’s information or to delete the contact. Select the Add an Emergency Contact icon to create a new contact.
Use the Emergency Contact (detail) page (HR_EMERG_CNTCT_SCF) to add, update, or delete an emergency contact.
Navigation
Select an emergency contact on the Emergency Contacts (summary) page, or select the Add Emergency Contact button or icon.
Image: Emergency Contact (detail) page
This example illustrates the Emergency Contact (detail) page.
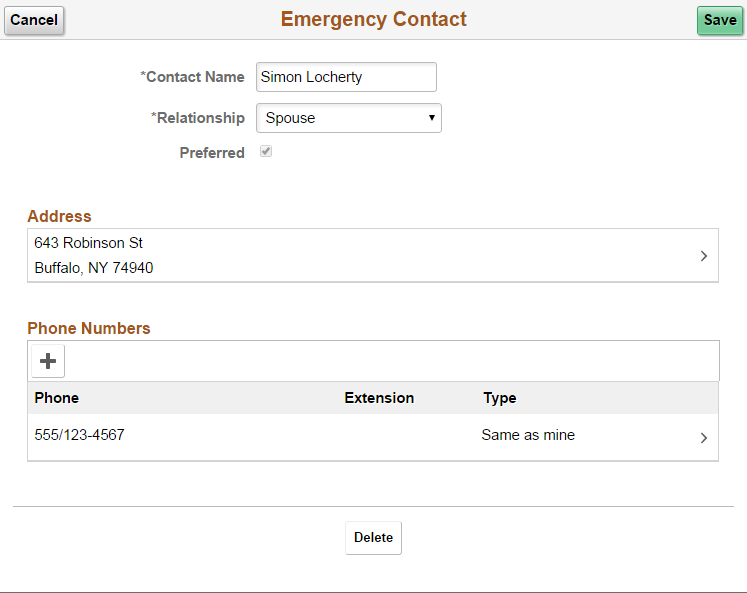
On this page, the contact name and relationship are enterable. Existing address and phone number information is read only. Select an existing address or phone number to edit or delete it.
You can provide multiple phone numbers for an emergency contact, but only one address.
Select the Delete button to remove the emergency contact.
Use the Emergency Contact - Address page (HR_EMERG_ADDR_SCF) to add, update, or delete an address for an emergency contact.
Navigation
On the Emergency Contact (summary) page, select an existing address, or select the Add button that appears if no addresses exist.
Image: Emergency Contact - Address page
This example illustrates the Emergency Contact - Address page.
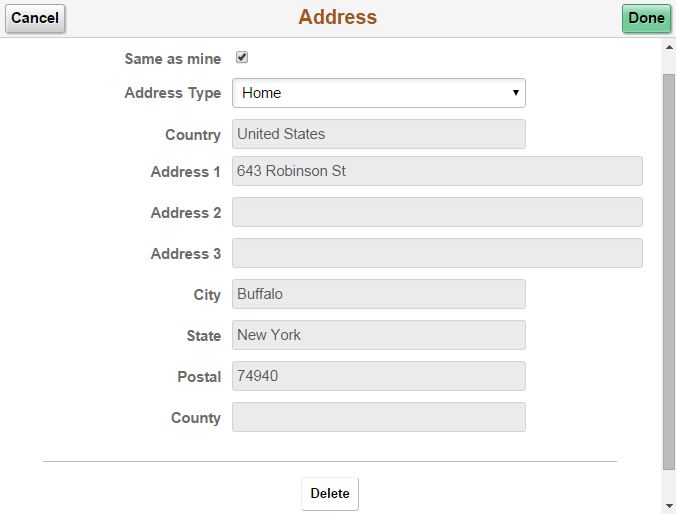
Users can either select the Same as Mine check box or manually enter a different address. Selecting the Same as mine check box populates the address detail fields and makes them read-only. The Address Type field remains editable regardless of whether the Same as Mine check box is selected.
The address format varies depending on the value in the Country field.
Use the Emergency Contact - Phone page (HR_EMERG_PHONE_SCF) to add, update, or delete a phone number for an emergency contact.
Navigation
On the Emergency Contact (summary) page, select an existing phone number, or select the Add Phone Number button or icon.
Image: Emergency Contact - Phone Number page
This example illustrates the Emergency Contact - Phone Number page.
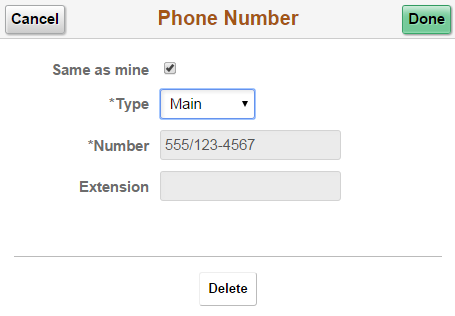
Users can either select the Same as Mine check box or manually enter a different phone number. Selecting the Same as Mine check box populates the phone number detail fields and makes them read-only. The Type field remains editable regardless of whether the Same as Mine check box is selected.
Use the Additional Information page (HR_ADDTL_INFO_FL) to review miscellaneous personal information.
Navigation
Select the Personal Details tile on a PeopleSoft Fluid Employee Self Service home page, then select the Additional Information tab or tile on the Personal Details page.
Image: Additional Information page
This example illustrates the Additional Information page.

Note: The page display may vary by device and access method. For example, the transaction name appears on the content page when accessing the information from the navigation collection. When accessing the page from the Personal Details dashboard, the title of the page appears in the banner and other headings may appear on the page.
Users cannot edit the information that appears on this page. Instead, informational text directs users to contact the human resources department if information is incorrect.
Employee Information
This section will display your Human Resources business partner contact information when you are associated with a Human Resources business partner team.
When you are not part of a business partner team, this section will display a message to contact the Human Resources department if any of your employee information is incorrect.
This video demonstrates the HR Business Partners feature enhancement:
Image Highlights, PeopleSoft HCM Update Image 32: HR Business Partner Enhancements
For more information on business partners and business partner setup, see the Configuring Business Partners documentation.
Use the Business Partners page (HR_EE_BUS_PRTNR_FL) to view your business partners and their contact information.
Navigation
Select the Personal Details tile on a PeopleSoft Fluid Employee Self Service home page, then select the Business Partners tab or tile on the Personal Details page.
From the OnBoarding Dashboard, select the Business Partners Tile.
(This option is available for those workers who have an OnBoarding activity guide in progress.)
Note: The Personal Details page will not display the Business Partners tab if the person who is viewing this page is not associated with a business partner team or if the team is not configured to display on Personal Details. For configuration settings, see the Configure Business Partner Page.
Image: Business Partners page
This example illustrates the Business Partners page.
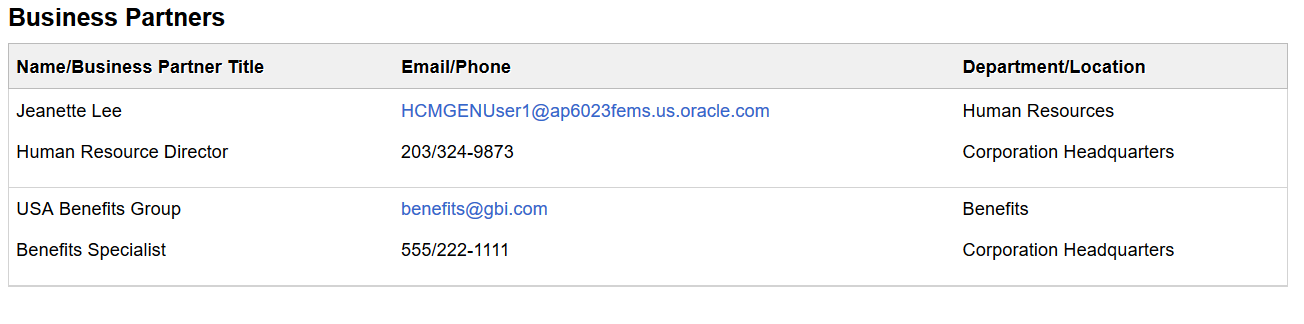
Note: The page display may vary by device and access method. For example, the transaction name appears on the content page when accessing the information from the navigation collection. When accessing the page from the Personal Details dashboard, the title of the page appears in the banner and other headings may appear on the page.
Use this page to view your business partner contact information.
This video demonstrates the HR Business Partners feature:
Image Highlights, PeopleSoft HCM Update Image 31: HR Business Partners
Use the Voluntary Self-Identification of Disability page (HR_DISABILITY_FL) to complete and file Form CC-305 disability data electronically.
Navigation
Select the Personal Details tile on a PeopleSoft Fluid Employee Self Service home page, then select the Disability tab or tile on the Personal Details page.
Use PeopleTools security to grant or restrict component access for employee types based on your business needs. For example, if the page is to be accessed only by U.S. employees, you must add the page to the permission list and grant access to only those employees.
Image: Voluntary Self-Identification of Disability page
This example illustrates the Voluntary Self-Identification of Disability page.
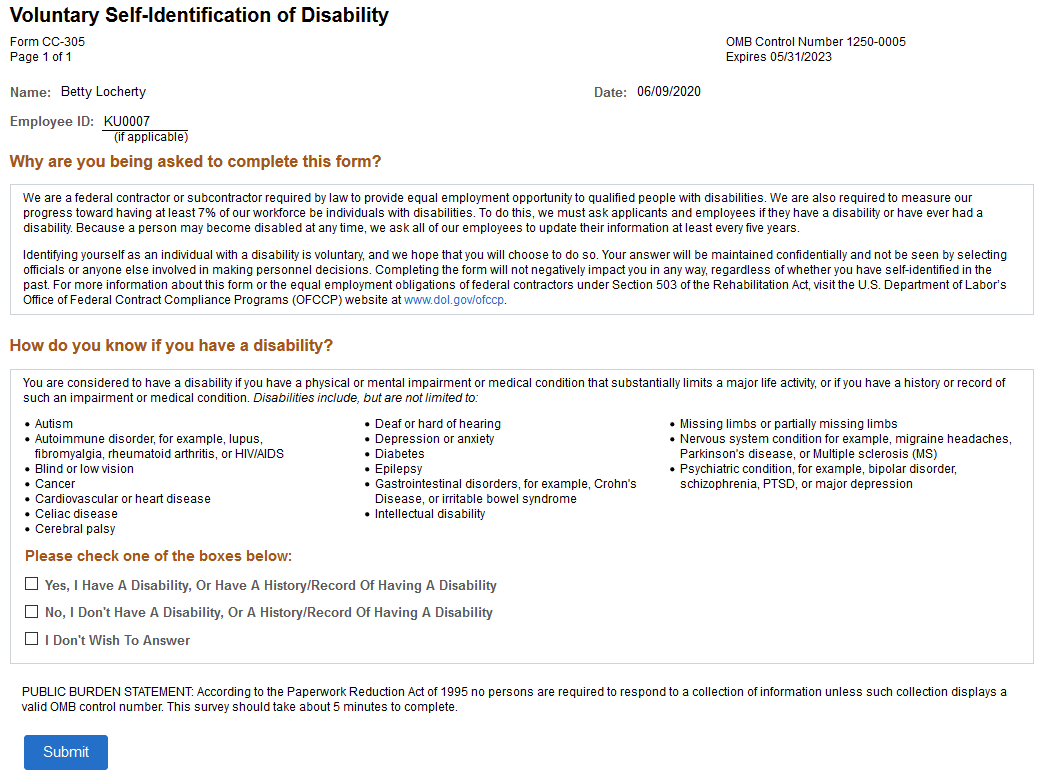
PeopleSoft uses the Text Catalog to deliver the page with the same verbiage and layout as the current OFCCP Form CC-305. Administrators change the text as necessary if OFCCP makes changes to the verbiage.
When the employee submits the self-service Voluntary Self-Identification of Disability page, the system tracks and stores the data (employee’s name, user ID, date of submission, and response regarding disability) in the Section 503 Disability group box on the Disability Page in the Personal Information - Disability component.
Note: The Voluntary Self-Identification of Disability page is always blank when opened, even if the employee previously entered and saved information. Administrators can view previously entered disability information for an employee by accessing the employee’s Disability page (HR_DISABILITY) and clicking the View History link to display the Disability History page (DISABILITY_USA_SEC).
|
Field or Control |
Definition |
|---|---|
| Name, Employe ID, and Date |
The system displays the employee’s name, identification number, and the current date. |
How do you know if you have a disability?
|
Field or Control |
Definition |
|---|---|
| Please check one of the boxes below |
Select one disabled value option. One must be selected. All options are blank by default, unless the employee or administrator has previously entered disability data, in which case that data appears. |
Use the Veteran Status page (HR_VET_STATUS_FL) to enter and update self-identification veteran information.
Navigation
Select the Personal Details tile on a PeopleSoft Fluid Employee Self Service home page, then select the Veteran Status tab or tile on the Personal Details page.
Image: Veteran Status page
This example illustrates the Veteran Status page (1 of 2).
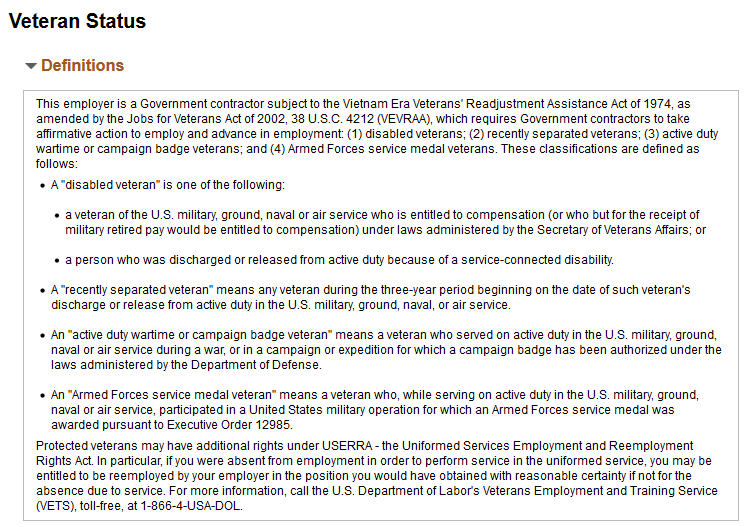
Image: Veteran Status page (2 of 2)
This example illustrates the Veteran Status page (2 of 2).
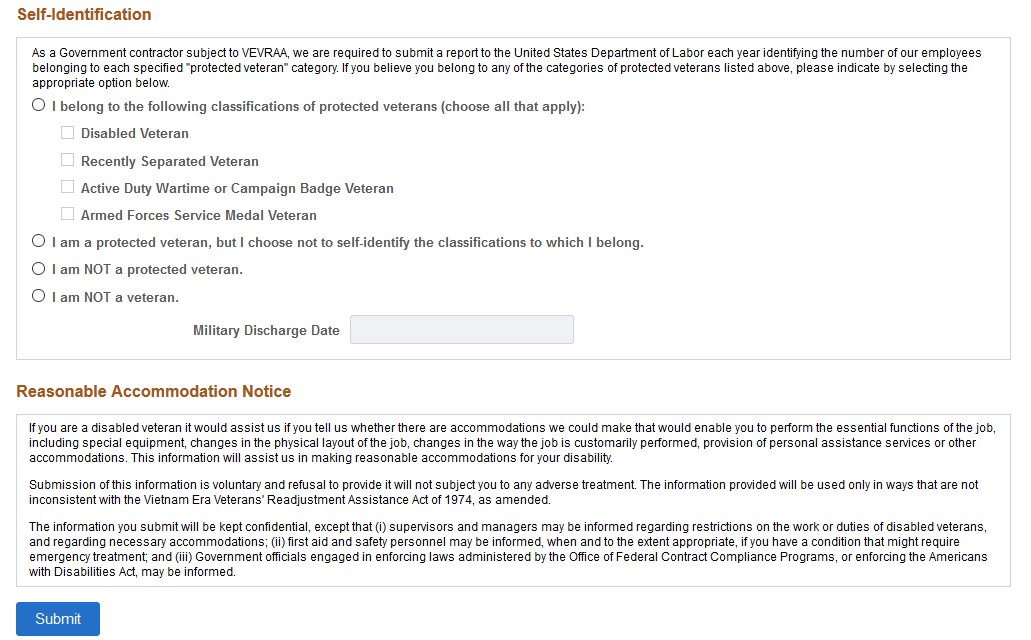
For field descriptions, see the classic self-service Veteran Status Page (HR_DISABILITY) in your PeopleSoft HCM Workforce Data Management, Human Resources Administer Workforce documentation.
Use the Form I-9 page (HR_I9_EE_FL) to access the I-9 instructions PDF, to access the Form I-9 page (HR_I9_EE) where you enter personal employee eligibility information, and to review the date on which you submitted your Form I-9,
Navigation
Select the Personal Details tile on a PeopleSoft Fluid Employee Self Service home page, then select the Form I-9 tab or tile on the Personal Details page.
Note: The Personal Details Tile tile will display the Action Required message when an employee working in the U.S. needs to submit I-9 form information.
Image: Form I-9 page
This example illustrates the Form I-9 page.
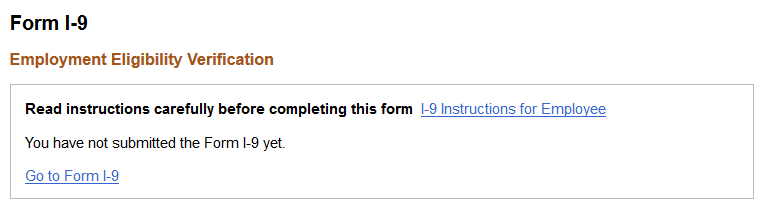
Image Highlights, PeopleSoft HCM Update Image 34: Form I-9 2020 Updates for USA
For field definitions, see the Employment Eligibility Verification Page, Section 1 (HR_I9_EE) documentation.