Using PeopleSoft Fluid User Interface for Time Management as a Manager
The Managers can use the PeopleSoft Fluid User Interface to view team time, manage exceptions and to review employee time reporting locations.
Select the Team Time tile on the Manager Self Service home page to access a list of PeopleSoft Time and Labor, and PeopleSoft Absence Management manager self-service tasks that you can perform. The tasks listed are based on the applications that are installed and on the security access of the logged in user.
Time and Labor Manager Self Services Pages Online Help Video
These page controls appear on all the time options in manager self service right panels.
|
Field or Control |
Definition |
|---|---|
| Select Employee Page |
Refer Select Employee Page for more details. |
 |
Select to open the filter modal using which you can define the filter criteria for the select employee panel. |
 |
Select to sort the search results by name and title. |
 |
Select to expand and collapse the navigation collection on the left panel. |
 |
Click to access the list of employees after defining the filter criteria in Manager Search Options. Note: The get employees button is available for Report Time, Weekly Time, Payable Time and Leave Balances component. This contains the pre populated values from manager search options if any. The fields that will be displayed here can also be configured under manager search options |
 |
Click to open the filters modal to enter the filter criteria. Note: You can edit the criteria and further filter or remove the manager search options criteria. |
 |
Select to return to Select Employees page after defining the filter criteria in the filters modal. |
 |
Select to close the filters modal. |
 |
Select to reset the values which are already entered in the filters modal. |
 |
Select to display the previous employee from the list of employees in the select employee page. |
 |
Select to display the next employee from the list of employees in the select employee page. Note: The previous and next button is disabled, if there are no previous or next employee in the select employee page list. |
| Return to Select Employee link |
Select to go back to the list of employees received as the result of filter search. |
 |
Click to go back to the previous employees details. |
 |
Click to go the next employees details. |
|
Page Name |
Definition Name |
Usage |
|---|---|---|
|
HC_TL_START_NAV_FLU_MSS_GBL (this is the cref for the tile) TL_START_NAV_FLU (page for dynamic data) |
Add the Team Time tile to the homepage access the Team Time navigation collection page. |
|
|
HC_HR_DIR_NAV_FLU (this is the cref for the tile) |
Opens the Team Time application start page. From this page, the Manager can navigate to the different time options using Fluid User Interface. The left panel items when selected allows the manager to perform actions like review reported time, weekly time, payable time, and leave balances of the employees. |
|
|
TL_MSS_EMP_SEL_FLU TL_EMPPRS_FILT_SCF Enter Time Details for Punch Time Reporters: TL_PCH_TIME_FLU Enter Time Details for Elapsed Time Reporters: TL_ELP_TIME_FLU |
Page to view the list of employees. This page is also used to view the employees according to the criteria defined in filter. The default landing page is Enter Time page which is inside the Timesheet folder. On expanding the Timesheet Folder, you can view the Enter Time and Time Summary results. |
|
|
Report Time page |
Report time details for Punch time reporters: TL_WEB_CLOCK_FLU Report Time details for Elapsed time reporters: TL_RPTD_ELP_FLU |
Select to get the search result for Report Time according the defined filter criteria. Select any employee from the list to open the report time page for that employee. Managers can navigate through the Previous and Next to go to employees in the search list. |
|
Weekly Time Entry details for Punch time reporter: TL_PRE_POP_PCH_FLU Weekly Time Entry details for Elapsed time reporter: TL_PRE_POP_ELP_FLU |
Select to get the search result for Weekly Time Entry according to the defined filter criteria. Modify reported time or delete reported time for the employees according to the row level security or Time and Labor security. |
|
|
TL_WEEK_TIME_FLU |
Select to get the search result for Weekly Time Summary according to the defined filter criteria. Select any employee from the search result to view the time reported for a week. The manager can also modify and report time per week. |
|
|
TL_MSS_EMP_SEL_FLU |
View and select the employees to review their payable time.. |
|
|
TL_PAYBTIME_FLU |
Review employees payable time details with duration and Time reporting code, payable hours, and estimated gross for the selected period. |
|
|
TL_COMPLEAVBAL_FLU |
Select the employee using the filter and view the employees with the selected filter criteria. This page provides the summary of leave balances for those employees enrolled in Base Benefits leave plans. |
|
|
TL_ATTENDANCE_FL |
This page provides the summary of violations for a selected period of start and end date. This page can also be accessed from punch time sheet via related actions. The related actions open as a new modal. |
|
|
TL_MNG_EXCEP_NUI |
View and resolve the exceptions using Fluid User Interface. Displays all exceptions of the team at one place. |
|
|
TL_MSS_EMP_MAP_FLU |
To view the employee location when the employee has enabled the use of location services. |
|
|
TL_EMP_PRES_FLU |
To view detailed information about team members, including time entries, scheduled and reported time for each type of time reporters. |
|
|
TL_WC_RSLT_FL |
Access frequently used work items for Time and Labor. |
Use the Team Time tile (TL_START_NAV_FLU) to view the total number of exceptions of time reporting and to navigate to other Manager Self Service pages.
Navigation
Select the Fluid Home under the Main Menu. On the page that appears, select Manager Self Service. The Team Time tile is available on the Manager Self Service landing page.
A manager can add the tile through personalizing a system-delivered homepage or by creating a customized homepage.
Image: (Desktop) Team Time Tile
This example illustrates the Team Time tile for desktop.
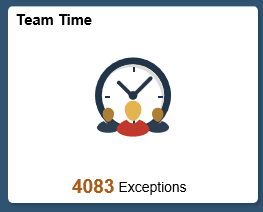
Image: (Smartphone) Team Time tile
This example illustrates the Team Time tile for the smartphone.
This Team Time start page is a navigation collection that enables the managers to access the frequently used Time and Labor management components from one location. The left panel of this page lists the components collected under 14 categories.
Timesheet Folder
Report Time
Weekly Time Entry
Weekly Time Summary
Payable Time
Leave / Comp Time
Request Absence
Cancel Absences
View Requests
Absence Balances
Manage Exceptions
Reporting Locations
Workforce Availability
Time and Labor WorkCenter
On selecting the left navigation collection, you can open the corresponding search pages on the right panel. Expanding Timesheet Folder opens Enter Time and Time Summary search pages on the right panel.
Image: (Smartphone) Team Time Page
This example illustrates the Team Time page in a smartphone
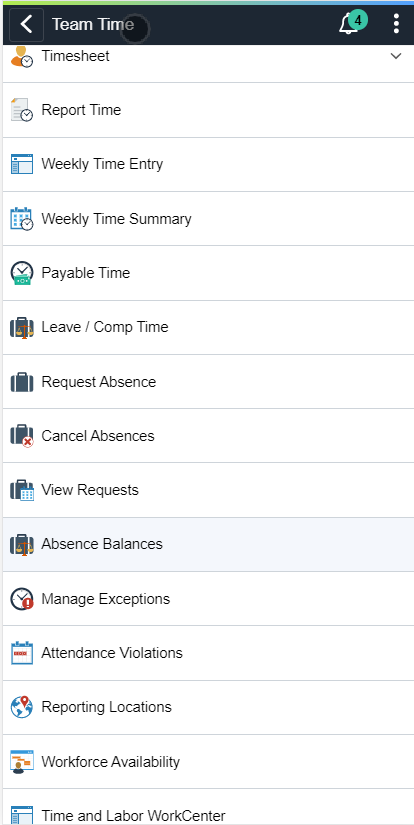
On selecting the listed items, the manager can navigate to different time options.
Use the Select Employee (TL_MSS_EMP_SEL_FLU) page to view the employees according to the criteria defined in filter.
Navigation
Select the Team Time tile on the Manager Self Service page or a homepage where the tile is added.
By default, the team time landing right panel is the select employee page. The right panel displays the filter options or the employee list.
The right panel displays the details for the components selected in the left panel.
Note: On setting up auto populate, the get employees and filter button don’t appear. The results are displayed directly. The get employees button displays employees based on the Manager Search Options page criteria. Filter button will open the filter options with manager search options filter values defaulted. We can edit this and further filter or remove this by updating the manager search options criteria.
Image: Enter Time_Select Employee page
This example illustrates the fields and controls on the Enter Time_Select Employee page.
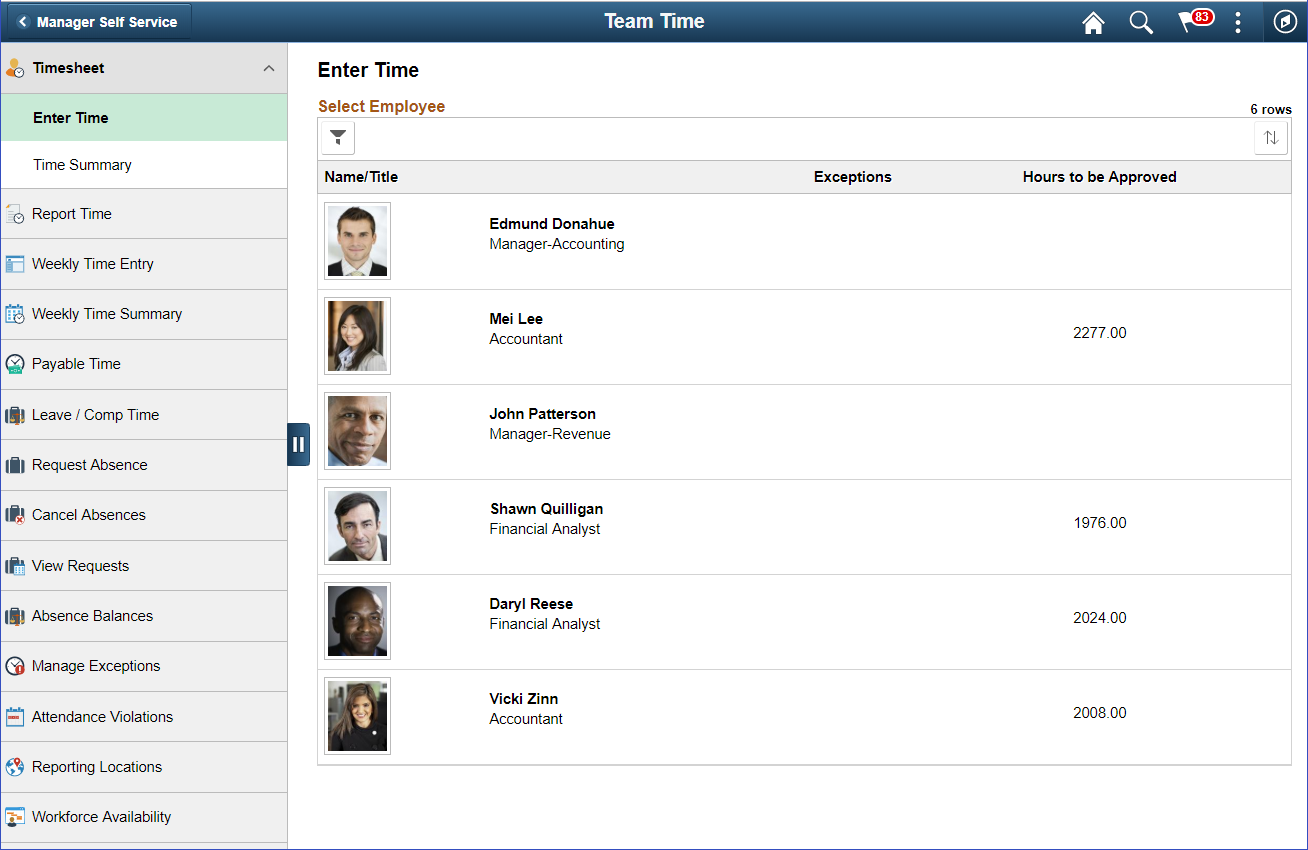
Note: The default landing page is the Enter Time_Select Employee page. The Manager can setup the auto populate option under Manager Search Option page in order to load the employees with the matching criteria.
Image: (Tablet) Select Employee page
This example illustrates the fields and controls for Select Employee page using a tablet.
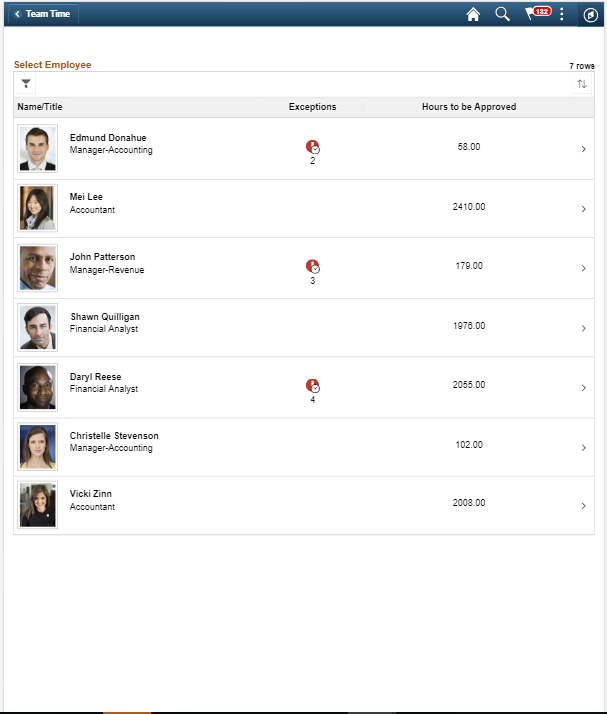
The manager can select one of the employee on the right panel to view the details.
This example illustrates the fields and controls of a Manager Self Service Enter Time page of an Elapsed Time Reporter view for a manager:
Image: Manager Self Service Enter Time Page for an Elapsed Time Reporter
This example illustrates the fields and controls of Enter Time page of an Elapsed Time Reporter.
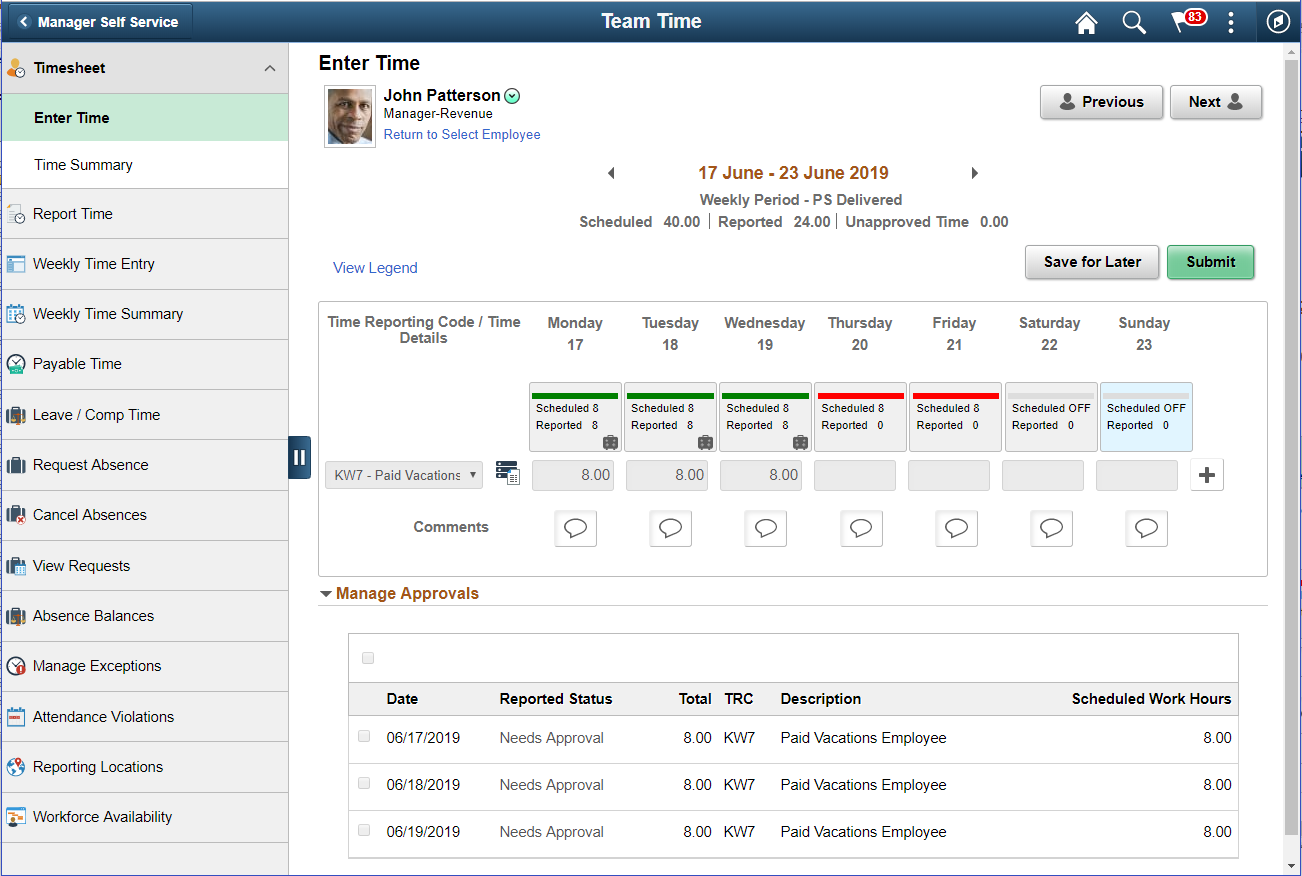
Image: Enter Time Page with Time Units
This example illustrates the fields and controls on the Enter Time Page with Time Units. You can find definitions for the fields and controls later on this page.
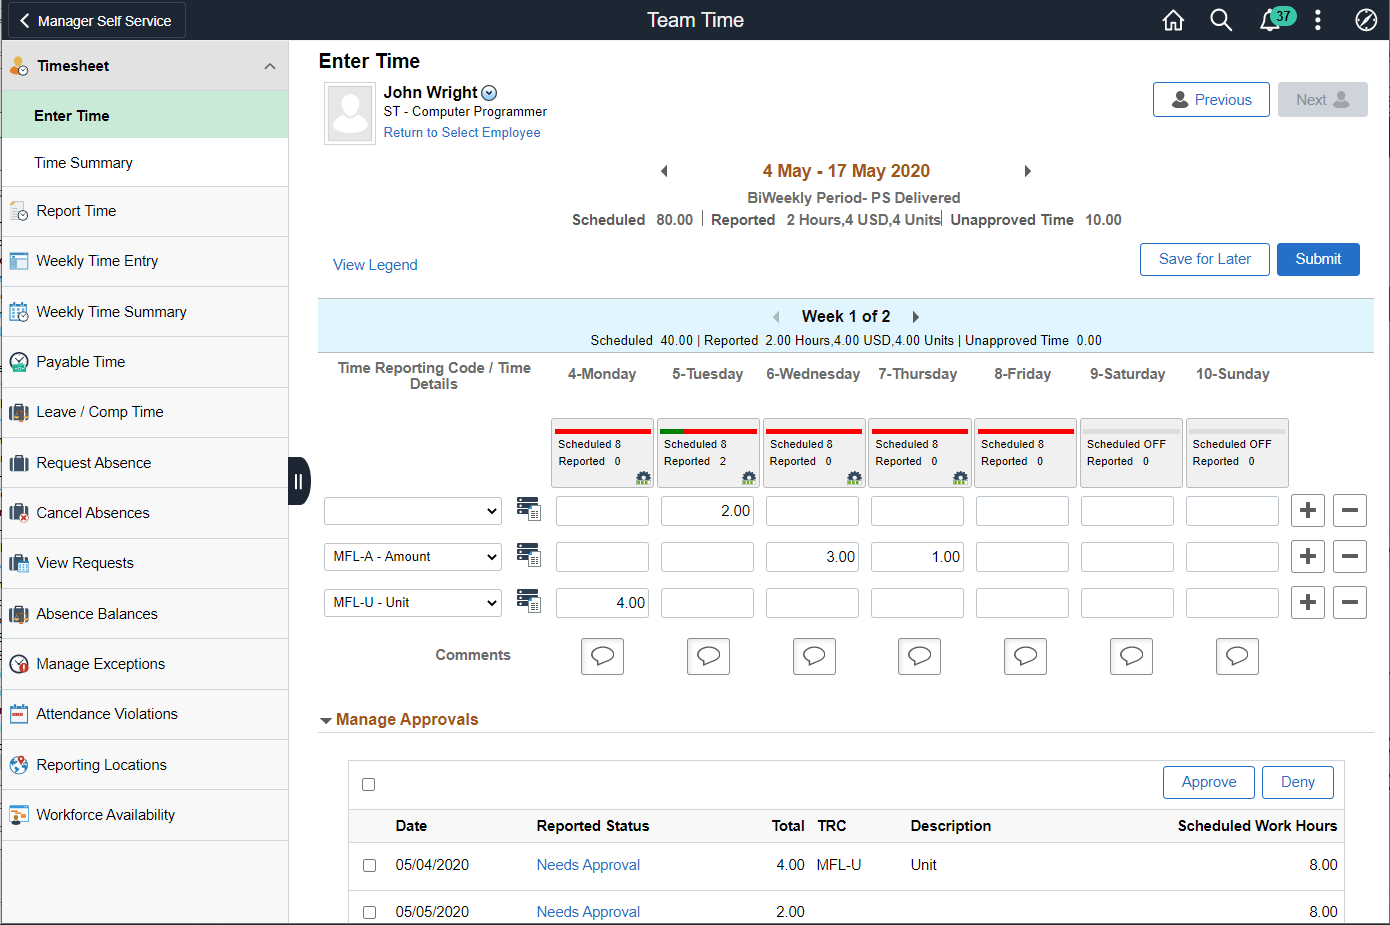
The header displays reported time in different units other than hours for an elapsed time reporter. The weekly header box also shows the reported time in units other than hours.
Note: The header box and the weekly header hides the TRC types Units and Dollars for a day when the particular TRC types are not present for the day .
|
Field or Control |
Definition |
|---|---|
| Unapproved Time |
Displays the unapproved hours which requires approval from the respective manager. |
|
Select to view the previous employee listed in enter time search page. |
|
Select to view the next employee listed in the enter time search page. |
 |
The Time details for different entries. This icon will be hidden and the time detail values are expanded in the timesheet pages if the option of Expand Time Details on Timesheet is selected in Time and Installation page. For more details, see Time and Labor Installation Page. |
| Manage Approvals |
Grid that displays the date —wise list of time report with description and scheduled work hours. Note: When there is unapproved reported time, the Manage Approvals section appears. |
 |
Check the time to approve and select approve button for time approval. |
 |
Check the time and select deny button for rejecting time. |
 |
Check the time and select push back button for sending the time back for checking. |
Image: Manager Self Service_Enter Time Page
This example illustrates the Manager Self Service Enter Time Page view for an Punch Time Reporter.
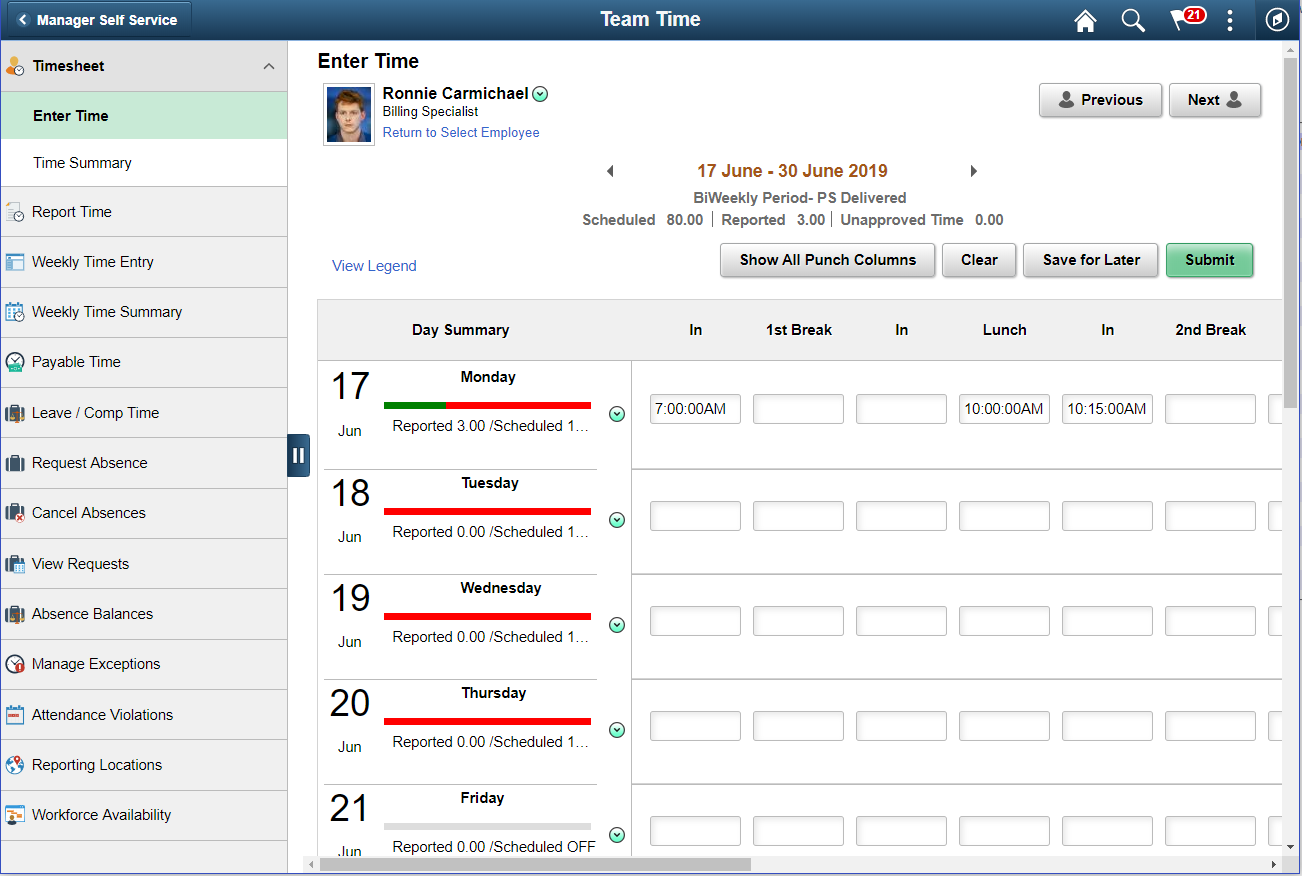
Image: Time Detail values inline for Punch Time reporter
This example illustrates time detail values inline in the timesheet of a Punch Time Reporter.
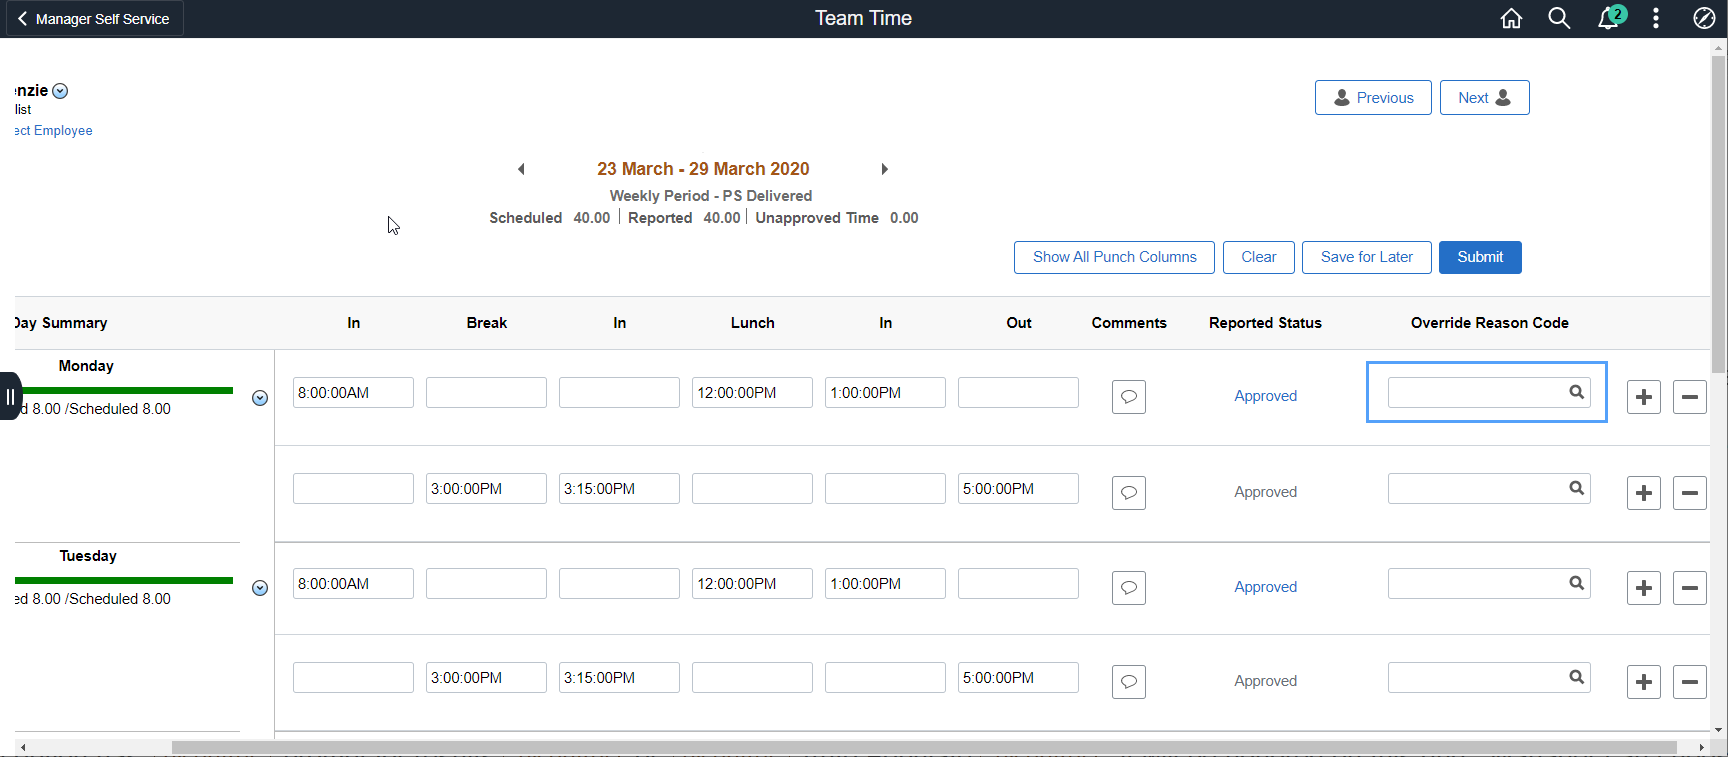
Administrators can configure for managers to view the time detail values inline in the timesheet by selecting the option of Expand Time Details on Timesheet under Time and Labor Installation Page.
The Enter Time pages for Punch time reporters show Time Details icon when Expand Time Details on Timesheet option is not selected under Fluid Timesheet section in Time and Labor Installation page.
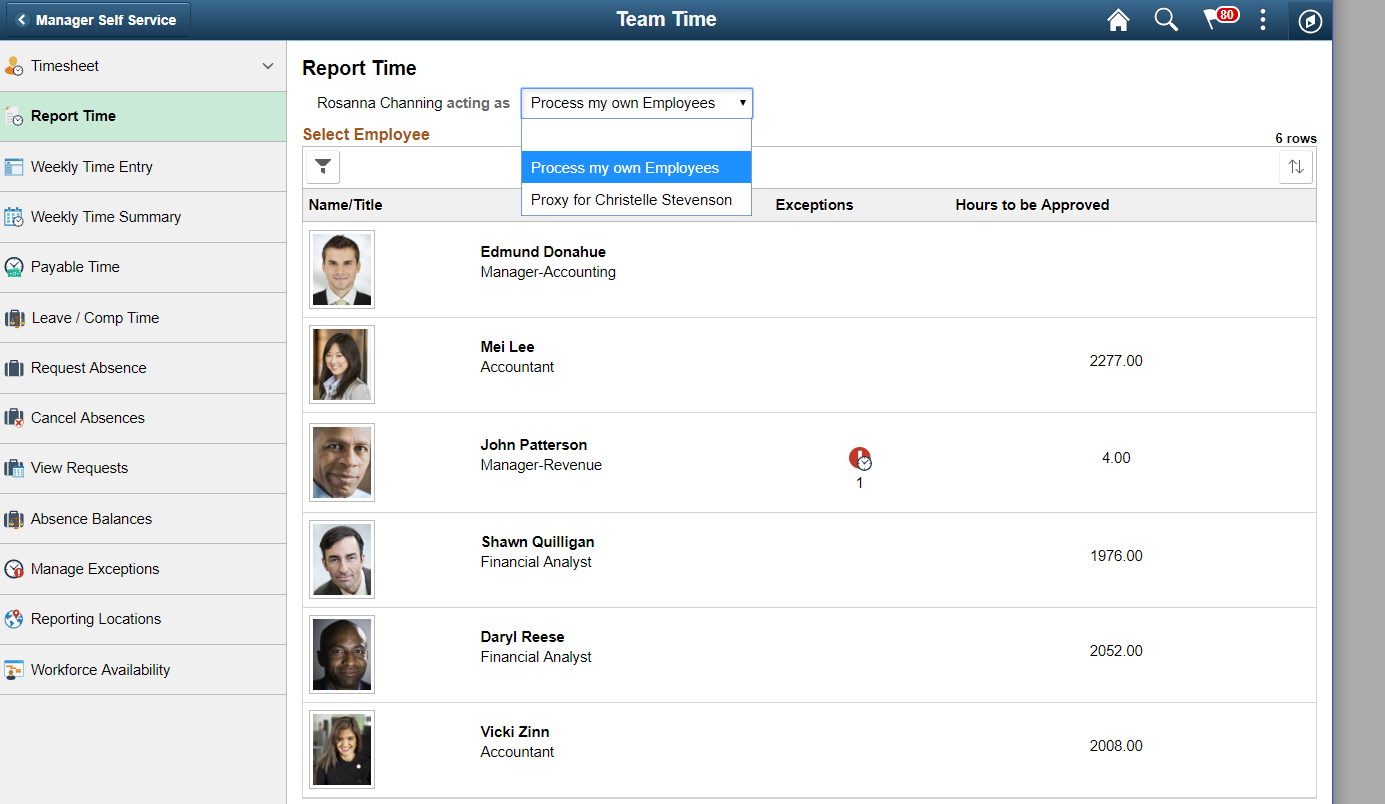
An employee can delegate the another person to report time on his/her behalf by authorizing another person as proxy.
Image: Enter Time Page with proxy
This example illustrates Enter Time page enabled with proxy.
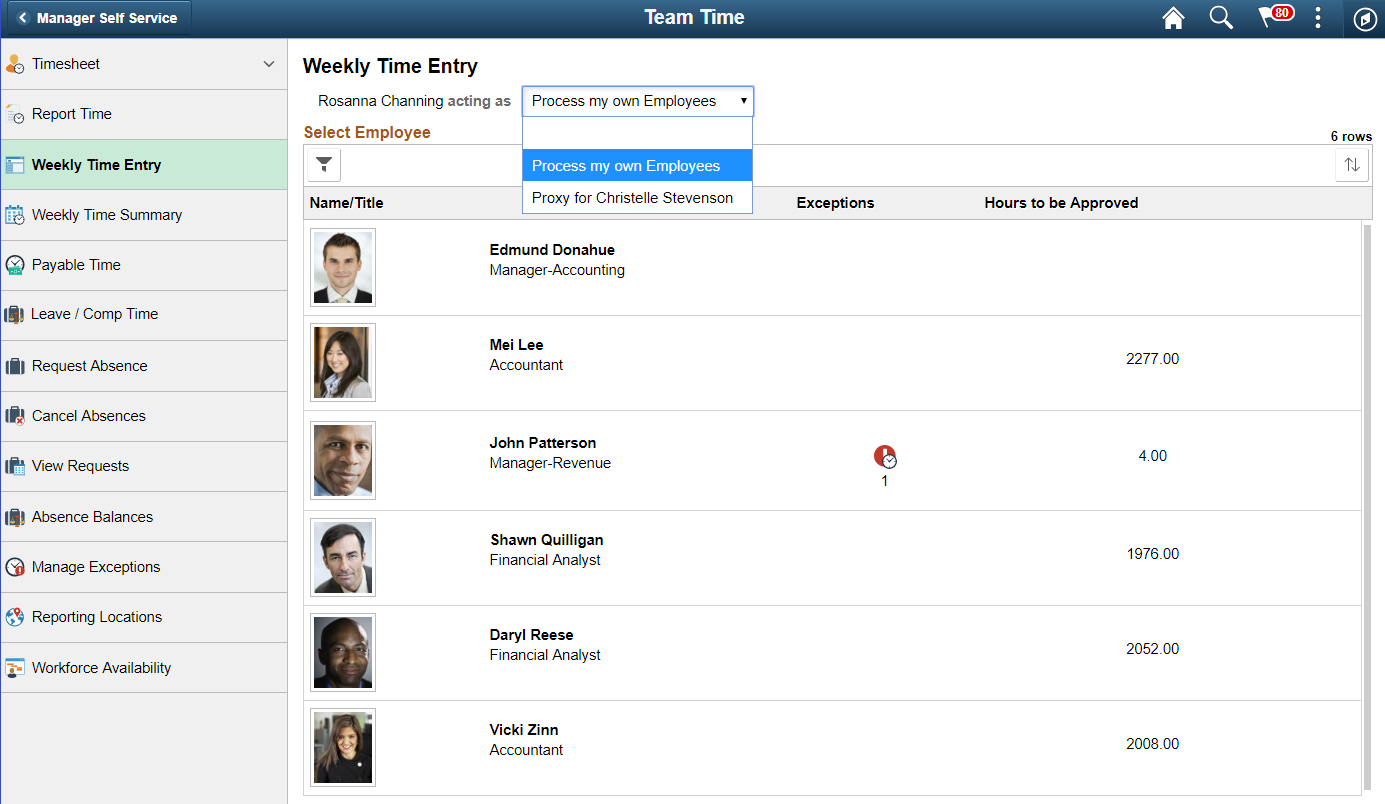
Note: Once delegation request is accepted by proxy and delegation transaction active, the grid will be shown in Report Time pages. If Manager Search option has prompt for results or Auto Populate, it will be honored on this grid. Manager can choose between Process my own Employees or to act on behalf of the delegator. When manager selects Process my own Employees, it shows a list of employees belonging to them (according to the row level security) . When manager selects Delegators’ name, it shows a list of employees that belong to the delegator (according to the row level security).
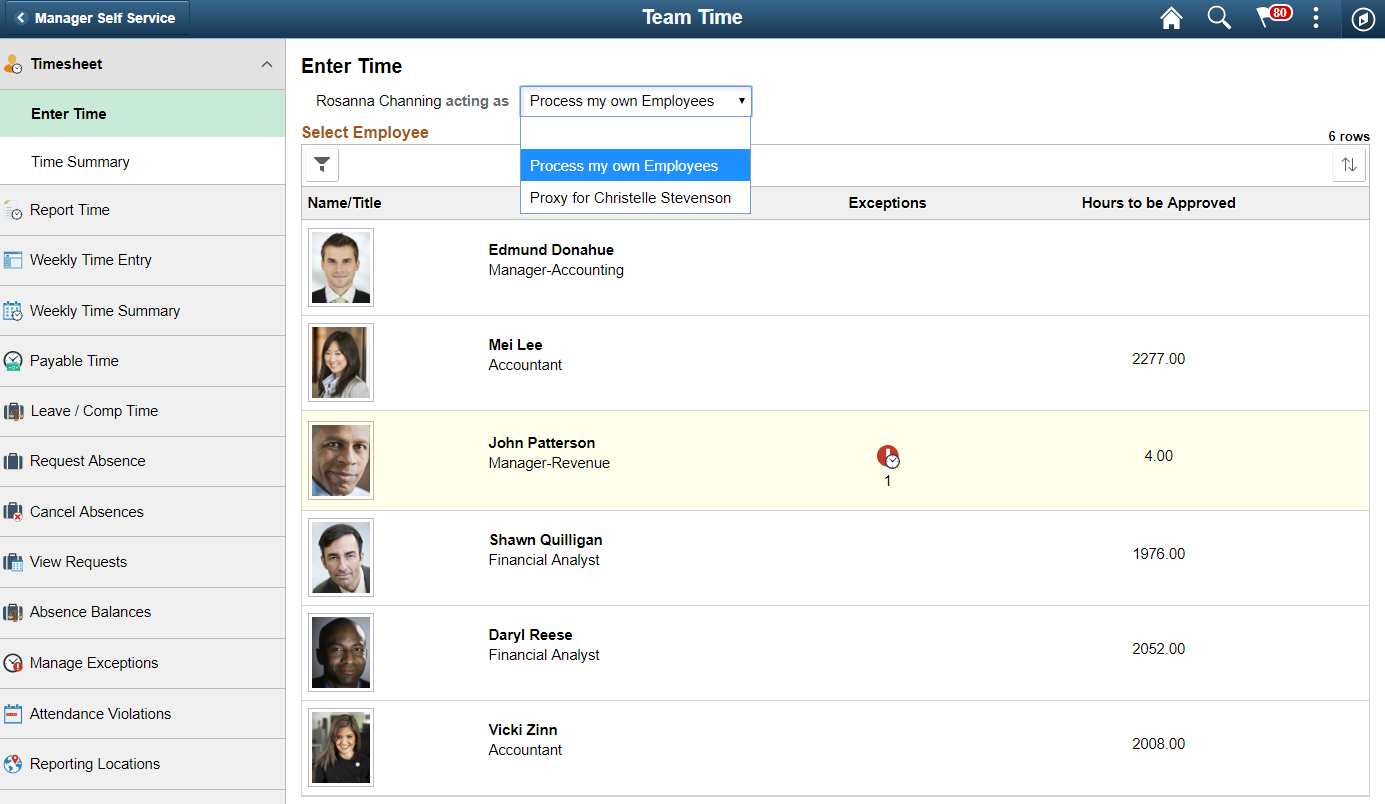
Image: Time Summary Search Page
This example illustrates the Time Summary Search page.
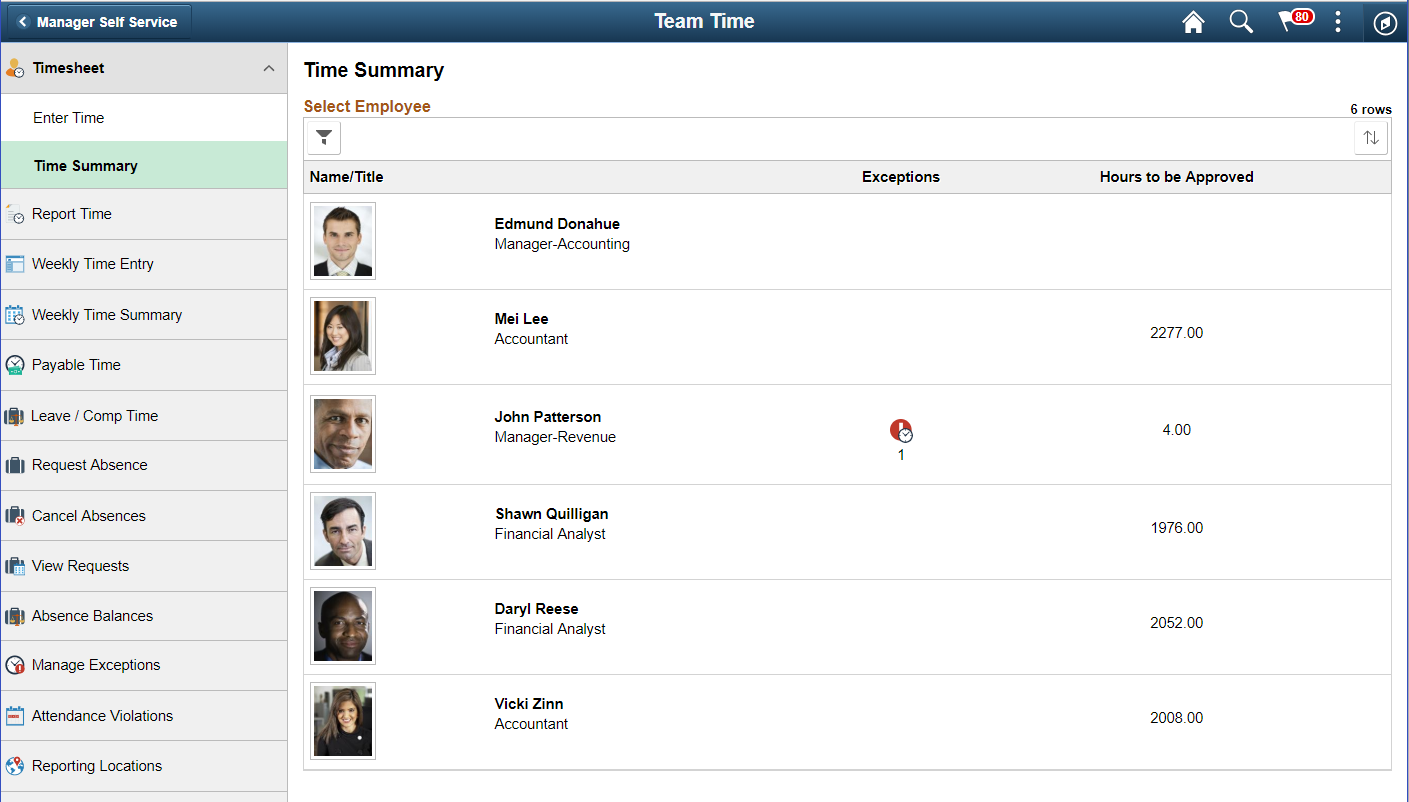
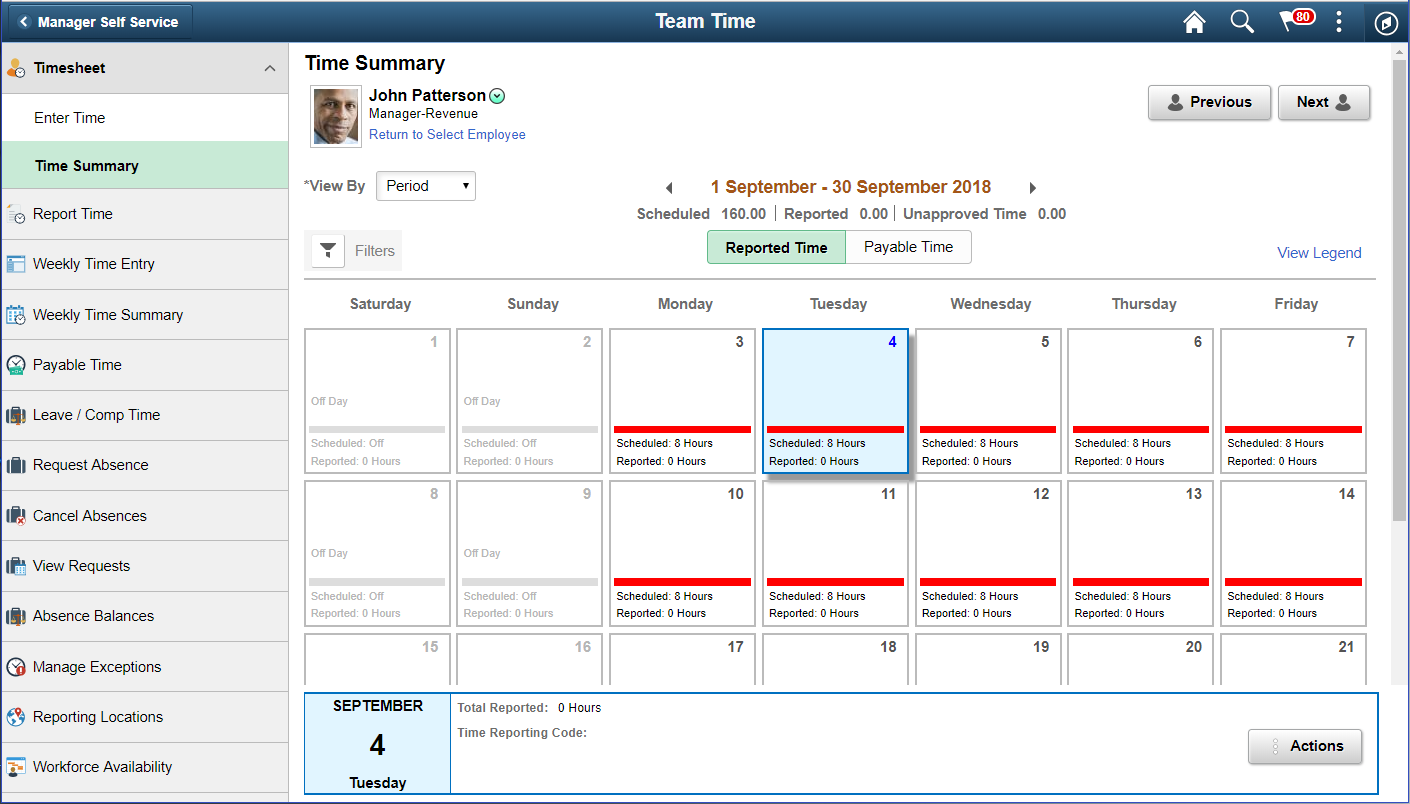
Select an employee to view the Time Summary for that employee.
Image: Monthly Time Summary Page
This example illustrates the fields and controls of the Time Summary Monthly view for a selected employee.
On selecting the Payable Time Summary you can get an overview of the payable time overview.
Image: Monthly Time Summary_Payable Time Tab_Page
This example illustrates the fields and controls of the Time Summary Monthly view inn the Payable Time tab for a selected employee.
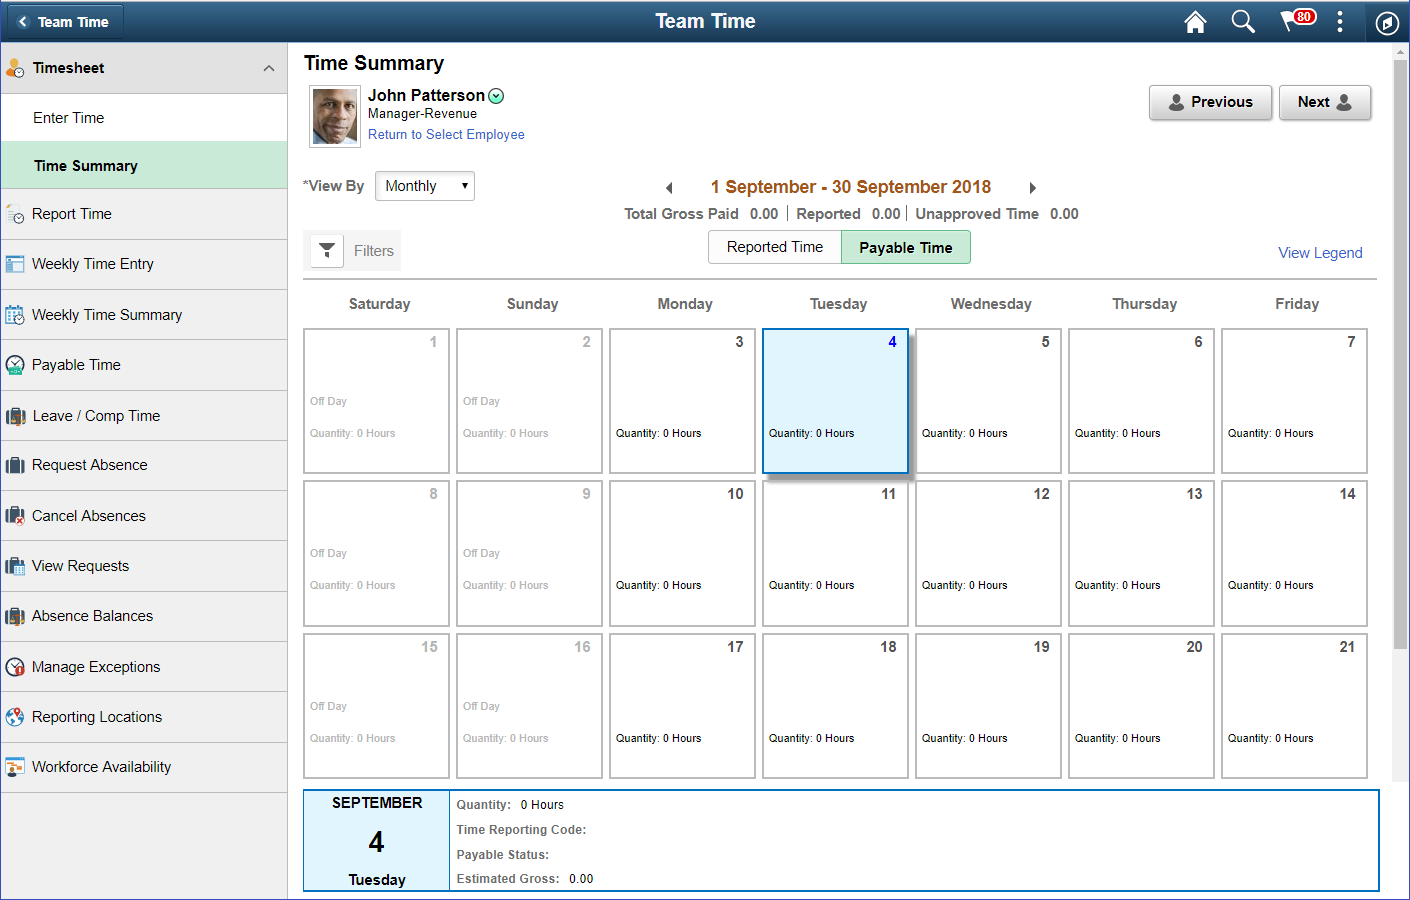
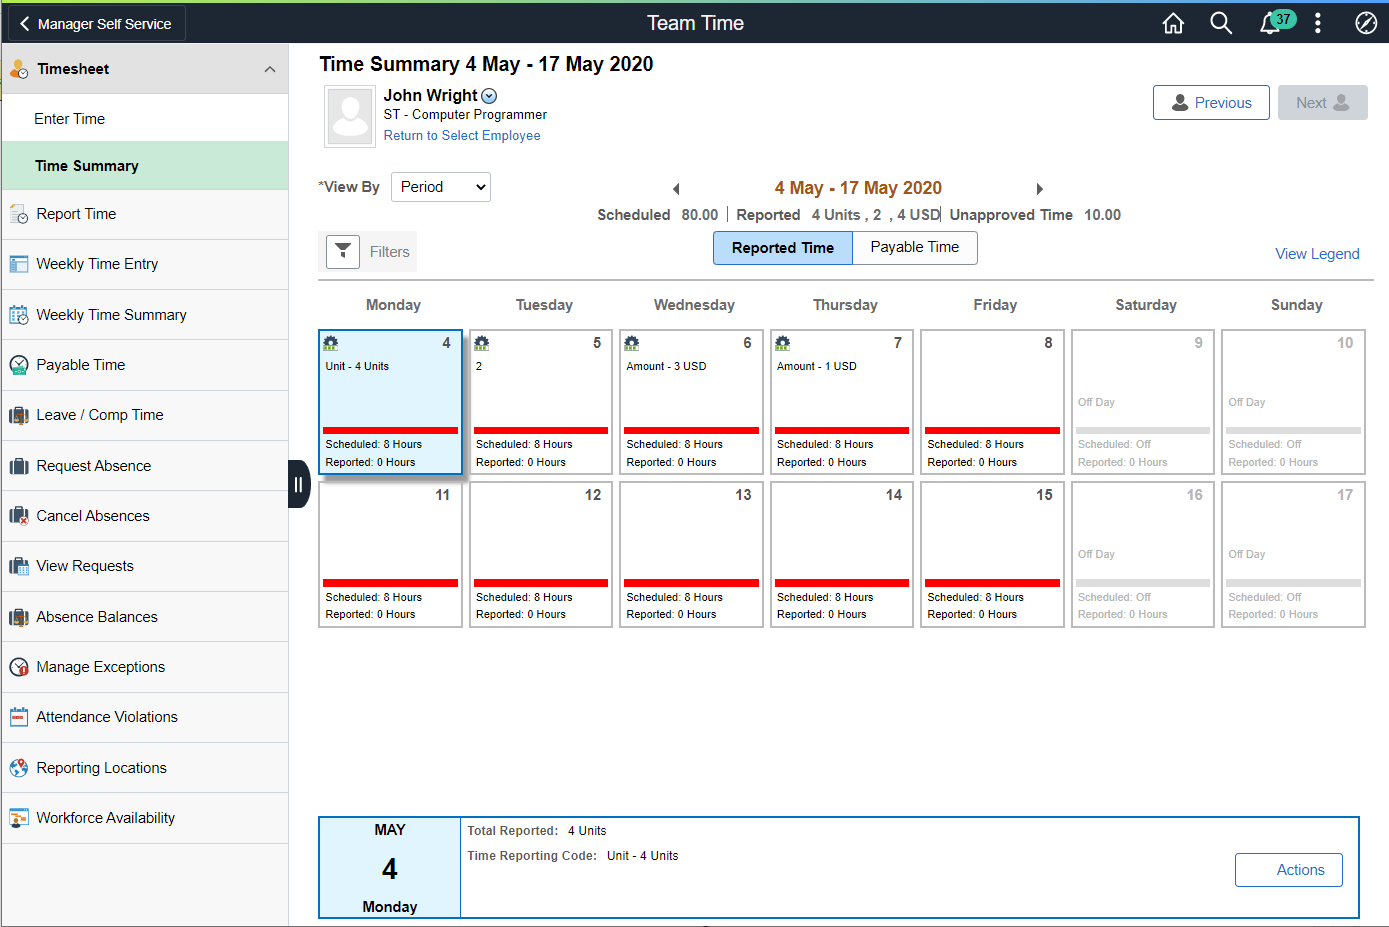
Image: Time Summary Page_Reported Time tab
This example illustrates the fields and controls on the Time Summary Page_Reported Time tab.
Use Get Employees button in order to pull up the list of employees.
Fluid Payable Time Total by Units
The Manager Payable Time and View Payable Time pages displays the quantity of time in units.
Image: Payable Time_Summary Tab
This example illustrates the fields and controls of Payable Time page summary tab.
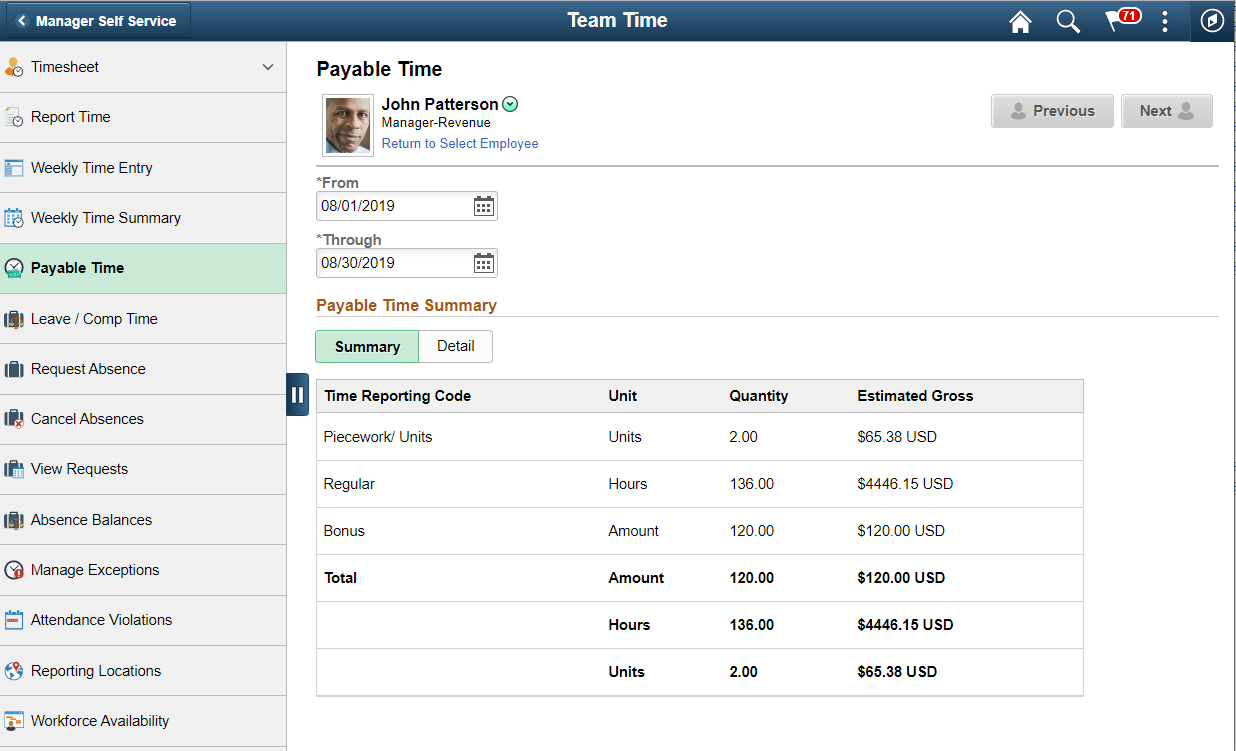
Image: Payable Time_Details page
This example illustrates the fields and controls of Payable Time page details tab.
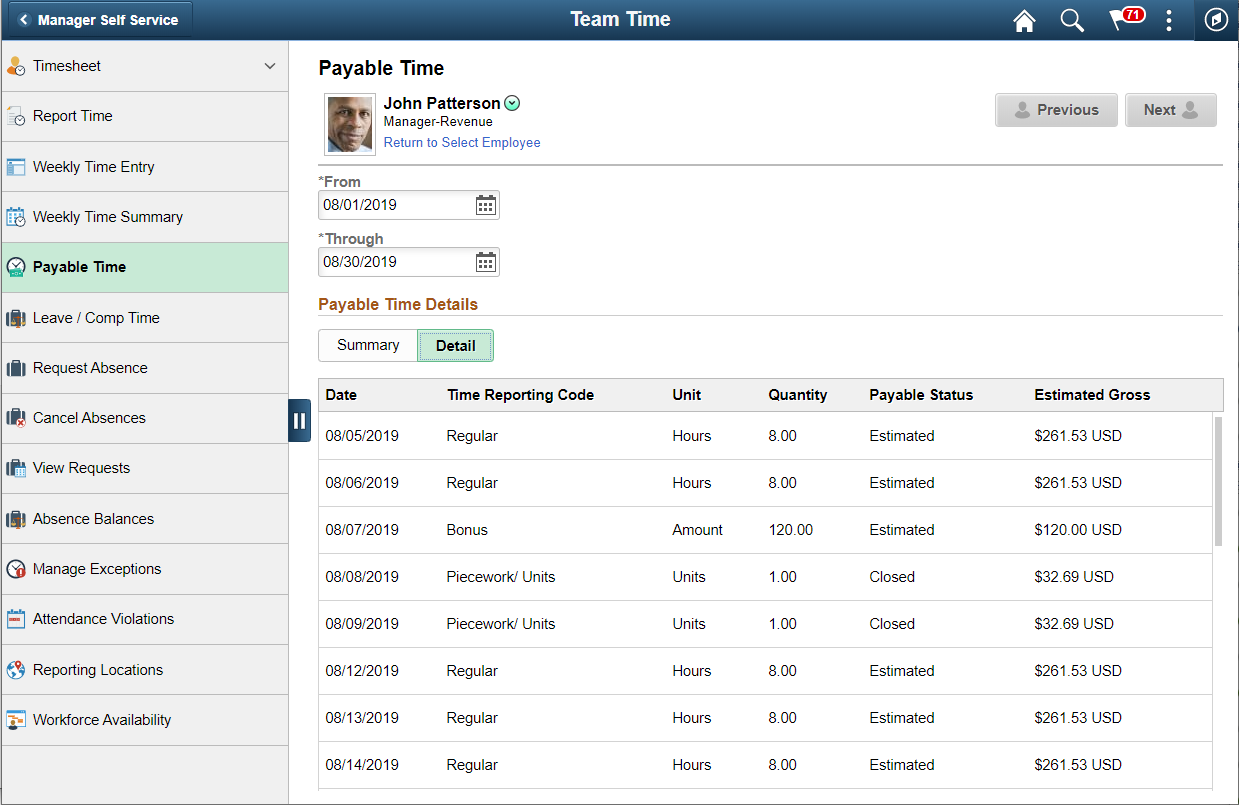
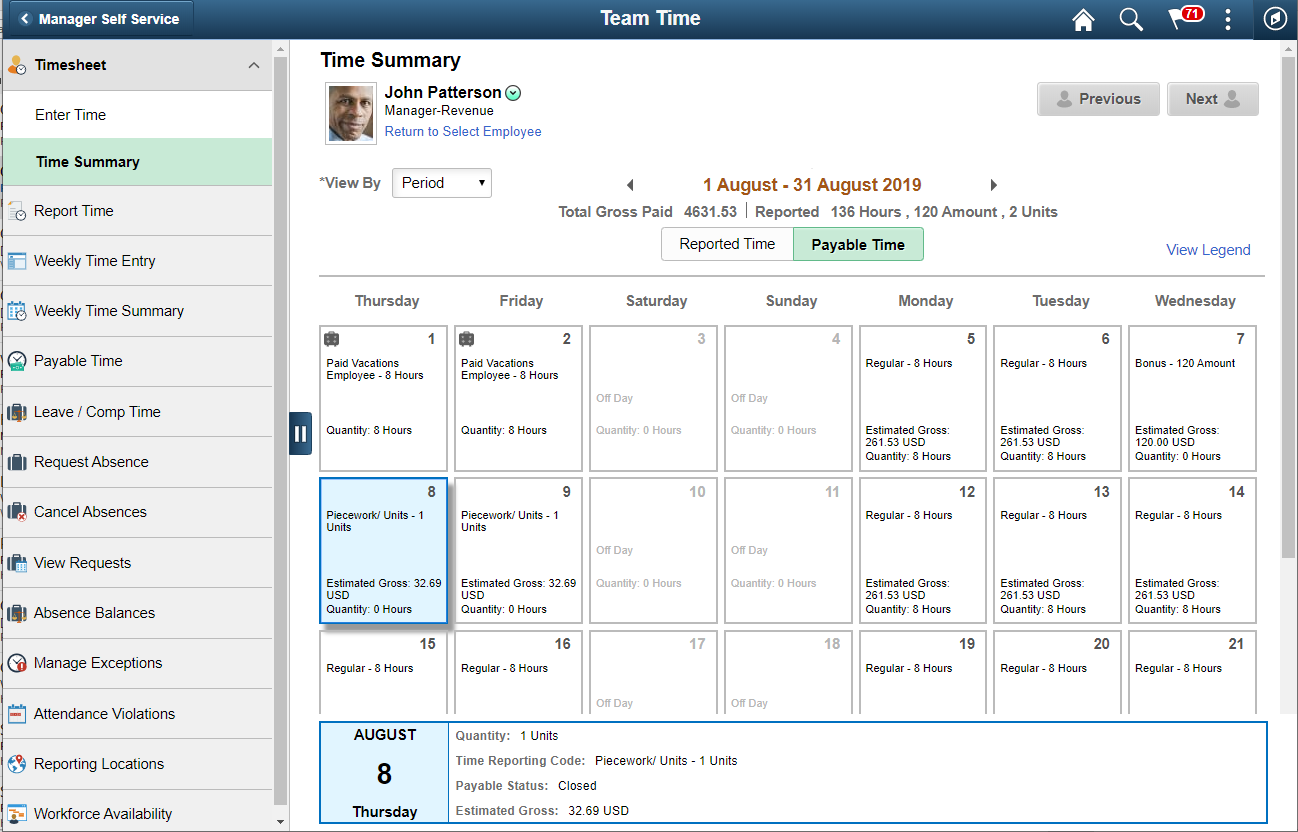
Image: Time Summary_Payable Time tab
This example illustrates the fields and controls of Time Summary_Payable Time tab with units of time in hours.
Select the filter icon to open the filters modal where you can enter the parameters used set the filter criteria.
Image: Report Time Select Employee Filters page
This example illustrates the fields and controls of the filters modal where you can specify the parameters for resulting the select employees.
The Report Time page allows the manager to enter reported time, modify reported time or delete reported time for the employees according to their data access.
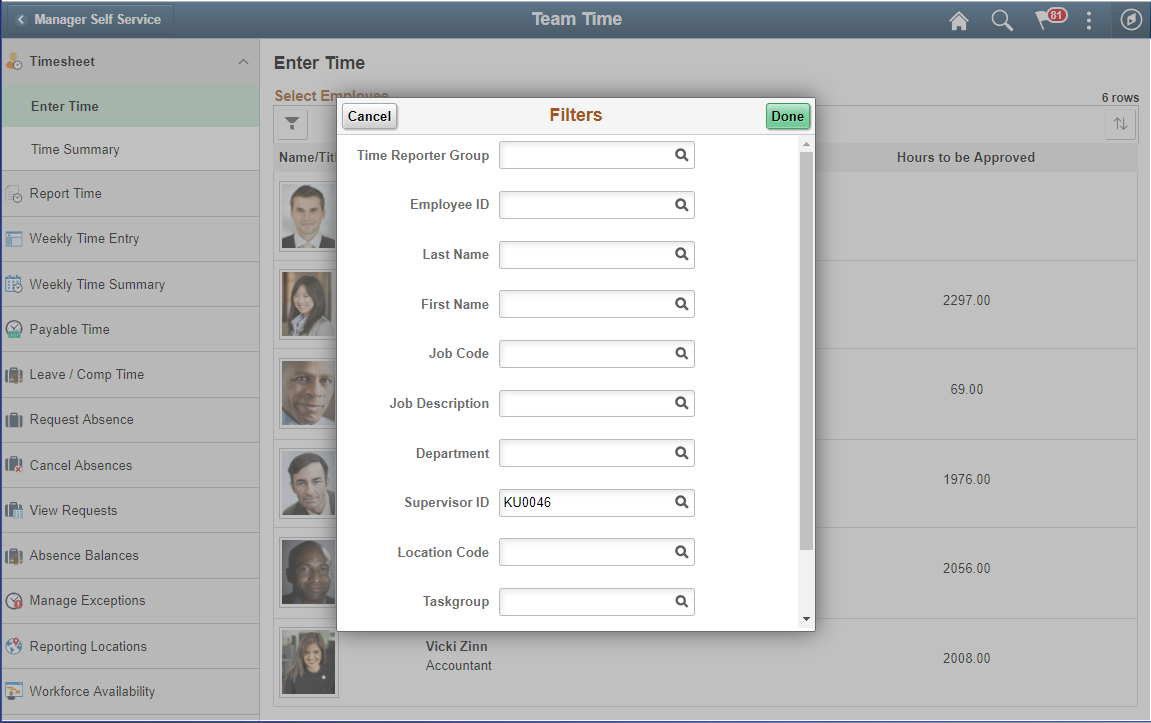
The filters modal provide a quick employee search for you with one or more of the following options:
Time Reporting Group
Employee ID
Employee Record
Last Name
First Name
Business Unit
Job Code
Job Description
Department
Supervisor ID
Report To Position Number
Location Code
Company
North American Pay Group
Workgroup
Taskgroup
Position Number
Note: This options can be configured using manager search options page.
Image: Report Time page for Elapsed Time reporters
This example illustrates the fields and controls of Report Time page (TL_RPTD_ELP_FLU) for Elapsed Time reporters.
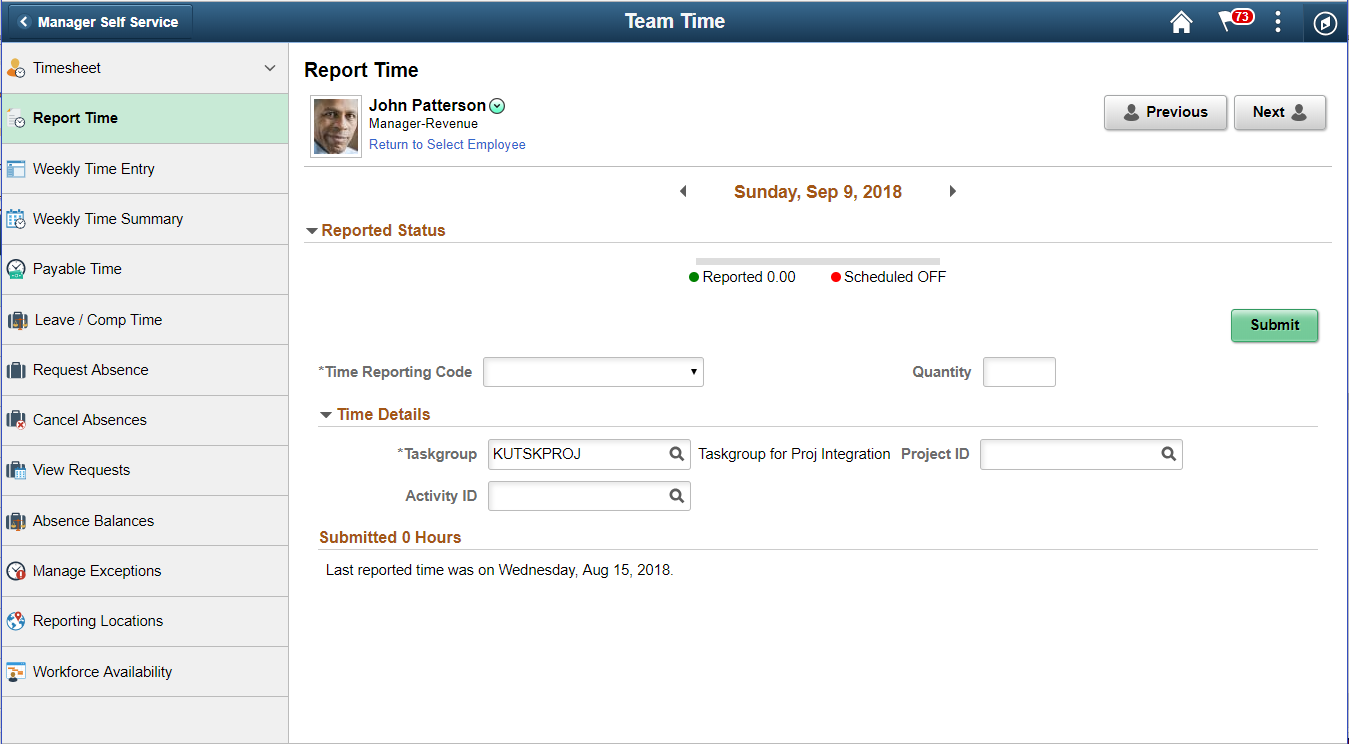
Image: Report Time_Delegation enabled Page
This example illustrates the Report Time page enabled with delegation.
Use Weekly Time Entry (TL_PRE_POP_ELP_FLU) page to view the time reported for a week. The manager can also modify and report time per week.
Image: (Desktop) Weekly Time page
This example illustrates the fields and controls of Weekly Time page for Manager Self Service.
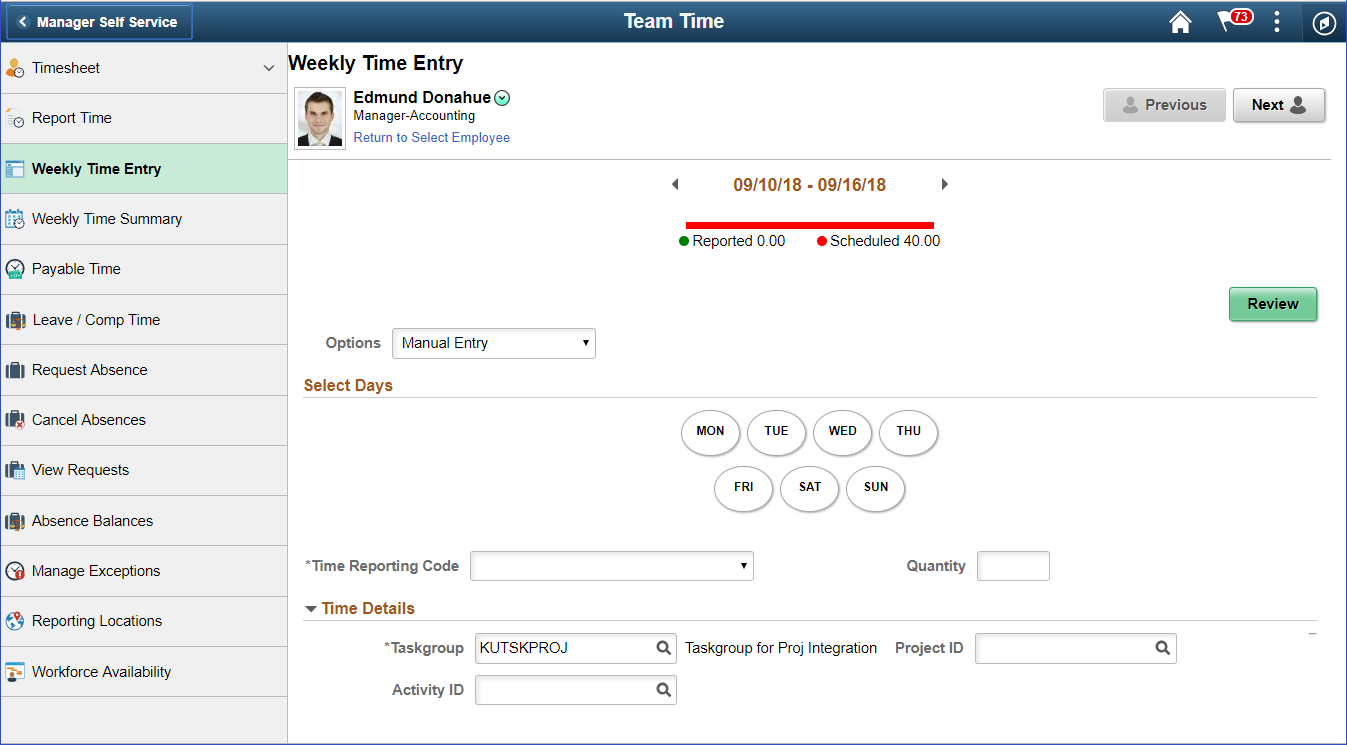
Image: Weekly Time Entry with Delegation Page
This example illustrates the Weekly Time Entry page enabled with delegation.
Auto Approval For Time Submitted by Manager
The time entered by the manager on behalf of their employees are auto-approved for the following conditions:
The reported time is entered or edited by the Manager
Only Time that is entered and edited by the manager
Any Time (Line or day level) only if acted on by the Manager
The immediate approver in the approval chain is the same person as the acting Manager or their delegates (Applies to multiple managers in the same approval level).
Note: This is for Any case. For ALLcase, the auto-approval will only trigger for the time reporter or manager in this case. If there are other steps in the approval chain, then the time will be auto-approved and only skip the acting Manager or delegates step. The time still be in Needs Approval status until it is approved by all in the approval chain. Time Sent Back or Denied will still retain its status until acted upon by the Manager.
Refer the configurations mentioned in Configurations Page for auto approval for time submitted by a manager.
The following video gives an overview of
Image: Enter Time Page with Manager Auto Approval enabled for Elapsed Time Reporter
This example illustrates an Enter Time Page with Manager Auto Approval enabled for Elapsed Time Reporter.
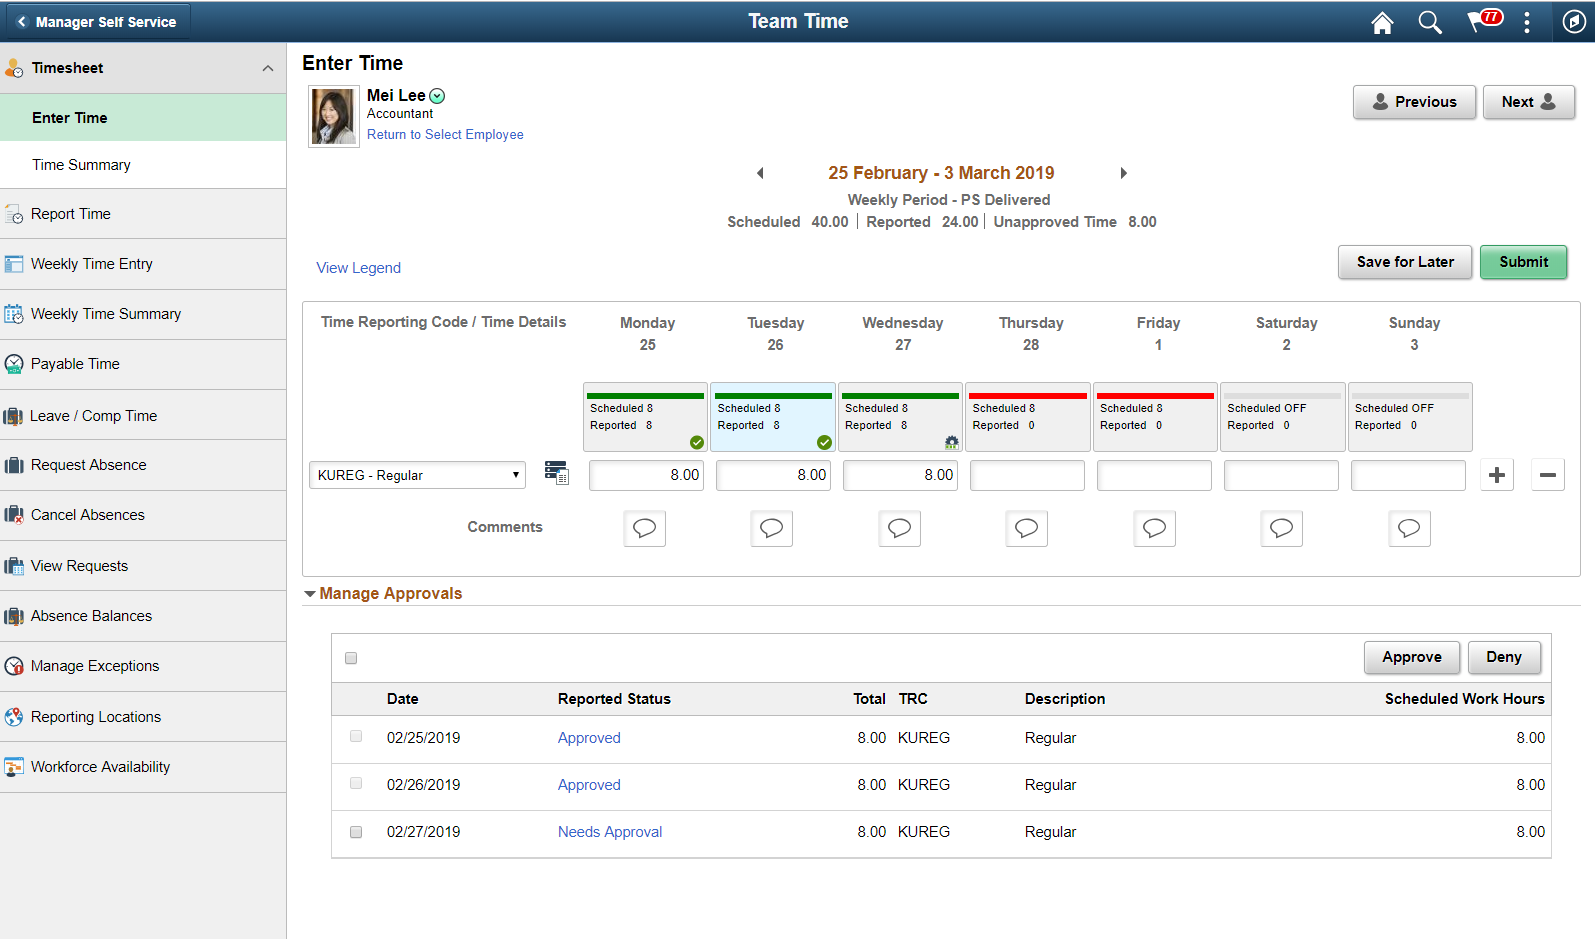
The example has two instances of time reported by manager, and the third by employee. When the time is reported by the immediate manager, it gets auto approved.
Image: Enter Time Page with Manager Auto Approval enabled for Punch Time Reporter
This example illustrates an Enter Time Page with Manager Auto Approval enabled for Punch Time Reporter.
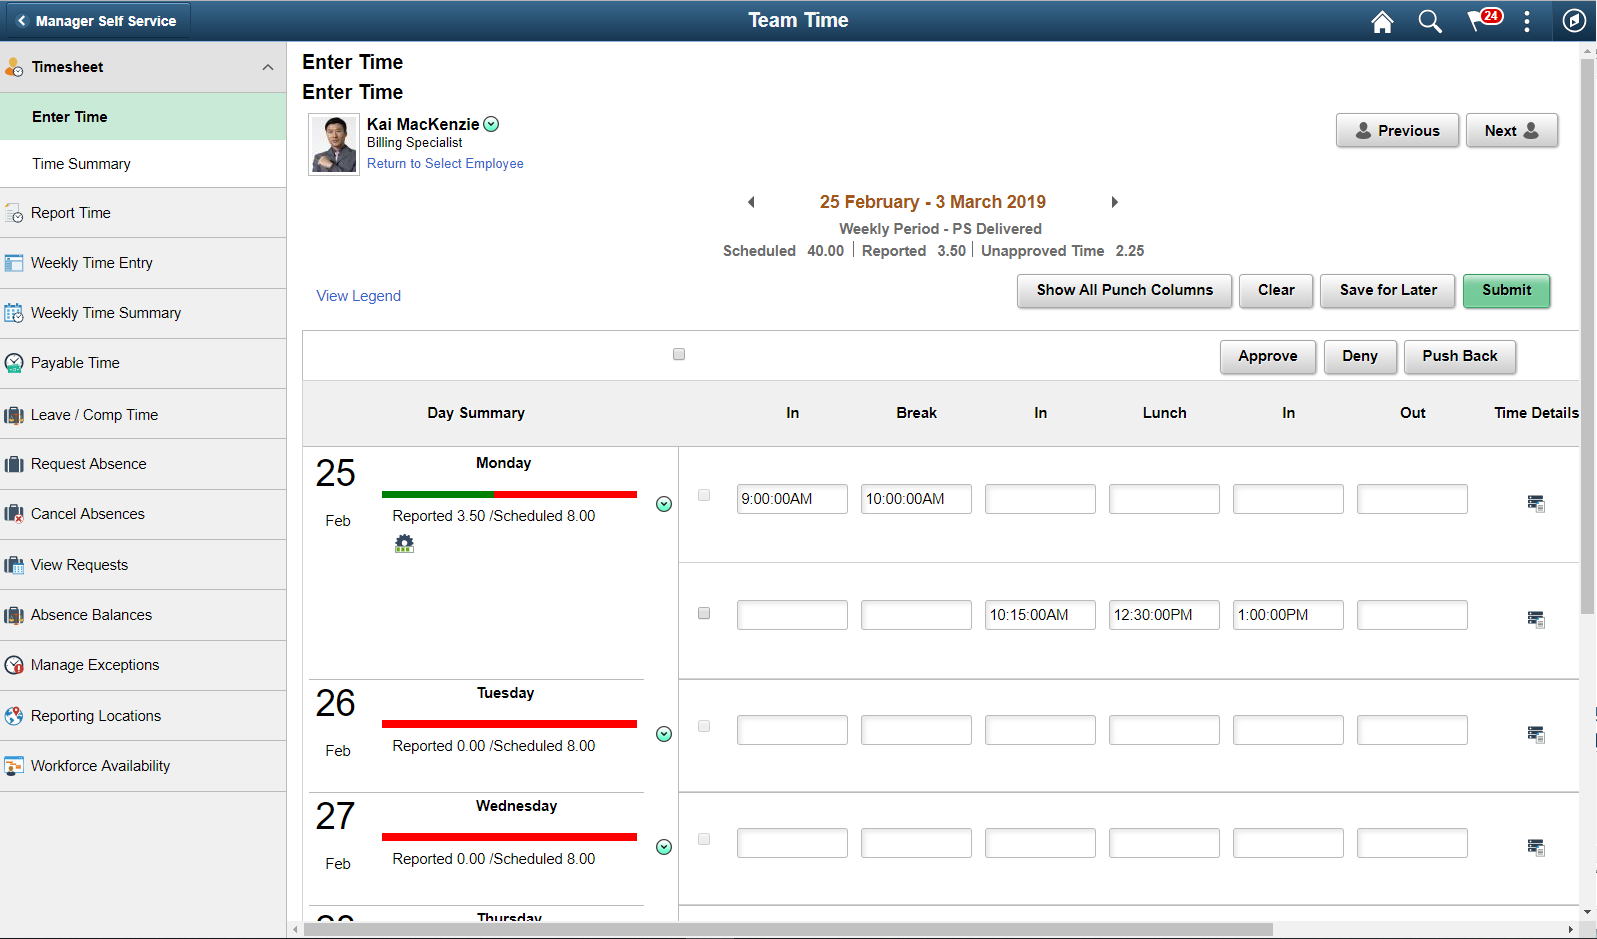
In case of punch time reporting, any punches reported by employee comes for an approval to the manager, whereas if the manager either edits or reports a new punch for a particular day, all the punches would get auto approved.
Note: In addition to Enter Time page, the auto approval is applicable for Report Time page, Weekly Time Entry page.
The auto approval feature is available for batch programs like mass time and rapid time approvals.
Image: Time Detail values inline for Elapsed Time reporter
This example illustrates the Time detail values inline in the Timesheet of an Elapsed Time reporter.

Administrators can configure managers to view the time detail values inline in the timesheet by selecting the option of Expand Time Details on Timesheet under Time and Labor Installation Page.
The Enter Time pages for elapsed time reporters show Time Details icon when Expand Time Details on Timesheet option is not selected under Fluid Timesheet section in the Time and Labor Installation page.
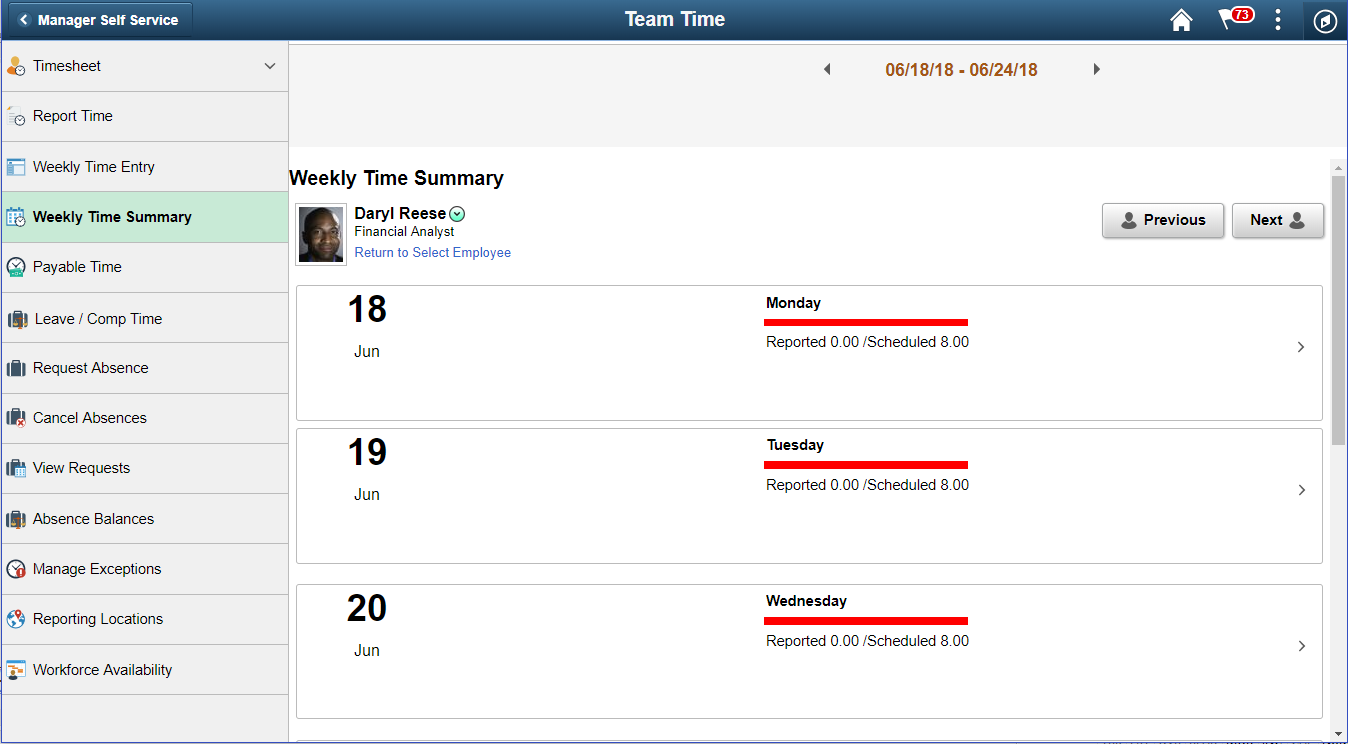
Select the details chevron to get the details of weekly team time reported for a particular employee.
Image: Weekly Team time details page
This example illustrates the fields and controls of Weekly Team Time for Manager Self Service.
|
Field or Control |
Definition |
|---|---|
| Return to Select Employee |
Select the hyperlink to go back to the Weekly Team Time page where it list the employees according to the search criteria. |
 |
Select to view the related actions menu. |
Image: Weekly Time_Related actions
This example illustrates the fields and controls of the weekly time page related actions.
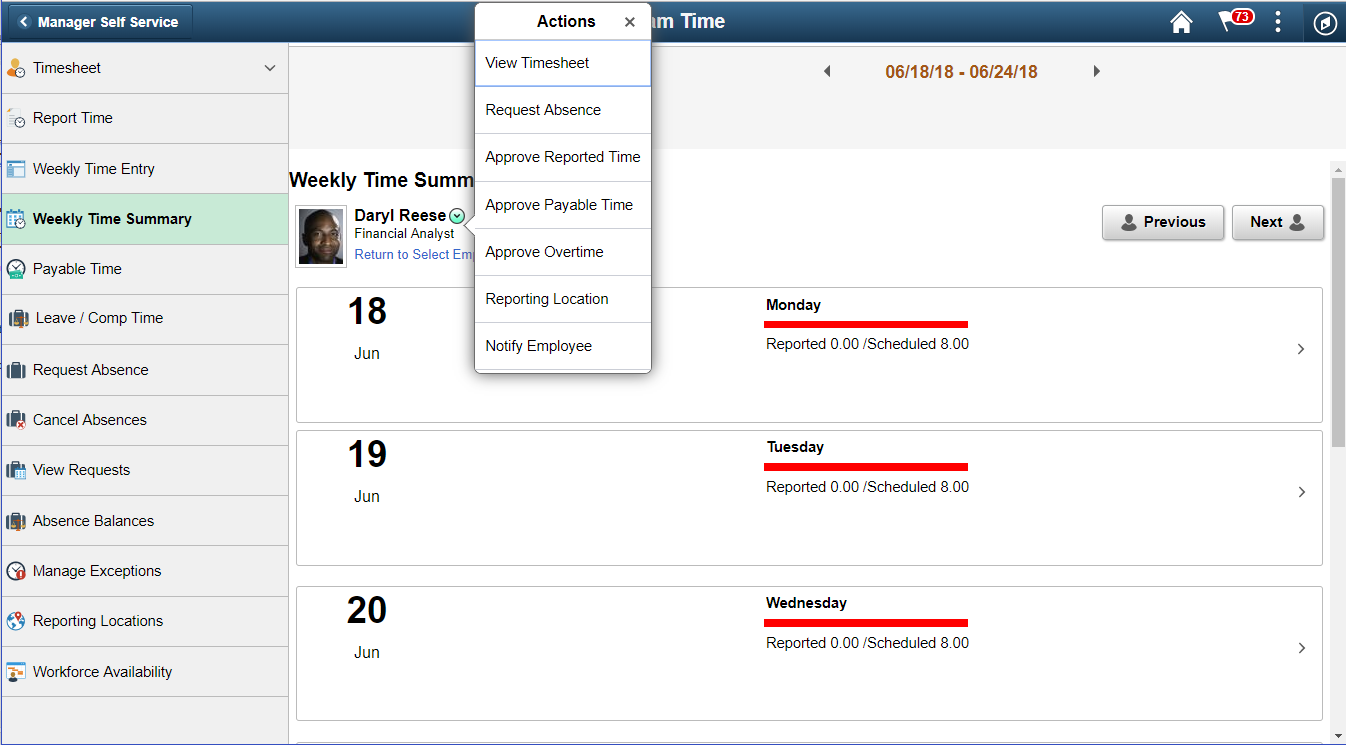
|
Field or Control |
Definition |
|---|---|
| View Timesheet |
Select to launch the classic Timesheet page. |
| Request Absence |
Select to request absence for the selected employee. |
| Approve Reported Time |
Select to launch classic Approve Reported Time page to approve reported time for the selected employee.. |
| Approve Payable Time |
Select to launch classic Approve Payable Time summary page to approve payable time for the selected employee. |
| Approve Overtime |
Select to launch classic Approve Overtime page to approve overtime for the selected employee. |
| Reporting Locations |
Select to launch Reporting Locations page and view the physical location from where the employee has entered their time. The physical location is captured and stored as a latitude and longitude. |
| Notify Employee |
Select to launch HR Notification page to send notifications. |
Note: The Request Absence related action is available if the employee is part of the absence system. This related action is used to launch classic Request Absence page to view the absences requested for the selected employee.
The related actions open for a date selected in the date picker.
Further on selecting chevron, the weekly time page details will navigate back to Report Time page with Return to Weekly Time page link.
Use the Payable Time (Select employees) page to select an employee Use Payable Time page (TL_PAYBTIME_FLU) to select the employee and review their payable time.
Image: Payable Time page
This example illustrates the fields and controls of the Payable Time page for a signed in manager.
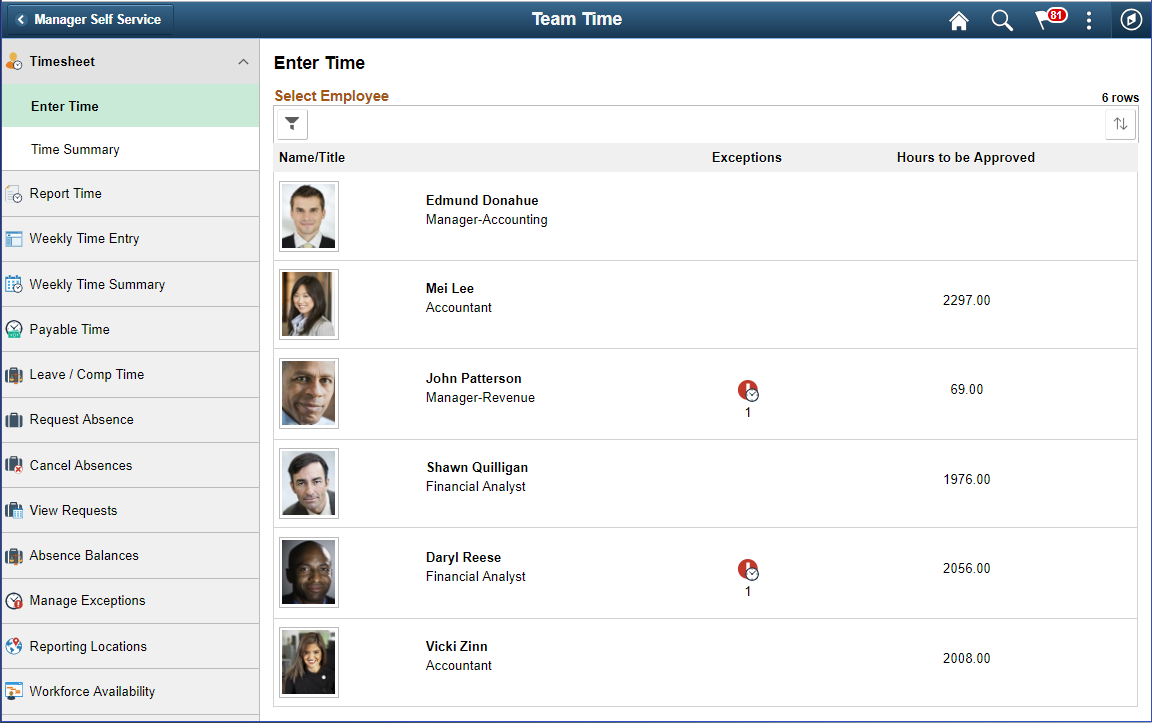
The manager can use filters to search the employees for a certain filter criteria.
Use Payable Time (TL_PAYBTIME_FLU) page to review employees payable time details with duration and Time reporting code, payable hours, and estimated gross for the selected period.
Image: Payable Time page
This example illustrates the fields and controls of the payable Time page.
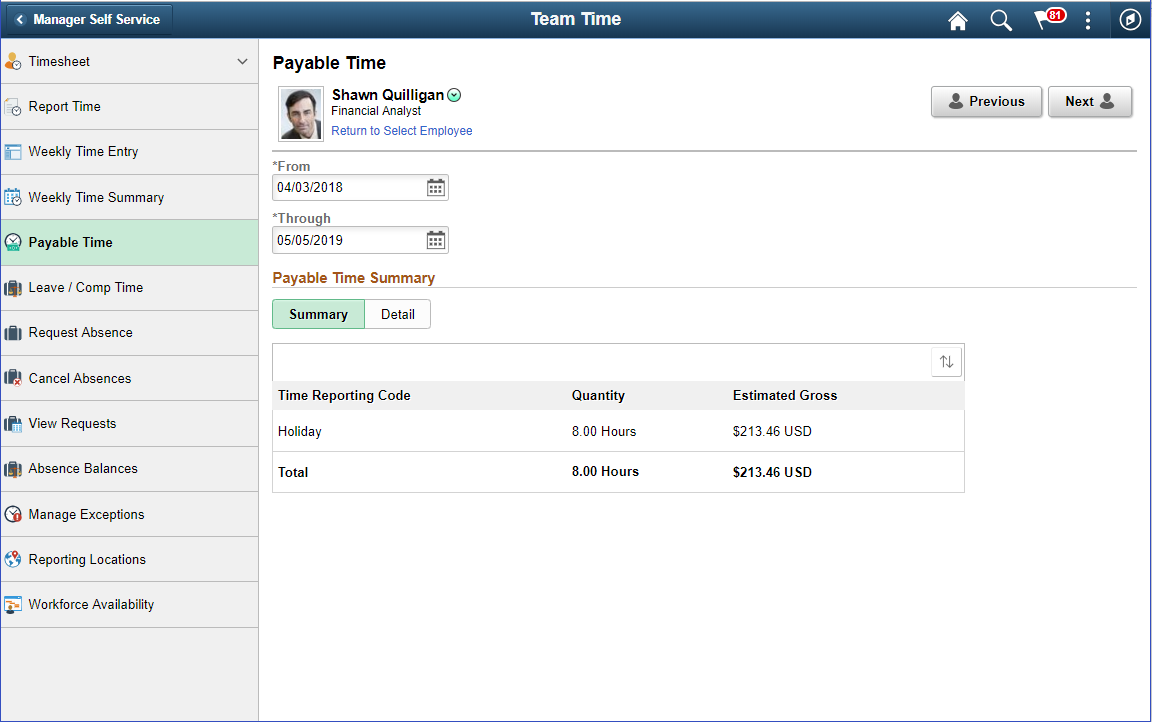
|
Field or Control |
Definition |
|---|---|
| Payable Time Summary |
The manager can review the estimated gross and payable hours for a selected period of time. |
Select on the Detail tab to view the Payable Time Detail page.
Image: Payable Time Detail page
This example illustrates the fields and controls for Payable Time Detail page.
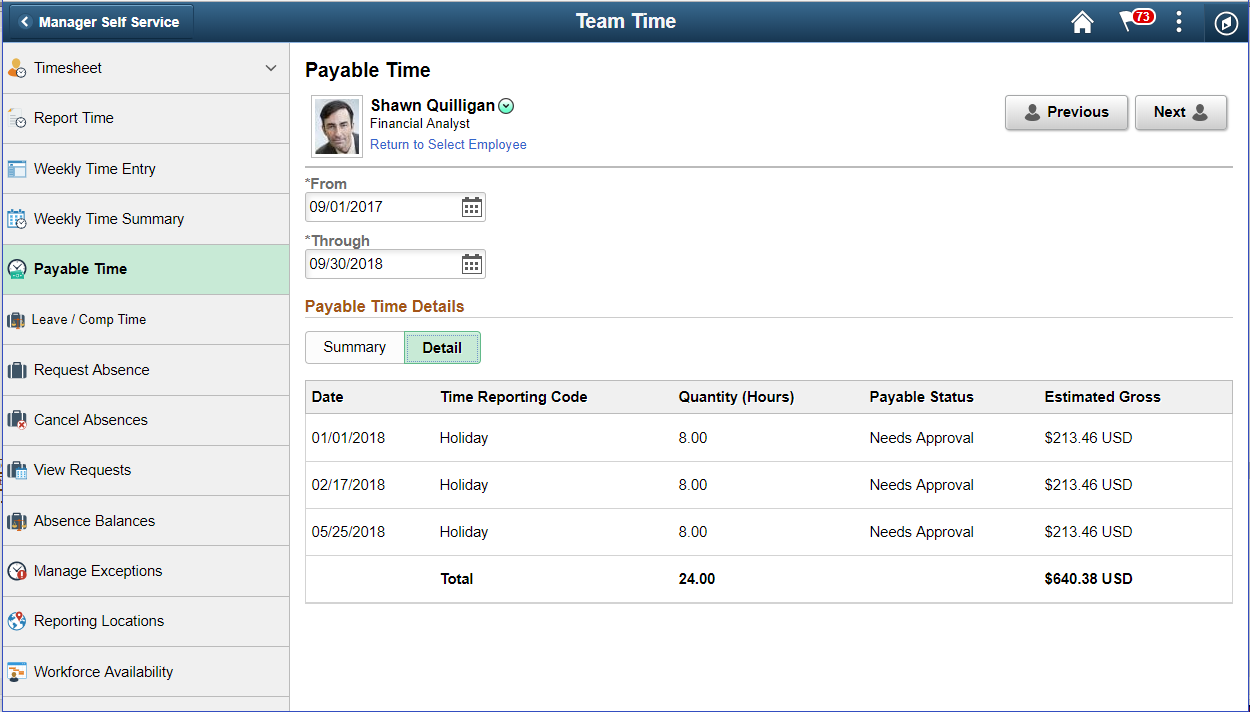
The detail tab displays the Payable Status of the employee.
Use the Leave / Comp Time (Select Employee) page to select the employee using the filter and view the employees with the selected filter criteria.
Image: Leave / Comp Time (Select Employees) page
This example illustrates the fields and controls on the Leave / Comp Time (Select Employees) page. You can find definitions for the fields and controls later on this page.
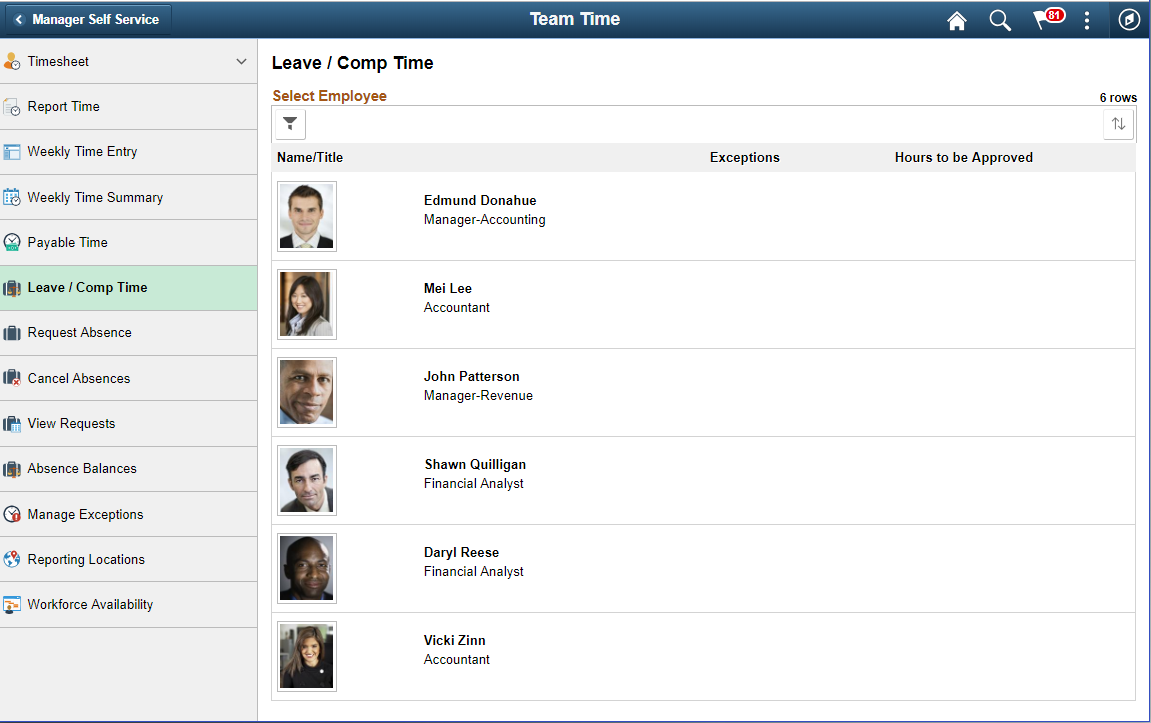
Image: (Smartphone) Leave /Comp Time page
This example illustrates the fields and controls on the (Smartphone) Leave /Comp Time page.
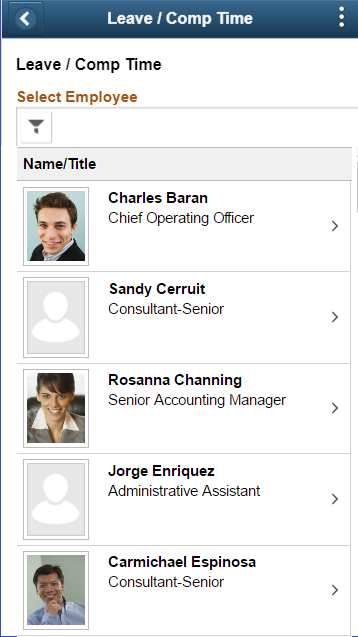
Click on the chevron to view the Leave / Comp Summary page.
The Leave / Comp Time Summary (TL_COMPLEAVBAL_FLU) page is used to view the summary of leave balances of employees in card format.
Image: Leave / Comp Time Summary page
This example illustrates the fields and controls of Leave / Comp Time Summary using desktop.
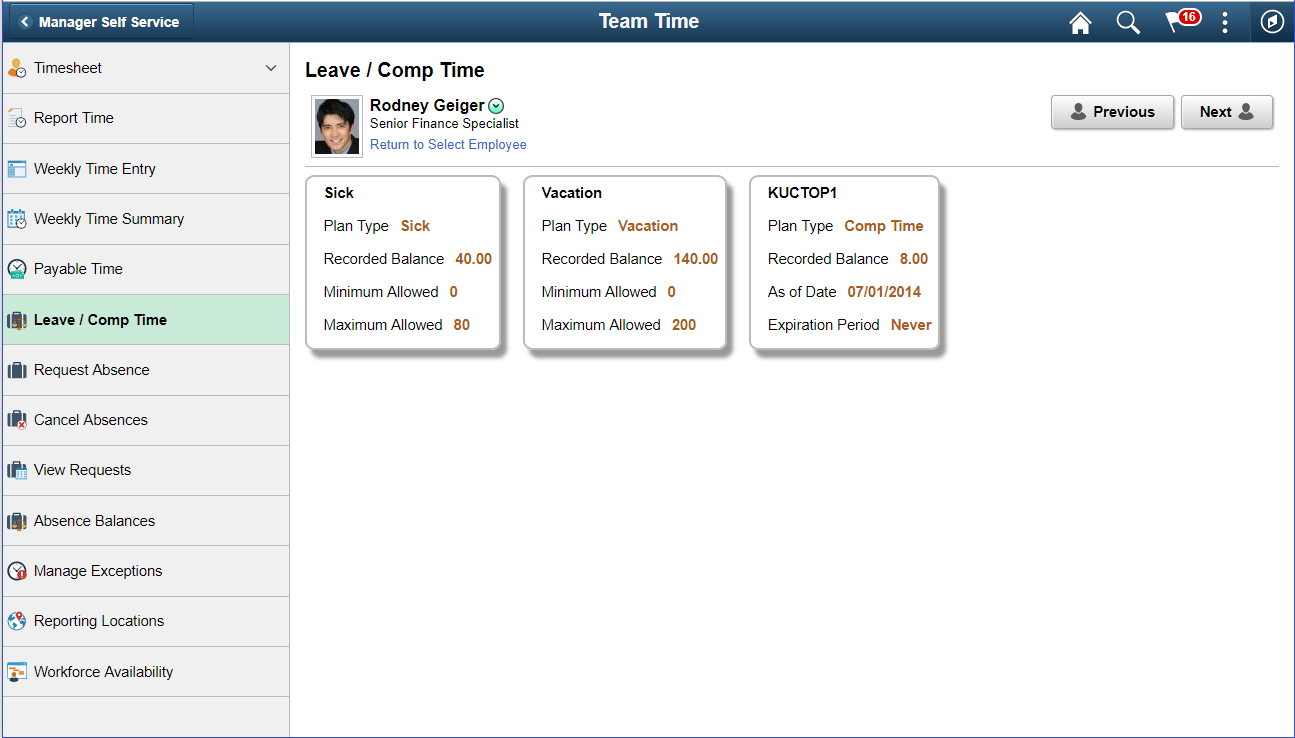
The sick, vacation and compensatory time off are shown in cards. Each of your leave types and compensatory time off plans are displayed as cards..
The compensatory time off displaysAs of Dateand Expiration Period.
Note: The Expiration Period will be for the last approval run balance. This is determined on the basis of comp plan and the latest accrual.
Image: (Smartphone) Leave / Comp Time Summary page
This example illustrates the Leave / Comp Time summary page using smartphone.
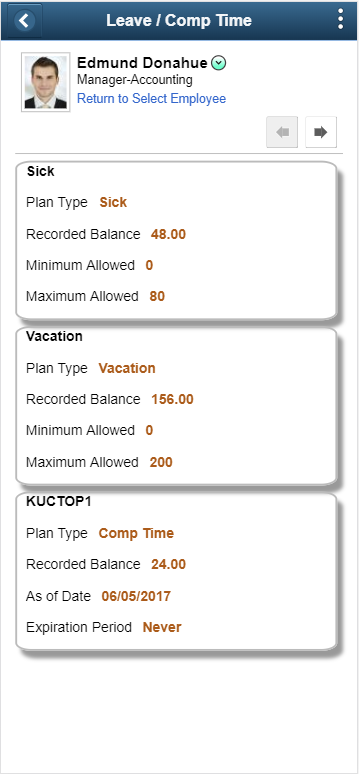
Click on the leave type card to view the Leave / Comp (TL_COMPLEAVHST_FLU) page.
The Sick and Vacation details show the minimum allowed and Maximum Allowed leave upfront on the card. The Comp Time leave card displays As of Date and Expiration Period.
Image: Leave / Comp Time Details page
This example illustrates the fields and controls of the Leave / Comp Time Details page.

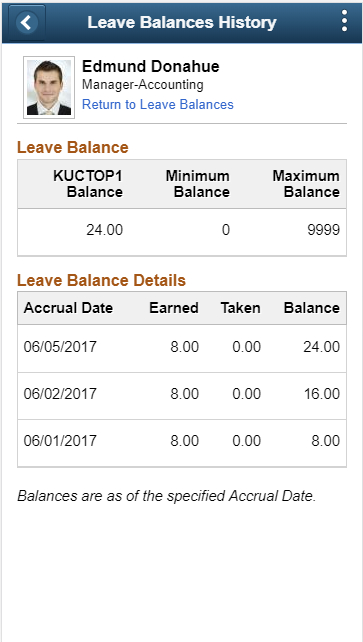
Image: Leave Balance details for smartphone
The following example illustrates the fields and controls of Leave Balances details for employees using smartphone.
|
Field or Control |
Definition |
|---|---|
| Earned |
Number of leaves earned for an year. |
| Taken |
Number of leaves taken so far. |
| Balance |
Number of leaves remaining for the year. |
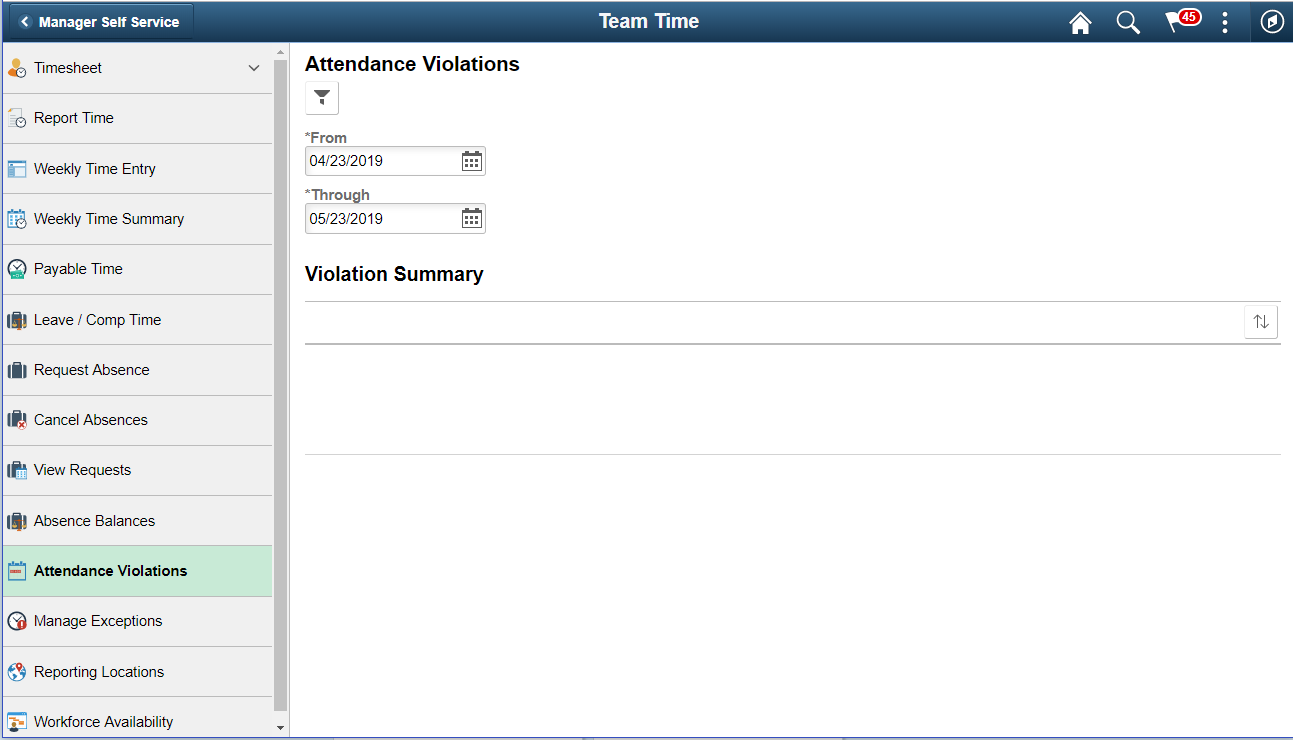
Use the Attendance Violations page to view the summary of violations for a selected period of time.
Navigation
Select the Team Time tile on the Manager Self Service page or a homepage where the tile is added.
Select the Attendance Violation on the left hand pane from Team Time navigation collection page.
Image: Attendance Violations page
This example illustrates the fields and controls on the Attendance Violations page.
|
Field or Control |
Definition |
|---|---|
| Start TimeEnd Time |
Select and enter start and end time for which the attendance violation summary for the selected employee need to be displayed. |
Image: Attendance Violations page with Summary view
This example illustrates the Attendance Violations summary for a particular period.
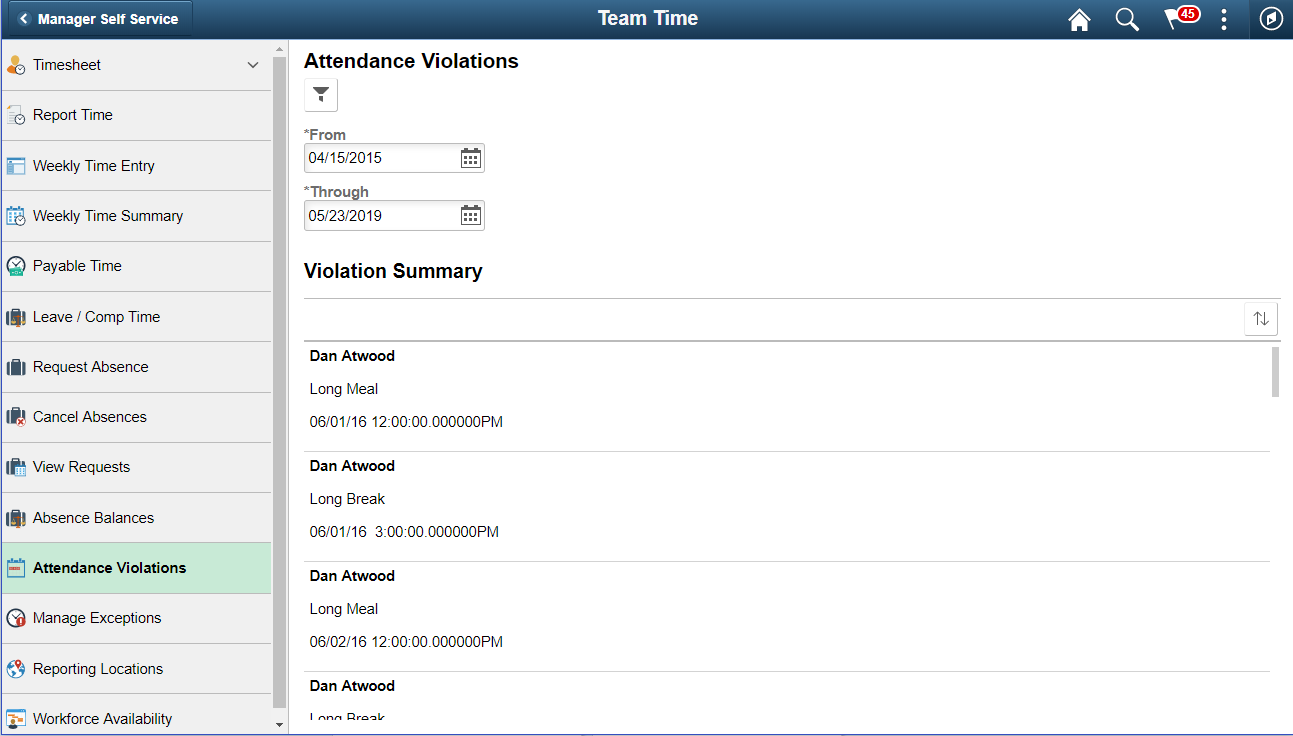
Note: The manager can view his employees attendance violation summary from the related actions of Enter Time page.
Image: Enter Time page showing Related Actions
Attendance Violation from Enter Time Related Actions
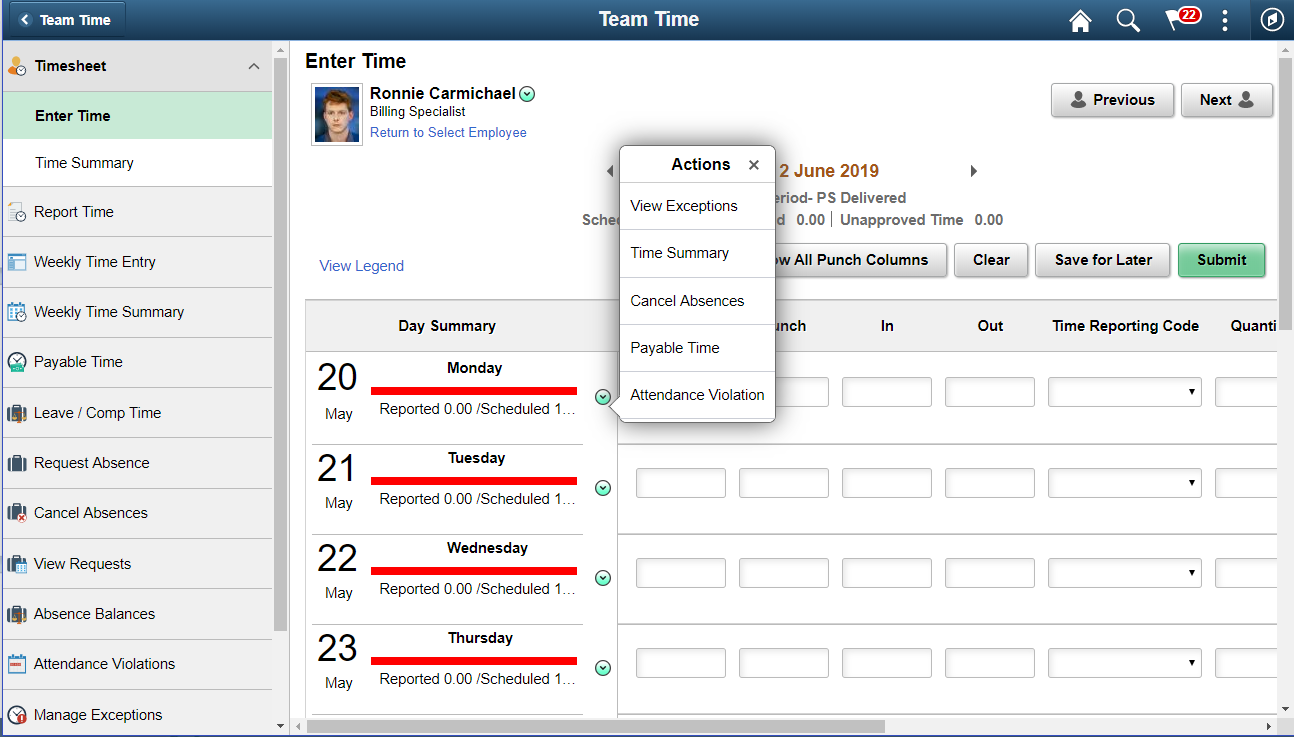
On selecting attendance violation from the related action, it opens a window with attendance violation summary.
Image: Attendance Violations_Violation Summary page
This illustrates an example of Attendance Violations — violation summary page.
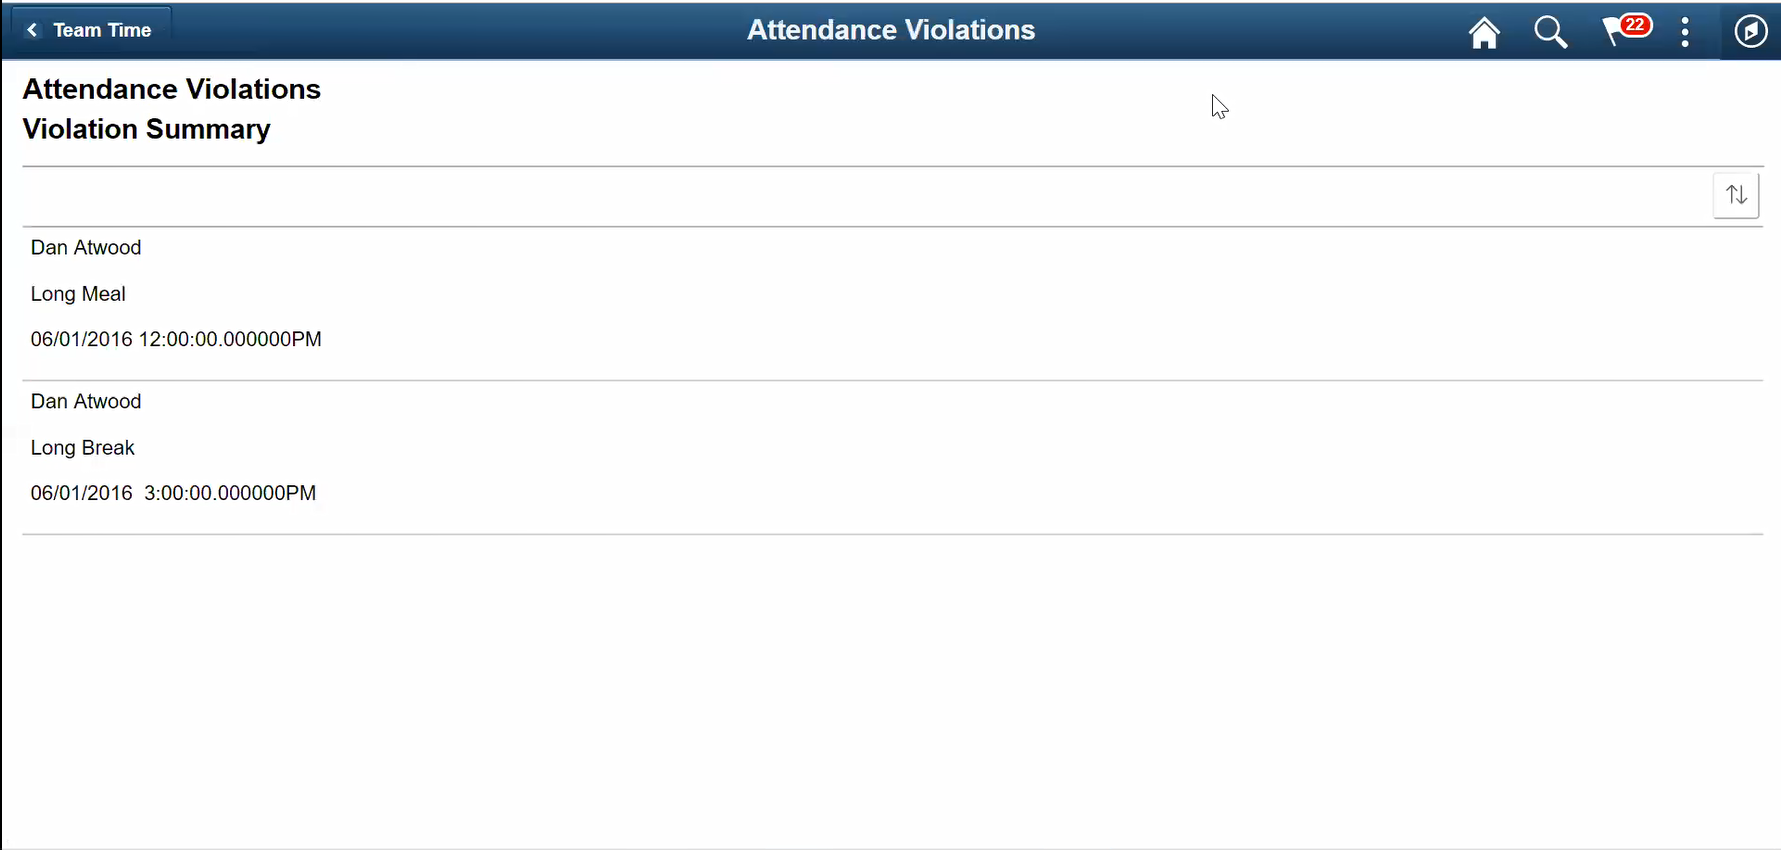
Image: Enter Time page with Attendance violations icon
This example illustrates the fields and controls of Enter Time page with Attendance violations icon.
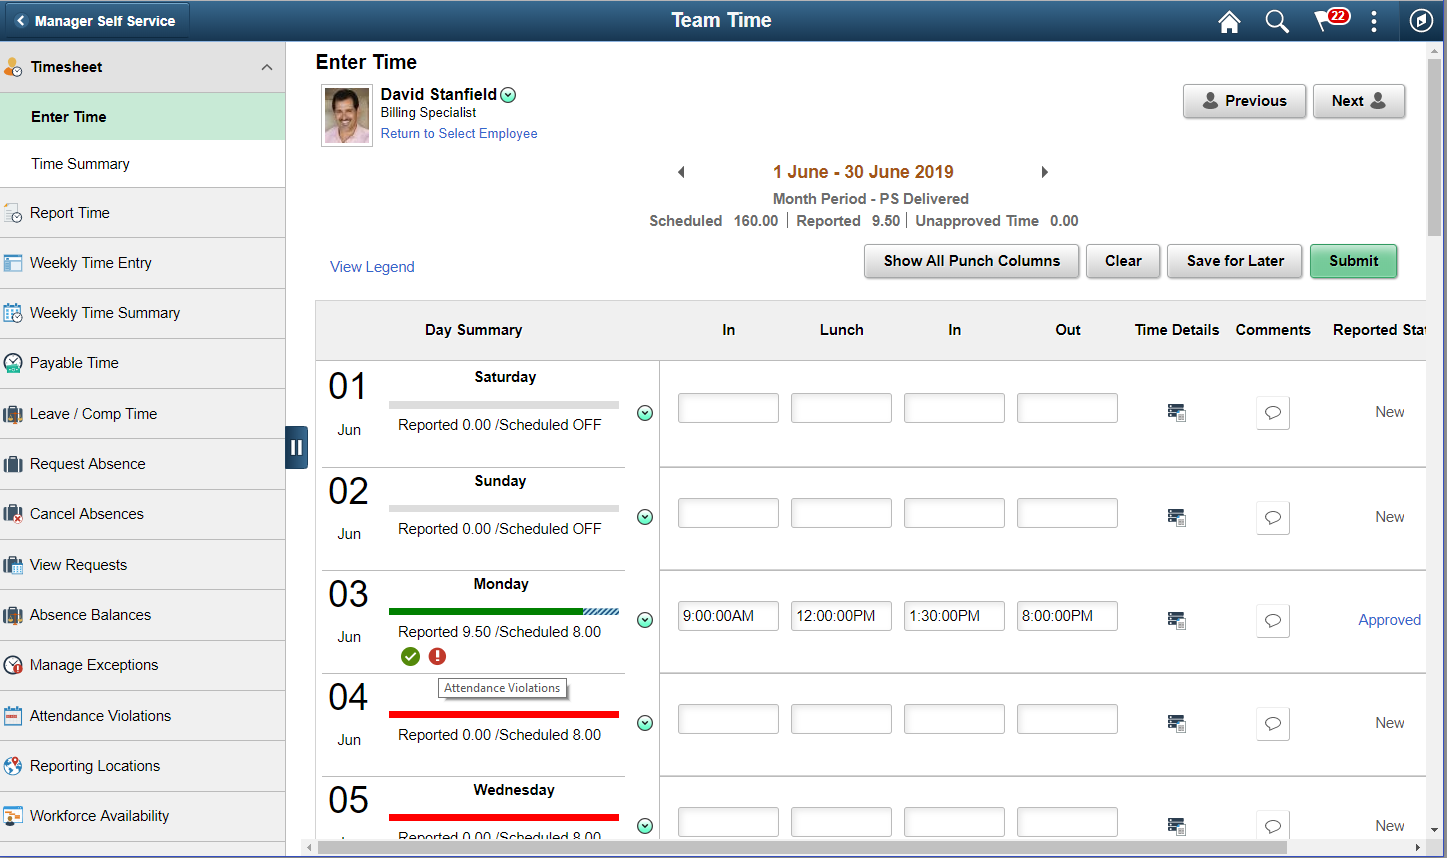
The day summary shows a red icon for attendance violations.
Use the Manage Exceptions page to view and resolve exceptions using Fluid User Interface.
Navigation
Select the Team Time tile on the Manager Self Service page or a homepage where the tile is added.
Select the Manage Exceptions from on the left hand pane from Team Time navigation collection page.
Image: Manage Exceptions page
This example illustrates the fields and controls on the Manage Exceptions_Update / Add Timepage.
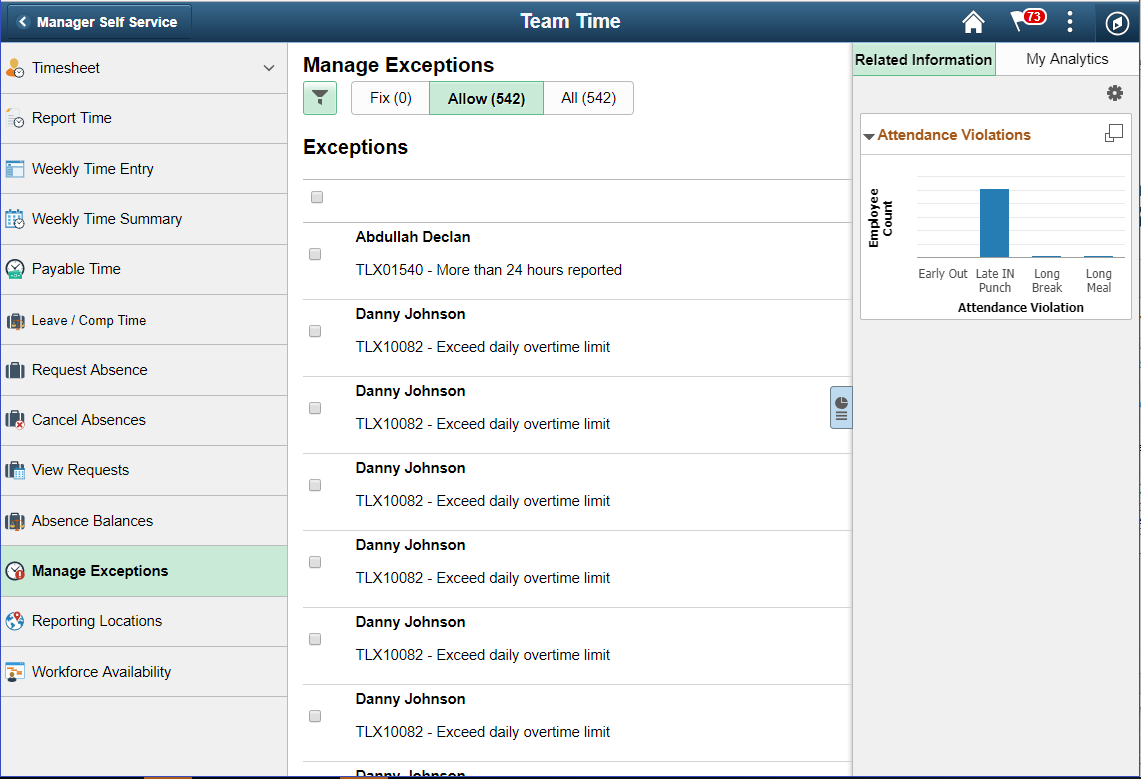
Select the chevron to open the Manage Exceptions details page. The details page contain the Return to Manage Exceptions link to go back to the Manage Exceptions page.
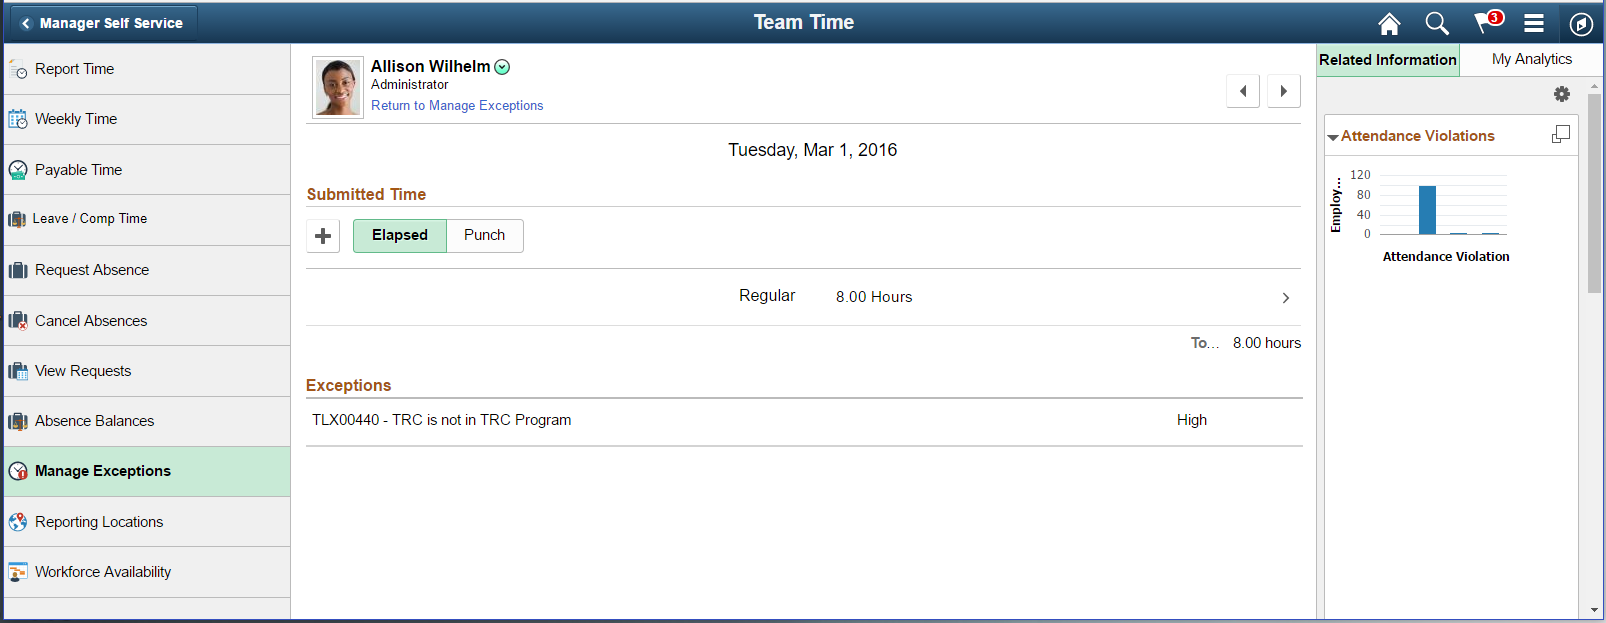
Image: Manage Exceptions_Update Time page
This example illustrates the fields and controls on the Manage Exceptions_Update / Add Time page.
|
Field or Control |
Definition |
|---|---|
 |
Click on the icon to add a new time. Also select the time row to delete or modify the reported time. |
Note: The manager can dismiss the exception by clicking on the check box Allow. When the resolution of an exception requires a modification of the employee timesheet, the manager can transfer it to the employee timesheet to make corrections. The manager can add a new time row by clicking on the plus icon and enter the missed punch to resolve the exceptions.
Managers can use the Reporting Locations page to view the employee location when the employee has accepted the use of location services and your organization has licensed and enabled Oracle Maps Service for PeopleSoft on the Installation Table — Setting Up Implementation Defaults
Navigation
Select the Team Time tile on the Manager Self Service page or a homepage where the tile is added.
Select the Reporting Locations from the list in the Team Time page.
When Oracle Maps Service for PeopleSoft is enabled, the Team Time page from the Fluid Manager Self Service pages displays the Reporting Locations transaction category. When Oracle Maps Service is disabled, the Reporting Locations option is not available for selection on the Team Time page.
Image: Reporting Locations Page
This example illustrates the fields and controls on the Reporting Locations page.
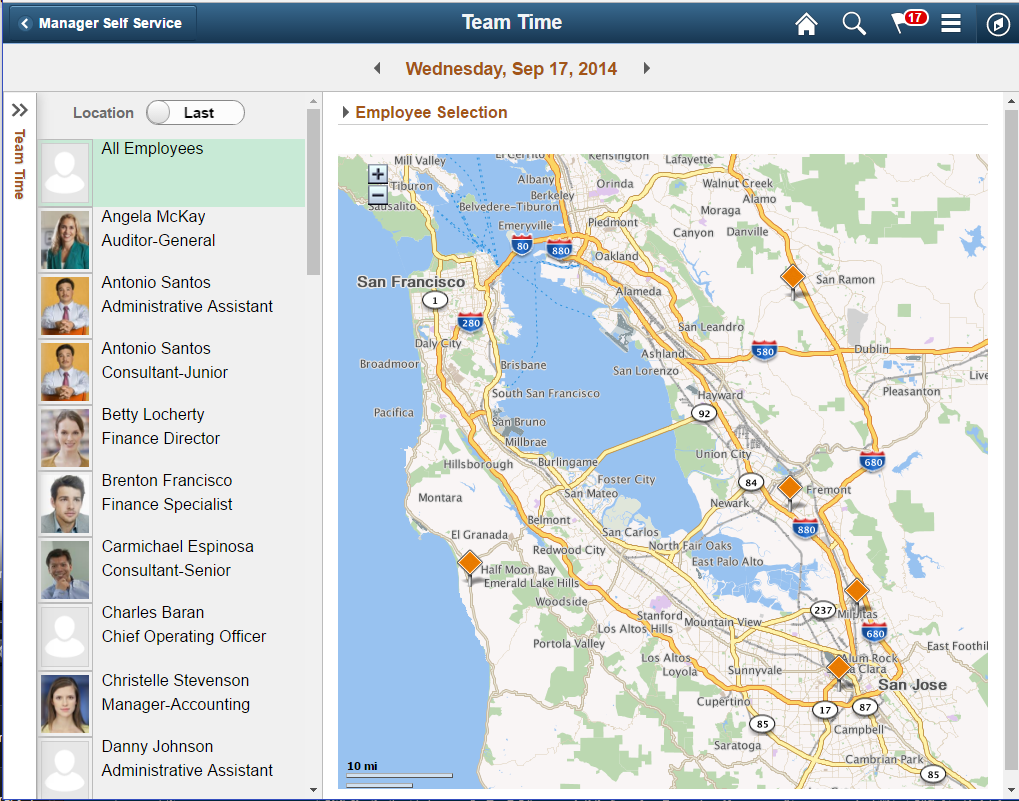
The Time and Labor related Manager Self Service tasks are Manage Exceptions and viewing Reporting Locations.
Note: When Oracle Maps Service for PeopleSoft is enabled, the Team Time page from the Fluid Manager Self Service pages displays the Reporting Locations transaction category. Select this option to access the Reporting Locations Page and view where your employees reported their time. When Oracle Maps Service is disabled, the Reporting Locations option is not available for selection on the Team Time page.
Managers can use the Workforce Availability page (TL_EMP_PRES_FLU) to access the Workforce Availability landing page and the related categories with detailed information of the team members. Workforce Availability provides ability for the managers to see a comprehensive view of his team's availability for the day - who is in office, who is in training, who has not clocked in.
Navigation
Select the Team Time tile on the Manager Self Service page or a homepage where the tile is added.
Select the Workforce Availability from the list in the Team Time page.
The manager can track his employee’s availability status, and related actions in desktop, smartphone and tablet for a day or week and plan for a better coverage. The Manager can track the availability of team members at any given time of the day and can monitor the schedule adherence and then plan the schedule coverage. This facility is available for the weekly status too.
Image: Workforce Availability Page
This example illustrates the fields and controls on the Workforce Availability page.
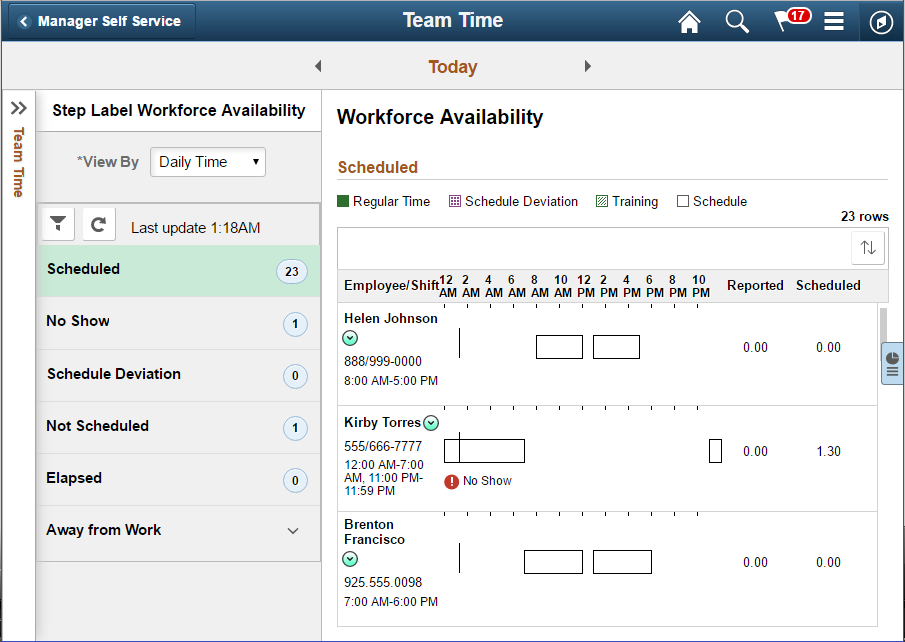
The right hand panel for scheduled category displays different combination of data for employees who are in any of the following combinations:
Absence and Training for the day
Absence, training and on deviation
Actual reported time as per schedule
Absence (Benefits leave)
Comp Leave, Training and Reported Time.
Schedule Deviation
Note: The user can view the drill down details for each specific or combination of different categories.
|
Field or Control |
Definition |
|---|---|
 |
Select to view the hidden navigation collection for manager self service which includes all the time related actions. |
| Scheduled |
Shows all the scheduled employees for that day . This category displays multiple categories at one place. |
| No Show |
Displays the list of punch time reporters who are scheduled to work on that day but there is neither reported time nor absence or training. |
| Schedule Deviation |
Lists the employees who deviated from their schedule. Deviation is arrived using TL Installation configuration which we will discuss in the next slide. Only Punch time reporters are considered for this category. |
| Not Scheduled |
Shows the Elapsed and Punch time reporters with scheduled OFF / Holiday for that particular day. |
| Elapsed |
Shows the list of elapsed time reporters who have reported time. |
| Away from Work |
Once you expand Away from Workcategory, it will show the following sub categories:
|
| Employee/Shift |
Displays the name, phone number and shift of the employee. |
 |
Shows the patterns in which the categories of employees are represented in the below grid or in legends. |
| My Analytics |
Shows the overview of the analytics for workforce for the current view. |
| Add icon |
Add a new scenario for analytics by defining the needed scenarios |
| Workforce Availability link |
Select to view My Analytics for the current scenario, or enhance the filter on the left pane to add Prompts for criteria as needed. |
Note: In scheduled category, the drill down details displays data for all categories for that particular day. The Manager and the Employees are in the same Time Zone. Current Time would be converted to Manager Time Zone and displayed both as text and the current time indicator.
The green bar represents the regular time. The gaps in between two bars indicate a meal break. Along with the Punch time reporters, the supervisor can also view the elapsed time reporters. There is a warning icon to highlight the employees in the no show category.
|
Element |
Definition |
|---|---|
|
View By |
Drop down list where you select Daily Time or Weekly Time. Daily Time : See a comprehensive view of team's availability for the day. Weekly Time:: View the availability and the schedule coverage of team members for the week and as the week progresses. Manager can choose any date through the date picker and also be able to navigate back and forth using the Previous and Next day buttons on the date header |

Filter |
Navigates to the filter modal where you can specify the employee population. |

Refresh |
Refresh the window with the updated data. |

Sort |
Click this icon to change the sort order of team members. You can sort by any field shown. |

|
Click to see the detailed view related to the particular employee. |
|
|
Select to go to the related actions menu. |
|
Scheduled |
Shows the scheduled time in hours. |
|
Reported |
Shows the reported time in hours. |
Image: (Smartphone) Workforce Availability Page
This example illustrates the fields and controls on the Workforce Availability page for the smartphone.

The category specific details represented in the form of boxes in smartphone. Each category have generic text and appear in a box with a pattern that corresponds to the particular category.
|
Field or Control |
Definition |
|---|---|
|
Shows the detailed information on the schedule details. |
Use the Workforce Availability Scheduled daily page (TL_EMP_PRES_FLU) to view the snapshot of all categories. Manager can view the punch and Elapsed employees who are scheduled to work for the specified week. Only Employees assigned with schedules would be considered.
Navigation
Select the Team Time tile on the Manger Self Servicefluid home page, and then Select the Workforce Availability on the Team Time page.
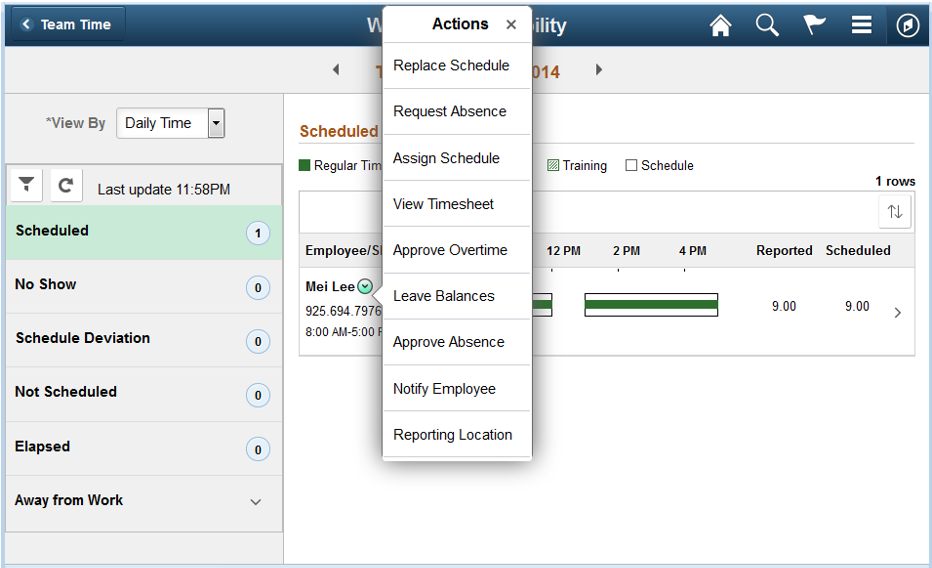
Click on the related actions to get the Actions panel.
Image: Related Actions
This example illustrates the fields and controls on the Related Actions panel.
|
Field or Control |
Definition |
|---|---|
| Replace Schedule |
Select to launch the Replace Schedule page to access the schedule for replacements and to do the necessary actions for replacements and send notifications. |
| Request Absence |
Select to launch the Assign Work Schedule page to access the time reporter data to schedule and assign it to a particular employee. |
| View Timesheet |
Select to launch the Timesheet page to access the reported time entries, approve pending reported time, payable time and absences. |
| Approve Overtime |
Select to launch Approve overtime requests page to access the employee selection criteria. |
| Leave Balances |
Select to launch Leave and Compensatory Time to access the related selection criteria. |
| Approve Absence |
Select to launch Approve Absence summary page to do the related action and to approve absences. |
| Notify Employee |
Select to launch HR Notification page to send notifications. |
| Reporting Locations |
Select to launch Reporting Locations page and view the physical location from where the employee has entered their time. The physical location is captured and stored as a latitude and longitude. |
Tap on the Reporting Locations options to launch the Reporting Locations Page
Note: The Reporting Locations option is available only for Daily view.
For setting up the reporting locations, refer Configurations Page in the Time and Labor Installation Page.
Use the No Show category daily page to view the details of the employees who are scheduled to work but haven’t reported time, in absence or in training. This category displays employees who are scheduled to work also.
Navigation
In the Workforce Availability page, Select No Show on the left panel.
Image: No Show Daily Pages
This example illustrates the fields and controls on the No Show daily page.
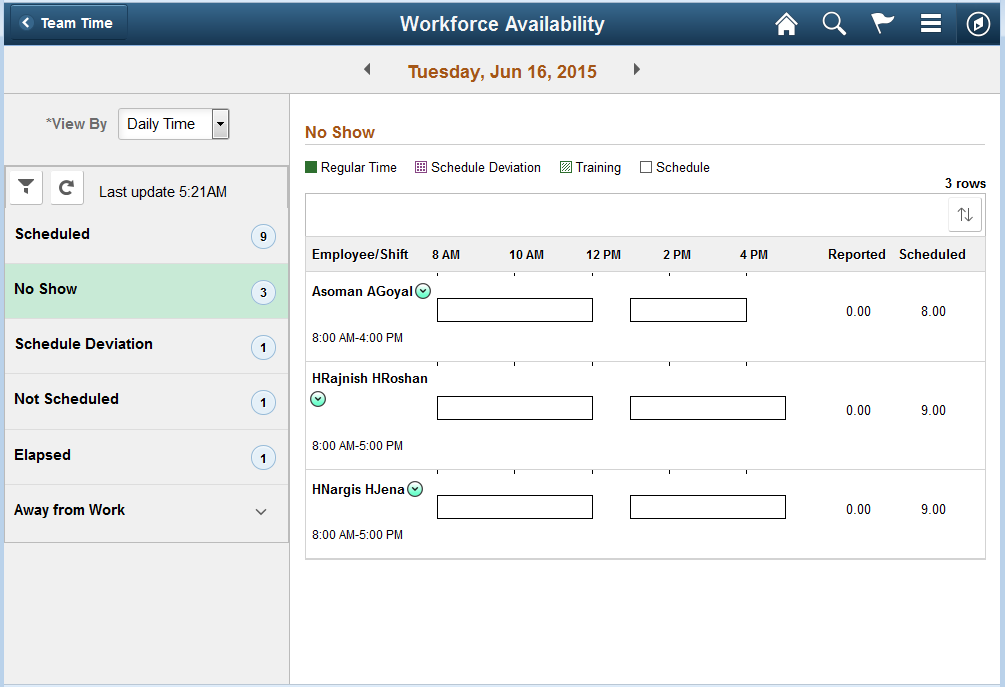
Image: (Smartphone) No Show daily page
This example illustrates the fields and controls on the No Show daily page of the smartphone.

No Show status displays when the schedule for the employee has begun and the employee has not reported to work. For punch time reporters, there is no drill-down and visual representation.
Note: If an employee has reported absence which is in denied/pushed back status, it should show up in no show category. Elapsed reporters are not part of No show and Schedule deviation categories.
Use Schedule Deviation category to view the count and the details of the employees who have deviated from the schedule.
Navigation
In the Workforce Availability page, select Schedule Deviation on the left panel.
Image: Schedule Deviation daily page
This example illustrates the fields and controls on the Schedule Deviation daily page of the tablet.
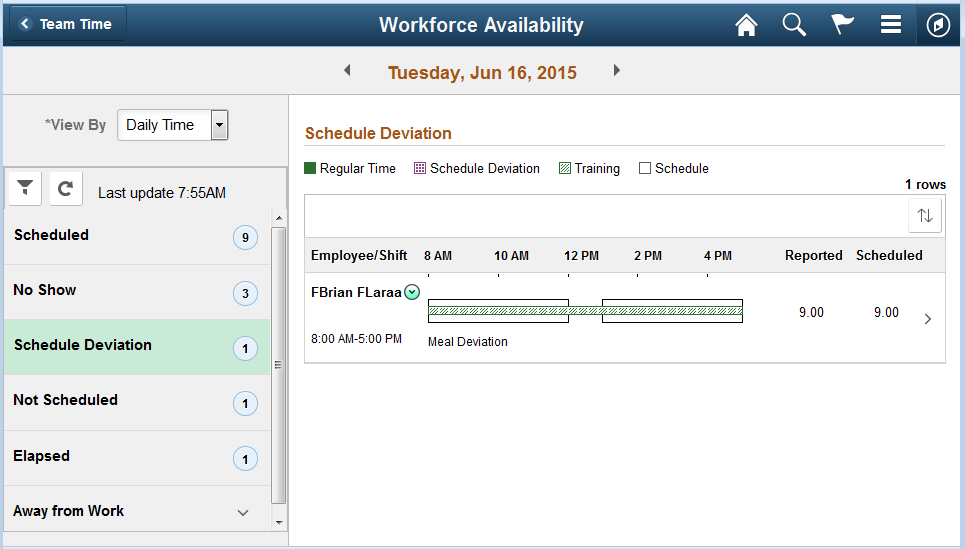
The Drill down for Schedule Deviation does not list the time off details means other than deviation data no other category data will be displayed in the drill down.
Image: Drill down Details Page
The modal shows the Drill down Details.
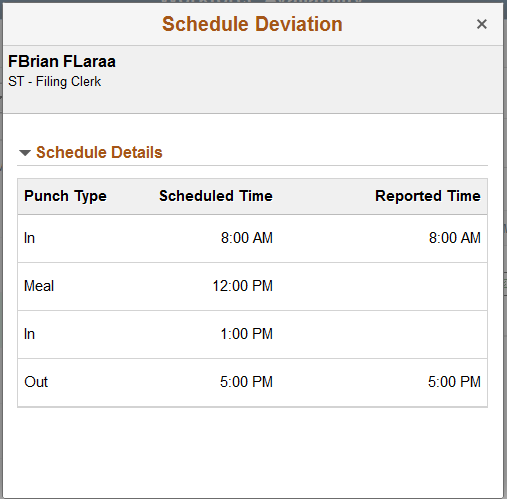
Image: (Smartphone) Schedule Deviation daily page
This example illustrates the fields and controls on the (Smartphone) Schedule Deviation daily page of the smartphone.
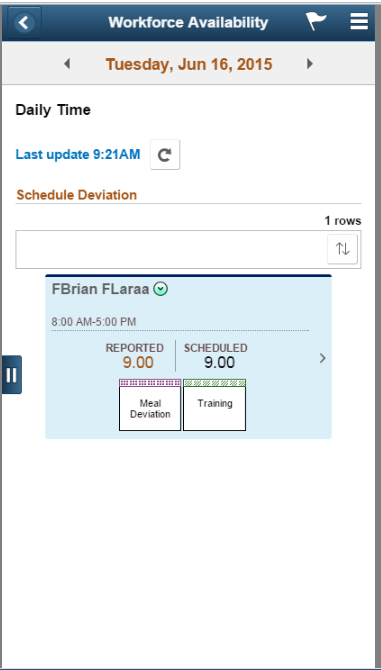
The grid in the smartphone displays the deviation for specific reasons. If there is more than one deviation, the grid displays the latest deviation reason. The grid represents additional status like time off or training as per the employee status. This category is not applicable for an elapsed reporter in smartphone. The manager can view the data in graphical representation from each day with specific reason for different type of deviation. The valid deviation reasons are Early In, Early Out, Late In and Late Out and Meal Deviation.
Note: This category displays even when the count is Zero. The detail page displays a message 'No data available.
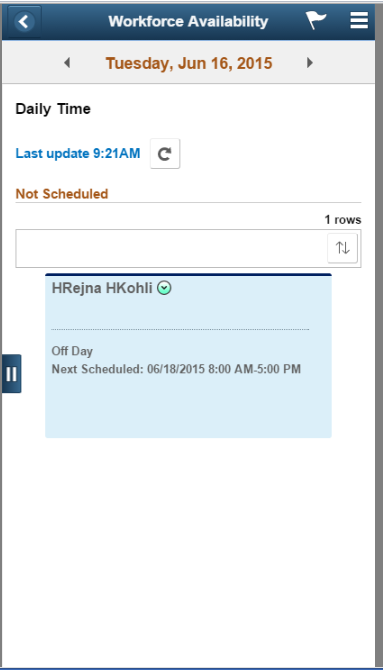
Use Not Schedule daily page to view the count and details of employees who report to a manager or within the hierarchy but do not have a schedule time, or on off or on holiday.
Navigation
In the Workforce Availability page, Select Not Scheduled on the left panel.
Image: Not Scheduled daily page
This example illustrates the fields and controls on the Not Scheduled daily page.
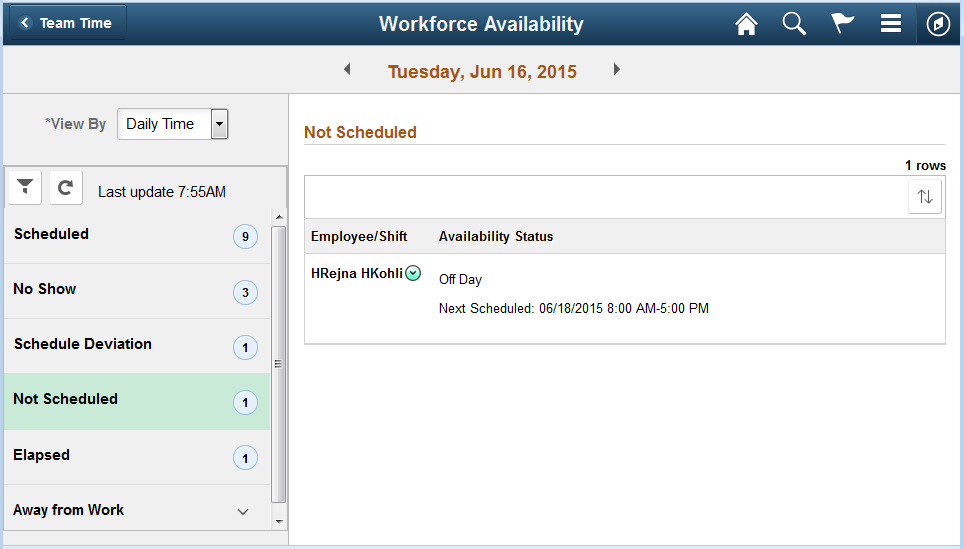
Image: (Smartphone) Not Scheduled daily page
This example illustrates the fields and controls on the Not Scheduled daily page on smartphone.
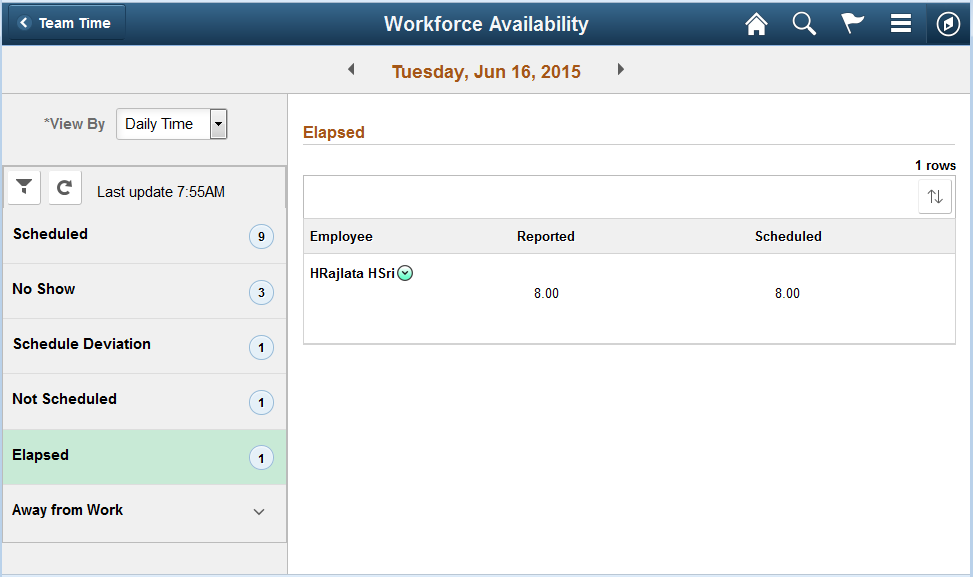
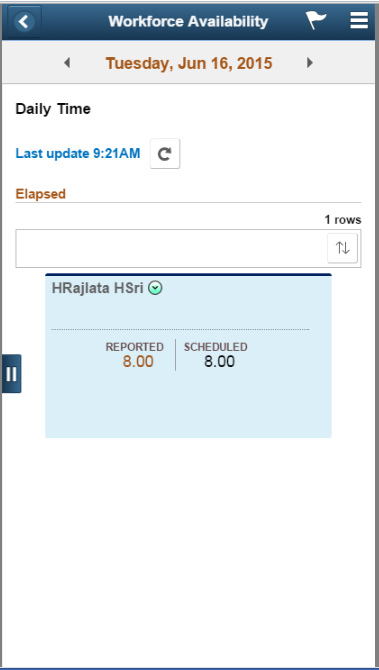
Use the Elapsed daily page to view the count and details of the elapsed employees who have reported time.
Navigation
In the Workforce Availability page, Select Elapsed on the left panel.
Image: Elapsed daily page
This example illustrates the fields and controls on the Elapsed daily page.
Note: There is no representation using widgets for the Elapsed and Not Scheduled categories.
Image: (Smartphone) Elapsed daily page
This example illustrates the fields and controls on the (Smartphone) Elapsed daily page.
The expanded view of Away From Work shows the sub categories.
Use Unapproved Absence daily page to view the count and details of the employees who have any unapproved absences or leave plans.
Navigation
In the Workforce Availability page, Select the Unapproved Absence on the left panel.
Image: Unapproved Absence daily page
This example illustrates the fields and controls on the Unapproved Absence daily page.
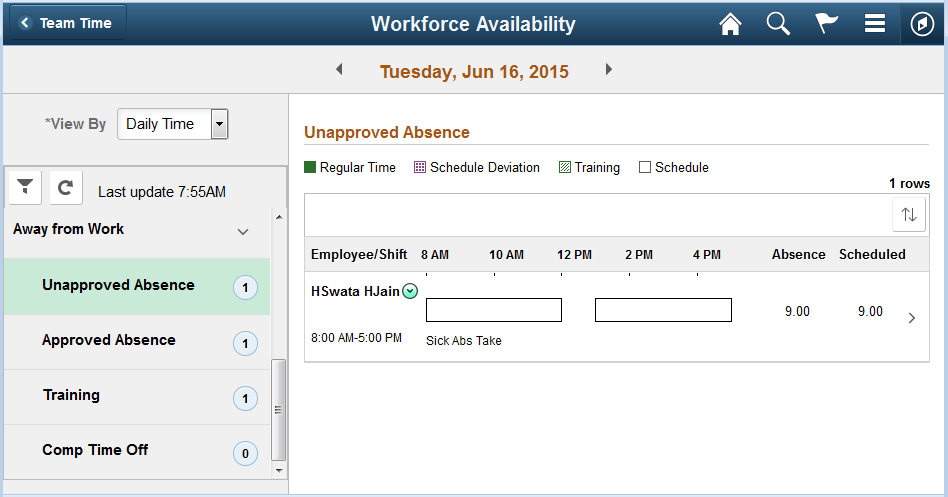
There are no patterns to represent the Unapproved Absence, Approved Absence and the Comp Time off. For these categories, there is an only schedule representation.
Click on the user to go to the drill-down modal window. The drill down shows the absence details.
Image: Unapproved Absence drill down
This example illustrates the fields and controls on the Unapproved Absence drill down.
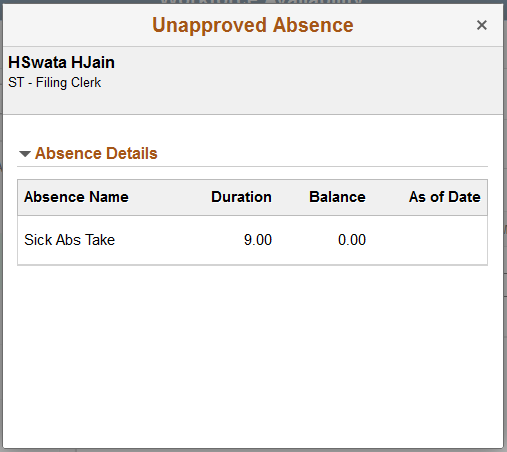
Image: (Smartphone) Unapproved Absence daily Page
This example illustrates the fields and controls on the Unapproved Absence daily page for the smartphone.
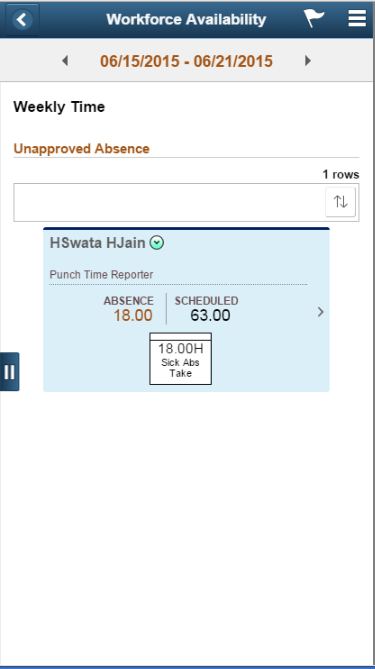
Click on Drop down icon to go to the related actions menu, which list the related action for unapproved absence category.
Use Approved Absence daily page to view the count and details of the employees who have any approved absences or leave plans.
Navigation
In the Workforce Availability page, select the Approved Absence on the left panel.
Image: Approved Absence daily page
This example illustrates the fields and controls on the Approved Absence daily page.
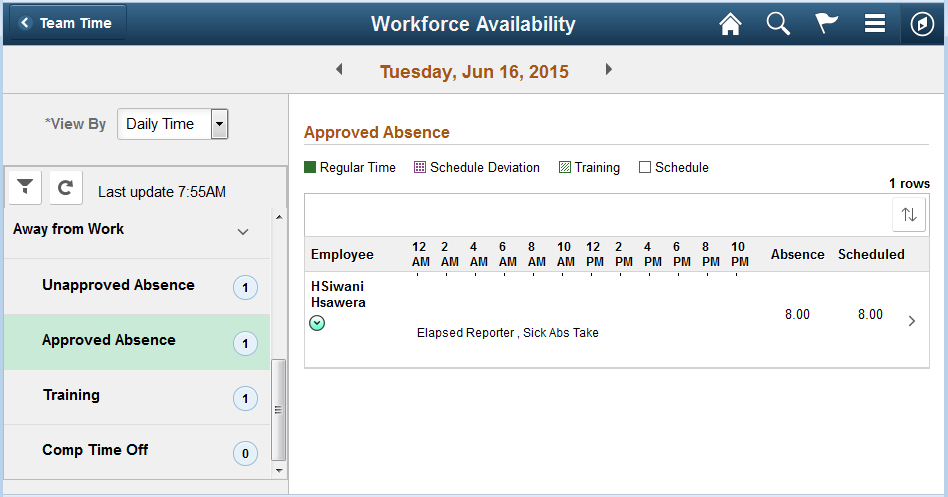
Click on the user to go to the drill-down modal window. The drill down shows the absence details.
Image: Approved Absence drill down
This example illustrates the fields and controls on the Approved Absence drill down.
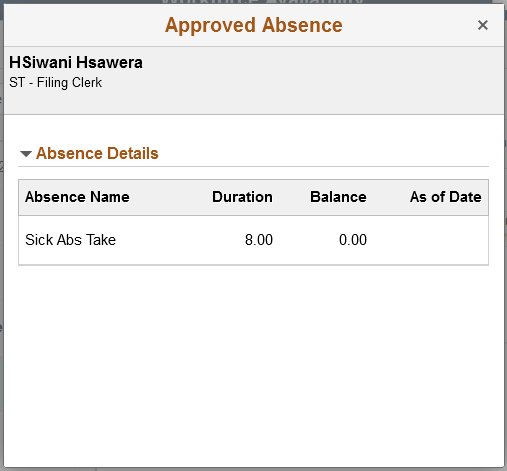
Image: (Smartphone) Approved Absence daily Page
This example illustrates the fields and controls on the Approved Absence daily page for the smartphone.

Tap on Drop down icon to go to the related actions menu, which list the related action for approved absence category.
Use Training daily page to view the count and details of employees who have enrolled for HR/ELM Training in the left panel.
Navigation
In the Workforce Availability page, select the Training on the left panel.
Image: Training daily page
This example illustrates the fields and controls on the Training daily page.
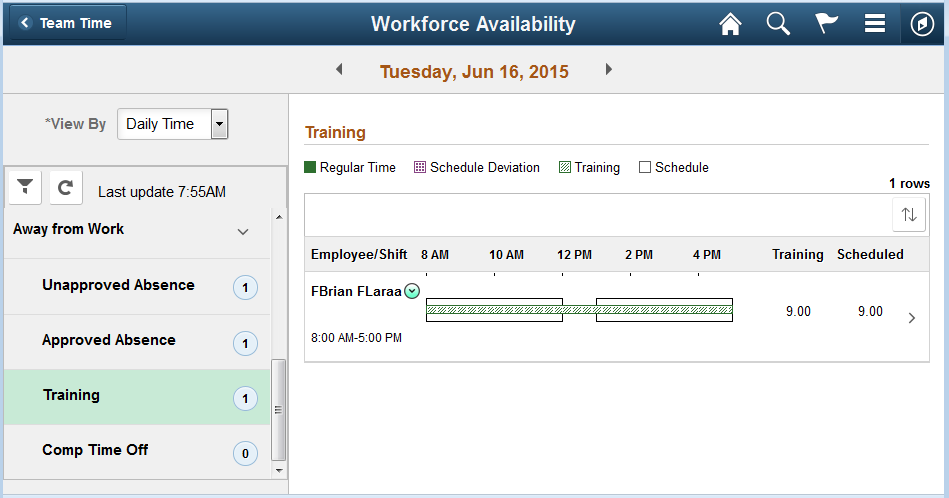
Image: (Smartphone) Training daily Page
This example illustrates the fields and controls on the Training daily page for the smartphone.
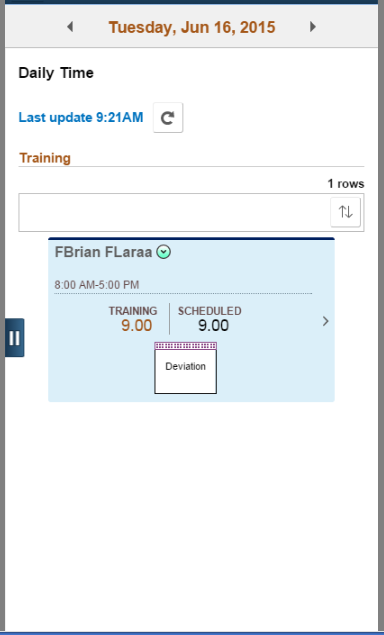
Tap on Drop down icon to go to the related actions menu, which list the related action for approved absence category.
Use Comp Time Off daily page to can view the count and details of employees who are out on compensatory time off.
Navigation
In the Workforce Availability page, select the Comp Time Off on the left panel.
Image: Comp Time Off daily page
This example illustrates the fields and controls on the Comp Time Off daily page.
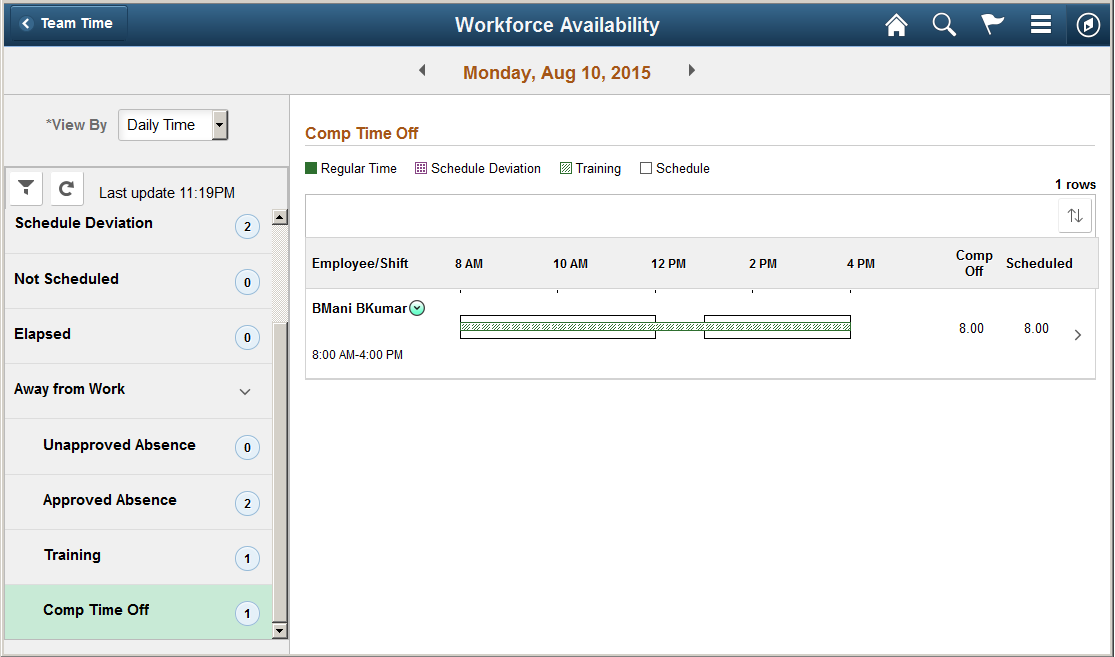
The widgets display for other categories, if they exist under Comp Time off category. It represents in a widget form if there is more than one status exist for a day.
Click on the user to go to the drill-down modal window.
Image: Drill down details
The modal represents the drill down details of Comp time.
Image: (Smartphone) Comp Time Off daily Page
This example illustrates the fields and controls on the Comp Time Off daily page for the smartphone.
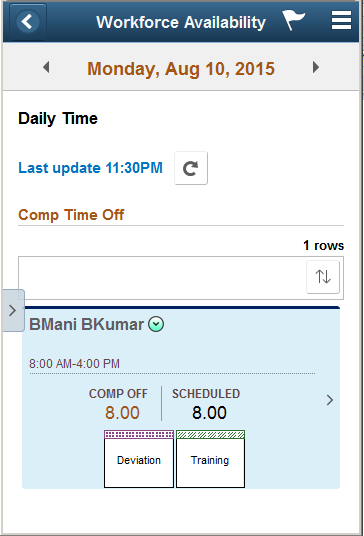
Tap on Drop down icon to go to the related actions menu, which list the related action for approved absence category.
The Elapsed scheduled text is displayed on the details area for Elapsed Time reporters, whereas the schedule is displayed below the widget for Punch Time reporters.
Weekly Time enables the Manager to view the availability of team members for the week, so that managers can forecast coverage or see the actual coverage versus the scheduled coverage.
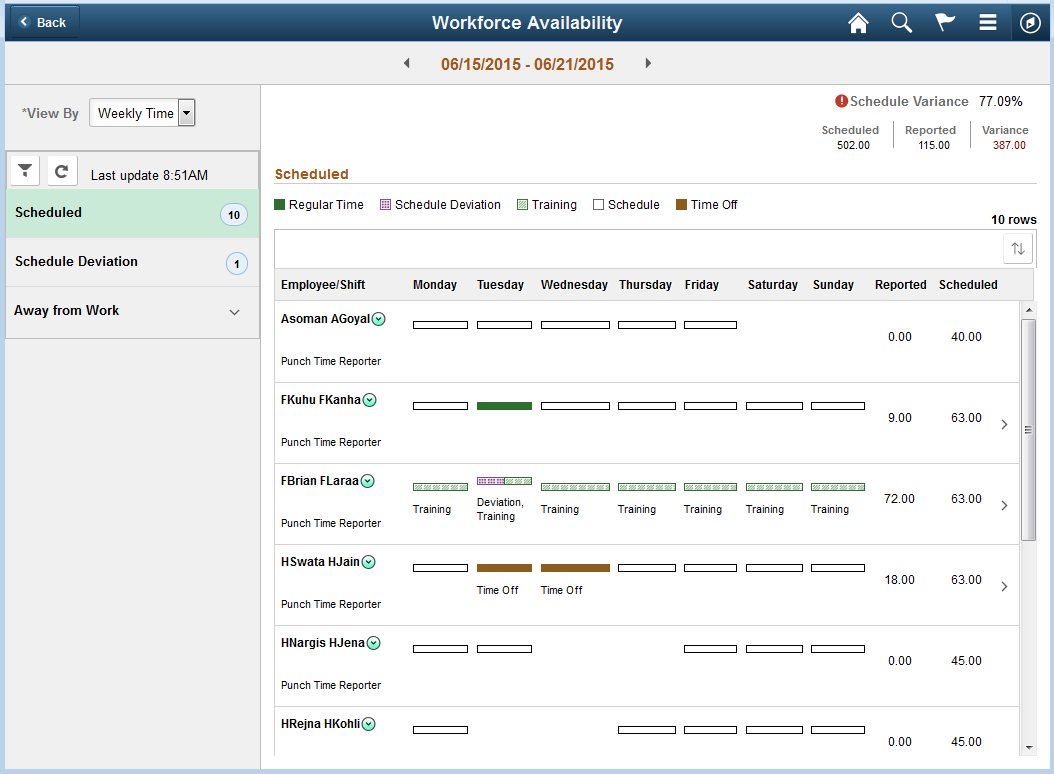
Use Workforce Availability – Scheduled Weekly page (TL_EP_WEEKLY_FLU) to view the categories and the employee scheduled to work for the respective week.
Manager can view the punch and elapsed employees who are scheduled to work for the specified week. The employees who are assigned with schedules are considered here.
Navigation
In the Workforce Availability page, select Weekly Time in the View By field.
Image: Scheduled Weekly Page
This example illustrates the fields and controls on the Schedule Weekly page.
|
Field or Control |
Definition |
|---|---|
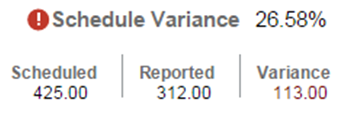 |
Review the total scheduled, reported hours and variation percentage for the whole group.
Schedule variance is calculated as variance/scheduled * 100. |
| Scheduled |
Displays the count of all the employees data captured in other categories except Not Scheduled category for the respective week. |
| Schedule Deviation |
Displays the count of employees who have violated on the entries above the tolerance time as set in the Installation configuration. |
| Away From Work |
Expand to display the categories Unapproved, Approved and Training are listed under Away From Work. |
| Employee / Shift |
Displays the name and phone number and shift of the employee. |
| Reported |
Shows the reported time in hours. |
| Scheduled |
Shows the scheduled time in hours. |
Click on Drop down icon to go to the related actions menu, which list the related action for approved absence category.
Image: Related Actions Common for all categories
This example illustrates the fields and controls on the Related actions common to all Weekly categories.
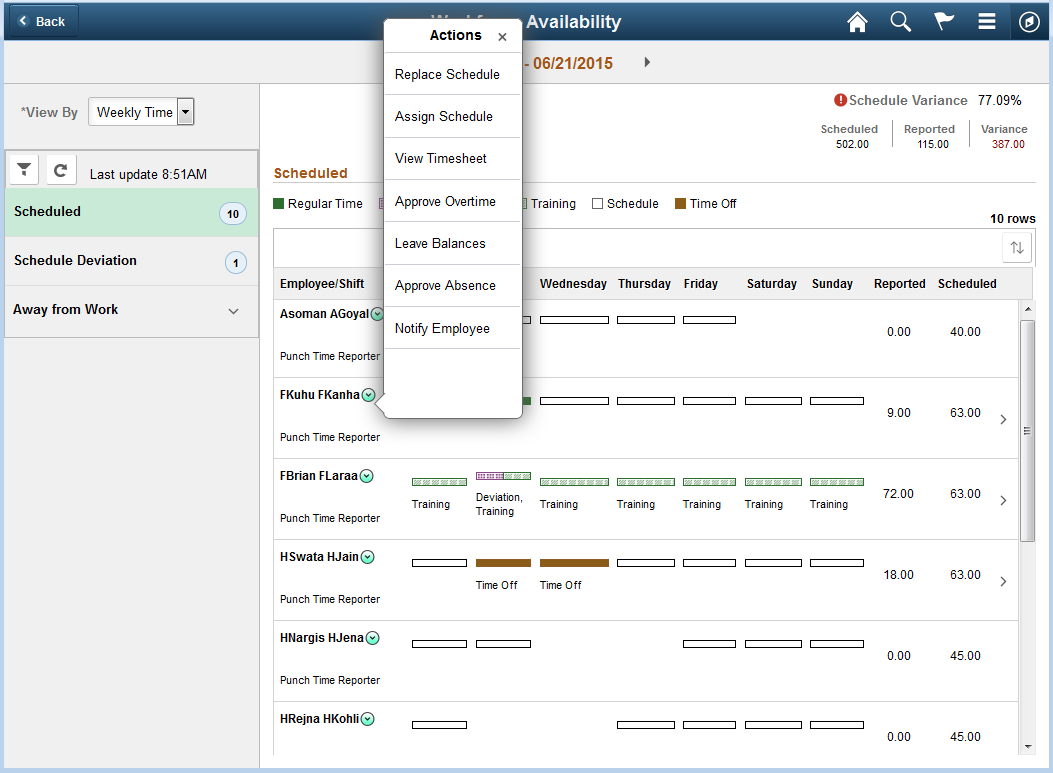
|
Field or Control |
Definition |
|---|---|
| Replace Schedule |
Select to launch the Schedule Replacements page to access the schedule for replacements and do the necessary actions for replacements and send notifications. |
| Request Absence |
Select to launch Absence Requests page to do the related action related to absence requests. |
| Assign Schedule |
Select to launch the Assign Work Schedule page to access the time reporter data to a schedule. |
| View Timesheet |
Select to launch the Timesheet page to access the reported time entries. |
| Approve Overtime |
Select to launch Approve overtime requests page to access the employee selection criteria. |
| Leave Balances |
Select to launch Leave and Compensatory Time to access the related selection criteria. |
| Approve Absence |
Select to launch Approve Absence summary page to do the related action related to approve absences. |
| Notify Employee |
Select to launch HR Notification page to send notifications. |
| Reporting Location |
Select to launch Reporting Locations page and view the physical location from where the employee has entered their time. The physical location is captured and stored as a latitude and longitude. |
Click on the user to go to the drill-down modal window.
Image: Scheduled Weekly detailed view
This example illustrates shows the Scheduled weekly detailed view.
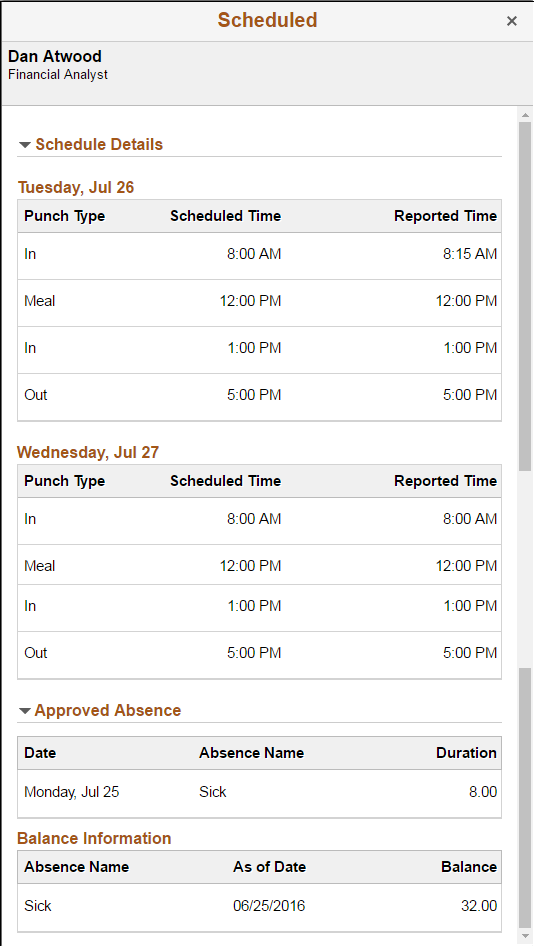
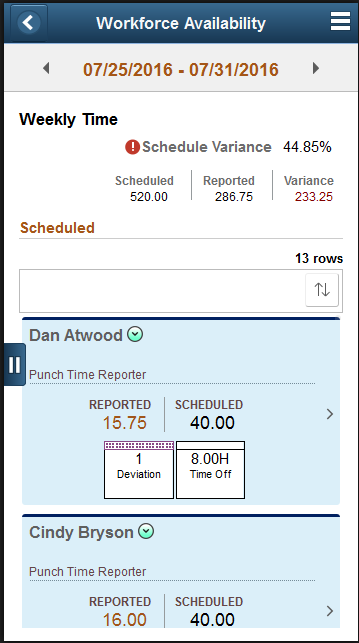
Image: Scheduled Weekly Time (Smartphone)
This example illustrates the Scheduled weekly time view in smartphone.
Use Schedule Deviation weekly page to view the count and the details of the employees who have deviated from the schedule for a week.
Navigation
In the Workforce Availability page, select the Schedule Deviation on the left panel.
Image: Schedule Deviation Weekly Page.
This example illustrates the fields and controls on the Schedule Deviation Weekly Page.
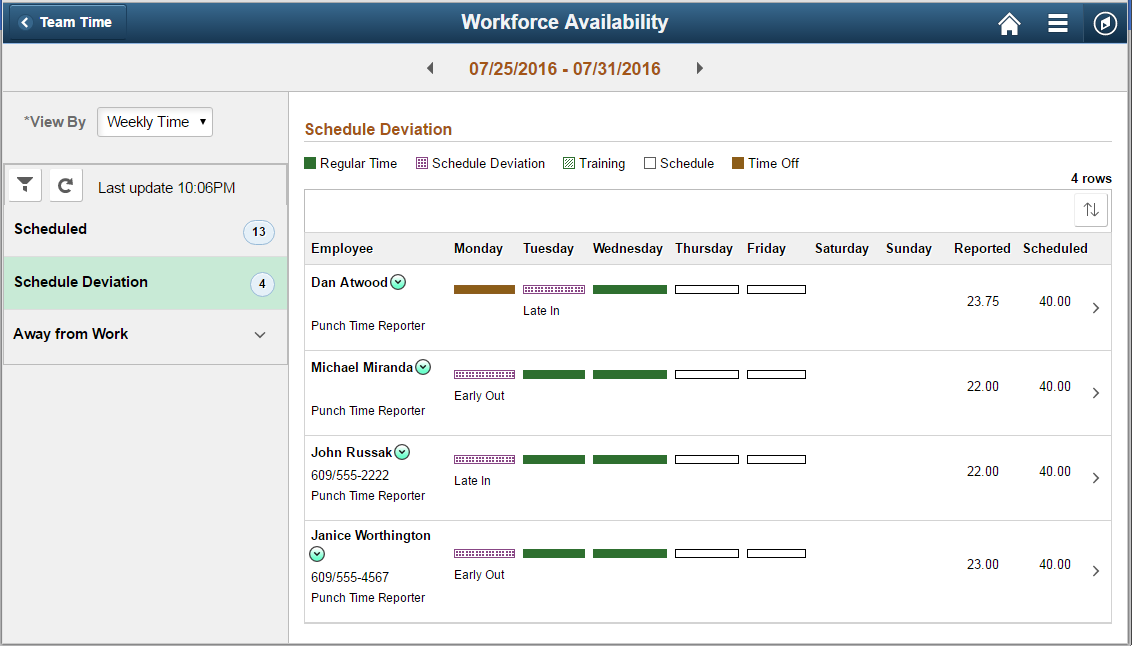
Image: Schedule Deviation Weekly detailed view
This example illustrates shows the Schedule Deviation weekly detailed view

Image: (Smartphone) Schedule Deviation Weekly Page
This example illustrates the fields and controls on the (Smartphone) Schedule Deviation Weekly Page.
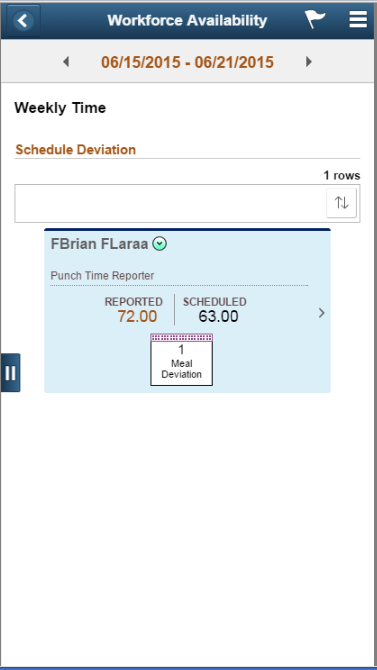
Tap on the employee to go to the drill down view.
The expanded view of Away From Work shows the sub categories.
Use Unapproved Absence weekly page to view the count and details of the employees who have any unapproved absences or leave plans.
Navigation
In the Workforce Availability page, select Weekly Time in the View By field select the Unapproved Absence on the left panel.
Image: Unapproved Absence weekly page
This example illustrates the fields and controls on the Unapproved Absence weekly page.
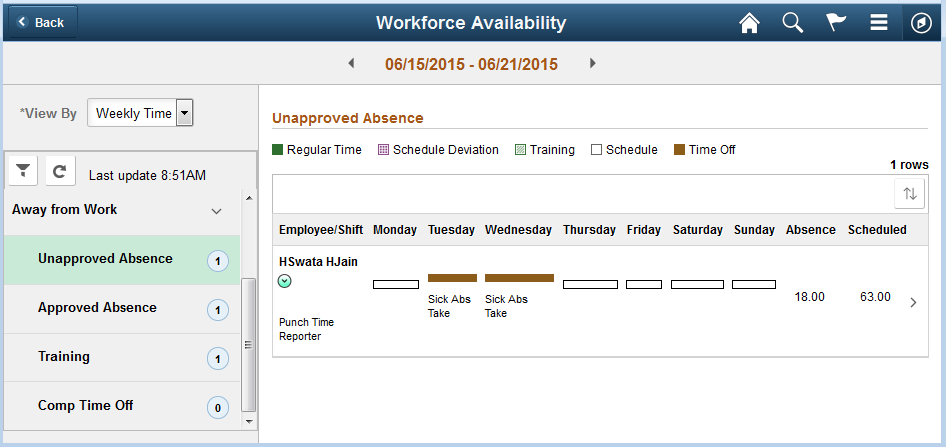
Click on the user to go to the drill-down modal window. The drill down shows the absence details.
Image: Unapproved Absence weekly drill down
This example illustrates the fields and controls on the Unapproved Absence weekly drill down
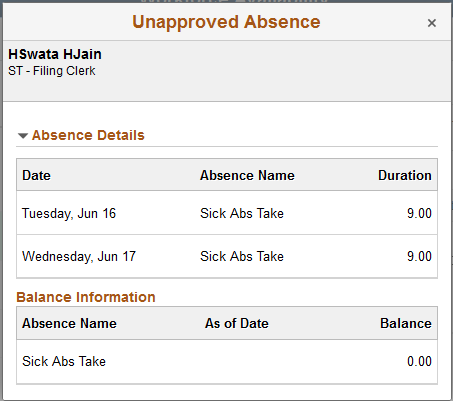
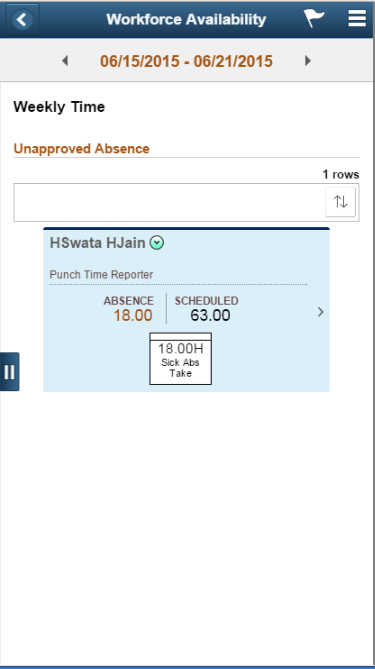
Image: (Smartphone) Unapproved Absence weekly Page
This example illustrates the fields and controls on the Unapproved Absence daily page for the smartphone.
Use Approved Absence weekly page to view the count and details of the employees who have any approved absences or leave plans.
Navigation
In the Workforce Availability page, select Weekly Time in the View By field and then select the Approved Absence on the left panel.
Image: Approved Absence weekly page
This example illustrates the fields and controls on the Approved Absence weekly page.
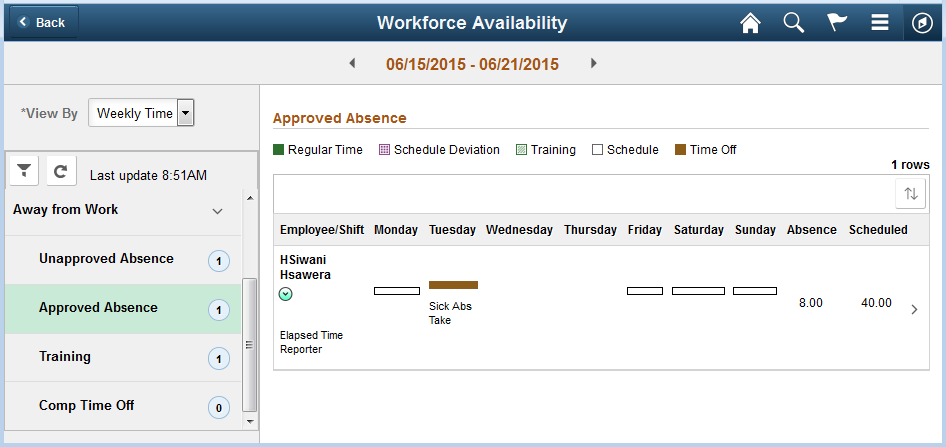
Click on the user to go to the drill-down modal window. The drill down displays the absence hours in the form of Duration/ Balance.
Image: Approved Absence weekly Page drill down
This example illustrates the fields and controls on the Approved Absence weekly Page drill down

Image: (Smartphone) Approved Absence weekly Page
This example illustrates the fields and controls on the Approved Absence daily page for the smartphone.
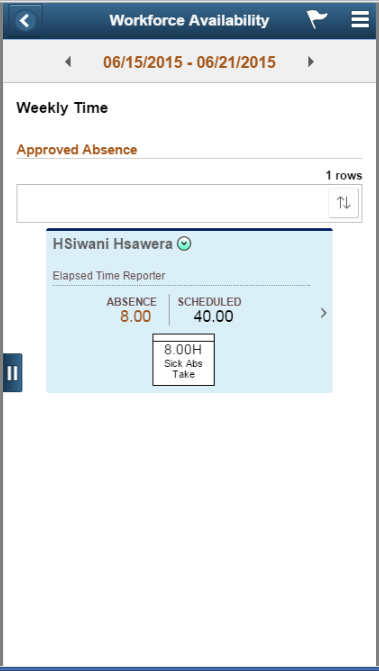
Tap on Drop down icon to go to the related actions menu, which list the related action for approved absence category.
Use Training weekly page to track or review employees who are in training and its course details. The details display the total hours of training for a week.
Navigation
In the Workforce Availability page, select Weekly Time in the View By field and then select the Training on the left panel.
Image: Training weekly page
This example illustrates the fields and controls on the Training weekly page.
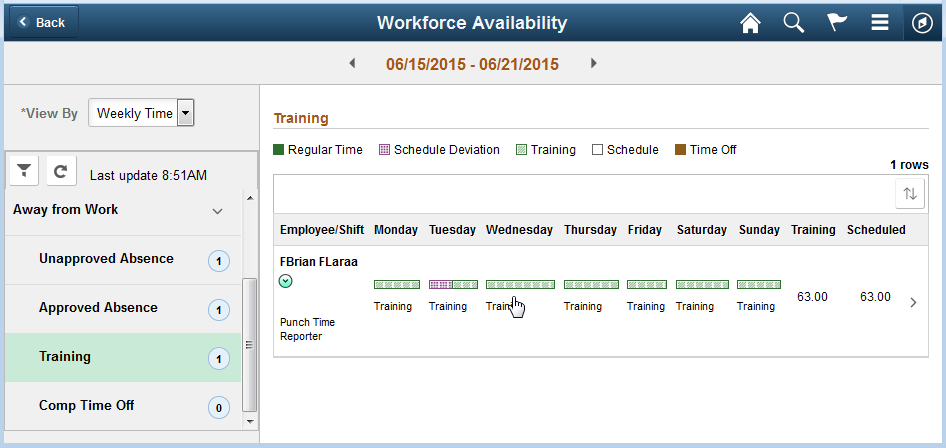
A specific pattern represents the training category.
Click on the user to go to the drill-down modal window. Drill down shows all the details for training for a week like the name of the training course, date and duration.
Image: Training Weekly drill-down
This example illustrates the fields and controls on the Training weekly drill down page.
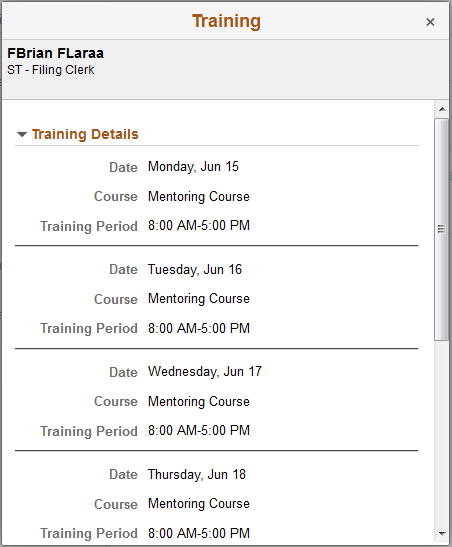
Image: (Smartphone) Training weekly Page
This example illustrates the fields and controls on the Training daily page for the smartphone.

Tap on Drop down icon to go to the related actions menu, which list the related action for approved absence category.
Use Comp Time Off daily page to can view the count and details of employees who are out on compensatory time off.
Navigation
In the Workforce Availability page, select Weekly Time in the View By field and then select the Comp Time Off on the left panel.
Image: Comp Time Off weekly page
This example illustrates the fields and controls on the Comp Time Off weekly page.
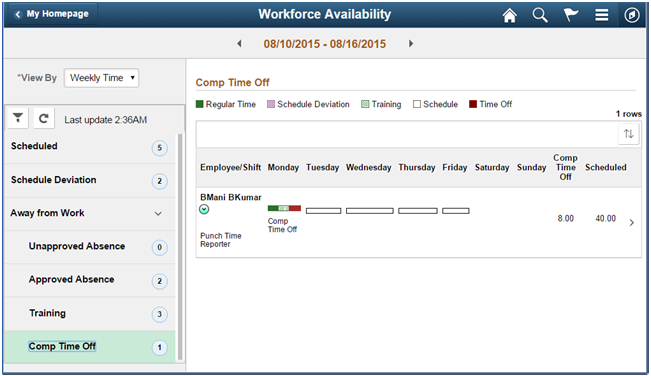
Tap on the user to go to the drill-down modal window.
Image: Comp Time Off weekly drill down
This example illustrates the fields and controls on the Comp Time Off weekly drill down.
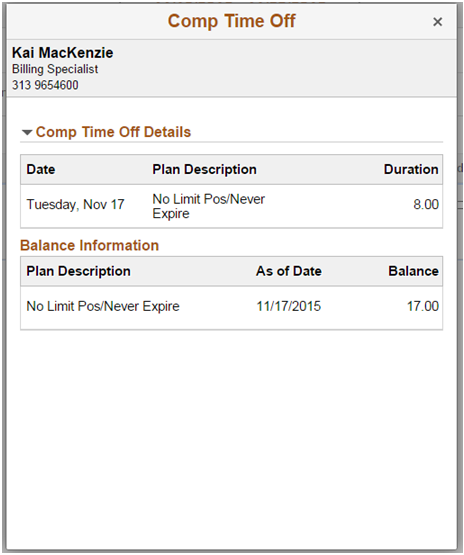
Image: (Smartphone) Comp Time Off weekly Page
This example illustrates the fields and controls on the Comp Time Off daily page for the smartphone.
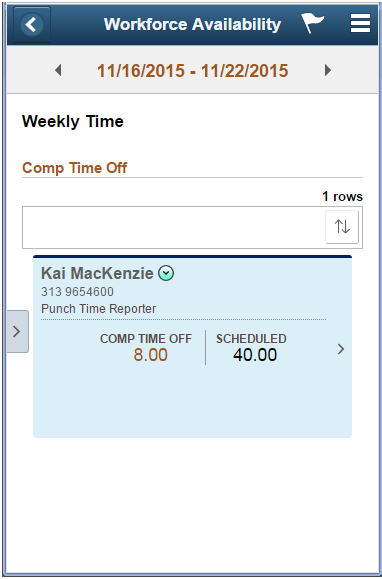
Tap on Drop down icon to go to the related actions menu, which list the related action for approved absence category.
The Elapsed scheduled text is displayed on the details area for Elapsed Time reporters, whereas the schedule is displayed below the widget for Punch Time reporters.
The Fluid Time and Labor WorkCenter is divided into four main sections – My Work, Links, Queries, and Reports/Processes. You can expand each sections by clicking those sections.
Image: Time and Labor WorkCenter (1_2) Page
This example illustrates the fields and controls on the Time and Labor WorkCenter Page. You can find definitions for the fields and controls later on this page.
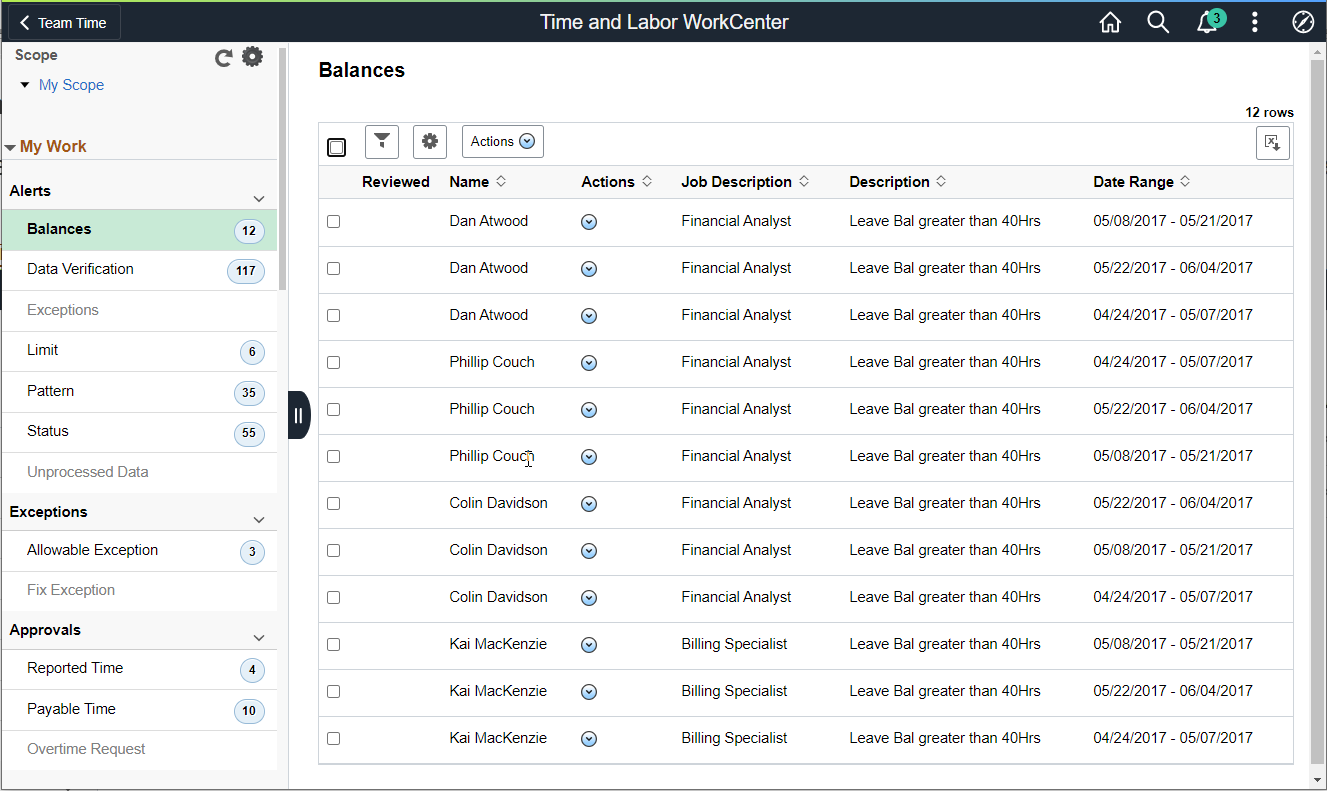
Image: Time and Labor Fluid WorkCenter (2_2) Page
This example illustrates the fields and controls on the Time and Labor Fluid WorkCenter (2_2) Page.
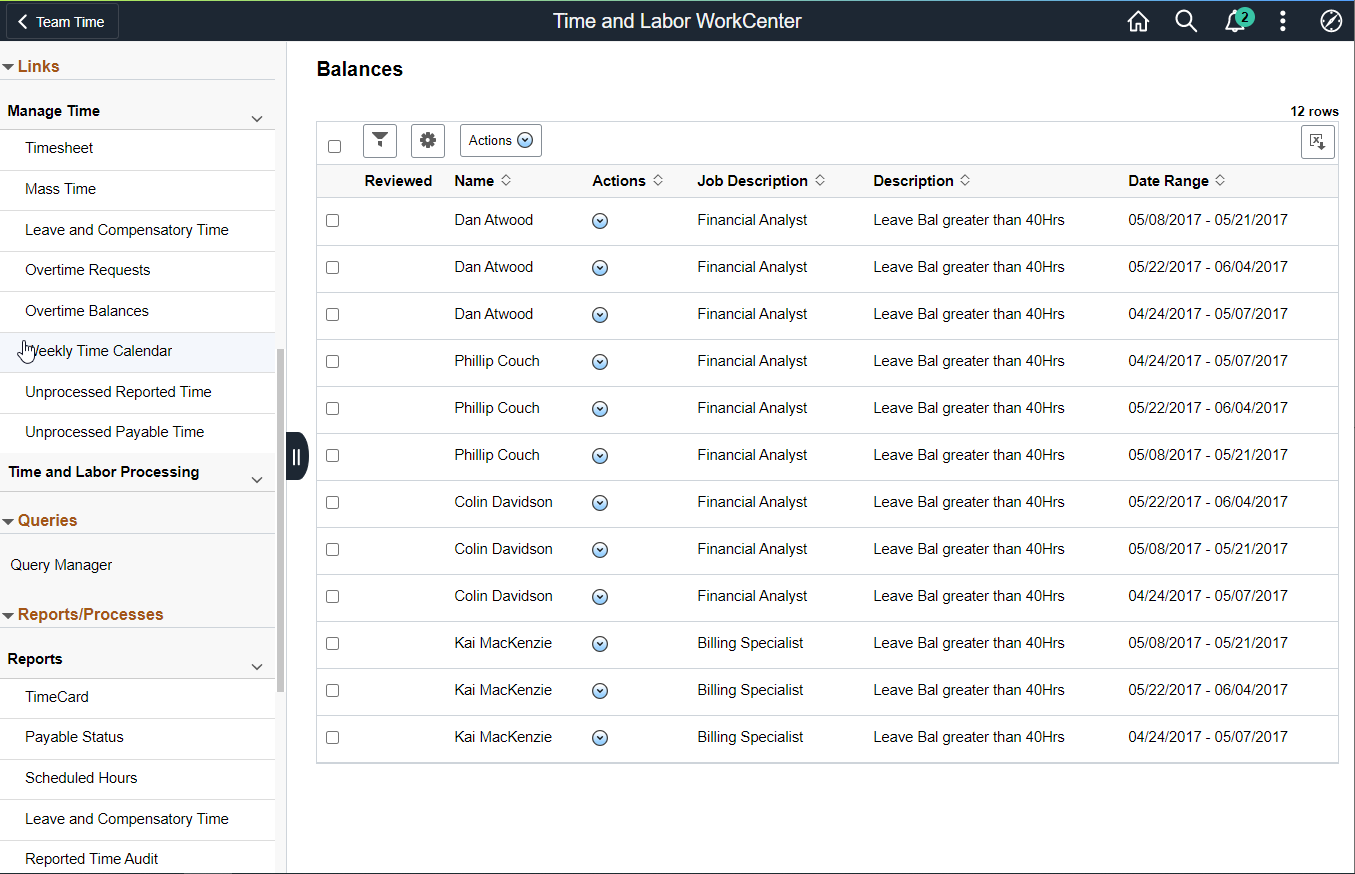
Users can personalize display options and add links to their own WorkCenter for maximum efficiency. For more information, see Setting Up and Personalizing PeopleSoft Fluid WorkCenters.
The WorkCenter page is divided into two areas: the navigation panel on the left and the transaction panel on the right.
Left Panel
The navigational panel on the left contains group boxes with links to specific transactions, menu components and other content. These group boxes are:
My Work. This group box contains six collapsible sections, Alerts, Exceptions, Approvals, Time Reporter Status, Attendance, and Unprocessed Time. For more information, see Understanding the My Work Group Box.
Links. For more information, see Understanding the Links Group Box.
Queries. For more information, see Configure Pagelets – Queries Page.
Reports/Processes. For more information, see Configure Pagelets – Reports/Processes Page.
|
Field or Control |
Definition |
|---|---|
| Scope |
Scope determines the data to be displayed in the WorkCenter. Note: If you have configured any additional scope, it will also be listed under the My Scope option. For more information on how to configure a new scope, see Configure Scope Page. |
 |
Click to refresh the content area to display either the first page that appears when you first access the WorkCenter, or the starting page if it is specified in your personalization. |
 |
Click to access these personalization options:
|
Image: Personalize Scope Page
This example illustrates the fields and controls on the Personalize Scope Page. You can find definitions for the fields and controls later on this page.
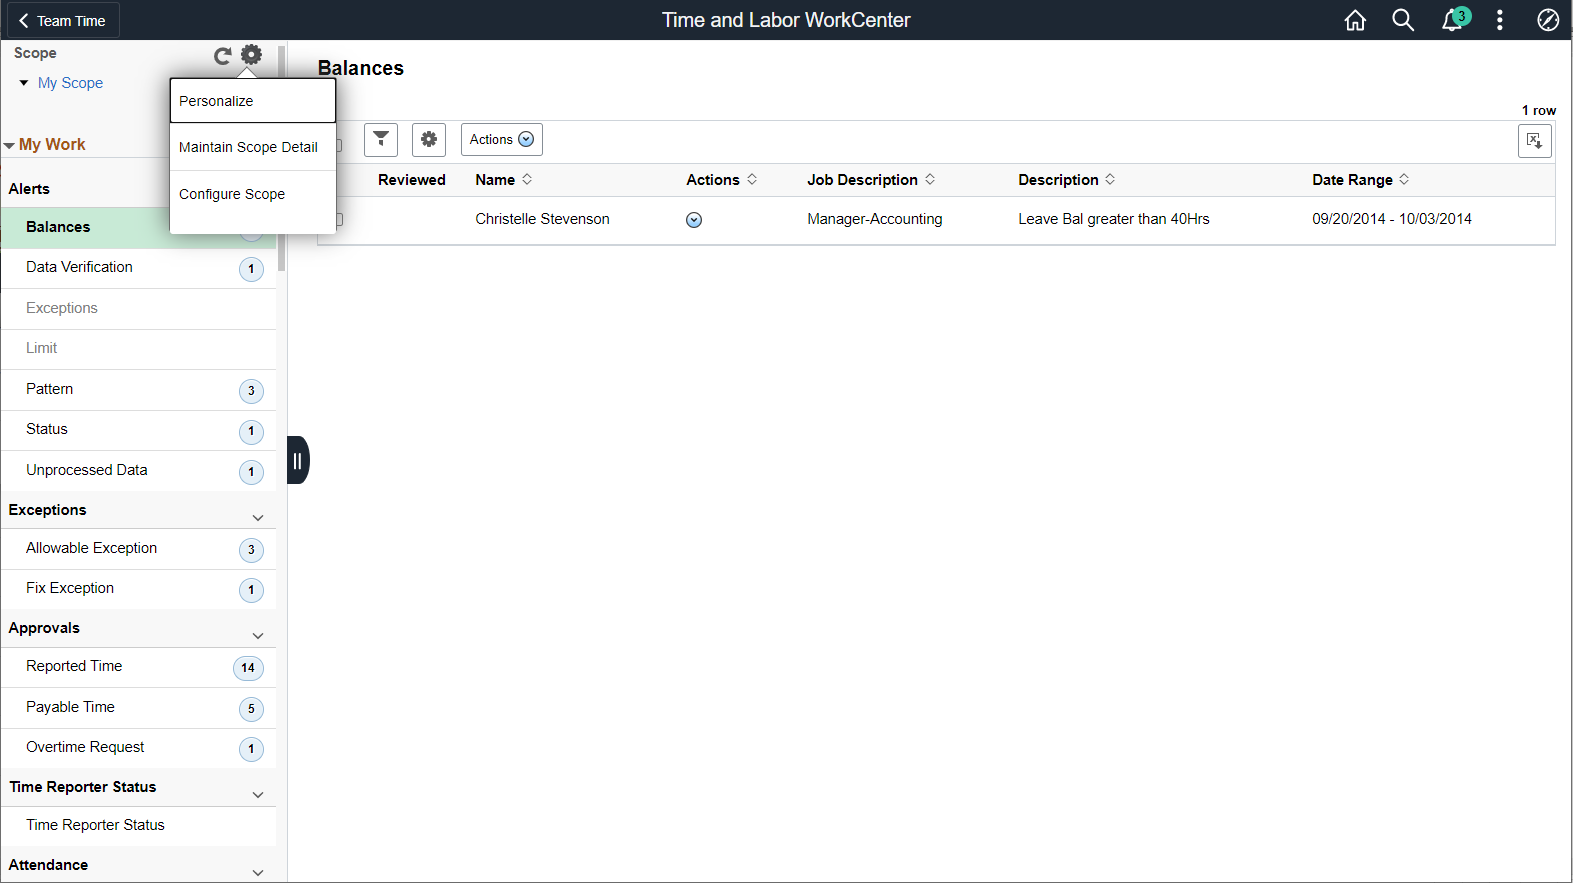
Image: My Scope_Personalized Output
This example illustrates the sample personalized output for one of the My work items.
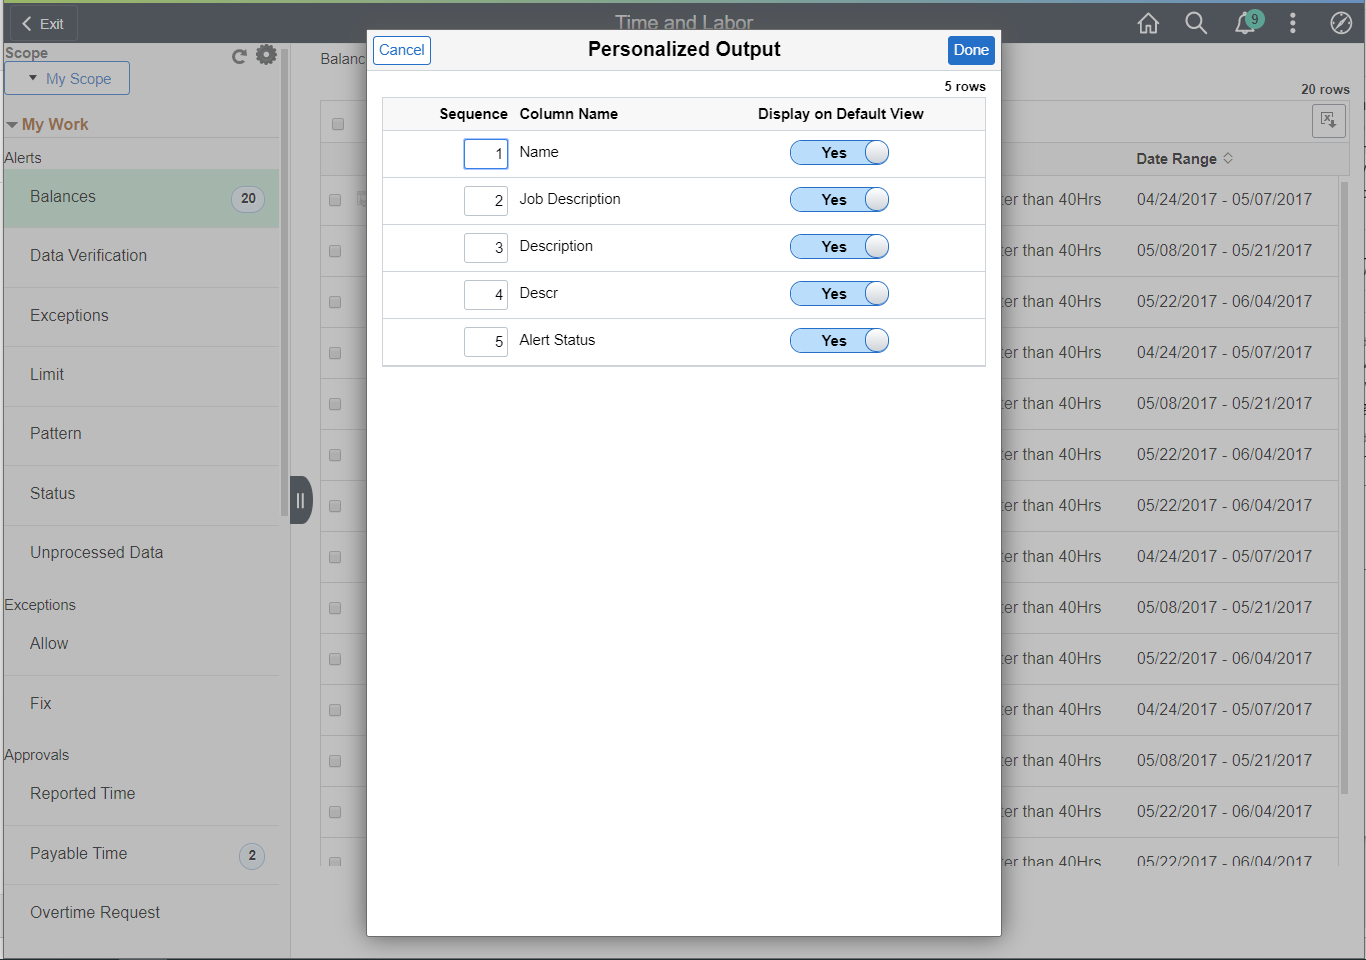
The modal for Personalized output provides an option to select the options to display on output.
Right Panel
The transaction panel on the right is where the selected transaction result or component (work item) is displayed.
By default, the first My Work item appears when you first access the Time and Labor WorkCenter. You can change this default setting of the WorkCenter on the Personalize Page (Fluid).
You can also filter and personalize the output based on your requirements. Use the Refine Filter Criteria page to select one or more criteria to narrow the search result. The Filter icon appears green when filters have been applied to your search. Use the Personalized Output page to modify the position of columns and to select the columns to be displayed as default for each work item. For more information, see Setting Up and Personalizing PeopleSoft Fluid WorkCenters.
Use the Maintain Scope Detail (EOWC_EDITVIEWLK_FL) page to define the scope for My Work items.
Image: Maintain Scope Detail Page
This example illustrates the fields and controls on the Maintain Scope Detail Page. You can find definitions for the fields and controls later on this page.
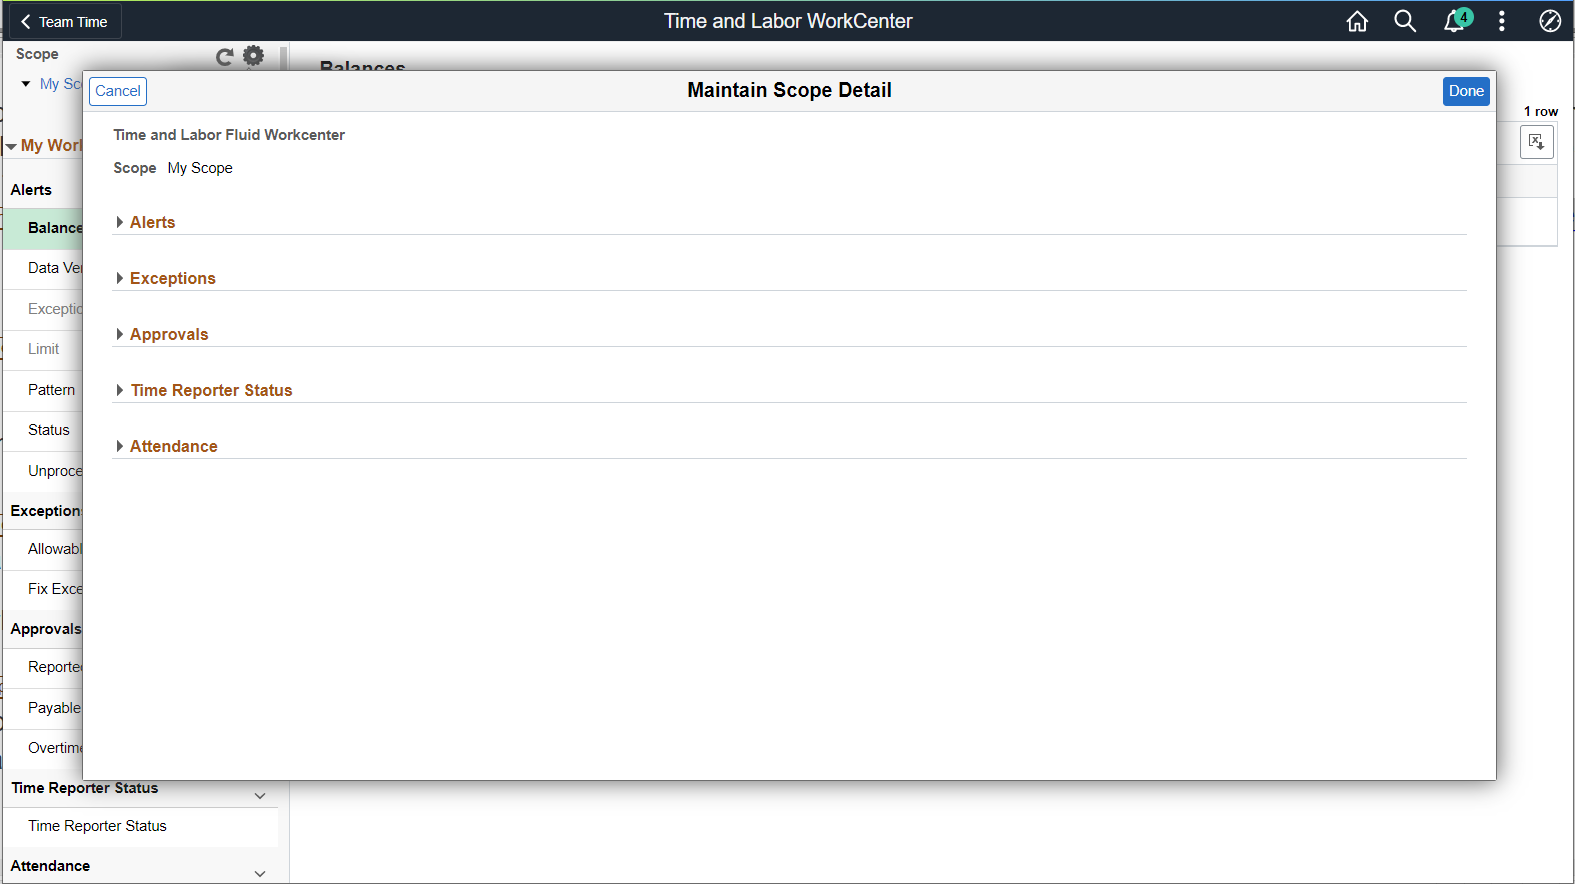
You can define the scope of alerts with Link Label, Description and Edit Filters. The Edit Filters enables you to define the scope values like date ranges.
The My Work group box provides Time and Labor work item links for alerts and exceptions in these group sections:
Alerts
Exceptions
Approvals
Note: Work item links are grayed out if no data is available for display.
Alerts
There are seven types of alerts available, they are Balances, Data Verification, Exceptions, Limit, Pattern, Status and Unprocessed Data.
Exceptions
Fix Exception Page
Approvals
There are Reported Time Approvals Page, Payable Time page and Overtime Request time page in Time and Labor Fluid WorkCenter.
Use the Balances page (HWC_RSLT_FL) to view the list of employees with balances for a selected date range.
Navigation
Click the Balances link in the My Work group box of the Time and Labor WorkCenter.
Image: Alert type_ Balances Page
This example illustrates the fields and controls on the Alert type_ Balances Page. You can find definitions for the fields and controls later on this page.
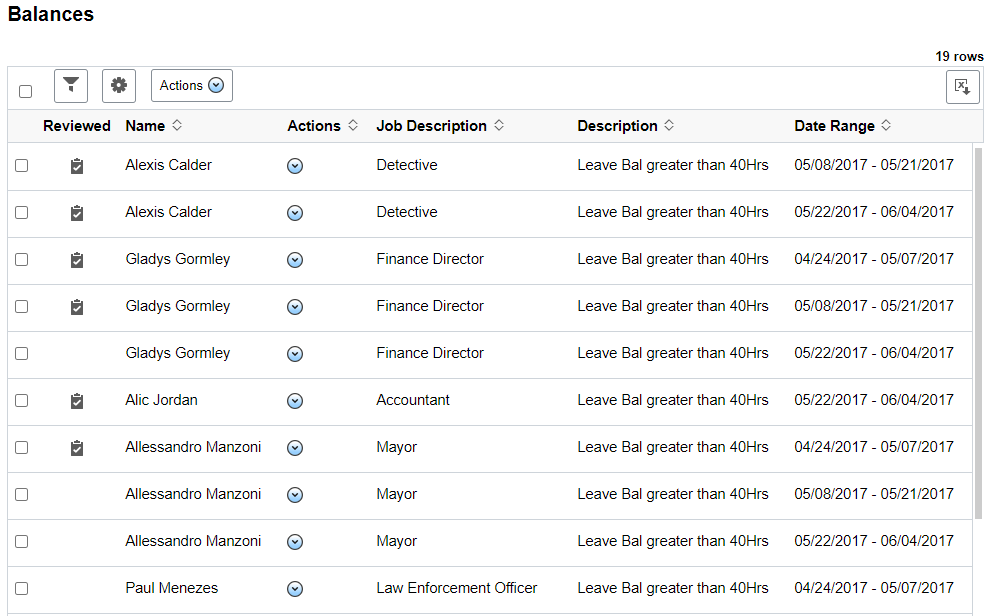
The WorkCenter uses manager search options as filters. Any default search criteria on manager search option gets extended to the WorkCenter.
Image: Manager Search Options for Alert items
This example illustrates the fields and controls on the Manager Search Options for Alert items. You can find definitions for the fields and controls later on this page.
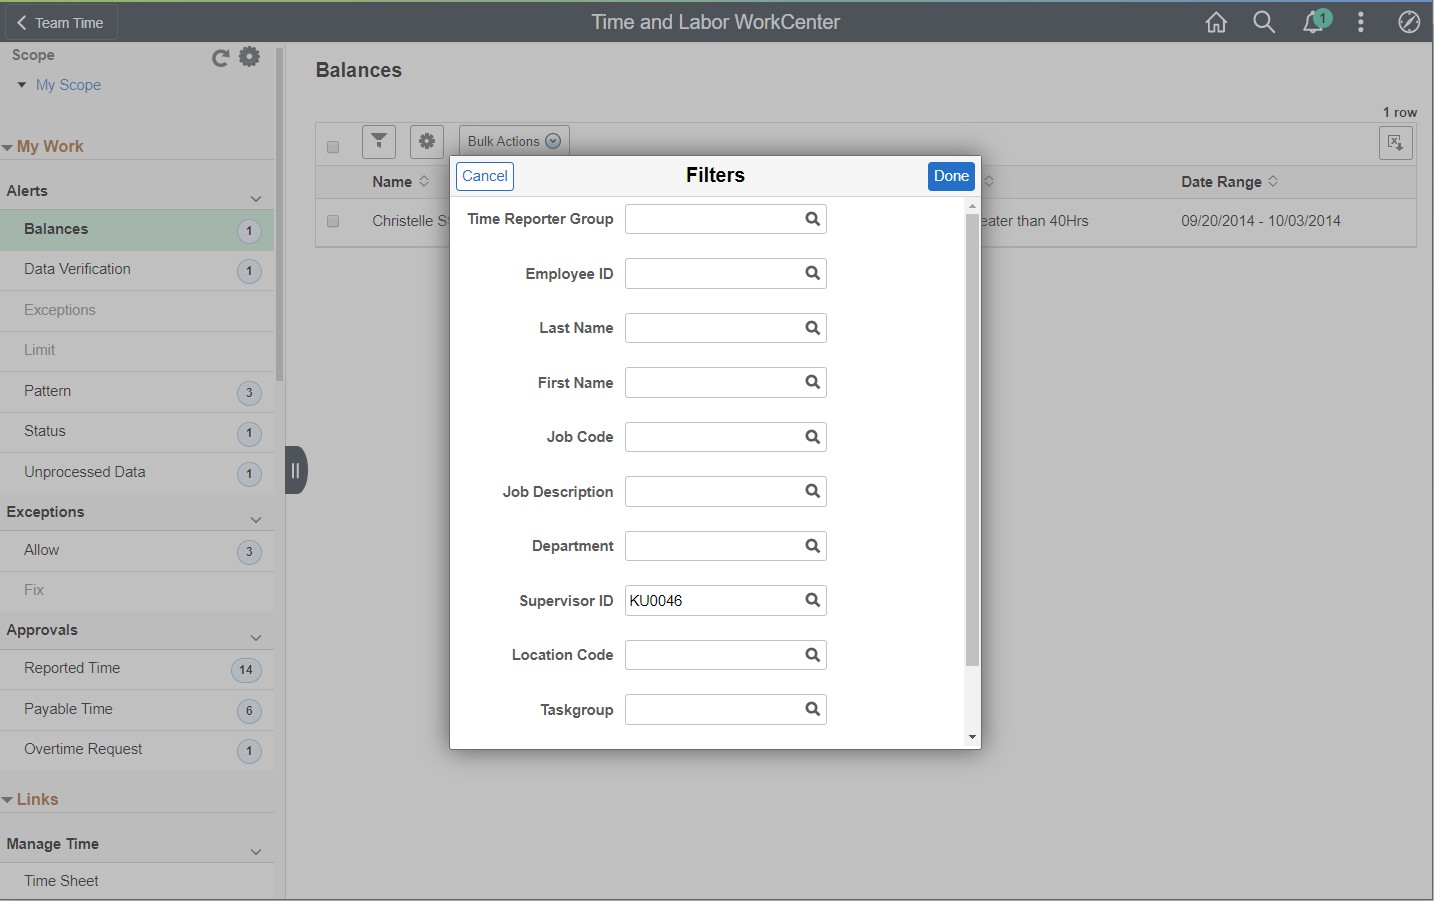
The Employee Selection Criteria defined under Manager Search Defaults configured at the organization level defines the Filter fields available for the manager to search upon.
Image: Alerts with Related Actions
This example illustrates the fields and controls on the Alerts with Related Actions. You can find definitions for the fields and controls later on this page.
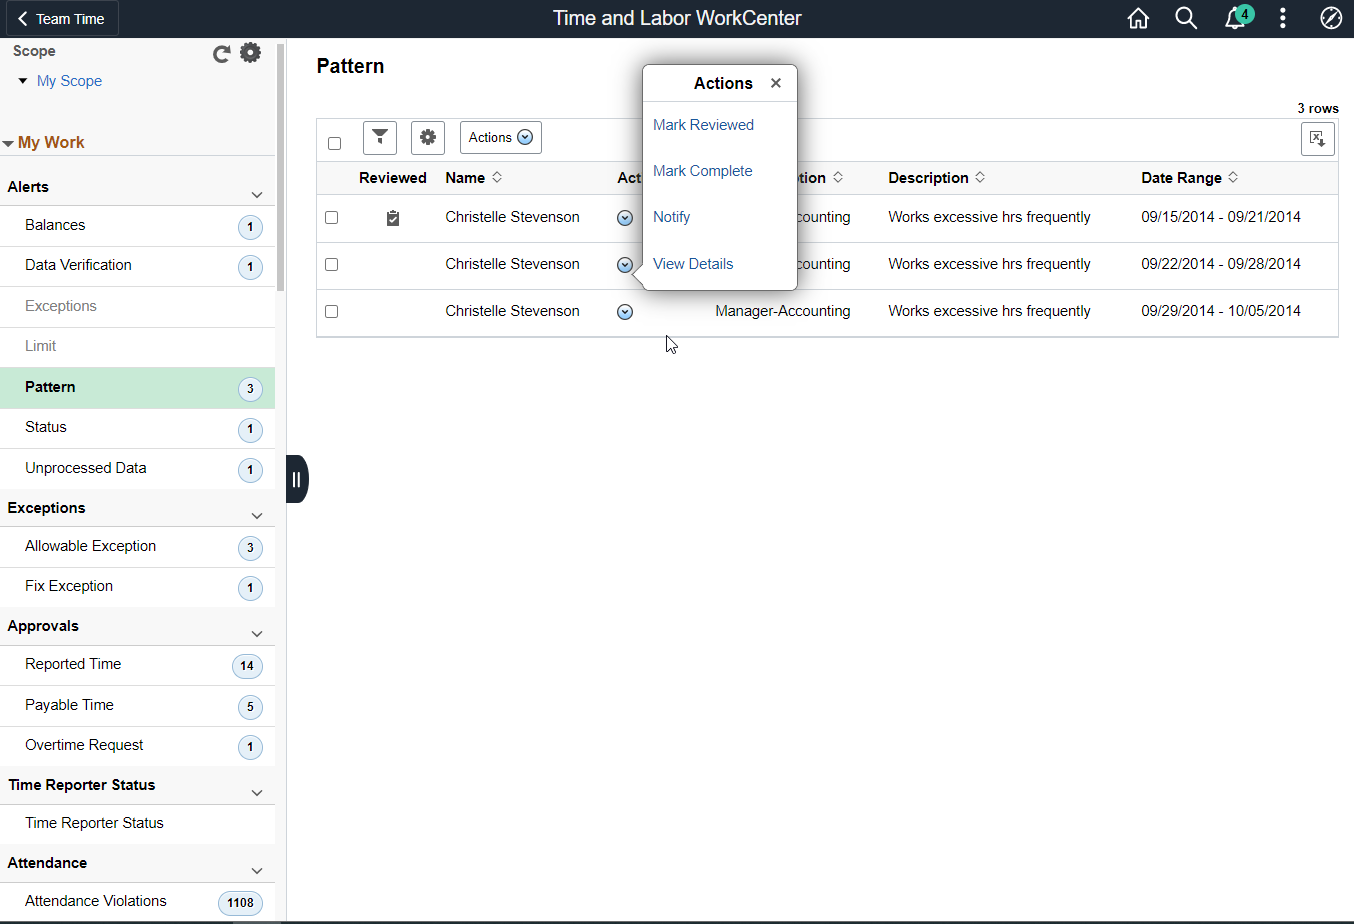
Select the related actions icon to the right side of the employee to view the related actions list.
|
Field or Control |
Definition |
|---|---|
Mark Reviewed |
Select to indicate that this alert has been reviewed. The screen displays the indication by showing the icon just before the employee name to show that the alerts are reviewed. |
| Mark Complete |
Perform the review complete for the selected employee. |
| Notify |
Perform notify for the selected employee. Selecting this opens the HR Notification modal to send the notification. |
| View Details |
Select to navigate to a page to view the details. |
Image: Bulk Actions for Alerts
This example illustrates the fields and controls on the Bulk Actions for Alerts. You can find definitions for the fields and controls later on this page.
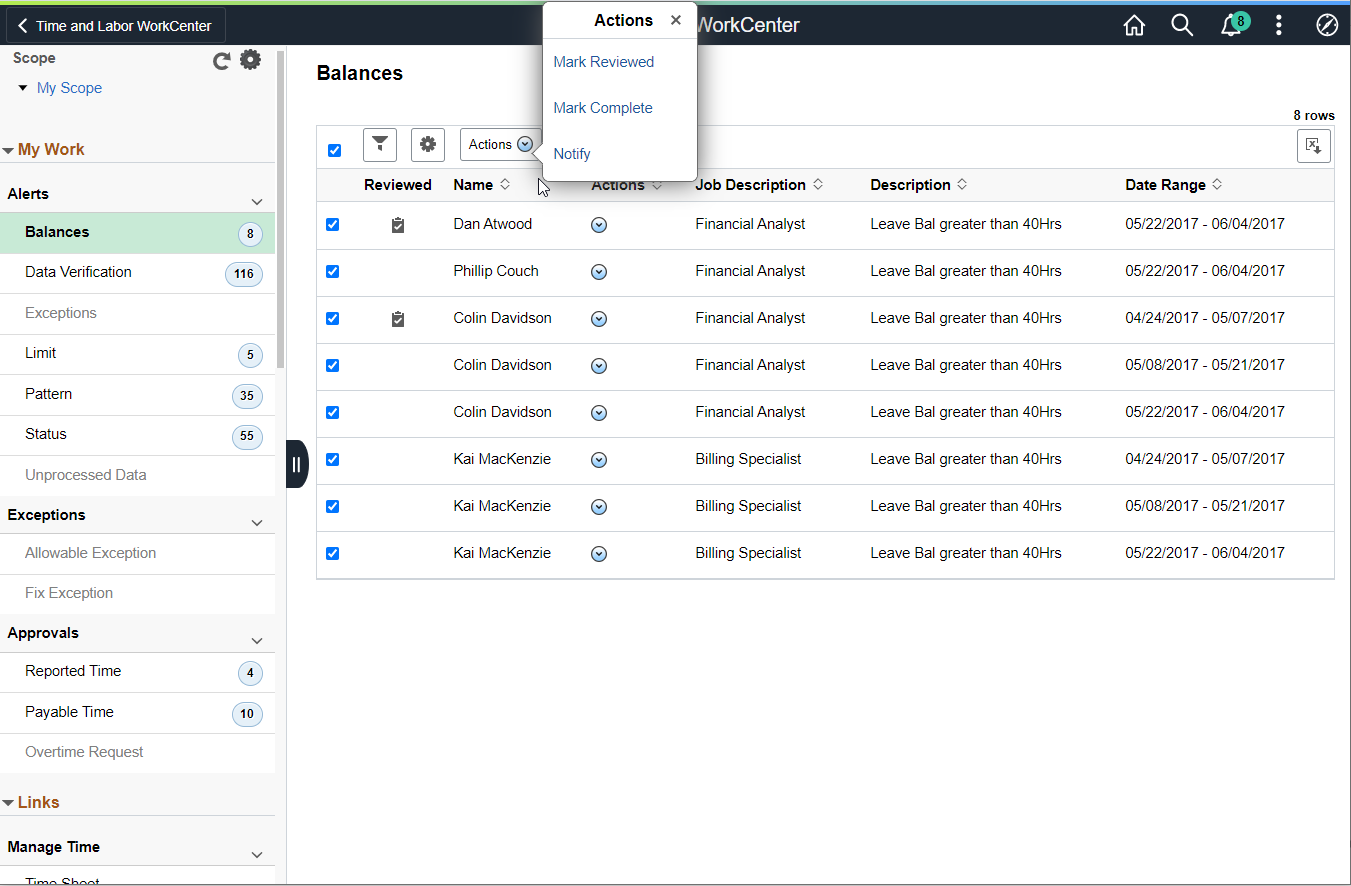
You can select one or more employees at a time to perform a bulk action at one go. The bulk actions for balances available are:
|
Field or Control |
Definition |
|---|---|
| Mark Reviewed |
Perform bulk review by selecting multiple employees at a time. The screen displays the indication by showing the icon just before the employee name to show that the alerts are reviewed. |
| Mark Complete |
Perform the review complete for multiple employees. |
| Notify |
Perform notify for multiple employees. Selecting this opens the HR Notification modal to send the notification. |
Note: The count will be updated only after the refresh of the page.
Use Allowable Exception page to view the exceptions in the reported time.
Click the Allowable Exception link under Exceptions in the My Work group box of the Time and Labor WorkCenter.
Image: Allowable Exception Page
This example illustrates the fields and controls on the Allowable Exception Page.
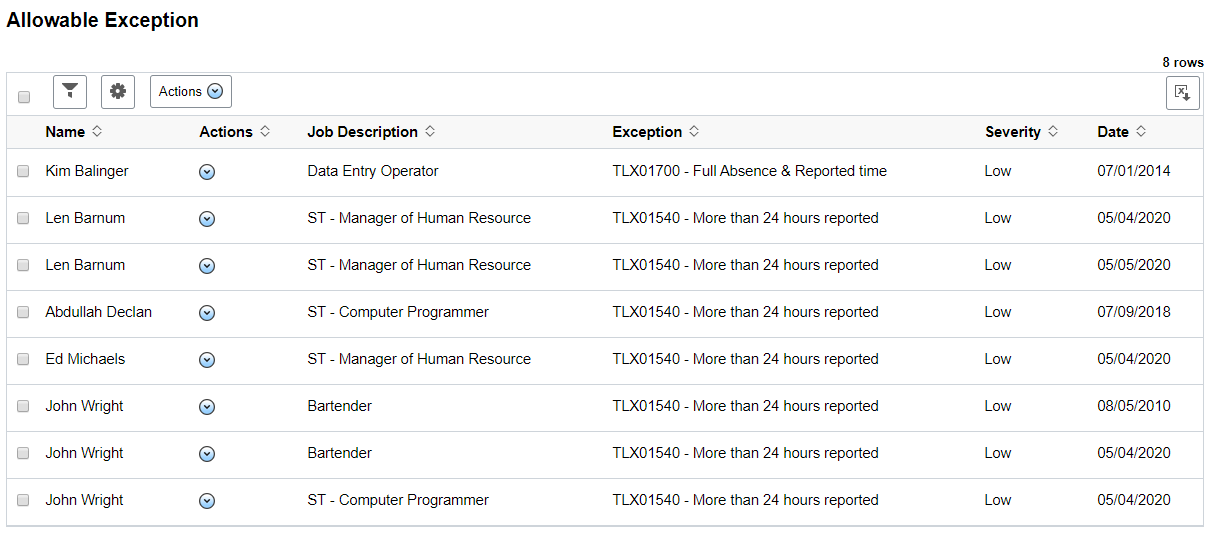
Select the related actions icon on the right pane to open the options.
Image: Allowable Exception_Related Action
This example illustrates the fields and controls on the Allowable Exception_Related Action. You can find definitions for the fields and controls later on this page.
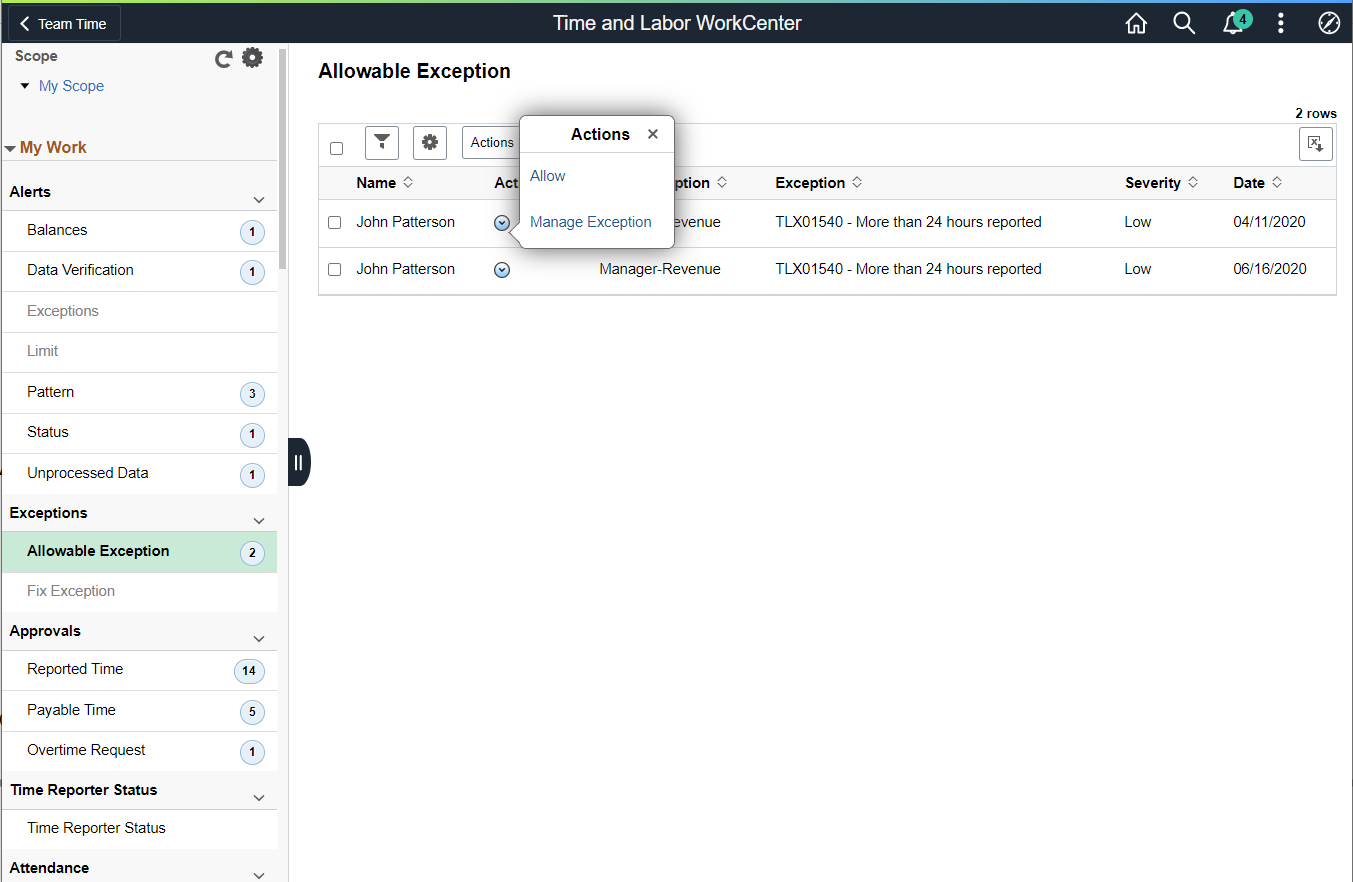
Select the related actions icon to the right side of the employee to view the related actions list. You can perform the following actions:
Allow: Select to allow the exception.
Manage Exception: Select to navigate to Manage Exceptions modal.
Image: Fix Exception Page
This example illustrates the fields and controls on the Fix Exception Page. You can find definitions for the fields and controls later on this page.
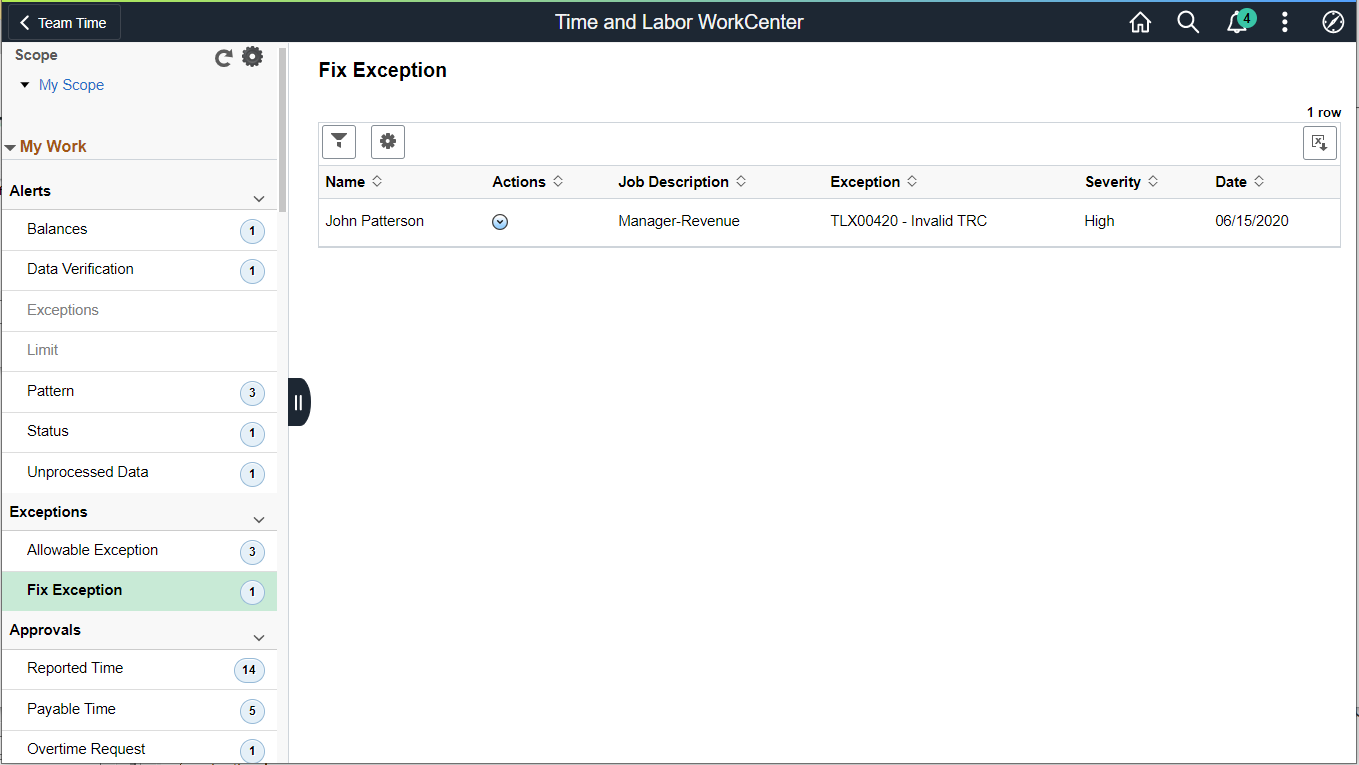
Select the related actions icon to the right side of the employee to view the related actions list. You can perform the following actions:
Image: Fix Exception Page_Related Action
This example illustrates the fields and controls on the Fix Exception Page_Related Action. You can find definitions for the fields and controls later on this page.
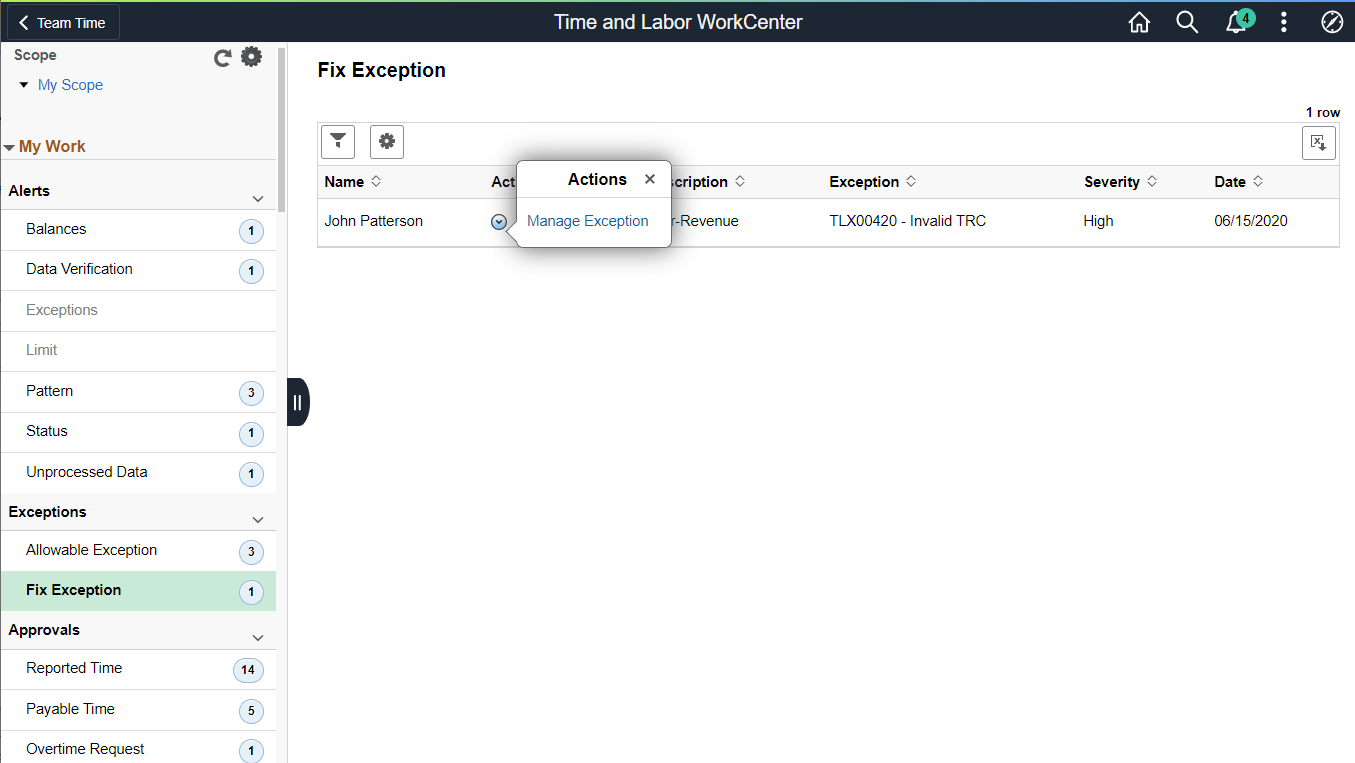
Select Manage Exception to navigate to Manage Exceptions modal.
Use the Reported Time Approvals page to view the list of employees with reported time approvals.
Navigation
Click the Reported Time Approvals link under Approvals in the My Work group box of the Time and Labor WorkCenter.
Image: Reported Time Approvals Page
This example illustrates the Reported Time Approvals Page.
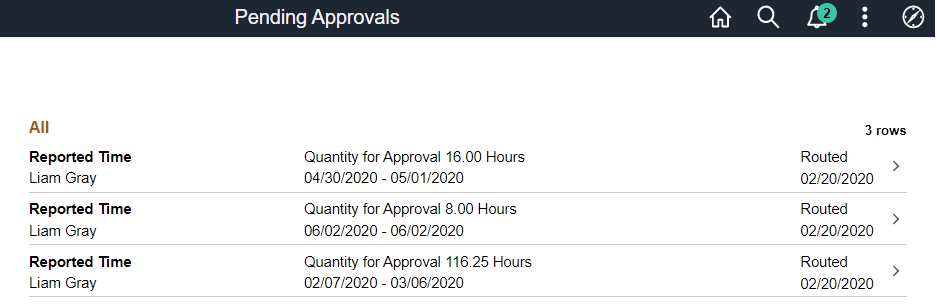
The Time Approvals page leads to the corresponding pending approvals page and are routed to Fluid AWE.
The Links group box provides access to the key components that are required to complete Time and Labor transactions.
Image: Links Group Box
This example illustrates the Links Group Box.
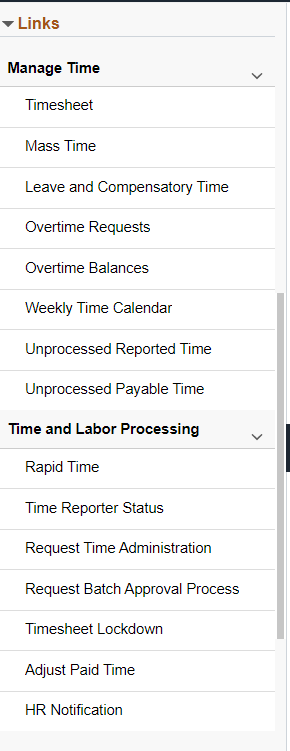
System administrators can manage links and configuration options for the Links Group Box on the Configure Pagelets - Links Page.
The Queries group box contains the Query Manager link. You can click this link to search for existing queries or create ones to use.
Image: Queries Group Box
This example illustrates the Queries Group Box.
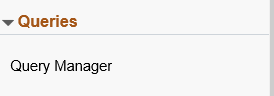
System administrators can manage links and configuration options for the Queries Group Box on the Configure Pagelets – Queries Page.
The Reports/Processes group box provides access to the Workforce Availability analytics and reports.
Image: Reports/Processes Group Box
This example illustrates the Reports/Processes Group Box.
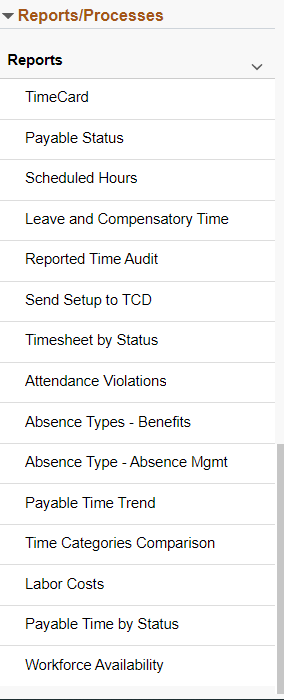
System administrators can manage links and configuration options for the Reports/Processes group box on the Configure Pagelets – Reports/Processes Page.