 and select the date on which you want to run
the Batch.
and select the date on which you want to run
the Batch.The Schedule Batch window facilitates you to run, schedule, re-start, re-run the batches in the Scheduler Service. After you upload the data in the required format into the Object Storage, you must load the data into the system using the Scheduler Service. You can schedule them to run in a required pattern and view the run time status of the scheduled services using the Monitor Batch feature.
The Schedule Batch window allows you to perform the following operations for your batch and batch group:
· Batch
Batch is a process of execution of the Date and time-based background tasks based on a defined period during which the resources were available for batch processing. You can perform the following operation for the batch:
The Execute batch option allows you to run a batch instantaneously. To execute a batch, perform the following steps:
1. Click Schedule Batch from the Header panel. The Schedule window is displayed.
2. Select the Batch Name from the Select Name drop down menu. For example, AMLDataLoad.
3. Click Execute. The Execution Status Dialog Box is displayed with the Batch executed successfully message. This indicates the unique identification reference number for the batch and date of the batch execution.
4. In the Execution Status Dialog Box, click Monitor to monitor the batch.
5. If you want to exclude/include some tasks, click Exclude Tasks. For more information, see Exclude/Include Tasks section.
6. If you want to hold/release some tasks, click Hold Tasks. For more information, see Hold/Release Tasks section.
7. If you want to edit the dynamic parameters of the batch, click Edit Dynamic Parameters For more information, see Edit Dynamic Parameters section.
NOTE:
You have provision to either execute or skip the execution of a batch based on the Holiday Calendar configuration.
If the batch execution day falls on a holiday, a message appears prompting you to confirm if you still want to go ahead with the batch execution on the holiday.
Click Confirm to execute the batch.
OR
Click Cancel to skip the execution of the batch for that particular date.
If the Holiday Calendar is not configured, then the above alert message will not be displayed.
For more information on how to configure Holiday Calendar, see Using FCCM Data Loading Service.
A new unique $RUNSKEY$ value is generated during the batch execution.
You can schedule a Batch to run just for Once, Daily, Weekly, Monthly, or Cron Expression for scheduling the batches. You can also have a user defined schedule to schedule and run a batch.
NOTE:
The batch execution will be skipped based on the Holiday Calendar configuration.
For example, if you have scheduled a execution of batch to run on every Friday, and if the second Friday is a holiday, the batch execution will be skipped for that particular day.
This is applicable for a batch to run Once, Daily, Weekly, Monthly, or Cron Expression.
For more information on how to configure Holiday Calendar, see Using FCCM Data Loading Service.
To schedule a Batch to run once, perform the following steps:
1. Click Schedule Batch from the Header panel. The Schedule Batch window is displayed.
2. In the Schedule Batch window, click Once.
3. Select the Batch or Batch Name you want to schedule for once from the Select drop down menu.
4. Enter a Schedule Name.
5. Click
and select the date on which you want to run
the Batch.
6. Click
 and select the time at which you want to run
the Batch.
and select the time at which you want to run
the Batch.
7. Click Schedule.
To schedule a Batch to run daily, perform the following steps:
1. In the Schedule Batch window, click Daily.
2. Select the Batch or Batch Name you want to schedule daily from the Select drop down menu.
3. Enter a Schedule Name.
4. Click
and select the start date from which you want
to run the Batch.
5. Click
and select the end date till which you want
to run the Batch.
6. Click
and select the time at which you want to run
the Batch daily.
7. Click Schedule.
To schedule a Batch to run weekly, perform the following steps:
1. In the Schedule Batch window, click Weekly.
2. Select the Batch or Batch Name you want to schedule weekly from the Select drop down menu.
3. Enter a Schedule Name.
4. Click
and select the start date from which you want
to run the Batch.
5. Click
and select the end date till which you want
to run the Batch.
6. Click
and select the time at which you want to run
the Batch.
7. Select the days on a week you want to run the Batch from the Select Days of the Week multi-select drop down menu.
8. Click Schedule.
To schedule a Batch to run weekly, perform the following steps:
1. In the Schedule Batch window, click Monthly.
2. Select the Batch or Batch Name you want to schedule weekly from the Select drop down menu.
3. Enter a Schedule Name.
4. Click
and select the start date from which you want
to run the Batch.
5. Click
and select the end date till which you want
to run the Batch.
6. Click
and select the time at which you want to run
the Batch.
7. Select the months in a year you want to run the Batch from the Select Months of the Year multi-select drop down menu.
8. Select the day of the month that you want to run the Batch from the Select Day of the Month drop down menu.
9. Click Schedule.
To run a Batch in a user-defined schedule, you can have
custom schedule with the help of Cron Expression.
A cron expression is a string comprised of
6 or 7 fields separated by white space. Fields can contain any of the
allowed values, along with various combinations of the allowed special
characters for that field. For more information, click  icon
next to the Cron
Expression field.
icon
next to the Cron
Expression field.
To schedule a Batch based on Cron Expression, perform the following steps
1. In the Schedule Batch window, click Cron Expression.
2. Select the Batch or Batch Name you want to schedule from the Select drop down menu.
3. Enter a Schedule Name.
4. Enter
the Cron Expression
for your schedule. For more information about the Cron
Expression, click icon next to the Cron Expression field.
5. Enter the Activation Condition for the Cron Expression for your schedule.
Activation Condition is an additional criteria evaluated post Cron Expression. The Batch is executed when both Cron Expression as well as any of the Activation Condition is fulfilled and the Batch is skipped if none of the condition is fulfilled.

NOTE:
This is an optional field.
Enter the Activation Condition and click + icon. You can add multiple conditions based on your requirements.
Click Validate Activation Condition
icon ( ) to validate your conditions.
If any of the activation condition is invalid, then you cannot schedule
the batch.
) to validate your conditions.
If any of the activation condition is invalid, then you cannot schedule
the batch.
Click Delete icon to delete the condition.

6. Click Schedule.
You can restart a Batch which has not been executed successfully or which has been explicitly interrupted, or cancelled, or put on hold during the execution process. By restarting a Batch, you can continue Batch execution directly from the point of interruption or failure and complete executing the remaining tasks.
To re-start a batch, perform the following steps:
1. Click Schedule Batch from the Header panel. The Schedule window is displayed.
2. From the Schedule window, select Re-start tab.
3. Select the Batch or Batch Name you want to re-start from the Select Name drop down menu.
4. Select the Batch Run ID.
5. Click Re-start.
NOTE:
You have provision to either execute or skip the execution of a batch based on the Holiday Calendar configuration.
If the batch execution day falls on a holiday, a message appears prompting you to confirm if you still want to go ahead with the batch execution on the holiday.
Click Confirm to restart the batch execution.
OR
Click Cancel to skip the execution of the batch for that particular date.
If the Holiday Calendar is not configured, then the above alert message will not be displayed.
For more information on how to configure Holiday Calendar, see Using FCCM Data Loading Service.
In case of Re-starting a batch, the existing RUNSKEY$ value is reused.
You can re-run a Batch which has previously been executed. Rerun Batch facilitates you to run the Batch irrespective of the previous execution state. A new Batch Run ID is generated during the Rerun process and the Batch is executed as similar to the new Batch Run.
To re-run a batch, perform the following steps:
1. Click Schedule Batch from the Header panel. The Schedule Batch window is displayed.
2. In the Schedule Batch window, select Re-run tab.
3. Select the Batch or Batch Name you want to re-run from the Select Name drop down menu.
4. Select the Batch Run ID.
5. Click Re-run.
NOTE:
You have provision to either execute or skip the execution of a batch based on the Holiday Calendar configuration.
If the batch execution day falls on a holiday, a message appears prompting you to confirm if you still want to go ahead with the batch execution on the holiday.
Click Confirm to re-run the batch execution.
OR
Click Cancel to skip the execution of the batch for that particular date.
If the Holiday Calendar is not configured, then the above alert message will not be displayed.
For more information on how to configure Holiday Calendar, see Using FCCM Data Loading Service.
In case of Re-running a batch, a new unique $RUNSKEY$ value is generated.
Dynamic Parameters facilitates you to the modify the dynamic parameters for the batch. You can change the param value from the Edit Dynamic Params window and save the changes to the Batch. The Edit Dynamic Parameters option is available in all the tab in the Schedule Batch window.
To edit the dynamic parameters for a batch, perform the following steps:
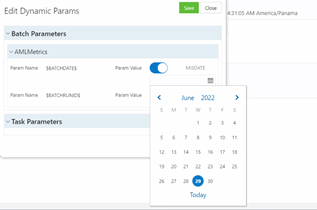
1. In the Schedule Batch window, click Edit Dynamic Parameters.
The Edit Dynamic Params window is displayed.

2. In the Edit Dynamic Params window, modify the values as required.
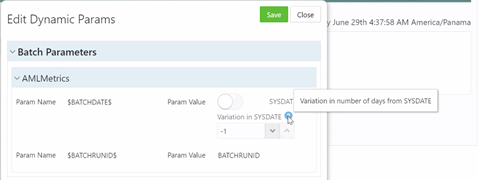
For the Param Name $BATCHDATE$:
§ If the Param Value is enabled, the MISDATE option is displayed. MISDATE refers to the date with which the data for the execution would be filtered. Click Calendar icon to select the MIS Date from the calendar.
§ If the Param Value field is disabled, the SYSDATE is enabled where you can set the variation in SYSDATE. The allowed values are from -1 to -100.
For example, if the schedule is set as 30 June 2022 and when you add the variation in SYSDATE as -2, the schedule will run on 30 June 2022, and $BATCHDATE$ parameter will be passed as 28 June 2022 where the scheduler service sends this data to target service.
If no variation is required in DATE (effective BATCHDATE will be SYSDATE in this case), leave the field empty.
ATTENTION:
The SYSDATE will be always calculated from the GMT equivalent time of execution.
For Example:
If you have scheduled the execution on 3rd August 3 AM SGT, its effective time is 2nd Aug 7th PM GMT and hence the date associated with batch (SYSDATE) becomes 2nd August instead of 3rd August.
3. Click Save.
The modified parameters are applied to the Batch.
You can modify the task definition state in the Batch Execution window to exclude or hold the defined task in a Batch from execution. The excluded tasks are therefore assumed to have completed execution and get excluded during the Batch Run.
While executing or scheduling a Batch from the Schedule Batch window, you can:
· Exclude a task or include the excluded task
· Hold a task or release the held task
You can exclude tasks or include the excluded tasks during Batch Execution. The excluded task components are therefore executed in the normal process assuming that the excluded task have completed execution.
To exclude/include tasks, perform the following steps:
1. In the Schedule Batch window, click Exclude Tasks. The Select Tasks window is displayed.
2. To exclude tasks:
a. Select
the required task from the Included Tasks
list and click  . You can press
Ctrl key for multiple selections.
. You can press
Ctrl key for multiple selections.
b. To
exclude all tasks, click  .
.
3. To include the excluded tasks:
a. Select the
required task from the Excluded Tasks list
and click  . You can press Ctrl
key for multiple selections.
. You can press Ctrl
key for multiple selections.
b. To include
all excluded tasks, click  .
.
4. Click Save.
You can hold tasks or release the held tasks during Batch Execution. The tasks which are on hold along with the defined components are skipped during execution. However, at least one task should be available in a Batch without being held/excluded for Batch execution.
To hold/release tasks, perform the following steps:
1. In the Schedule Batch window, click Hold Tasks. The Select Tasks window is displayed.
2. To hold tasks:
a. Select
the required task from the Released Tasks
list and click . You can press
Ctrl key for multiple selections.
b. To
hold all tasks, click .
3. To release held tasks:
a. Select
the required task from the Held Tasks
list and click . You can press
Ctrl key for multiple selections.
b. To
release all held tasks, click .
4. Click Save.
Batch Group is a process of grouping the batches that are required to be execute together for execution of the Date and time-based background tasks based on a defined period during which the resources were available for batch processing. You can perform the following operation for the batch group:
· Task Definition of a Batch Group
The Execute batch option allows you to run a batch instantaneously. To execute a batch group, perform the following steps:
1. Click Schedule Batch from the Header panel. The Schedule window is displayed.
2. Select the Batch Group from the Select Name drop down menu. For example, AMLDataLoad.
3. Click Execute. The Execution Status Dialog Box is displayed with the Batch executed successfully message. This indicates the unique identification reference number for the batch and date of the batch execution.
4. In the Execution Status Dialog Box, click Monitor to monitor the batch.
5. If you want to exclude/include some tasks, click Exclude Tasks. For more information, see Exclude/Include Tasks section.
6. If you want to hold/release some tasks, click Hold Tasks. For more information, see Hold/Release Tasks section.
7. If you want to edit the dynamic parameters of the batch, click Edit Dynamic Parameters For more information, see Edit Dynamic Parameters section.
NOTE:
You have provision to either execute or skip the execution of a batch group based on the Holiday Calendar configuration.
If the batch group execution day falls on a holiday, a message appears prompting you to confirm if you still want to go ahead with the batch group execution on the holiday.
Click Confirm to execute the batch group.
OR
Click Cancel to skip the execution of the batch group for that particular date.
If the Holiday Calendar is not configured, then the above alert message will not be displayed.
For more information on how to configure Holiday Calendar, see Using FCCM Data Loading Service.
A new unique $RUNSKEY$ value is generated at the batch group level during the batch group execution. The same value is considered for all the underlying batches.
You can schedule a Batch group to run just for Once, Daily, Weekly, Monthly, or Cron Expression for scheduling the batches. You can also have a user defined schedule to schedule and run a batch.
NOTE:
The batch group execution will be skipped based on the Holiday Calendar configuration.
For example, if you have scheduled a execution of batch group to run on every Friday, and if the second Friday is a holiday, the batch group execution will be skipped for that particular day.
This is applicable for a batch to run Once, Daily, Weekly, Monthly, or Cron Expression.
For more information on how to configure Holiday Calendar, see Using FCCM Data Loading Service.
To schedule a Batch to run once, perform the following steps:
1. Click Schedule Batch from the Header panel. The Schedule Batch window is displayed.
2. In the Schedule Batch window, click Once.
3. Select the Batch Group you want to schedule for once from the Select drop down menu.
4. Enter a Schedule Name.
5. Click
and select the date on which you want to run
the Batch.
6. Click
and select the time at which you want to run
the Batch.
7. Click Schedule.
To schedule a Batch to run daily, perform the following steps:
1. In the Schedule Batch window, click Daily.
2. Select the Batch Group you want to schedule daily from the Select drop down menu.
3. Enter a Schedule Name.
4. Click
and select the start date from which you want
to run the batch group.
5. Click
and select the end date till which you want
to run the batch group.
6. Click
and select the time at which you want to run
the batch group daily.
7. Click Schedule.
To schedule a Batch to run weekly, perform the following steps:
1. In the Schedule Batch window, click Weekly.
2. Select the Batch Group you want to schedule weekly from the Select drop down menu.
3. Enter a Schedule Name.
4. Click
and select the start date from which you want
to run the batch group.
5. Click
and select the end date till which you want
to run the batch group.
6. Click
and select the time at which you want to run
the batch group.
7. Select the days in a week you want to run the batch group from the Select Days of the Week multi-select drop down menu.
8. Click Schedule.
To schedule a Batch to run monthly, perform the following steps:
1. In the Schedule Batch window, click Monthly.
2. Select the Batch Group you want to schedule weekly from the Select drop down menu.
3. Enter a Schedule Name.
4. Click
and select the start date from which you want
to run the batch group.
5. Click
and select the end date till which you want
to run the batch group.
6. Click
and select the time at which you want to run
the batch group.
7. Select the months in a year you want to run the batch group from the Select Months of the Year multi-select drop down menu.
8. Select the day of the month that you want to run the batch group from the Select Day of the Month drop down menu.
9. Click Schedule.
To run a Batch Group in a user-defined schedule, you can
have custom schedule with the help of Cron Expression. A cron expression
is a string comprised of 6 or 7 fields separated by white space. Fields
can contain any of the allowed values, along with various combinations
of the allowed special characters for that field. For more information,
click icon next to the
Cron Expression field.
To schedule a Batch Group based on Cron Expression, perform the following steps
1. In the Schedule Batch window, click Cron Expression.
2. Select the Batch Group you want to schedule from the Select drop down menu.
3. Enter a Schedule Name.
4. Enter
the Cron Expression for your schedule.
For more information about the Cron Expression, click icon
next to the Cron Expression field.
5. Enter the Activation Condition for the Cron Expression for your schedule.
Activation Condition is an additional criteria evaluated post Cron Expression. The Batch Group is executed when both Cron Expression as well as any of the Activation Condition is fulfilled and the Batch Group is skipped if none of the condition is fulfilled.
NOTE:
This is an optional field.
Enter the Activation Condition and click + icon. You can add multiple conditions based on your requirements.
Click Validate Activation Condition
icon () to validate your conditions.
If any of the activation condition is invalid, then you cannot schedule
the Batch Group.
Click Delete icon to delete the condition.
6. Click Schedule.
You can schedule the batches and set the pre conditions within a Batch group with frequency as Weekly, Monthly, or based on an Interval for scheduling the batches. The batch that satisfies the configured pre conditions are executed as part of the schedule.
NOTE:
Pre Conditions can only be applied when using the Schedule option in the Schedule Batch window.
To set the pre conditions to the batches in a batch group weekly, perform the following steps:
1. In the Schedule Batch window, you can select either Once, Daily, Weekly, Monthly, or Cron Expression option based on the schedule that you want to run the batch group.
2. Select the Batch Group you want from the Select drop down menu.
3. Enter a Schedule Name.
4. Specify the other details displayed when you are selecting Once, Daily, Weekly, Monthly, or Cron Expression.
5. Click Pre Conditions.
6. In the Pre Conditions window, specify the Batch from the drop down and from the Frequency drop down and select Weekly.
7. Select the days from the Select Days drop down that you want to schedule the batch run within the selected week.
8. Click
 to add the specified entry.
NOTE:
Pre Conditions can be added only to one batch at a time.
9. Click Save. The batch is executed based on the configured pre conditions.
To set the pre conditions to the batches in a batch group monthly, perform the following steps:
1. In the Schedule Batch window, you can select either Once, Daily, Weekly, Monthly, or Cron Expression option based on the schedule that you want to run the batch group.
2. Select the Batch Group you want from the Select drop down menu.
3. Enter a Schedule Name.
4. Specify the other details displayed when you are selecting Once, Daily, Weekly, Monthly, or Cron Expression.
5. Click Pre Conditions.
6. In the Pre Conditions window, specify the Batch from the drop down and from the Frequency drop down and select Monthly.
7. Select the days from the Select Days drop down that you want to schedule the batch run within the selected week.
8. Click
to add the specified entry.
NOTE:
Pre Conditions can be added only to one batch at a time.
9. Click Save. The batch is executed based on the configured pre conditions.
To set the pre conditions to the batches in a batch group based on an interval, perform the following steps:
1. In the Schedule Batch window, you can select either Once, Daily, Weekly, Monthly, or Cron Expression option based on the schedule that you want to run the batch group.
2. Select the Batch Group you want from the Select drop down menu.
3. Enter a Schedule Name.
4. Specify the other details displayed when you are selecting Once, Daily, Weekly, Monthly, or Cron Expression.
5. Click Pre Conditions.
6. In the Pre Conditions window, specify the Batch from the drop down and from the Frequency drop down and select Interval.
7. Select the interval from the Custom Recurrence (Repeat every) Days drop down that you want to schedule the batch run within the selected week.
NOTE:
The Custom Recurrence can be set maximum to 60 days.
8. Click
to add the specified entry.
NOTE:
Pre Conditions can be added only to one batch at a time.
9. Click Save. The batch is executed based on the configured pre conditions.
You can restart a Batch which has not been executed successfully or which has been explicitly interrupted, or cancelled, or put on hold during the execution process. By restarting a Batch, you can continue Batch execution directly from the point of interruption or failure and complete executing the remaining tasks.
To re-start a batch, perform the following steps:
1. Click Schedule Batch from the Header panel. The Schedule window is displayed.
2. From the Schedule window, select Re-start tab.
3. Select the Batch Group you want to re-start from the Select Name drop down menu.
4. Select the Batch Run ID.
5. Click Re-start.
NOTE:
You have provision to either execute or skip the execution of a batch group based on the Holiday Calendar configuration.
If the batch group execution day falls on a holiday, a message appears prompting you to confirm if you still want to go ahead with the batch group execution on the holiday.
Click Confirm to restart the batch group execution.
OR
Click Cancel to skip the execution of the batch group for that particular date.
If the Holiday Calendar is not configured, then the above alert message will not be displayed.
For more information on how to configure Holiday Calendar, see Using FCCM Data Loading Service.
You can re-run a Batch which has previously been executed. Rerun Batch facilitates you to run the Batch irrespective of the previous execution state. A new Batch Run ID is generated during the Rerun process and the Batch is executed as similar to the new Batch Run.
To re-run a batch, perform the following steps:
1. Click Schedule Batch from the Header panel. The Schedule Batch window is displayed.
2. In the Schedule Batch window, select Re-run tab.
3. Select the Batch Group you want to re-run from the Select Name drop down menu.
4. Select the Batch Run ID.
5. Click Re-run.
NOTE:
You have provision to either execute or skip the execution of a batch group based on the Holiday Calendar configuration.
If the batch group execution day falls on a holiday, a message appears prompting you to confirm if you still want to go ahead with the batch group execution on the holiday.
Click Confirm to re-run the batch group execution.
OR
Click Cancel to skip the execution of the batch group for that particular date.
If the Holiday Calendar is not configured, then the above alert message will not be displayed.
For more information on how to configure Holiday Calendar, see Using FCCM Data Loading Service.
Dynamic Parameters facilitates you to the modify the dynamic parameters for the batch. You can change the param value from the Edit Dynamic Params window and save the changes to the Batch. The Edit Dynamic Parameters option is available in all the tab in the Schedule Batch window.
To edit the dynamic parameters for a batch group, perform the following steps:
1. In the Schedule Batch window, click Edit Dynamic Parameters. The Edit Dynamic Params window is displayed.
2. In the Edit Dynamic Params window, modify the values as required.
3. Click Save. The modified parameters are applied to the Batch.
You can modify the task definition state in the Batch Execution window to exclude or hold the defined task in a Batch from execution. The excluded tasks are therefore assumed to have completed execution and get excluded during the Batch Run.
While executing or scheduling a batch group from the Schedule Batch window, you can:
· Exclude a task or include the excluded task
· Hold a task or release the held task.
You can exclude tasks or include the excluded tasks during Batch Group Execution. The excluded task components are therefore executed in the normal process assuming that the excluded task have completed execution.
To exclude/include tasks, perform the following steps:
1. In the Schedule Batch window, click Exclude Tasks. The Select Tasks window is displayed.
2. To exclude tasks:
a. Select
the required task from the Included Tasks
list and click . You can press
Ctrl key for multiple selections.
b. To
exclude all tasks, click .
3. To include the excluded tasks:
a. Select the
required task from the Excluded Tasks list
and click . You can press Ctrl
key for multiple selections.
b. To include
all excluded tasks, click .
4. Click Save.
You can hold tasks or release the held tasks during Batch Group Execution. The tasks which are on hold along with the defined components are skipped during execution. However, at least one task should be available in a Batch without being held or excluded for Batch execution.
To hold/release tasks, perform the following steps:
1. In the Schedule Batch window, click Hold Tasks. The Select Tasks window is displayed.
2. To hold tasks:
a. Select
the required task from the Released Tasks
list and click . You can press
Ctrl key for multiple selections.
b. To
hold all tasks, click .
3. To release held tasks:
a. Select
the required task from the Held Tasks
list and click . You can press
Ctrl key for multiple selections.
b. To
release all held tasks, click .
4. Click Save.