2 System Setup

In Administration, System Setup Menu, configurations such as Port of call, System Cruise, System Date Change, System Cruise Change and Database Parameters are setup.

Figure 2-1 Administration Menu
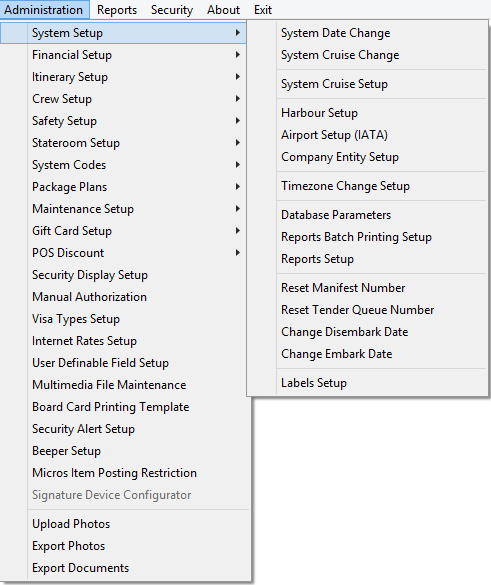

This figure shows the function in Administration Menu.

Harbour Setup

The Harbour Setup function enable you to maintain the Port the ship embark and the local agent handling the port administration.

Setting Up a Harbour/Port

Figure 2-2 Harbour Setup
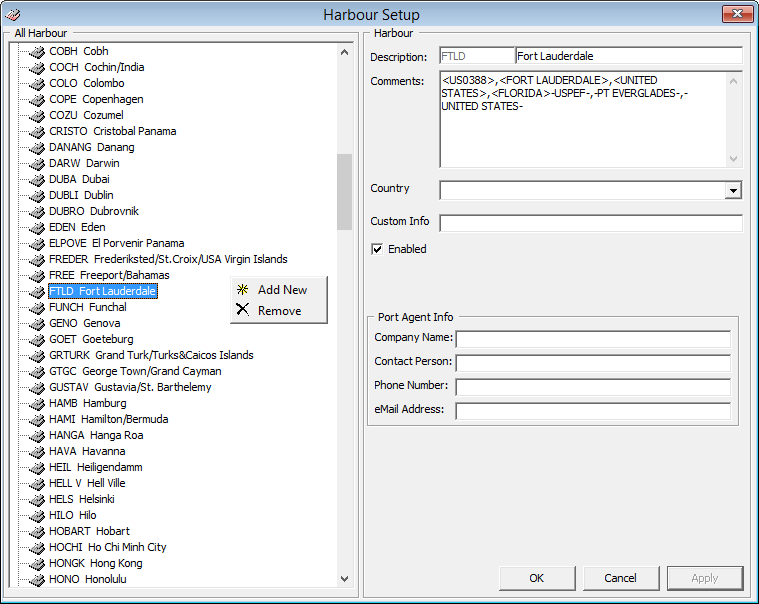

This figure shows the Harbour Setup
  1. From the Administration Menu, select System Setup, then Harbour Setup under the sub-category.
  2. In the left pane of the Harbour Setup window, right-click and select Add New to add a new code.
  3. In the Description field, enter the short code and description of the harbour name.
  4. In the Comment field, enter the ISO Port Codes using an angle bracket <> and comma as separator, if any. The system also inserts the standard ISO Port codes from APIS during installation/update in the Comment field.
  5. Select the Country from the drop-down list, if any.
  6. In the Port Agent Info section, enter the Port Agent information and the click Apply to save the entry. The Enabled check box is checked by default. Uncheck the check box to disable the code from the selection window.

Removing a Harbour/Port

  1. From the Harbour Setup window, right-click the Port code and select Remove.
  2. Click OK to save and close the window.

System Cruise Setup

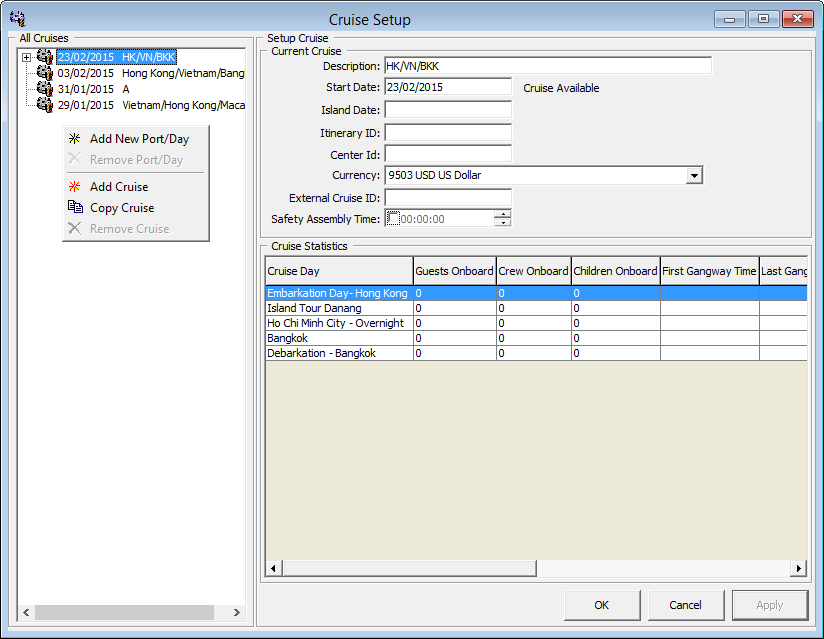
Before the Ship sets sail on its voyage, you must setup the start/end of the cruise in System Cruise Setup, detailing the start and end date, arrival/departure time at each port and the base currency.

Figure 2-3 Cruise Setup


This figure shows the Cruise Setup for each cruise, the start date, base currency accepted.

Table 2-1 Cruise Setup Field Definition

Field Name Description

Description

Short code of the cruise. Mainly use to identify the cruise

Start Date

The start date of the cruise.

Island Date

Special coded description for General Ledger (GL) Interface.

Itinerary ID

An identifier for the voyage/cruise.

Center ID

Special coded description for GL.

Currency

Official on board currency. See Financial Setup, Currencies

External Cruise ID

Cruise ID from an external party.

Safety Assembly Time

Schedule Safety Assembly Time for the cruise.

Creating System Cruise

  1. Select System Setup, then System Cruise Setup from the drop-down list.
  2. In the Cruise Setup window, right-click the All Cruises pane and select Add Cruise to open a blank setup form.
  3. Enter the Description, Start Date, Island Date, Itinerary and Currency.
  4. Click Apply to save.

Adding Port Day to Cruise

  1. At the All Cruises section of the Cruise Setup form, right-click on the Cruise Name and select Add New Port/Day.
  2. At the Setup Cruise form, enter the Date, Description, Port Comments, Weather and select from the drop-down list the Arrival Port, IPM Port Type, Arrival Country, Arrival Time and Departure Date/Time.
  3. Click Apply to save the form.
  4. Repeat the above steps for additional port day.

    Note:

    You cannot alter the Port Day once the date is entered. You are require to first remove and re-enter the port day before adding the remaining port day.

Removing Port Day

  1. At the All Cruises pane, right-click on the Port Date you wish to remove.
  2. Select Remove Port/Day option.

    Note:

    The system validates all reservations against the port day before a port/day or cruise is removed. If there are linked reservations found, amend the booking before proceeding.

Copying Cruise Day

The Copy Cruise function copies the same cruise setup/itineraries into a future date. If the information is completely different, we recommend that you create the cruise from scratch and add the port day individually.
  1. In the All Cruise section, select the Cruise Day, then right-click and select Copy Cruise.

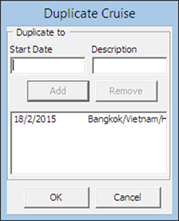
    Figure 2-4 Duplicate Cruise


    This figure shows the Duplicate Cruise window which allow you to add the date you are duplicating to.
  2. Insert the Start Date and Description in the Duplicate Cruise window, then click Add. The copy cruise is not allowed if a Start Date exist.
  3. Click OK to confirm and populate the information in All Cruises section.

Removing a Cruise

You can only remove a cruise when there are no reservation records attached to the cruise day. This option is dimmed when the system detects there is a link to a port day.
  1. At the All Cruises section, expand the Cruise Day container and select the port day to remove by right-clicking the date.
  2. Repeat above step until all the port day for that cruise is removed.
  3. Right-click on the Cruise Day and select Remove Cruise.
  4. Click OK to exit and return to System Cruise setup.

System Date Change

The Night Auditor or appointed user from the Finance Department is responsible to perform the System Date Change nightly. Before you run the System Date Change, all revenue centers must be in balance, and this includes the Point-of-Sale (POS) System, Cashbook and other processes deem necessary by the ship operator.

Performing System Date Change

  1. From the System Setup drop-down menu, select System Date Change.

    Note:

    You are not allowed to proceed when the Cashier’s sessions is still active.
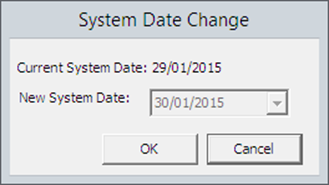
  2. At the System Date Change prompt, confirm the New System Date by clicking OK.

    Figure 2-5 System Date Change


    This figure shows the System Date Change prompt
  3. You will receive a warning message when expected disembarking guest/crew remain as check-in in the system. Select Yes to proceed or No to return to the previous menu and resolve all pending check out.
  4. When you select Yes, a progress window Closing pay period shall prompt once the System Date Change commences. This only appears if the Payroll system is linked, and it changes all the pending reservations status for the date to No-Show.
  5. Once the System Date Change completes, you will receive an window indicating the new system date. Click OK to close the prompt.

System Cruise Change

At the end of each cruise, all the revenue centers and system accounts must be in balance and closed before you start a new cruise. This task is performed by the Chief Purser.

Performing System Cruise Change

Important:

The following process sets all accounts to Closed. All outstanding balances are carried forward to the next cruise. Do proceed with caution
  1. Select System Cruise Change.
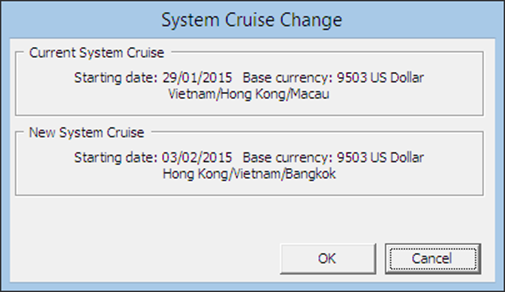
  2. At the System Cruise Change prompt, click OK to confirm the New System Cruise.

    Figure 2-6 System Cruise Change


    This figure shows the System Cruise Change window, from Current System Cruise to the New System Cruise
  3. You will receive a ‘Open Balance Warning’ if an unbalanced System Account is detected. Select Yes to proceed or No to return to previous menu and then resolve all pending check out.
  4. Once the cruise change completes, the application will return to the Main menu.

Database Parameters

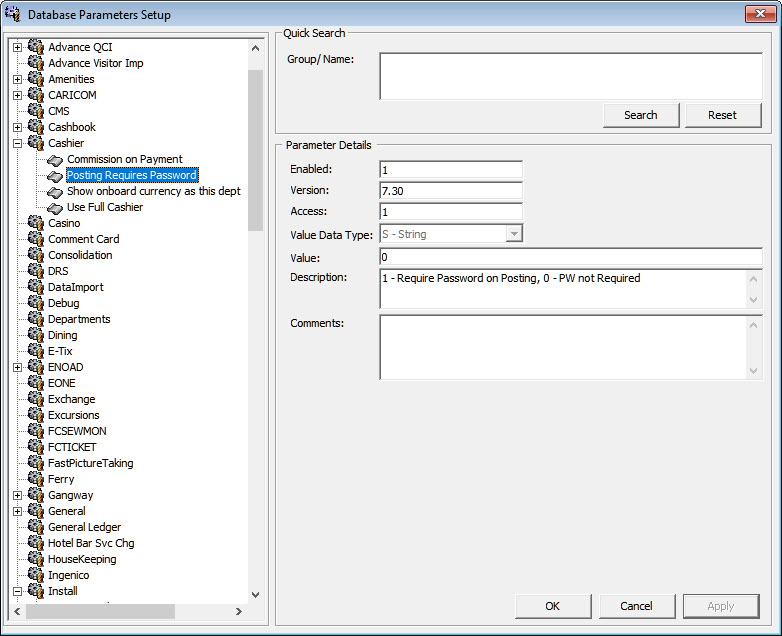
The application is deployed with a set of Database Parameters that controls the operability and functionality of the module. These system parameters are grouped by module, followed by its function. Please consult Oracle Hospitality Cruise Customer Support prior to changing any of these parameters to avoid adverse implications.

Figure 2-7 Database Parameter

This figure shows the Database Parameters window
  1. From the System Setup menu, select Database Parameters.
  2. In the Database Parameters Setup window, click the plus (+) key to expand the group or navigate to Quick Search section, and search the parameter name in Group/Name field and then click Search.
  3. Changing the value at the Parameter Details changes the behavior of the functions.
    1. Enabled: By default, all parameters are set to Enabled. In order to disable a parameter, change the value to 0 (0 = Disabled/ 1 = Enabled).
    2. Value: The acceptable value is defined in the description.

Defining the days to keep log files

You can to keep an activity log of certain functions, particularly the Interfaces. The number of days is keep is set up in Database Parameter:
  • Group Interface, Days to keep log file.

  • Group Gangway, Gangway Log Days

Once defined, the system checks the log entries when the module starts and purge entries older than the days enter.

Airport Setup

The Airport Setup code is used in Crew and Management Module, Flight Overview window. It allow you to arrange a passenger or crew arrival pickup or departure drop-off. You can also import an airport list instead of inserting the details manually, and this list must be save in eXtensible Markup Language (XML) format (IATA_AIRPORT_List.XML) in Oracle Hospitality Cruise folder.
  1. From the System Setup menu, select Airport Setup (IATA).
  2. In the Airport (IATA) setup window, the import commences once it detects the IATA_AIRPORT_List.xml file.
  3. Click Yes at the Admin prompt to confirm the data to import, and then OK when the import is successful.

Adding Airport Code Manually

  1. At the Airport Setup (IATA) setup, All Airport section, right-click and select Add New.
  2. Enter a short code and description in the Description field.
  3. Enter a comment in the Comment field, if any.
  4. Click Apply to save.

Company Entity

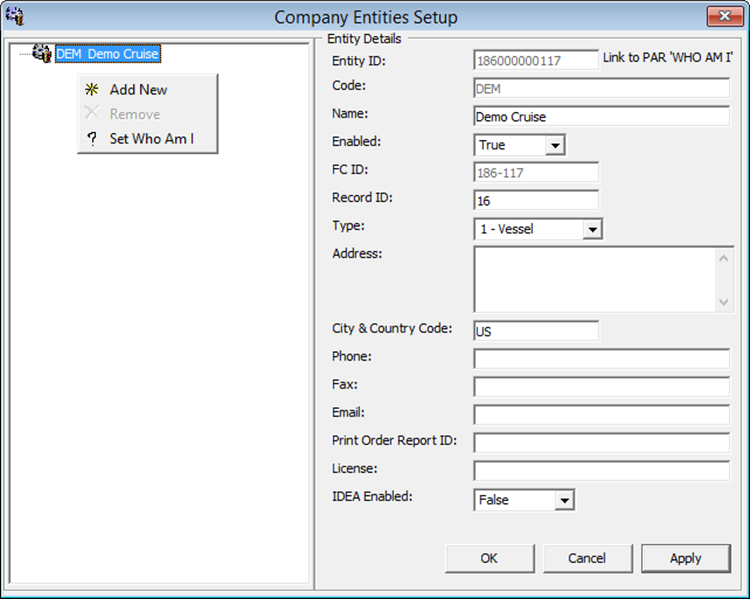
This function allows you to enter the company entity of the ship.
  1. From the System Setup menu, select Company Entity Setup.
  2. Right-click on the left pane of the form and select Add New.
  3. Enter all the information in the Entity Details section and then click Apply.

    Figure 2-8 Company Entities Setup

    This figure shows the Company Entities Setup window.

    Table 2-2 Field Definition of Company Entities Setup

    Field Name Description

    Entity ID

    Company Entity ID, provided by SPMS

    Code

    Company or Ship Code

    Name

    Company or Ship name

    Enabled

    Set to True

    Record ID

    Defines the record ID representing an entity

    Type

    Type of Entity
    • 1 = Vessel/Ship

    • 2 = Headquarter

    • 3 = Warehouse

    Address

    Address of entity

    City & Country Code

    Country of entity

    Phone

    Phone

    Fax

    Fax

    Email

    Email address

    Print Order Report ID

    Print Order Report ID used by Materials Management System (MM)

    License

    License Code provided by SPMS

    IDEA Enabled

    Field use by MMS and is defaulted to False

Assigning Company ID

  1. At the left pane of Company Entity Setup window, right-click the entity name and select Set Who Am I.
  2. At the confirmation prompt, select Yes to update information to Parameter Who Am I link.
  3. Restart the application for change to take effect.

Time Zone Change

This function enables you to set the ship’s clock forward or backward when the ship travels through different time zones, thus recording an accurate crew work hours. This function is only used in Time & Attendance module.
  1. From the System Setup option, select Timezone Change Setup.
  2. At the Timezone Change Setup window, right-click on the left pane and select Add.
  3. In the Details section, select the Data and Time from the drop-down list when the change should take place.
  4. Enter the number of hours in the Change Hours filed and a remark of the change.
  5. Click Apply to save.

Batch Reports Printing Setup

The function enable you to setup a group of reports to print at a scheduled time and it requires the OHC Auto Report application to be running at all times.
  1. At the System Setup option, select Reports Batch Printing Setup.

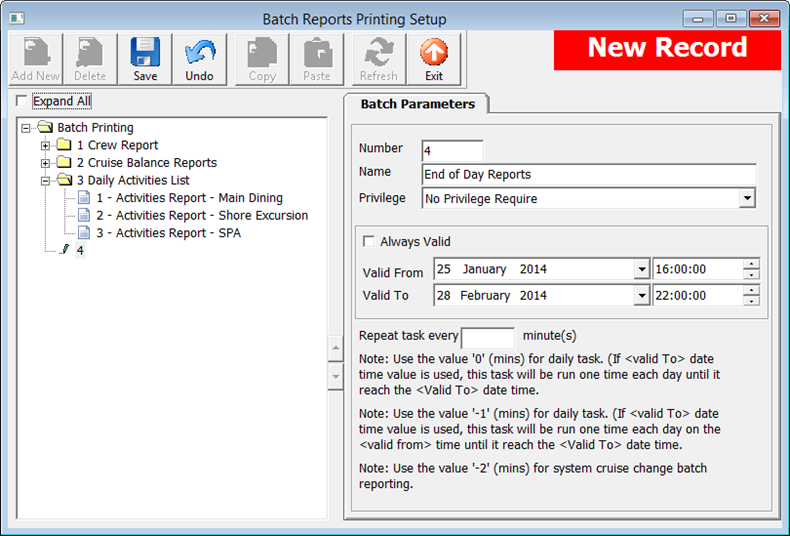
    Figure 2-9 Batch Reports Printing Setup

    This figure shows the configuration window of Batch Reports Printing Setup.
  2. In the Batch Reports Printing Setup window ribbon bar, click the Add New button.
  3. Enter the all the required fields and then click Save.

Adding Report to Batch Printing

  1. Select the Report Group from the Batch Printing tree.
  2. In the Report Parameters tab, select an Action Type from the drop-down list.

    Table 2-3 Batch Report Printing Options

    Option Description

    1 – Skip

    Option to skip the selection process.

    2 – Report

    Enable a search option and report selection from existing report database.

    3 – External Program

    The function call an external program when running the Batch Report. Only external program that is defined in Parameter, “General”,“External Program List” is allowed to be save.

    4 – Call Batch Printing

    Enable to link and include existing report group to the current.

  3. In the Report Name field, click Search to look up for the report.
  4. Select the day of the week from the Schedule drop-down field.
  5. Choose the Output method from the drop-down list. If the selected methods is to save to file, enter the Export File name and path and Email Address for the files to be sent to the specific user.
  6. Click Save at the ribbon bar to save.

Copying Batch Details to Other Report

  1. Select the Report Group from the tree and then click the Copy button at the ribbon bar.
  2. In the Report Group to copy to, click Add New and then Paste.
  3. Click the Save button to save.

Deleting Batch Report Details

  1. Select the Report Group from the Batch Printing tree and then click Delete button at the ribbon bar.
  2. At the confirmation prompt, click Yes to proceed.

    Note:

    This action deletes the record permanently. Please proceed with caution.

Reports Setup

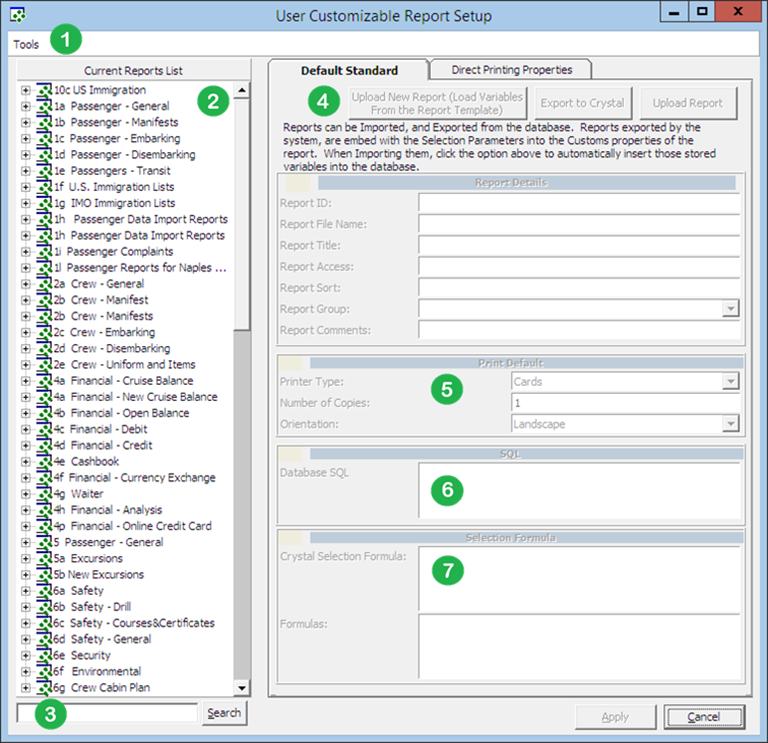
The Report Setup function allows you to add customized Crystal reports to the existing System report set, or export the report template for use on another ship or for further customization.

Figure 2-10 Report Setup


This figure shows the configuration window to setup a report and its required parameters

Table 2-4 Setup Functions In Report

Figure Description

1

Tools function that uploads report templates from a public folder.

2

List of report set available, including those that was manually uploaded.

3

Search function that enables you to search for a report.

4

Report detail of the report. For example, Report ID, User Access, Report Group.

5

Default printer configuration.

6

Formula embedded in the Crystal Report template.

7

Selection criterion input required from the user prior to generating a report.

Adding New Report

  1. From the System Setup option, select Reports Setup.
  2. In the User Customizable Report Setup, Current Report List pane, right-click and select Add New Report to enable the fields on the right pane.
  3. Navigate to the right pane and select Upload New Report (Load Variables From the Report Template) or Upload Report.
  4. Search for the .RPT file on your local drive if you are uploaded a report template.
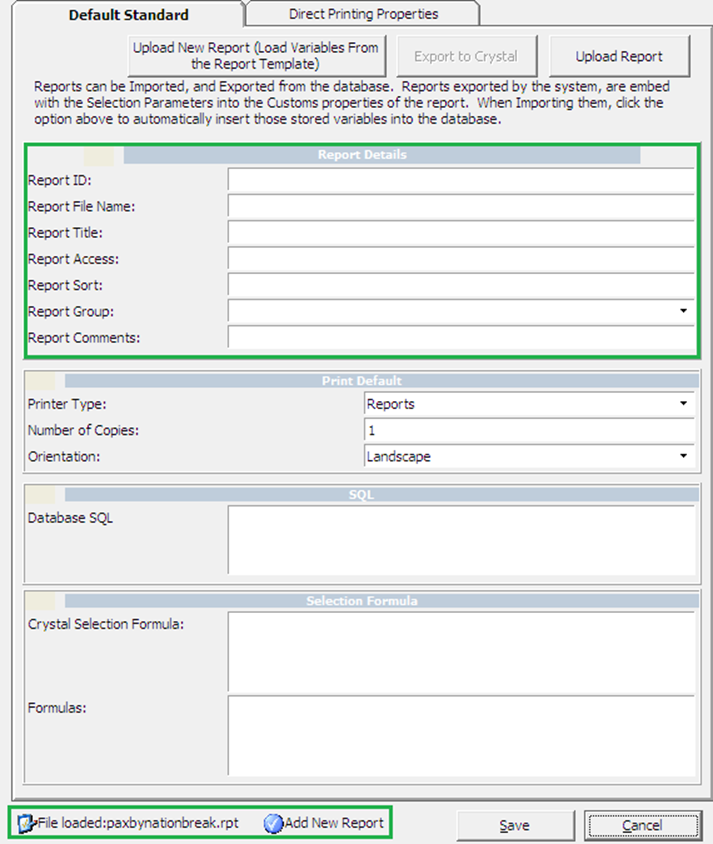
  5. In the Report Details section, enter the following information:
    1. Report ID: Unique ID of customized report.
    2. Report File Name: Crystal Report file name, for example, pabxnationbreak.rpt.
    3. Report Title: Report name to show in Current Report List.
    4. Report Access: User Access Right to view/print report.
    5. Report Sort: Sort order of the report within the assigned report group.
    6. Report Group: Group this report belongs to. Select from the drop-down list.
    7. Report Comments: Additional comments/Information pertaining to this report.

    Figure 2-11 Default Standard for Report


    This figure shows the Default Standard tab you must fill up when creating a report.
  6. In the Print Default section, select the Printer Type, Number of Copies and the Print Orientation.
  7. Click Save to add the report to the list.
  8. Click OK at the ‘Save New Report’ prompt. The newly added report name is shown at the bottom of the screen

Removing a Report

  1. In the User Customizable Report Setup window, expand the Current Report List tree by clicking the plus (+) key.
  2. Right-click the report name you wish to remove and then select Remove Report.
  3. Click Yes when prompt.

Exporting a Report

  1. In the User Customizable Report Setup window, expand the Current Report List tree.
  2. Click the Export to Crystal button in the Default Standard tab.
  3. Select the location to save the file and note that the file type is indicated as Crystal Report.

Change Debark/Embark Date

This function allows you to change the bulk change a Debark or Embark Date when the need arises. For example, passengers are not allowed to debark due to severe weather condition.
  1. From the System Setup option, select Change Debark Date or Change Embark Date.
  2. Select the date from the From/To Date field and check the applicable passenger type and the status.
  3. Select a New Date and check the Reset Boardcards check box if you need to issue new boardcard.
  4. Click OK and then select Yes to proceed or No to abort.
Labels Setup

The system is pre-installed with a range of hard coded labels for use in various functions. You may modify the description of the labels to suit the Ship’s operation. Consult Oracle Hospitality Cruise Support if you wish to change the description of these labels.