| Oracle Product Lifecycle Analytics Configurator and Data Mapping Guide Release 3.6 E83717-01 |
|

 Previous |
 Next |
| Oracle Product Lifecycle Analytics Configurator and Data Mapping Guide Release 3.6 E83717-01 |
|
Previous |
Next |
This chapter relates to Agile PLM for information on configuration (attribute mapping) related to Agile PLM for Process see Extending the Agile PLM for Process Data on page 43.
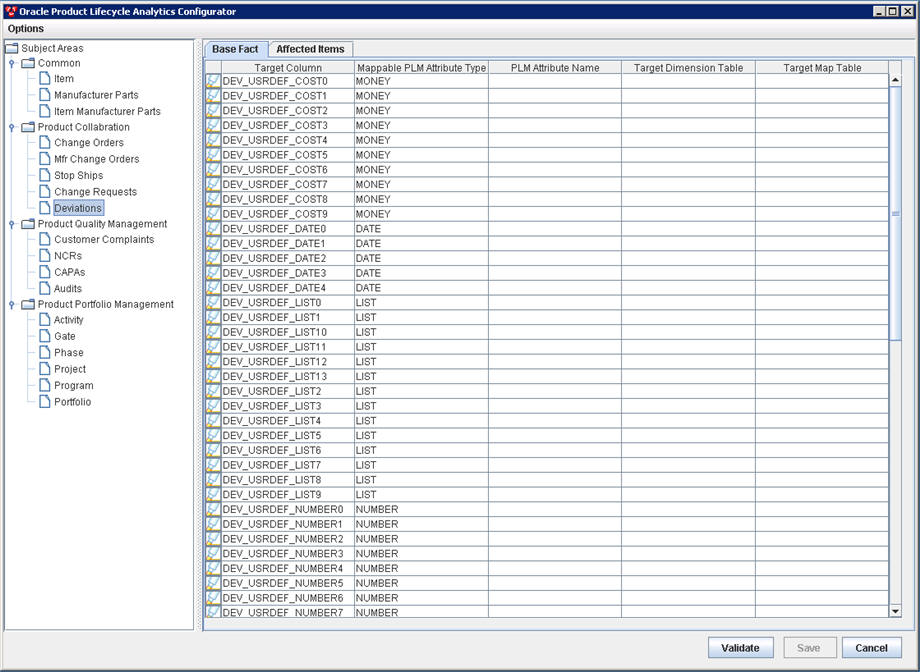
The Oracle Product Lifecycle Analytics (OPLA) Configurator interface consists of the following two basic panes:
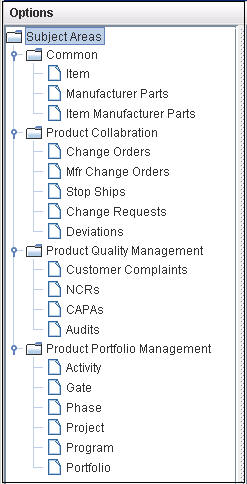
Subject Area pane - Displays the Agile PLM module and its subject areas. It is located on the left-hand-side of the OPLA Configurator.
Mapping Table pane - Displays the target and source destinations for all the PLM attributes that can be configured. It is located on the right-hand-side of the OPLA Configurator.
You can customize the default values for the Subject Area pane and the Mapping Table pane as per your requirements.
For more information on how to customize the default values, see Customizing the Interface on page 19.
A Subject Area is a group of configurable fact tables in the MDS schema. These configurable fact tables correspond to subject areas of PLM Analytics modules within OPLA.
The Subject Area pane has a hierarchical tree structure. The first level shows the Agile PLM module name, and the second level shows the supported subject areas for that module.
Each subject area can be associated with one or more Fact types. Each fact type appears as a tab on the right pane, where its corresponding attributes are displayed.
In Product Portfolio Management, for the Program, Phase and Portfolio subject areas, the Cover page, Page Two, and Page Three attributes specific to the corresponding domains appear on the right pane. For example, the Phase subject area displays only the Phase-specific P3 attributes. For Gate, Activity and Project subject areas, the P3 attributes of all the subclasses are displayed.
In the OPLA Configurator the right side shows the Mapping Table pane. It is a fact table where the target and source information is displayed. Some tips on the Mapping Table pane:
Some target values are auto-populated.
Source data for each row needs to be selected manually from the options provided.
Target columns show the target field name and dimension table where applicable.
User-defined fields are prefixed with 'USR_DEF'.
| Column | Description |
|---|---|
| Target Column | Column name within the Fact table in MDS schema to which the PLM Attribute is mapped. |
| Mappable PLM Attribute Type | Type of PLM Attribute (or Field) that can be mapped to the corresponding column in the Fact table. Possible Values: Number, Date, List, Multi-list, and Money. |
| PLM Attribute Name | Name of the PLM Attribute (or Field) that is mapped to the corresponding column in the Fact table. |
| Target Dimension Table | Name of the dimension table in the target MDS schema. It is used only if the PLM Attribute Type is "List" or "Multi-List".
Note The user cannot change the Target Dimension Tables for the user-defined "List" attributes of PPM, as all the user-defined columns for PPM are maintained in a single dimension table. Refer Oracle Product Lifecycle Analytics Data Reference Manual for the database tables. |
| Target Map Table | Name of the bridge table in the target MDS schema. It is used only if the PLM Attribute Type is "Multi-List". |
You can customize the data elements (in the user interface) to suit your requirements. The customizable settings are described in the table below.
All configuration files are located at <install directory>\config.
| To configure the following settings | Edit the following file |
|---|---|
| User Interface button names | Messages_en_US.properties |
| Table column headers | Messages_en_US.properties |
| Logging levels | log4j.properties |
To display the Preferences dialog box, select Tools > Preferences. The Preferences dialog box controls how table and column categories appear based on their status (valid, invalid, undefined, or nonresistant).
For each category and its status, you can select the icon that is associated with the category, the color of the font, and determine if the category should be hidden. The preferences are saved to the Settings.xml file and will appear the next time you start DataLoad. You can copy the Settings.xml file to other computers so that DataLoad uses the same preferences.
To set the display preferences:
Click Options > Preferences.
Select the attribute types you want displayed in the right pane.
Click Save.
To view the Source columns corresponding to the displayed Target columns in the right pane, select Run in Debug mode.
You can increase the number of the available user-defined (configurable) fields in the schema.
You can add columns to enhance the MDS Schema if the available user-defined configurable fields in the tables are not sufficient to accommodate your business requirements.
The supported attribute types are:
Date
List
Multi List
Number
Money or Cost
Text
To add new user-defined columns in the MDS Schema:
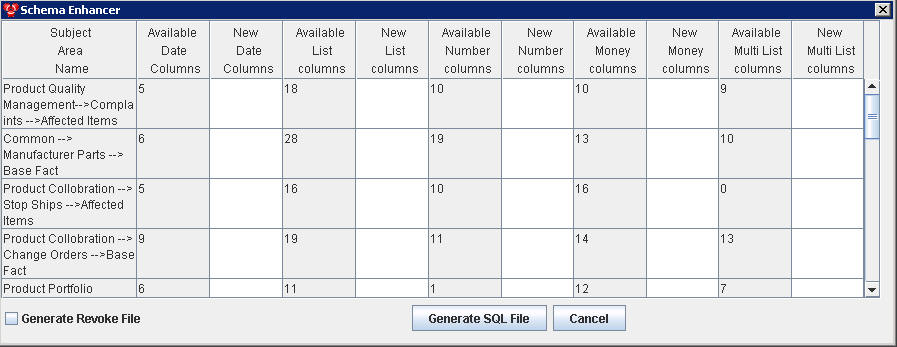
Click Options > Add user-defined Fields. The Schema Enhancer dialog box appears.
The Schema Enhancer dialog box lists the tables that have Date, List, Number, Money, Multi-List, and Text columns and the count of each of these columns for every table.
In the New columns cell, enter the number of additional columns of the attribute type you need in the table.
Click Generate SQL File to generate the SQL script that enables you to alter the tables to include the additional columns.
Save the generated file with a .sql extension.
Run the generated SQL file manually on the MDS database schema user, to include the additional user-defined columns in the specific table. The OPLA Configurator displays the new columns as rows.
Note Select Generate Revoke File checkbox to generate a script that retains the existing table structure. If you want to reverse the addition of new fields, execute the revoke file.
You can associate PPM sub classes with domains such as Portfolio, Program, Project, and Phase. Agile PPM allows you to create multiple sub classes within the Activity class. You can associate more than one of these sub classes to a specific domain. The differentiation of the attributes specific to each of these similar sub classes requires the addition of Fact Staging (FS) tables in the schema design. Refer to the Oracle Product Lifecycle Analytics Data Reference Manual for information.
The ETL propagates data from the Source to the FS tables and then to the target Fact tables. The Schema Enhancer generates scripts to create additional columns for Fact tables, FS tables, and Dimension tables. It also generates appropriate meta data information for the Dictionary table.
You can manually add new user-defined dimension tables to the MDS schema if the available dimension tables are not sufficient to accommodate your business requirements.
To add new user-defined dimension tables to the schema:
Using the structure given below, you can create new dimension tables in the MDS Schema:
CREATE TABLE USRDEF_L<XXX>_D
(
USRDEF_L<XXX>_ID NUMBER(22) NOT NULL,
NAME VARCHAR2(4000 CHAR) NOT NULL,
LEVEL0 NUMBER(22),
LEVEL1 NUMBER(22),
LEVEL2 NUMBER(22),
LEVEL3 NUMBER(22),
LEVEL4 NUMBER(22),
LEVEL0_NAME VARCHAR2(256 CHAR),
LEVEL1_NAME VARCHAR2(256 CHAR),
LEVEL2_NAME VARCHAR2(256 CHAR),
LEVEL3_NAME VARCHAR2(256 CHAR),
LEVEL4_NAME VARCHAR2(256 CHAR),
USRDEF_TEXT0 VARCHAR2(256 CHAR),
USRDEF_TEXT1 VARCHAR2(256 CHAR),
USRDEF_TEXT2 VARCHAR2(256 CHAR),
USRDEF_DATE0 DATE,
USRDEF_DATE1 DATE,
USRDEF_DATE2 DATE,
USRDEF_NUMBER0 NUMBER,
USRDEF_NUMBER1 NUMBER,
USRDEF_NUMBER2 NUMBER,
LAST_MODIFIED_DATE DATE,
LIST_ID NUMBER(22),
ENABLE NUMBER(1) DEFAULT 1,
INTEGRATION_ID VARCHAR2(80 CHAR),
ROW_ID NUMBER(22),
DATASOURCE_NUM_ID NUMBER(22),
LIST_NAME VARCHAR2(510 CHAR) DEFAULT 'UNDEFINED'
);
The table is named in the following format: USRDEF_ XXX Where XXX represents the dimension table name.
Add the newly created table name as an XML element into <installdir>\config\Configurator.xml
<usrdimensionTables>
<!-Existing entries
<list name="USRDEF_L01_D" dimcol="USRDEF_L01_ID"/>
<list name="USRDEF_L02_D" dimcol="USRDEF_L02_ID"/>
<list name="USRDEF_L03_D" dimcol="USRDEF_L03_ID"/>
<!-New Entry-->
<list name=" USRDEF_L<xxx>_D " dimcol=" USRDEF_L<XXX>_ID"/>
</usrdimensionTables>
Save the Configurator.xml file.
PPM provides a flexible project management platform to organize your projects in a way that suits your business and operations. However, to obtain meaningful analytical reports on your projects, Oracle Product Lifecycle Analytics (OPLA) recommends that you organize your projects according to structured templates. These templates are an outcome of proven best practices in project management. For information on these best practices, see the Oracle Product Lifecycle Analytics (Oracle PLA) User Guide. The comprehensive out-of-the-box reports in Oracle Product Lifecycle Analytics (OPLA) are based on these best-practice templates.
In Agile PLM-PPM, Activity and Gate are the two Classes in PPM. You can configure the subdivisions in your project as sub classes of the Activity or Gate Classes. These user-configured sub classes need to be mapped into one of the following domains, so they adhere to the best practice templates:
Portfolio
Program
Phase
Decision Gate
Oracle Product Lifecycle Analytics (OPLA) uses domain values to determine Portfolio, Program, Project, Phase, Tasks, and Decision Gates to report and analyze against the Subject Areas.
Projects and Tasks are identified using the Phase domain value. An activity that is one level above a Phase is considered a Project, and activities that are one or more levels below a Phase are considered Tasks. Decision gates for a project are identified using the Decision Gate domain values.
A root Project in PLM can be identified as a Project in OPLA only if you configure domain values. If you do not configure domain values, the ETL run does not populate the Phase-Gate Fact table and you receive a warning notification on email.
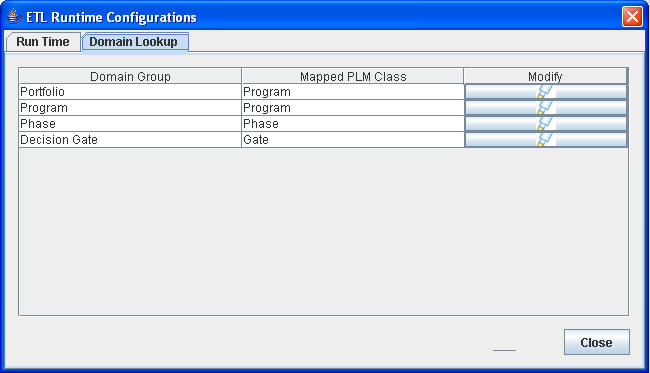
The ETL Runtime Configuration window enables you to:
Configure the Domain values for all the sub classes using Domain Lookup tab
Set the ETL properties at run time using the Run Time tab
To configure the Domain values:
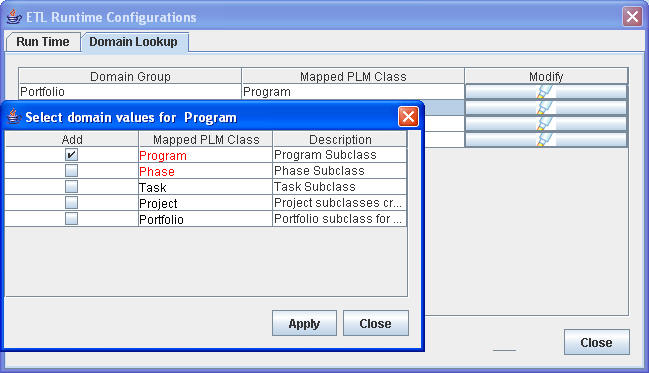
Click Options > ETL Configurations. The ETL Run Time Configuration Window appears - as shown below.
In the Domain Lookup tab, the Domain Group column lists all the available domain groups. The Mapped PLM Class column displays the PLM sub classes mapped to the domain groups.
Click the Add icon on a domain group row. This is the domain group for which you want to configure a corresponding PLM subclass. For example, Program. The Select Domain values for Program popup window is displayed.
The sub classes displayed in the Select Program Domain Values popup window are specific to the Activity class. This applies to Project, Portfolio, and Phase Domain Groups.
If you \ clicked the Add icon on the Gate Domain Group row in the Domain Lookup tab, only sub classes specific to the Gate class appear in this window.
Select the checkbox in the Add column to choose the PLM subclass. You can select any sub class that belongs to Activity class.
Click Apply.
The selected PLM subclasses are appended into the target domain group and saved into the database. If a subclass is already mapped to another domain, a warning message appears. If you are a 9.2.2.x user, it is recommended that you create separate sub classes for your 'Program' and 'Portfolio', and configure both these subclasses to 'Program' domain. This ensures meaningful analytical reports.
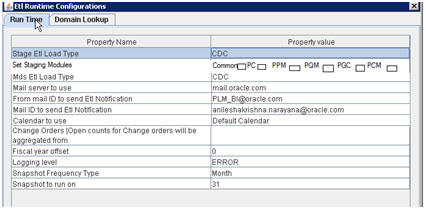
To set the ETL run time properties:
Click Options > ETL Configurations. The ETL Runtime Configuration Window appears.
Click the Run Time tab. The ETL Runtime properties appears as follows:
Calendar to use parameter: Out-of-the-box the default variable is Default Calendar. Choose the Gregorian Calendar option to see the traditional January to December calendar.
Double-click on the Property value column against a Property Name.
Enter or modify the ETL Run time property.
Click Apply.
These properties come into effect only after the ETL has been run.
| Property Name | Description |
|---|---|
| STAGE ETL Load TypeandMDS ETL Load Type | You can set this property to run ETL as any of the following:
1. Full Load (Full) 2. Incremental Load (CDC) 3. Disable (Disable) The very first time you use the Oracle PLA Configurator for new mappings, the ETL run type is always Full Load irrespective of the value of this property. |
| Set Staging Module | Uncheck the check box to disable specific staging modules.
For example, if you only need the PC and PQM staging modules, you can disable PPM, PCM, and PGC. |
| Change Orders | Enter a date from when you want to start analyzing week-level aggregations. |
| Mail server to use | Enter a valid mail server name. Use the server that sends email notifications for the ETL execution status. |
| From mail ID to send ETL Notification | Enter the e-mail ID from which the ETL execution status emails are to be sent. |
| Change Orders | Enter a date from when you want to begin runtime configuration analysis. |
| Mail ID to send ETL Notification | Enter the e-mail IDs of the users who need to receive emails of the ETL execution status. |
| Calendar to use | If you are a Time Utility Member choose Fiscal Calendar as your default calendar. You can change this parameter manually if you want to use Default Calendar. |
| Fiscal Calendar Start Date | Enter the start date of the Fiscal year. This setting allows you to perform analysis of Business Intelligence data based on your organization's fiscal or calendar year.
The date must start with the 1st day of the month. |
| Fiscal year offset | This parameter specifies the offset for the fiscal calendar year with reference to the Default Calendar year.
Values are: 0 - The dates and year for the Fiscal Calendar match the dates and year of the Default Calendar. 1 - The dates and year for the Fiscal Calendar is one year ahead of the current calendar year. -1 - The dates and year for the Fiscal Calendar is one year behind the current calendar year. For example, if your fiscal calendar year for 2011 starts on April 1, 2010, then for the Fiscal year offset value choose 1. |
| Logging level | This parameter indicates the debugging level required to log the run time ETL messages into the VLOG table.
Options are: ERROR WARNING INFO DEBUG ALL |
| Snapshot Frequency Type | Based on the project summary snapshot, this setting is used to perform analysis of BI data.
Options are: Month - Snapshot fact table populated monthly. Week - Snapshot fact table populated weekly No Snapshot - Snapshot fact table never populated. |
| Snapshot to run on | Based on the project summary snapshot, this setting is used to perform analysis of BI data. You select which day of the week you want to run the ETL to take a snapshot of the project summary table.
Options are: SUNDAY MONDAY TUESDAY WEDNESDAY THURSDAY FRIDAY SATURDAY If you have choose Month as your Snapshot Frequency Type, and the day of the week you choose for the Snapshot to run on field does not occur in that month, then the snapshot will run on the last day of the month. |
The OPLA Configurator is a standalone executable provided with the OPLA installation software. When you install Oracle Product Lifecycle Analytics, the executable is automatically downloaded to the bin folder (within the OPLA installation directory) on your computer. All dependent files are downloaded to the lib folder. Configuration files are downloaded into the config folder, while the configuration logs are stored in the log folder.
The OPLA Configurator uses database authentication to connect to the Staging Schema and MDS databases. No additional database privileges are required.
Connection information is maintained in the property file -<install dir>/config/DataMartConfig.properties.
The password used for the connection is encrypted as per the prescribed Oracle Agile algorithm.
To change the password:
Run the DMEncoder.bat file available at the path <install directory>\bin and enter the password string for ODM / OPLA MDS database users.
Copy the generated strings for ODM_USER_PASSWORD and MDS_USER_PASSWORD respectively.
Open the <install directory>\config\DataMartConfig.properties file where the password is initialized for the MDS database schema user.
Replace the copied strings as values for ODM_USER_PASSWORD and MDS_USER_PASSWORD respectively.
Save changes and close the file.
To run the Oracle Product Lifecycle Analytics Configurator, follow these steps:
In the OPLA installation folder, navigate to the bin folder.
Double-click the Configurator.bat file. (On Solaris/Linux, run Configurator.sh). The Oracle Product Lifecycle Analytics Configurator interface is displayed.
From the Options menu in the Oracle Product Lifecycle Analytics Configurator, select ETL Configurations. This opens the ETL Runtime Configurations window.
In the ETL Runtime Configurations window, select the Run Time tab.
From the Property Name column, select the MDS ETL Load Type row. From the adjacent Property value column (and the MDS ETL Load Type row) select the Disable option.
From the Property Name column, select the STAGE ETL Load Type row. From the adjacent Property value column (and the STAGE ETL Load Type row) select the Full or CDC option.
In the ETL Runtime Configurations window, first select Apply, and then Close.
Click OK, in the ETL Parameters Updated message box.
The next step is to execute the ETL from the Oracle Data Integrator (ODI).
To load data into the MDS from the Agile PLM source database, you must carry out a data integration using the Operator feature in Oracle Data Integrator.For more information on how to install and use the Oracle Data Integrator (ODI), see the ODI documentation in the Oracle Technology Network (http://www.oracle.com/technology/documentation/agile.html).
To execute the ETL using the Operator feature in ODI, and run the staging schema, follow these steps:
Go to Start > Programs > Oracle > Oracle Data Integrator > ODI Studio.
Click the Connect to Repository... icon
The Oracle Data Integrator Login window appears.
Select your Login Name, and enter your User name and Password.
Click OK.
Select the Operator tab, and navigate to Load Plans and Scenarios section.
Right-click the ANALYTICS_ETL Version 001 component for Agile PLM or the AGILEP4P_ETL_LOAD component for Agile PLM for Process and select Execute. The Execution window appears.
In the Execution dialog box, select the following:
a. MDS for the Context attribute.
b. Local (No Agent) for the Agent attribute.
c. 5 for the Log Level attribute.
d. Click OK. The Information window stating the message Sessionstarted appears.
Click OK. The ETL process begins.
After ETL is executed, ODI sends a success or failure notification to the email users configured during installation. Email user configurations can be changed in the ETL_PARAMETER table in the MDS schema. The ETL_PARAMETER table is in the ODM schema if ODM and MDS were installed in separate schemas. These parameters can also be changed using the Configurator for Agile PLM deployments only.
To view the status of the ETL process:
Log in to the ODI.
Select the Operator tab, and navigate to the Session List section.
To view all running tasks, select All Executions or Status from the left frame.
Alternatively:
To check overall progress, go to the Hierarchical Sessions section and select Status or All Executions.
You can increase the Operator Display Limit to 1000 (default value is 100) to view the status of all the tasks that are under execution in ODI.
To increase the Operator Display Limit, in ODI Operator, follow these steps:
Go to ODI > User Parameters > Operator Display Limit.
Set the value for Operator display limit to 1000.
Important You need a thorough understanding of the Agile PLM classes and the attribute definitions in the source environment, in order to perform an accurate mapping of PLM attributes. You must also be a power user of the Agile Java Client.
Before you begin:
Make sure you have a complete working environment that includes the following layers:
Agile PLM Java Client
Agile PLM MDS schema and ETL components
To verify the mapping, keep any database SQL editor open.
Understand the color coding used in the OPLA Configurator:
Blue text: Indicates attributes that have already been mapped.
Red text: Indicates attributes that are disabled in PLM.
Keep a copy of the Oracle Product Lifecycle Analytics Operational Schema Data Reference Manual handy to verify target tables used by the BI Reports.
You must have completed a staging FULL load ETL.
Attributes are located and then mapped. It is done using the Agile Java Client Admin module and the OPLA Configurator.
In the Agile Java Client Admin module:
Open the Setting > Data Setting > Classes node.
Open the class or subclass tab from which you wish to source attributes for the MDS target tables.
Under User Interface Tabs, select an attribute group, for example, Page Two.
View the attributes and note them down.
In the OPLA Configurator:
In the left pane, expand the subject area category node, and click the subject area corresponding to the Agile PLM class. For example, under PQM, click NCR.
In the right pane, select either the Base Fact or the Affected Items tab.
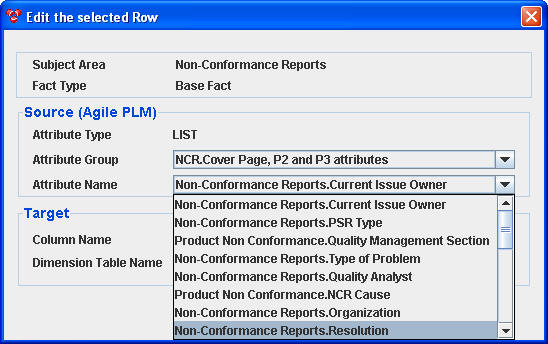
Select the Target Column row for the attribute type you wish to map, and click . The Edit the selected Row dialog box opens. Alternatively, you can right-click on a target cell.
4. In the Edit the selected Row dialog box, select options from the drop-down lists to map the field or column to PLM attributes as per the details you noted down earlier.
In the Attribute Group list, select the PLM attribute group from which you wish to source attributes. The list of attribute groups is different for Base Fact and Affected Items. For details, see Supported Mappings.
In the Attribute Name list, select the attribute name that you want to map. The list shows the options that you have enabled in Java Client. If a list ID has already been mapped to a target dimension table, only those attributes associated with the same list ID are displayed for selection.
If you choose a user-defined list, you are now provided the option to map it to a target dimension table. This is not applicable to user-defined list attributes of PPM.
The Attribute Name list displays only the attribute names that correspond to the Attribute Group you select.
From the Dimension Table Name list, select a target dimension table for the mapping. You can map the same list /multi-list attribute to any number of target dimension table names, but a list ID can be associated with only one target dimension table. You cannot map a cascade list to any user-defined list.
Click OK.
Click Save.
|
Note: If you are a 9.2.2.7 user, you need to configure the multi-list attribute in PPM_ACTIVITY_PLM_REFERENCE table, for Program or Portfolio analysis. This multi-list attribute is available in PPM > Activity > Activity Fact Tab. |
Click Validate, to validate your attribute mappings.
You will see an Errors and Warnings dialog box if you have any errors or warnings, or if any of the following conditions occur:
Column already used for mapping - In MDS an Agile PLM attribute is mapped to more than one target column.
Attribute disabled in PLM after configuration - In Agile PLM, a previously mapped Agile PLM attribute is now disabled.
List modified in PLM after configuration - An Agile PLM attribute previously configured to a conforming dimension has been modified in Agile PLM to use a non-conforming source list.
If you get any of these errors, you must change the mapping for the attribute identified in the error message.
Errors are also logged in the Configurator.log file. The Configurator.log file is located in <install directory>/logs/.
You can also save the errors to a .csv file, click Save to File.
After you finish mapping, run the MDS ETL (full load). This ensures that the data loads from the source tables in Agile PLM Data Mart to MDS as per your mapping.
Data loads into the newly configured tables after the MDS ETL runs.
After the ETL run, verify the records in the target table by using any database SQL editor to connect to the MDS database.
To execute the MDS ETL, you must first open the OPLA Configurator, select the pertinent property names and their respective values. After this is done, you need to run the required attribute in Oracle Data Integrator Operator feature.
To run the MDS ETL, follow these steps:
In the OPLA installation folder, navigate to the bin folder.
Double-click the Configurator.bat file. (On Solaris/Linux, run Configurator.sh). The Oracle Product Lifecycle Analytics Configurator interface is displayed.
From the Options menu in the Oracle Product Lifecycle Analytics Configurator, select ETL Configurations. This opens the ETL Runtime Configurations window.
In the ETL Runtime Configurations window, select the Run Time tab.
a. From the Property Name column, select the STAGE ETL Load Type row. Click the adjacent Property value column, select Disable.
b. From the Property Name column, select the MDS ETL Load Type row. Click the adjacent Property value column, select CDC.
c. In the ETL Runtime Configurations window, first select Apply, and then Close.
Click OK, in the ETL Parameters Updated message box.
Go to Start > Programs > Oracle > Oracle Data Integrator > ODI Studio.
Launch the ODI Studio, and log in using authentication details for the ODI session created during installation.
Select the Operator tab, and navigate to Load Plans and Scenarios section.
Right-click the ANALYTICS_ETL Version 001 component for Agile PLM or the AGILEP4P_ETL_LOAD component for Agile PLM for Process and select Execute. The Execution window appears.
In the Execution dialog box, select the following:
MDS for the Context attribute.
Local (No Agent) for the Agent attribute.
5 for the Log Level attribute.
Click OK. The Information window stating that the message Session started appears.
Click OK. The ETL process begins.
After you complete the above steps the data populates into the MDS, and you can now start analysis in OBIEE. If you are a user of custom user defined dimension and measures you must first complete RPD customizations.
After ETL is executed, ODI sends a success or failure notification to the email users configured during installation. Email user configurations can be changed in the ETL_PARAMETER table in the MDS schema. The ETL_PARAMETER table is in the ODM schema if ODM and MDS were installed in separate schemas. These parameters can also be changed using the Configurator for Agile PLM deployments only.