You can open a base record BP by one of the the following methods:
- Opening the commitment funding sheet and then clicking the BP link (<Base Record Name BP>) in title.
- Clicking on, or hovering over, a row (base record) to activate the gear menu and clicking Open Base Record.
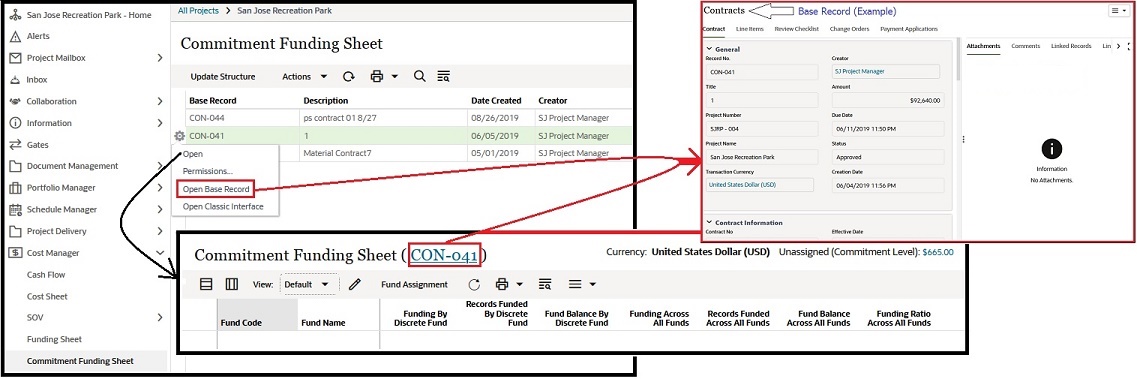
The following explains the elements of a base record BP.
Title and Menu Options
The top area displays the name of the base record BP (title), and on the right corner, it has a Menu Options (three horizontal lines with a down arrow) that enables you to access or conduct the following:
- Funding
Opens the Commitment Funding Sheet (<Base Record Name BP>) window.
- Funding in Classic View
Opens the Commitment Funding Sheet window (Classic View).
- Email as Attachment
Opens an email message window that has a PDF verison of the Base Record attached, and the From and Subject fields auto-populated.
- Print
Enables you to print the Base Record using one of the following formats: HTML, PDF, or Custom (using a Custom Print Template).
- Review
Enables you to review the Base Record by way of a file viewer or AutoVue.
- Help
Enables you to access the Base Record help (PDF version) or the User Productivity Kit.
- Close
To close the Base Record window and go back to the Commitment Funding Sheet (<Base Record Name BP>) window.
Tabs and Properties Tabs
The body of the window is divided into two panes, the left hand and the right hand. The left hand pane has the following tabs and each pane corresponds to a tab on the right hand pane, as explained in the following table:
Left-hand pane | Right-hand pane |
|---|---|
<Base Commit Record Name BP> tab Information about the Base Record. For example, if the Base Record is Contracts, the Contacts tab will have the following blocks providing details:
| Attachments tab Lists any files that are attached to this Base Record. Comments tab To post or read existing comments, in text format. It also enables you to upload files by accessing either a location on your computer (Browse), or by accessing the Document Manager and selecting a file from the Project Documents. If you select the Browse option, you have the option to include reference files and:
Linked Records tab To access any records that are linked to this Base Record. Linked Mail tab To access any emails that are linked to this Base Record. Workflow Progress tab This tab enables you to:
Audit Log tab To see a record of all of the actions that have been taken on the Base Record. The following are captured in the Audit Log window:
Reference Records tab Lists all of the records that have been referenced in this Base Record. You can click on the records listed to see the details. From the top right-hand, click the View Graphic option to open and see the Reference Records - Graphic which shows the relation between the record and its references. |
Left-hand pane | Right-hand pane |
|---|---|
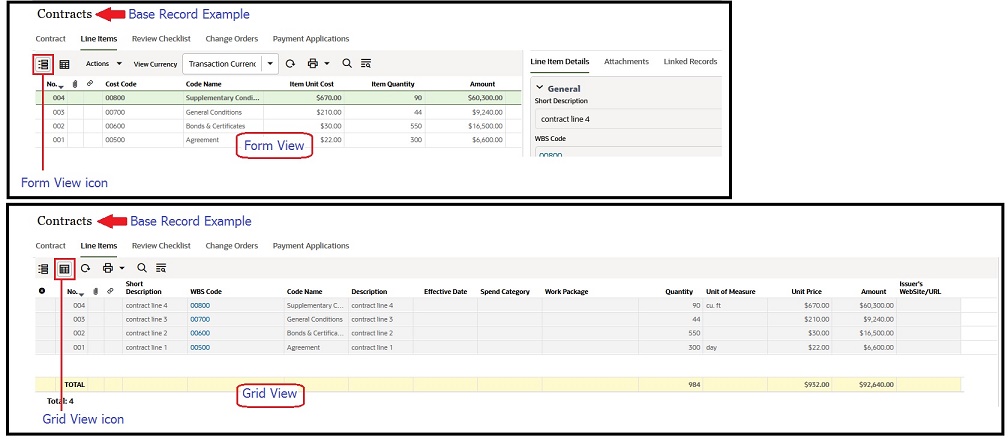
Line Items tab
| Line Item Details tab
|
Left-hand pane | Right-hand pane |
|---|---|
Review Checklist tab
| None |
Left-hand pane | Right-hand pane |
|---|---|
<Change Commit Record Name BP> tab Create To open the Create New <Change Commit record name> (for example, Change Orders) window and add:
And from the Menu Options:
Next to the Menu Options, you can select to Save your changes to revisit your work later, or to Send your changes to the next step if your changes are completed. Refresh Search Find on Page | None |
Left-hand pane | Right-hand pane |
|---|---|
Payment Applications tab Create To open the Create New Payment Applications window and: In the Payment Applications tab add:
In the Line Items tab, for each WBS Code and in case the information is missing, you can enter values in the Short Description, Description, Work Package, Material Price, and other cells that are not grayed. You can right-click on any column heading and sort the cells, remove columns, or add columns. From the top right corner, click Save to save your changes, or click Error Check to see which required cells you have missed to enter a value in, or click Cancel to discard your changes. And from the Menu Options:
Next to the Menu Options, you can select to Save your changes to revisit your work later, or to Send your changes to the next step if your changes are completed. Refresh Search Find on Page | None |