In order to verify the existing logic, to enable and disable the Mapping Paths at a high level and at each Mapping ID Level, to publish the reports, to enable and disable the published reports, to re-execute and overwrite the published reports there are two new features introduced such as Reports Mapping and Reports Publish in the OFS REG REP APME Application.
Currently, the Regulatory Reporting Logic is built inside the Configuration Package and therefore, any additional configuration is not supported in the REG REP APME Application. To enable this additional configuration, the Reporting Logic is now moved from the existing Configuration Package to OFSAA. The logic for computing the MDRM Values are located in OFSAA, and the Configuration Package performs as a Key Value Pair for each MDRM. Adjustments will still be distinct, and the same values will be supplied as adjustments into the Configuration Package.
· All the users are required to be mapped to the following user groups and user roles:
Table 45: User Group
Group Code |
Group Name |
|---|---|
REGADMINGRP |
Regulatory Reporting Admin Group |
REGMAPPERGRP |
Regulatory Reporting Mapper Group |
This section provides the procedures to view, enable and disable the mappings at a high level and at each mapping ID level and to add a configuration in the OFS REG REP APME Application.
1. This section provides the procedure to view the Seeded Data Mapping Details.
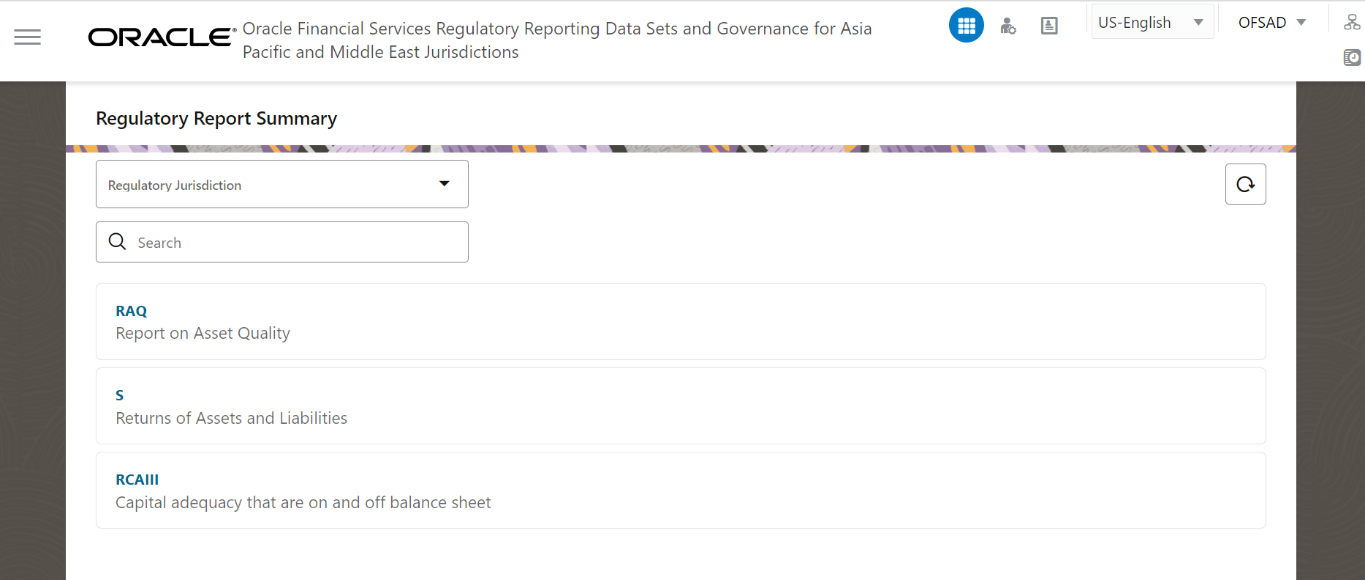
2. After logging into the OFSAAI Applications Page, navigate to Oracle Financial Services Regulatory Reporting Data Sets and Governance for Asia Pacific and Middle East Jurisdictions, select Regulatory Reports, then select Report Mappings.
Figure 263: Regulatory Reporting Summary Page
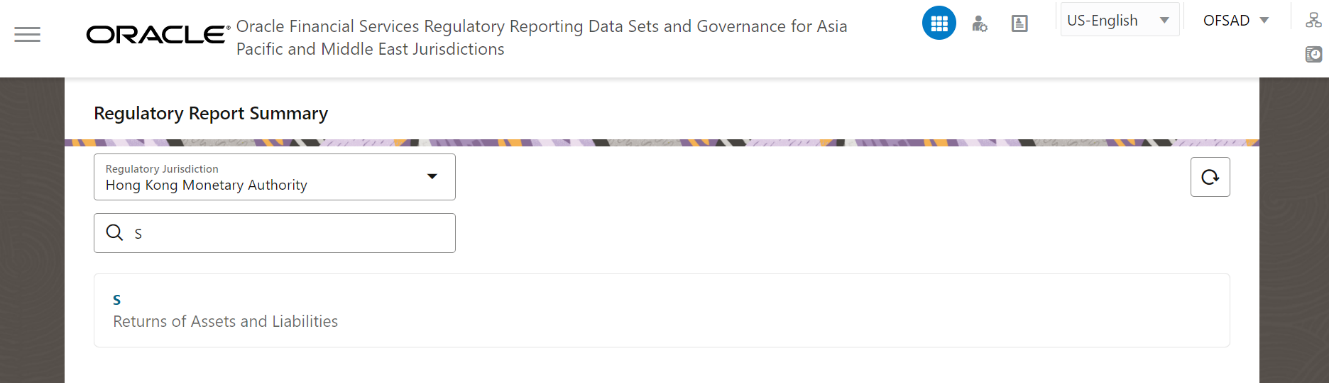
3. Select the Regulatory Jurisdiction from the dropdown list and in the Search Pane, enter the report that you wish to add the additional configuration.
Figure 264: Regulatory Report Summary Result Page
4. Click on the S Report link and the list of schedules associated with the report is displayed.
Figure 265: Report Schedule Summary Page

5. Click on any one of the schedules and the Reporting Line-Item Summary Page is displayed.
Figure 266: Schedule Based Reporting Line-Item Summary Page

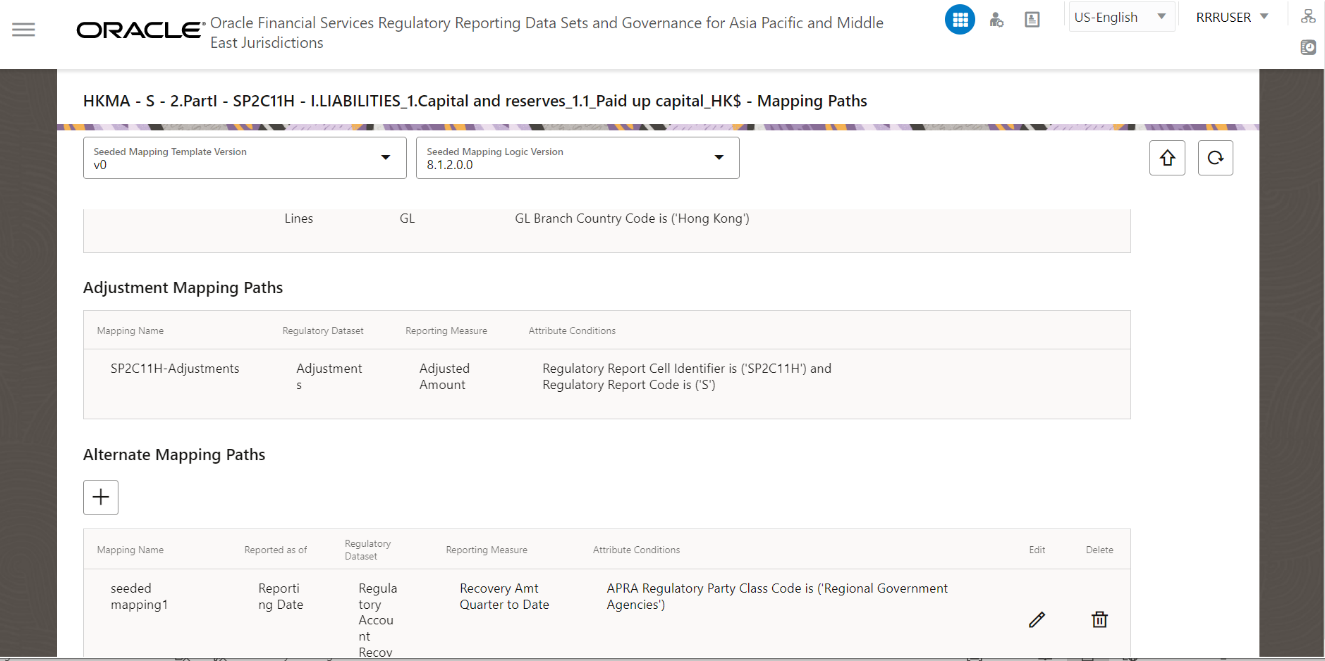
6. Select the line item for which you wish to view the seeding mapping details. Select the Seeded Mapping Template Version and the Seeded Mapping Logic Version from the dropdown list for this specific line item to view its Seeded Mapping Path Details.
Figure 267: Seeded Mapping Details Page

The Seeded Mapping details consists of the Reporting Logic for mapping such as Measures, and Attributes and Values seeded by the application. Each line item can contain one or many mapping IDs associated with it. You can either enable and disable the entire Seeded Mapping of a line-item or enable and disable specific mapping of a line-item in the application.
7. Double click on the Attribute Conditions of the existing Seeded Mapping to view the Mapping Path.
Figure 268: Mapping Data Path for a Line Item Window

8. Click Ok to close this window.
1. This section provides the procedure to enable or disable the Seeded Data Mapping Details.
2. In the Seeded Data Mapping Details Page, you can enable or disable the Seeded Mapping Details.
Figure 269: Seeded Mapping Details Page
3. You can disable the Seeding Mapping Path option to disable all the line items under this specific Seeded Mapping.
Figure 270: Disabled Seeding Mapping Details Page

Or
4. You can disable the Seeding Mapping of a specific Mapping ID option.
Figure 271: Disable seeded Mapping of a Specific Mapping ID Page

5. You can enable the disabled Seeding Mapping Details of a specific line item or a Specific Mapping ID in the application.
1. This section provides the procedure to add the Seeded Data Mapping Details.
2. After logging into the OFSAAI Applications Page, navigate to Oracle Financial Services Regulatory Reporting Data Sets and Governance for Asia Pacific and Middle East Jurisdictions, select Regulatory Reports, then select Report Mappings.
Figure 272: Regulatory Reporting Summary Page
3. Select the Regulatory Jurisdiction from the dropdown list and in the Search Pane, enter the report that you wish to add the additional configuration.
Figure 273: Regulatory Report Summary Result Page
4. Click on the S Report link and the list of schedules associated with the report is displayed.
Figure 274: Report Schedule Summary Page
5. Click on any one of the schedules and the Reporting Line-Item Summary Page is displayed.
Figure 275: Schedule Based Reporting Line-Item Summary Page
6. Select the line item for which you wish to view the seeding mapping details. Select the Seeded Mapping Template Version and the Seeded Mapping Logic Version from the dropdown list for this specific line item to view its Seeded Mapping Path Details.
Figure 276: Seeded Mapping Details Page
7. The seeded mapping details consists of the reporting logic for map
8. Click the Add icon  to add an alternative mapping path for an MDRM. The Alternative Mapping Path Page is displayed.
Figure 277: Alternative Mapping Details Addition Page

9. Enter information in the following fields.
Table 46: Alternative Mapping Details Addition
Field Name |
Description or Instruction |
|---|---|
Mapping Name |
Enter the name of the new mapping configuration. |
Mapping Description |
Enter the description for the new mapping configuration. |
Regulatory Dataset |
Select the appropriate dataset from the dropdown list that will be used for Regulatory Reporting. |
Measure |
Select the appropriate measure from the dropdown list. The list of measure available is based on the Regulatory Dataset Selection. |
Reporting as of |
Select the appropriate reporting option from the available list: · Reporting Date- Select this option for a specific reporting date. · Previous End of Month- Select this option to report based on previous end of the month. · Previous end of Quarter- Select this option to report based on previous end of the quarter. · Previous end of Year- Select this option to report based on previous end of the year. |
Aggregation Over Time |
Select the appropriate aggregation option from the available list: · Month to Date- Select this option to calculate the aggregation from a month to a specific date. · Quarter to Date- Select this option to calculate the aggregation from a Quarter to a specific date. · Year to Date- Select this option to calculate the aggregation from a Year to a specific date. · Inception to Date- Select this option to calculate the aggregation from an inception to a specific date. |
10. Click the Attribute Add icon to add the attribute conditions for the MDRM. The Attribute Addition Window is displayed.
Figure 278: Attribute Condition Add Window

11. For more information on the User Interface Metadata, see MOS.
12. Click the Edit icon  to add the attribute conditions such as Attribute Name, Operator and Value from the dropdown list.
Figure 279: Attribute Condition Details page

13. Click the Save icon  to save the added attribute details.
14. Click the Save button  to save the added Alternative Mapping Path in the application. A Regulatory Mapping added Confirmation Window is displayed.
Figure 280: Regulatory Mapping Added Confirmation Window

15. Click the Ok button  and the newly added Alternative Mapping Path Save Page is displayed.
Figure 281: Added Mapping Save Page
Before retrieving the report, this feature allows you to verify the reporting values after considering Seeded Mappings and Alternate Mappings.
Prerequisites
· Based on the selected jurisdiction for Report Publish, the corresponding jurisdiction batch must be executed:
§ REG_FISCAL_PERIODS_HKMA
§ REG_FISCAL_PERIODS_RBI
To publish the reports, follow these steps:
1. After logging into the OFSAAI Applications Page, navigate to Oracle Financial Services Regulatory Reporting Data Sets and Governance for Asia Pacific and Middle East Jurisdictions, select Regulatory Reports, then select Report Publish.
Figure 282: Report Publish Summary Page

2. Click the Add icon to publish a report. The Publish Reports Window is displayed.
Figure 283: Publish Reports Window

3. Enter information in the following fields.
Table 47: Reports Publish
Field Name |
Description or Instruction |
|---|---|
Report Publish Name |
Enter the business name of the publish. |
Reporting Date |
Select the Maximum Run Execution Date using the calendar. By default, the Maximum Run Execution Date is displayed for a group of runs executed in that period. |
Reporting Run |
Select the Reporting Run from the dropdown list. |
Legal Entities |
Select one or many legal entities from the dropdown list. |
Regulatory Jurisdiction |
Select the jurisdiction from the dropdown list. |
Logic Version |
Select the logical version of the seeding mapping of the report. |
Regulatory Reports |
Select the one or more regulatory reports from the dropdown list. |
4. Click the Publish Button to publish the report for the report to retrieve the Fact Table Data. A Confirmation Window is displayed.
Figure 284: Reports Publish Confirmation Window

5. Click the Ok button to view the recently published report details in the Report Publish Execution Summary.
NOTE:
To view the Report Publish data from Agile REPORTER, execute the RESAVE_DE_REG_COMMON batch to resave the Derived Entities.
To re-execute, final publish or view the published reports, follow these steps:
1. After logging into the OFSAAI applications page, navigate to Oracle Financial Services Regulatory Reporting Data Sets and Governance for Asia Pacific and Middle East Jurisdictions, then select Report Publish.
Figure 285: Report Publish Summary Page
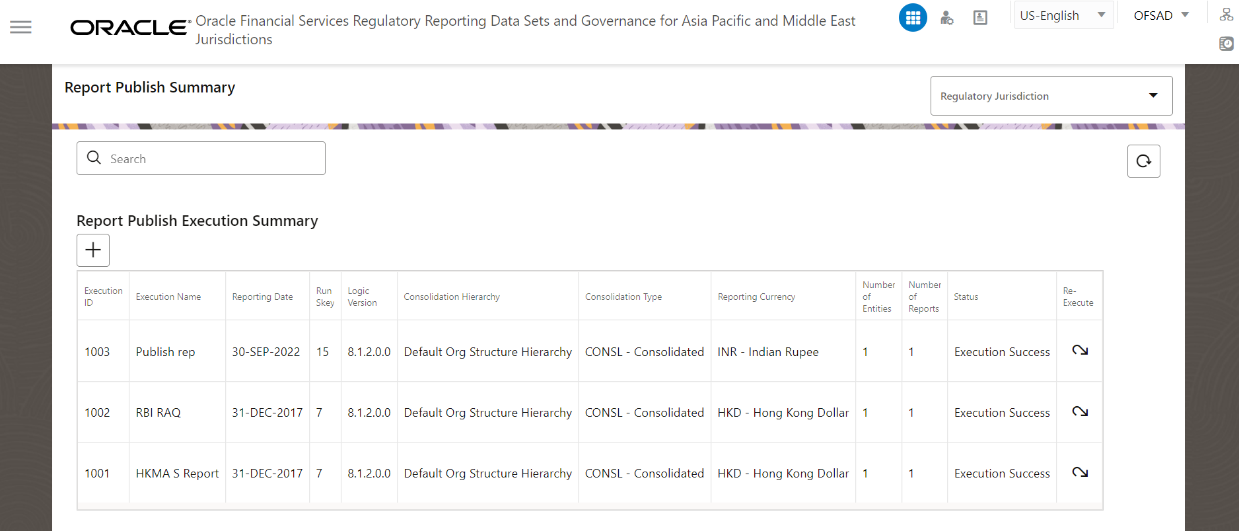
2. Select the Regulatory Jurisdiction from the dropdown list and enter a specific report that you wish to view using the Search Pane. The Report Publish Summary Result Page is displayed.
Figure 286: Report Publish Execution Summary Page

You can Re-execute, Final Publish or View the details of the published report.