Configure the Service Layer Application Server
JVM Settings
- Navigate to Servers>Server Types>WebSphere application servers.
- Select the ServiceLayer application server.
- Expand Java and Process Management.
- Select Process Definition.
- Select Java Virtual Machine.
- In the Classpath text box, enter the location of the Service layer property files.
- Set Initial Heap Size to 512.
- Set Maximum Heap Size to 2048.
- In the Generic JVM Arguments text box, enter the following arguments, replacing the location of each file (highlighted) with the correct location for the configuration.
- Click OK.
- Follow the below steps to disable IBM JAXRS Engine.
- Navigate to Servers -> Server Types -> WebSphere application servers
- Select the ServiceLayer application server
- In the Server Infrastructure area, select Java and Process Management -> Process definition.
- In the Server Infrastructure area, select Process Definition.
- In the Additional Properties area, select Java VirtualMachine.
- In the Additional Properties area, select Custom Properties.
- Select the New box.
- In the Name entry field, type:
- In the Value entry field, type true.
- Select OK.
- Follow the below steps to disable WebSphere Application Server JPA initialization, because JPA initialization is done from ServiceLayer.
- Navigate to Servers -> Server Types -> WebSphere application servers
- Select the ServiceLayer application server
- In the Server Infrastructure area, select Java and Process Management -> Process definition.
- In the Server Infrastructure area, select Process Definition.
- In the Additional Properties area, select Java VirtualMachine.
- In the Additional Properties area, select Custom Properties.
- Select the New box.
- In the Name entry field, type:
- In the Value entry field, type the names of the applications to be excluded from JPA processing. If there are multiple applications, separate each with the ":" character. If you wish to specify all applications, simply type the "*" character.
- Select OK.
- Follow the below steps for JAX-RS 2.0Spec, for accessing the rest services.
Example: /opt/oracle/servicelayer/conf/ or c:\oracle\servicelayer\conf\
Note: Be sure to include the trailing slash (/ or ) character.
Note: You may find it easier to copy the text below to a text editor and make the necessary changes there, then copy and paste it into the JVM Arguments text box.
-Duser.language=en -Duser.region=US -Djava.net.preferIPv4Stack=true -Djava.net.preferPv6Addresses=false -javaagent:/opt/oracle/servicelayer/libs/spring-instrument-5.2.9.RELEASE.jar -Dtangosol.coherence.override=/opt/oracle/servicelayer/conf/service-coherence-config.xml -Dtangosol.coherence.cacheconfig=/opt/oracle/servicelayer/conf/-service-coherence-cache-config.xml -Dtangosol.coherence.mode=prod -Djava.util.logging.config.file=/opt/oracle/servicelayer/conf/logging.properties Windows Machine -Duser.language=en -Duser.region=US -Djava.net.preferIPv4Stack=true -Djava.net.preferPv6Addresses=false -javaagent:C:\servicelayer\libs\spring-instrument-5.0.7.RELEASE.jar -Dtangosol.coherence.override=C:\servicelayer\conf\service-coherence-config.xml -Dtangosol.coherence.cacheconfig=C:\servicelayer\conf\service-coherence-cache-config.xml -Dtangosol.coherence.mode=prod -Djava.util.logging.config.file=C:\servicelayer\conf\logging.properties |
com.ibm.websphere.jaxrs.server.DisableIBMJAXRSEngine
com.ibm.websphere.webservices.UseWSFEP61ScanPolicy
com.ibm.websphere.persistence.ApplicationsExcludedFromJpaProcessing
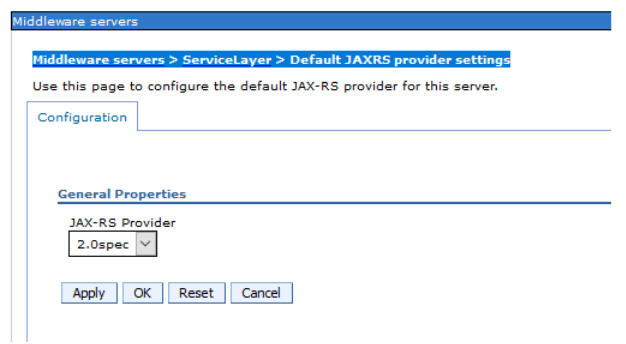
- Navigate to Servers>>Server Types>> Websphere Application Server and select the required Application Server. Ex: Middleware servers > ServiceLayer > Default JAXRS provider settings
- Select Configuration tab
- Under Container Services, select Default JAXRS provider settings.
- Change the JAX-RS Provider type to 2.0spec and click OK.
Configure the Listening Port
- Select Servers>Server Types>WebSphere application servers.
- Select the ServiceLayer server.
- In the Communications section, select Ports.
- Note the port listed for WC_defaulthost.
- If the port number needs to be changed, select the WC_defaulthost port.
- Modify the Port text box as needed.
- Click OK.
Configure the Virtual Host
- Select Environment > Virtual Hosts.
- Click default_host.
- Click Host Aliases.
- Click New.
- Enter the port assigned for WC_defaulthost in the previous listening port section.
- Click OK.