3 Deploying Logon Manager with an LDAP Directory
Oracle Enterprise Single Sign-On Logon Manager is a secure and easily deployable single sign-on solution that acts as a middle layer between the user and the target applications. Users need to authenticate only once; Logon Manager automatically detects and handles all subsequent requests for user credentials. For more information on Logon Manager, see the Oracle Enterprise Single Sign-On Suite Technical Overview white paper available from Oracle Support.
3.1 Logon Manager and LDAP Environments
You have the choice to deploy Logon Manager in a directory environment, which enables the delivery of single sign-on capability to any machine on the network through central storage of application credentials, templates, and policies. Users synchronize with the directory to download these items and update their credential stores with new or changed usernames and passwords.
Adding Logon Manager to your existing directory environment provides the following benefits:
-
Logon Manager leverages the existing user accounts, groups, and native directory permissions (ACLs) without the need to manage these items separately or synchronize them with another directory or database.
-
Logon Manager data is automatically protected by your existing backup and disaster recovery plans.
-
No dedicated servers or server-side processes are required; Logon Manager's scalability and performance depend solely on the capacity and robustness of your existing directory infrastructure.
-
Administrators are not burdened with additional administrative tasks or the need to learn new tools or concepts. Delegated administration of Logon Manager is achieved through the native capabilities of the directory.
A directory also enables the organization of Logon Manager templates and policies into a highly visual hierarchy. While you can use a flat model if your environment calls for it, a properly set-up hierarchy can help maintain top directory, Agent, and network performance, as well as simplify Logon Manager administration by permitting more efficient access control.
If you are using an Oracle directory product as your repository, refer to one of the following appendices for additional required configuration steps:
Note:
To deploy Logon Manager with Oracle Identity Manager, you must enable the "Anonymous Bind" option in Oracle Identity Manager; Logon Manager will not bind to Oracle Identity Manager when "Anonymous Bind" is disabled.3.1.1 How Logon Manager Extends Your Directory Schema
Before Logon Manager can store data in your directory, you must extend your directory schema using the Administrative Console. The schema extension consists of adding four object classes and setting the appropriate permissions so that objects of those types can be created, read, modified, and deleted. Existing classes and attributes are not modified in any way.
Note:
Note: Schema extension is a post-installation procedure. For instructions, see Extending the Schema. Oracle highly recommends that you perform a schema health check (as described by Microsoft best practices) before performing the schema extension.
For detailed information on the schema extensions made by Logon Manager, see the following appendices:
3.1.2 How Logon Manager Synchronizes with Your Directory
The Logon Manager Agent uses the LDAP synchronizer plug-in to communicate with your LDAP directory. When properly configured, synchronization occurs whenever one of the following events takes place:
-
The Logon Manager Agent starts.
-
Application credentials are added, modified, or deleted by the end-user.
-
The machine running the Agent acquires an IP address or its existing IP address changes (if Logon Manager is configured to respond to these events).
-
The auto-synchronize interval elapses (if configured).
-
The user initiates synchronization via the Agent's "Refresh" function.
During synchronization, the Logon ManagerAgent traverses the Logon Manager sub-tree and loads the contents of the sub-containers to which the current user has been granted access; it also synchronizes any credentials that have been added, modified, or deleted since the last synchronization.
Note:
Since Logon Manager does not support server autolocation nor use Windows credentials when authenticating to an LDAP directory other than Active Directory or AD LDS (ADAM), end-users will be prompted to authenticate to the directory in addition to authenticating to Windows and Logon Manager. In certain scenarios, it is possible to eliminate this extra prompt. See Selecting and Configuring an Authenticator for more information.3.1.3 Benefits of Load-Balancing a Logon Manager Deployment
When a directory server fails, Logon Manager will attempt to contact the next one on its server list. If no servers on the list can be reached, synchronization becomes unavailable until the problem is remedied. If your environment calls for more than one physical directory server, Oracle highly recommends using a load balancer that will evenly and automatically distribute the requests coming from the network among the servers behind it. If a machine goes offline, the rest can temporarily absorb its workload, providing failover transparency to the end-user and adequate time to bring the faulty machine back online.
WARNING:
Deploying Logon Manager with multiple LDAP servers that use replication for synchronization behind a load balancer is not supported for high availability in an active-active (load balanced) scenario; it is only supported in an active-passive (failover) scenario. For more information, contact Oracle Support.
3.1.4 How Logon Manager Handles and Stores Application Credentials
Logon Manager encrypts application credentials using a unique key generated when the user completes the First-Time Use (FTU) wizard. The credentials remain encrypted at all times, including in the Agent's local cache, the directory, and while in transit over the network. Logon Manager only decrypts credentials (to memory, never to disk) when a configured application requests logon, and wipes the target memory location as soon as the logon request completes. The amount of data Logon Manager stores per enabled application and per user is trivial (measurable in bytes and small kilobytes).
Note:
Oracle highly recommends enabling SSL support so that the credentials sent by the user to the directory during authentication are encrypted. If SSL is not enabled, those credentials will be sent in clear text and can be intercepted by a packet sniffer. For more information, see SSL Support.3.2 Designing the Logon Manager Directory Sub-Tree
Logon Manager gives you the freedom to set up the directory structure to best fit the needs of your organization. Specifically, you have the choice to store your data in a flat model, or create a hierarchy. While a flat model works fine for small deployments, growing and large deployments should utilize a hierarchy from the very beginning. The exact structure of your sub-tree will depend on the following factors:
-
Number of users
-
Number of applications you want Logon Manager to support
-
Robustness of the existing infrastructure
-
Structure of your organization.
3.2.1 Guidelines for Structuring the Logon Manager Sub-Tree
Oracle recommends that you set up your sub-tree as a hierarchy by following the guidelines below:
-
Use OUs to group templates and policies by category, such as department or division, according to the structure of your organization.
-
Control access at the OU level.
-
Disable inheritance and grant no user rights at the Logon Manager root container, unless your environment dictates otherwise.
When set up this way, a hierarchy provides the following benefits:
-
Highly visual and self-documenting tree structure. When you view your sub-tree in a directory browser, the sub-tree structure is self-descriptive and easy to follow.
-
No unwanted inheritance of rights. Users will not natively inherit rights to sub-OUs that you do not want them to access. This eliminates the need to explicitly deny unwanted access rights that are being passed down the tree.
-
Robust network, Agent, and directory performance. Typically, users who download large numbers of templates and policies generate more network traffic and a higher load on the directory than users who only download items relevant to their jobs. Grouping conserves your environment's resources and improves Agent response time.
-
Distributed administrative tasks. Your templates are organized into easily controllable sets, and access rights determine who can manage which templates. You also have the ability to implement rights-based version control of your templates.
-
Low administrative overhead. Controlling access at the template level requires setting permissions for each individual template via the Logon Manager Administrative Console; controlling access at the OU level is achieved via delegated administration using Microsoft and third-party management tools.
The figure below depicts a sample Logon Manager sub-tree whose design reflects the above best practices.
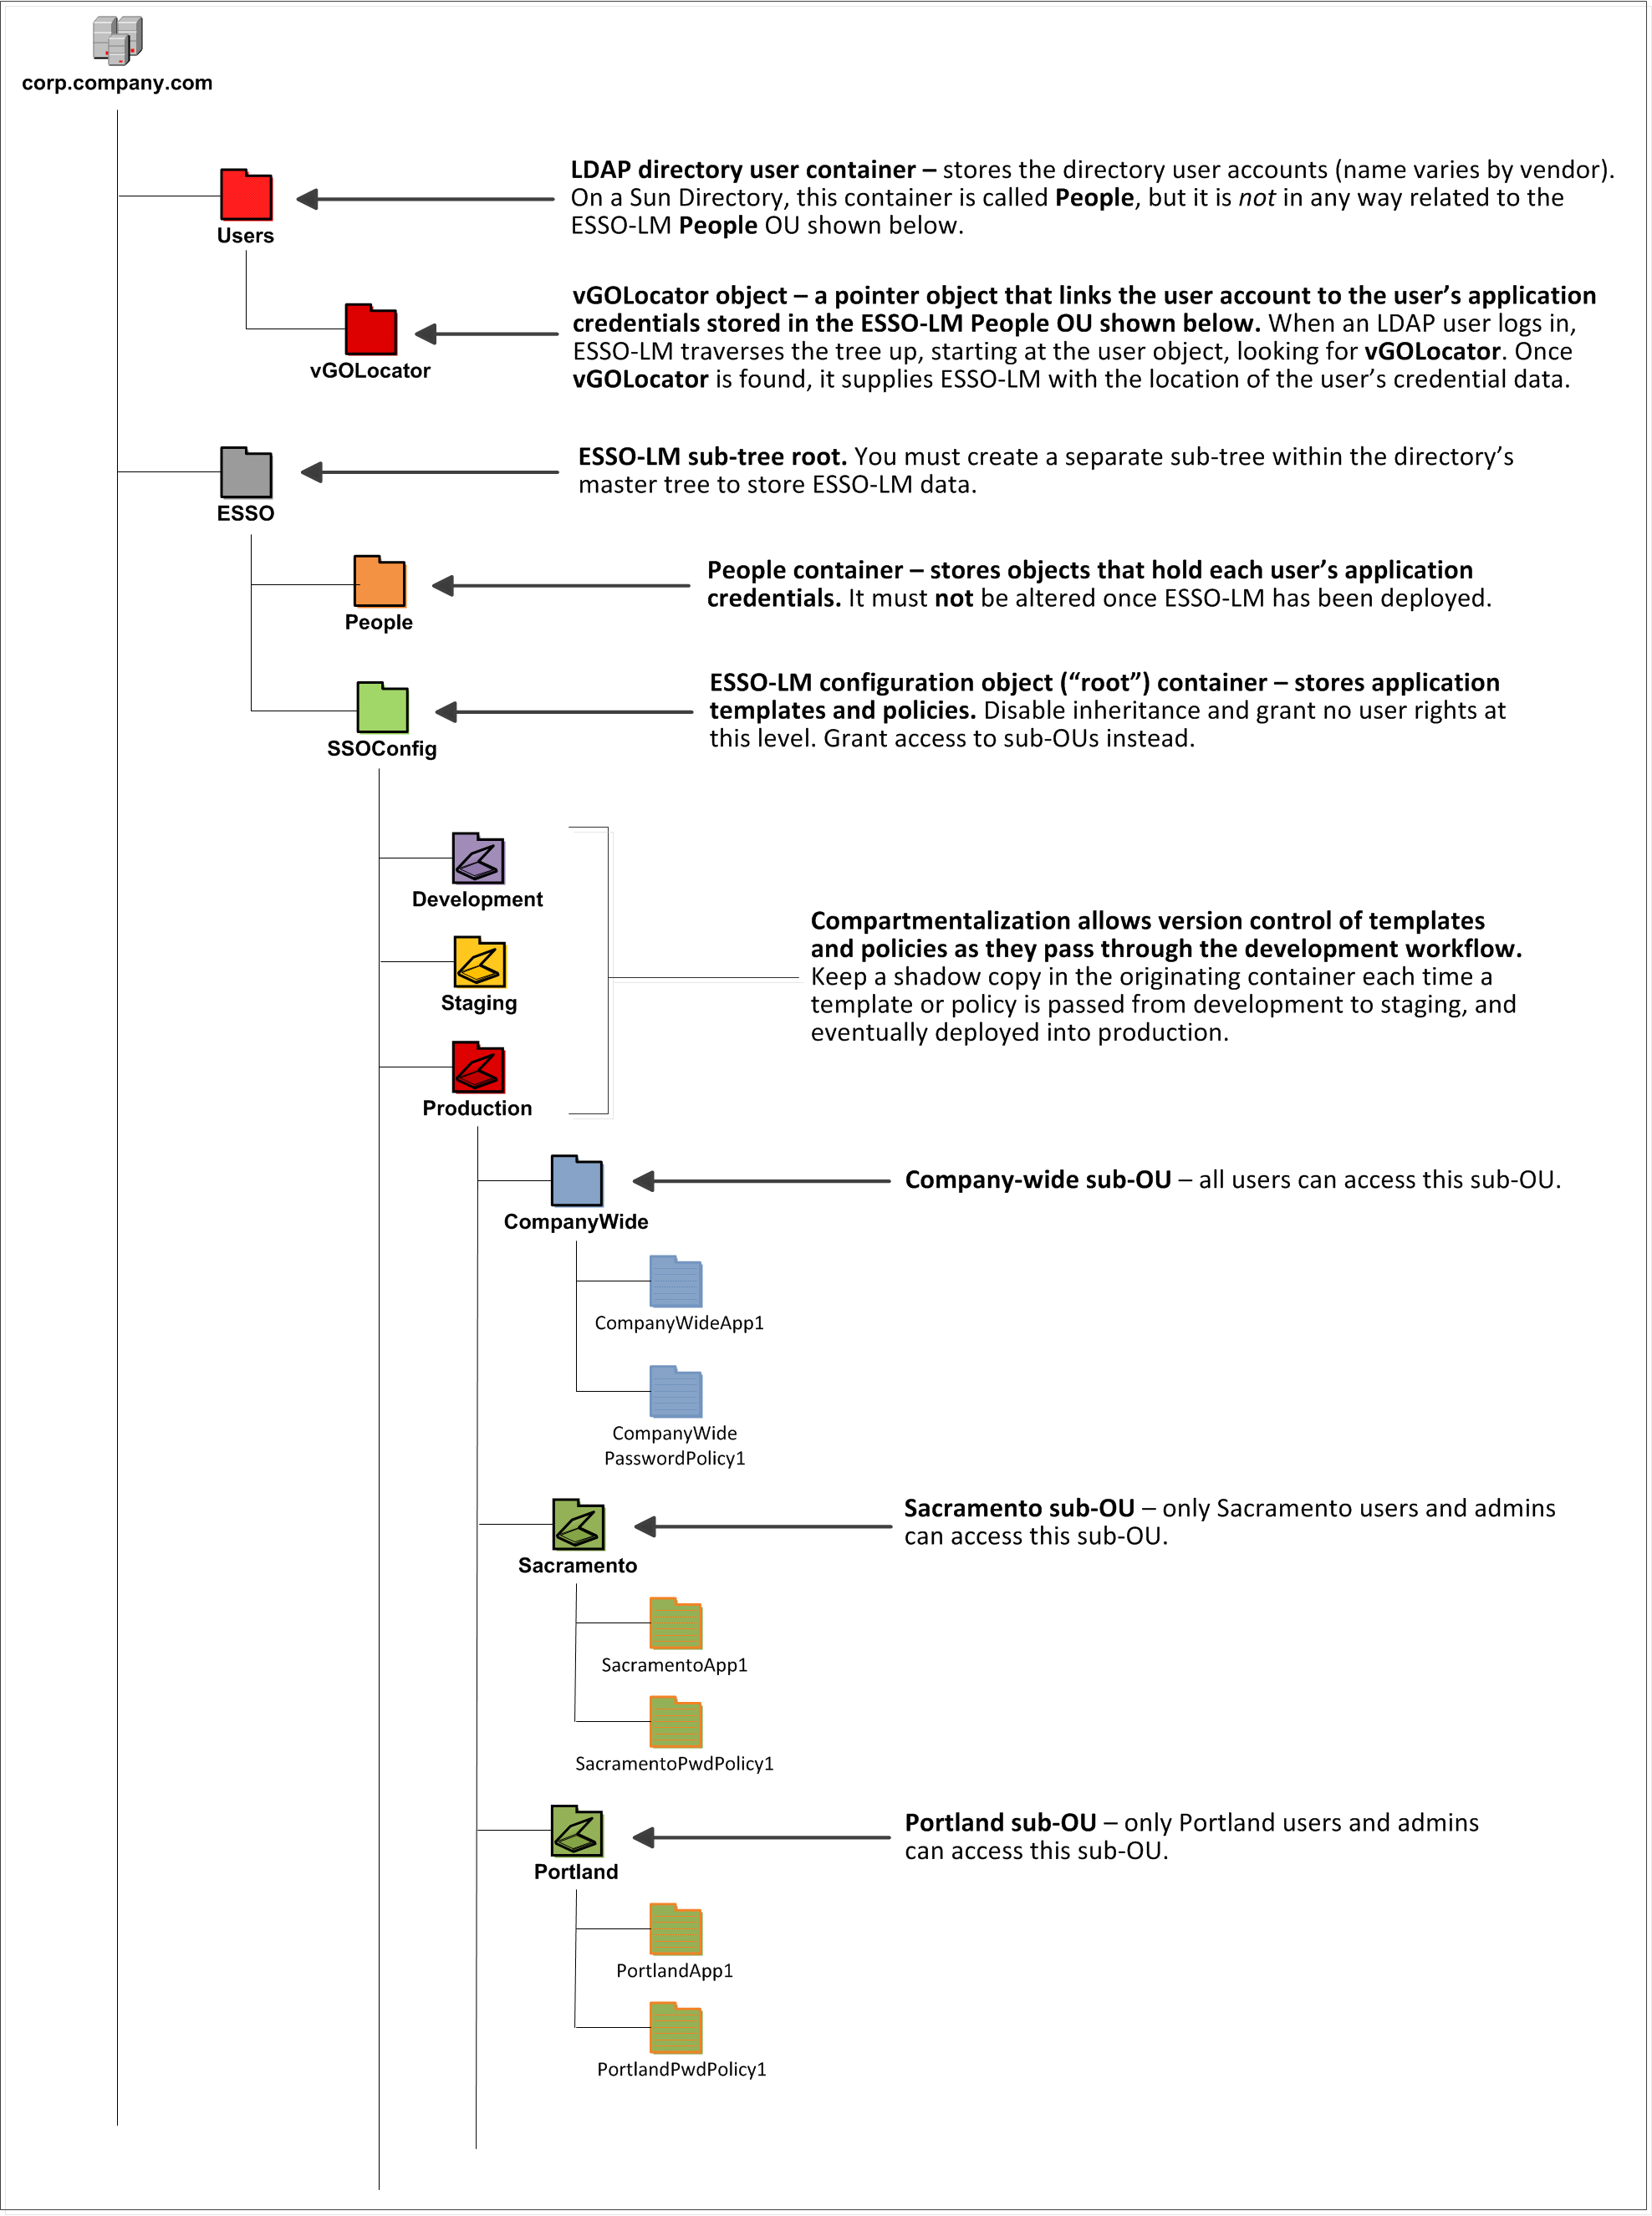
In our sample scenario, users from the Portland division do not need access to applications used by the Sacramento division, and vice versa; therefore, each division's templates and policies live in dedicated sub-OUs under the root and one division cannot access another division's sub-OU. In the end, your environment will dictate the specifics of your implementation.
Note:
Oracle highly recommends that you store templates and policies in individual OUs. To do this, you must Use Configuration Objects.If you are starting out with a flat model, but expect the number of users and provisioned applications to grow, create a sub-container under the root and use it to store your templates and policies as a flat file until you are ready to transition to a hierarchy. Monitor the performance of your environment as you add more users and provision more applications, and transition to a hierarchy sooner rather than later to minimize the required effort. When transitioning to a hierarchy, use the existing container as your new Logon Manager root container and create sub-OUs underneath it.
3.2.2 Special Directory Objects Required by Logon Manager
To successfully synchronize with an LDAP directory, Logon Manager requires that the following directory objects are configured before attempting synchronization:
-
People OU. When deploying Logon Manager with a directory other than Active Directory, application credentials cannot be stored under user objects. Instead, credentials are stored in flat format inside a special OU called People. You must create this OU as described in Creating the People OU.
-
Note:
This OU is not in any way related to the People container used by Sun Directory Server to store LDAP user accounts.Do not place the People OU inside the Logon Manager configuration object container (SSOConfig). Doing so will cause Logon Manager to parse the credentials of every Logon Manager user when loading templates, placing a significant, unnecessary load on the directory.
-
vGOLocator object. This object links an LDAP user account to the user's application credentials stored in the People OU. When the user logs in, Logon Manager traverses the tree up from the user's object until the vGOLocator object is found. The vGOLocator object provides Logon Manager with the path to the People OU.
Note:
Oracle recommends placing this object inside your directory user accounts container, as shown in the diagram on page 13. If necessary, it can also be placed in the root of the directory tree, although this option is not recommended. At the very least, vGOLocator must be placed at the same level as the container that holds your user accounts.
3.2.3 Version Control and Pre-Flight Testing of Templates and Policies
Oracle recommends that you create dedicated sub-OUs for each stage of your workflow: development, staging, and production, as shown in Figure 2. This way you will be able to:
-
Track changes made to templates and policies as they pass through the workflow and enter production by keeping shadow copies each time templates and policies move from one workflow stage to the next.
-
Roll back to a previous version of a template or policy if need arises.
-
Control who can work on which templates and policies at each workflow stage. In particular, you should strictly enforce rules governing who can put a template or a policy into production.
Always test every application template and administrative override in a contained environment before you deploy it to end-users. Testing helps you stage your changes and resolve any potential issues that would be much more costly to resolve were they to occur in production. Testing is particularly critical in large deployments: if you push out a misconfigured template or an incorrect administrative override network-wide, access to mission-critical applications may be lost enterprise-wide.
When setting up a contained test environment, create a dedicated test container to which only members of your development group will have access. Then, point the test Logon Manager Agent(s) at this container and place your templates and administrative overrides in it. Once you confirm that the templates and policies are functioning as intended, move them to the target production container.
If you decide not to keep shadow copies of your templates after you test them, move them from the test container to target production containers as follows:
-
Pull down the template from the directory.
-
Create a local backup of the template.
-
Push the duplicate into the new location within the directory.
-
Delete the template from its original location.
3.2.4 Precautions for Configuring Object Access Control Lists Using the Console
When you modify an object's Access Control List (ACL) using the Console, the connection string (repository host name or IP) used to connect to the repository is treated by the Console as a unique repository identifier and recorded in the object. The Console is thus unable to distinguish between two unique repositories and two methods to connect to the same repository.
Because of this, if you use different connection strings for the same repository, e.g. an IP address and host name, the changes made to an object from one session to the next will be lost. To work around this issue in an LDAP environment, always use the same connection string (IP address or host name) when modifying object ACLs through the Console.
3.2.5 Precautions for Upgrading the Agent and Console
To maintain template and settings compatibility throughout your environment, you should always use a version of the Console matching the oldest version of the Agent still deployed in production. Due to template schema changes between releases, older Agents may exhibit unexpected behavior when supplied a template created or modified by a newer version of the Console. For this reason, if you are upgrading to a newer release of Logon Manager, Oracle highly recommends that you do not upgrade your Console until all deployed Agent installations have been upgraded.
Note:
Even if you do not make any changes to a template, it is still rewritten using the currently installed Console's data schema when you push the template back to the repository.3.3 Global Agent Settings vs. Administrative Overrides
The behavior of the Logon Manager Agent, including its interaction with the directory, is governed by settings configured and deployed to the end-user machine by the Logon Manager administrator using the Logon Manager Administrative Console. The settings fall into one of the following categories:
-
Global Agent settings are the "local policy" for the Agent; they are stored in the Windows registry on the end-user machine and are included in the Logon Manager MSI package to provide the Agent with an initial configuration during deployment. Global Agent settings are stored in HKEY_LOCAL_MACHINE\Software\Passlogix (32-bit systems) or HKEY_LOCAL_MACHINE\Wow6432Node\Software\Passlogix (64-bit systems).
Caution:
Users able to modify the HKLM hive can alter their global Agent settings and thus change the behavior of the Agent from the one originally intended. To ensure that a setting will not be changed by the end-user, deploy it through an administrative override. -
Administrative overrides take precedence over the global Agent settings stored in the Windows registry and constitute the "domain" policy for the Agent. Overrides are downloaded from the central repository by the Agent during synchronization and stored in the Agent's encrypted and tamperproof local cache, which makes them immune to end-user alterations. When role/group security is enabled, administrative overrides can be applied on a per-user or per-group basis; they can also be applied enterprise-wide to enforce configuration consistency for all users.
Note:
Be conservative when planning your administrative overrides. Fewer overrides mean less data to store and transfer, and thus more efficient synchronization with the central repository. Reducing the number of overrides also simplifies troubleshooting by eliminating unknowns, as administrative overrides cannot be viewed on the end-user machine.
Global Agent settings together with administrative overrides constitute the complete configuration policy for the Agent. The rest of this guide describes the recommended optimal configuration and complements the information found in the Enterprise Single Sign-On Suite Administrator's Guide.
WARNING:
Settings such as domain names and user object paths should always be thoroughly tested before deployment and not deployed as administrative overrides unless absolutely necessary. A simple mistake, such as a mistyped domain name, can render end-user workstations unable to synchronize with the directory, in which case you will not be able to propagate a correction through the Console - changes will have to be made to user machines using other tools.
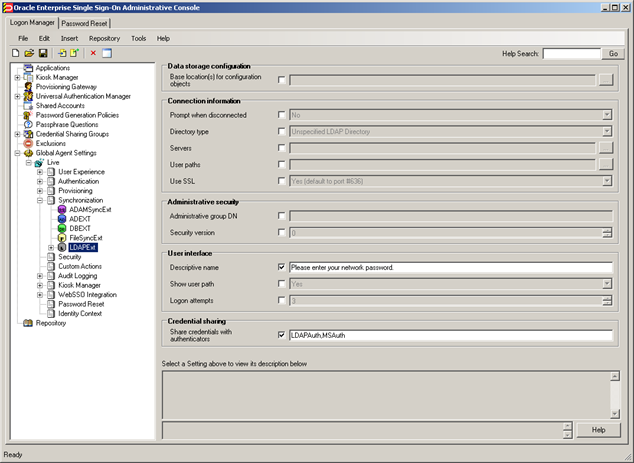
The figure below depicts a typical view of the Logon Manager Administrative Console set up for synchronization with an LDAP directory.
The next section describes best practices for configuring Logon Manager for synchronization with LDAP. If you need additional information on settings described in this guide, see the online help included with the Console.
Note:
Before you begin, make sure that the Logon Manager Agent and the LDAP synchronizer plug-in are installed on your machine; otherwise, AD settings will not be displayed in the Console. For installation instructions, see the installation guide for your version of Logon Manager.Tip:
In a development or staging environment, disable the option Check for publisher's certificate revocation in Internet Explorer to eliminate a delay when the Console starts and your machine is not connected to the Internet. (The delay is caused by Internet Explorer attempting to look up the server's certificate and timing out when a certificate authority cannot be reached.) Do not disable this option on production machines.The best practice for settings not described in this guide is to leave them at their default values, unless your environment dictates otherwise. The default value is automatically in effect whenever the check box for the setting in the Logon Manager Administrative Console is not checked. The value is visible in the inactive field next to the check box.
3.4 Recommended Global Agent Settings
This section lists Oracle-recommended best-practice global Agent settings. Configure the settings as described below and include them in the customized Logon Manager MSI package. (For instructions on creating the package, see the section "Packaging Logon Manager for Mass Deployment" in the Enterprise Single Sign-On Suite Installation Guide.)
3.4.1 Select the Correct Repository Type
Before you begin configuring Logon Manager's synchronization settings, you must inform Logon Manager which supported directory you are using. This allows Logon Manager to correctly interpret the repository structure and store its data without interfering with the repository's built-in data structures.
Note:
If your repository is not listed above, select Unspecified LDAP Directory (default) from the drop-down list for backwards compatibility in upgrade scenarios; otherwise select Generic LDAP Directory. For a list of supported directories, see the Oracle Fusion Middleware Certification Matrix.![]()
Located in: Global Agent Settings > Live > Synchronization > LDAPExt
To set: Select the check box, then select your repository from the drop-down list.
3.4.2 Configure a Server List with Desired Failover Order
In LDAP environments, server URLs must be explicitly provided to Logon Manager. Oracle highly recommends using at least two physical directory servers and placing them behind a load balancer for automatic, transparent failover. If you choose not to use a load balancer, arrange the server URLs in order of geographic proximity to the end-user so that the performance hit due to physical distance between the end-user and the next available server is minimized. For more information on load balancing, see Benefits of Load-Balancing a Logon Manager Deployment.
![]()
Located in: Global Agent Settings > Live > Synchronization > LDAPExt
To set: Select the check box, click the (…) button, and enter the desired values (one per line) as shown below. When you are finished, click OK.

3.4.3 Specify the Path to the Logon Manager Configuration Objects
You must specify the location of the Logon Manager root container (which stores Logon Manager configuration objects) for Logon Manager to store data in Active Directory.
![]()
Located in: Global Agent Settings > Live > Synchronization > LDAPEXT
To set: Select the check box, click the (…) button, and enter the desired value. When you are finished, click OK.
3.4.4 Use Configuration Objects
When deploying with an LDAP directory, Oracle highly recommends that you use directory objects for storing user and configuration data, allowing hierarchical storage, as well as role/group-based access control for individual containers, templates, and policies as described in Designing the Logon Manager Directory Sub-Tree. If you disable this feature, Logon Manager will store all template and configuration data as a single flat file in the Logon Manager root container.
![]()
Located in: Global Agent Settings > Live > Synchronization
To enable: Select the check box, then select Yes from the drop-down list.
3.4.5 SSL Support
Logon Manager repository synchronizers ship with SSL support enabled and Oracle highly recommends that you do not disable it. Your environment should always utilize SSL for all connections to the Logon Manager and other repositories for maximum security.
Note:
You must configure your environment for SSL connectivity before enabling this option.![]()
Located in: Global Agent Settings > Live > Synchronization >LDAPEXT
To re-enable (if disabled): Deselect the check box.
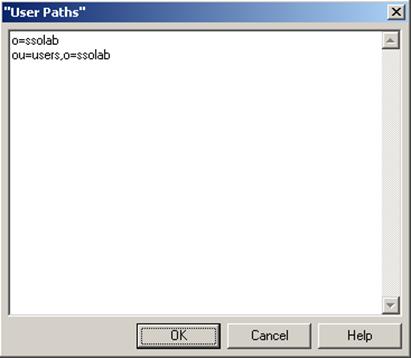
3.4.6 Specify the Path(s) to User Accounts
You must specify the location of the container(s) holding user accounts in your directory. If your directory stores user accounts in multiple locations, you can specify multiple paths. Follow the guidelines below when configuring this option:
-
When the Enable Directory Search for Users option is enabled, do not specify the directory root as a value here. Doing so will cause Logon Manager to parse the entire directory if a user enters an invalid user name.
-
When specifying paths, be as specific as possible to avoid extra account searches if the path you specify happens to be too broad. On the other hand, if the number of locations is excessive, it can help to specify a common parent container here to reduce the complexity of your configuration.
![]()
Located in: Global Agent Settings > Live > Synchronization > LDAPEXT
To let Logon Manager search for user accounts: deselect the check box (default setting).
To set: Select the check box, click the (…) button, and enter the desired values (one per line), as shown below. When you are finished, click OK.
3.4.7 Enable Directory Search for Users
![]()
If you do not want to specify exact paths to user accounts in your directory (for example, if they are spread out over a large number of locations), enable this option to allow Logon Manager to search for user accounts within one or more locations set in Specify the Path to the Logon Manager Configuration Objects. This feature requires anonymous bind access to the directory; if you do not wish to grant anonymous bind access to your directory, but still want to enable the directory search feature, you must specify a user with directory search rights using the Bind User DN and Bind User Password fields.
Located in: Global Agent Settings > Live > Synchronization > LDAPEXT > Special Purpose
To set: Select the check box, then select Yes from the drop-down menu.
3.4.8 Set the Naming Attribute String
If you are using Novel eDirectory, you must set the value of the Naming attribute string option to cn. For other LDAP directories, consult your directory team to find out how to configure this option.
![]()
Located in: Global Agent Settings > Live > Synchronization > LDAPEXT > Special Purpose
To set: Select the check box, then enter the desired value.
3.4.9 Decide Whether to Prompt the User when Disconnected from the Directory
Use the Prompt when disconnected option to decide whether Logon Manager should prompt the user to re-authenticate to the directory upon authentication failure or disconnection. Oracle recommends that you leave this setting at its default value of No; doing so will avoid unnecessary confusion and helpdesk calls.
![]()
Located in: Global Agent Settings > Live > Synchronization > LDAPEXT
To set: Select the check box, then select the appropriate option from the drop-down list.
This option is directly related to the Credentials to use option described above and has no effect if Allow disconnected operation is set to No.
3.4.10 Share LDAP Synchronizer Credentials with Authenticators
In certain scenarios, you can reduce the number of authentication prompts end users receive by sharing the LDAP synchronization credentials with one or more authenticators. See Selecting and Configuring an Authenticator for more information.
![]()
Located in: Global Agent Settings > Live > Synchronization > LDAPEXT
To set: Select the check box, then enter the names of target authenticators, separated by commas.
Use the following authenticator identification strings, depending on the authenticator(s) in use:
| Authenticator | Identification String |
| Windows v1 (deprecated) | WinAuth |
| Windows v2 | MSAuth |
| LDAP v1 | LDAP |
| LDAP v2 | LDAPAuth |
3.4.11 Add the LDAP Synchronizer to the Synchronizer Order List
Ensure that the LDAP (LDAPEXT) synchronizer plug-in is present and enabled in the Synchronizer Order list if at least one of the following is true for your environment:
-
Logon Manager is synchronizing with more than one repository.
-
Logon Manager is using roaming synchronization.
-
Kiosk Manager is installed in your environment.
Note:
Instructions for configuring Logon Manager for multi-repository and roaming synchronization, as well as installing and configuring Kiosk Manager, are beyond the scope of this guide. For more information, see the documentation for your version of Logon Manager and/or Kiosk Manager.![]()
Located in: Global Agent Settings > Live > Synchronization
To set: Select the check box, then click the (…) button. In the list that appears, select the checkbox next to LDAPEXT and click OK. Use the up/down arrows to set synchronization order as necessary.
3.4.12 Set the Authentication Prompt Window Title
Oracle recommends that you use this option to give the directory authentication prompt a descriptive title so that end users know what credentials to enter when the prompt appears.
![]()
Located in: Global Agent Settings > Live > Synchronization > LDAPEXT
To set: Select the check box, then enter the desired text.
3.4.13 Make the Logon Manager Agent Wait for Synchronization on Startup
To ensure that users always have the most recent credentials, application templates, password policies, and administrative overrides, configure the Agent to wait for synchronization on startup. When this option is enabled, the Agent checks whether the directory is online. If the directory is online, the Agent does not respond to application logon requests until it successfully synchronizes with the directory. If the directory is offline, the Agent does not attempt to synchronize and starts immediately.
![]()
Located in: Global Agent Settings > Live > Synchronization
To set: Select the check box, then select Yes from the drop-down list.
3.4.14 Use Optimized Synchronization
Optimized synchronization instructs the Logon Manager Agent to synchronize only credentials that have changed since the last synchronization. Do one of the following, depending on your environment:
-
Enable this option to improve synchronization performance on deployments with large numbers of credentials per user.
-
Disable this option to improve synchronization performance on deployments with fewer than five credentials per user and large number of templates downloaded per user.
![]()
Located in: Global Agent Settings > Live > Synchronization
Use the default value (Yes) unless your environment requires otherwise.
3.4.15 Restrict Disconnected Operation
During deployment, configure the Logon Manager Agent not to run if a connection to the directory cannot be established. This will prevent users from completing the First-Time Use (FTU) wizard when the Agent is not connected to the directory and no local cache is present. By not allowing the Agent to run when the directory is not available, you avoid a common situation in which a second set of encryption keys is created when a user completes the FTU wizard while disconnected from the directory.
Note:
See section "Configuring Logon Manager" in the Enterprise Single Sign-On Suite Administrator's Guide for more information on this required best practice.![]()
Located in: Global Agent Settings > Synchronization
To set: Select the check box, then select No from the drop-down list.
3.5 Recommended Administrative Overrides
Directory synchronization settings, such as domain names and object paths, should not be deployed as administrative overrides. (See Global Agent Settings vs. Administrative Overrides for an explanation.) The recommended best-practice overrides are described in the "Configuring Logon Manager" in the Enterprise Single Sign-On Suite Administrator's Guide.
3.6 Overview of the Deployment Process
This section provides a brief high-level overview of the Logon Manager deployment process an LDAP directory. Make sure you have read all of the preceding sections of this document before proceeding with deployment. Deploying Logon Manager with an LDAP directory requires you to:
-
Obtain the following documents:
-
The latest version of this document
-
Installing Oracle Enterprise Single Sign-On Suite
-
Oracle Enterprise Single Sign-On Suite Administrator's Guide
-
-
Install the Logon Manager Agent and the Logon Manager Administrative Console on a machine within your domain, as described in the installation guide for your version of Logon Manager. Make sure you select the LDAP Synchronizer plug-in when installing the Agent.
-
Complete the steps in Preparing the Directory for Logon Manager:
-
Extend the directory schema with Logon Manager classes and attributes.
-
Create the People OU, which will store each user's application credentials.
-
Create the vGOLocator object.
-
Create the configuration object container and the desired tree structure.
-
-
Configure Logon Manager as follows:
-
Complete the steps in Selecting and Configuring an Authenticator.
-
Complete the steps in Configuring the LDAP Synchronizer.
-
Configure the options described in Recommended Global Agent Settings in this guide.
-
Configure the options described in the "Configuring the Logon Manager Agent" section of the Enterprise Single Sign-On Suite Administrator's Guide.
Note:
For detailed descriptions of the settings in question, see the Console's online help. The online help is available via the Console's Help menu.
-
-
On a test machine, do the following:
-
Create a pilot set of core templates and policies.
-
Finalize the end-user experience by testing each core template, global Agent setting, and administrative override that will be deployed into production.
-
-
Create a custom MSI package and deploy it to end-user machines by completing the steps in the "Packaging Enterprise Single Sign-On Suite for Mass Deployment" section of the Enterprise Single Sign-On Suite Installation Guide.
-
Create, test, and deploy the remaining application templates. See the guide Configuring and Diagnosing Logon Manager Application Templates for in-depth information on provisioning different types of applications.
3.7 Preparing the Directory for Logon Manager
This section describes the basic procedures for preparing the directory for use with Logon Manager. The preparation consists of extending your directory schema with Logon Manager classes and attributes, allowing Logon Manager to store credentials under respective user objects, and creating the desired tree structure. Before starting this procedure, make sure that you have installed the Administrative Console.
3.7.1 Extending the Schema
-
Start the Suite Administrative Console.
Note:
In a development or staging environment, disable the option Check for publisher's certificate revocation in Internet Explorer to eliminate a delay when the Console starts and your machine is not connected to the Internet. (The delay is caused by Internet Explorer attempting to look up the server's certificate and timing out when a certificate authority cannot be reached.) Do not disable this option on production machines. -
In the Console, select Extend Schema from the Repository menu. The Console displays the "Connect to Repository" dialog.
-
-
In the Server Name field, enter a fully qualified IP address, hostname, or NetBIOS name of your schema master domain controller.
-
In the Repository Type drop-down list, select the desired LDAP directory type.
-
Enter the port number on which your directory is listening for connections. The default ports are 636 for SSL connections and 389 for non-SSL connections.
-
(Optional) If the directory server has been configured to use SSL, leave the Use secure channel (SSL) option selected; otherwise, deselect it. (See SSL Support for more information.)
-
In the Username/ID and Password fields, enter the credentials of the account you want Logon Manager to use to connect to the directory. Depending on your environment, you may need to include the corresponding domain name as part of the user name, for example: DOMAIN\user.
-
Click OK and wait for the Console to perform the schema extension. The Console displays a status dialog showing the progress. When the schema has been successfully extended, a confirmation message appears in the status dialog:
-
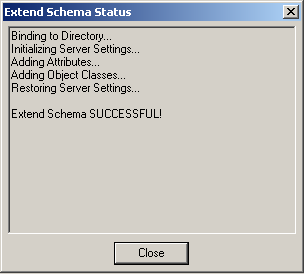
-
Click Close.
3.7.2 Creating the Sub-Tree Root and the Configuration Object Container
Note:
While it is possible to use an existing container for storing Logon Manager data, doing so may impair directory performance. Oracle highly recommends that you create a dedicated container as the sub-tree root.-
In the Logon Manager Administrative Console, select the Repository node in the tree.
-
Click the Click here to connect link in the right-hand pane. The Console displays the "Connect to Repository" dialog.
-
Fill in the fields as explained in steps 3-7 on page 29 and click OK to connect.
-
Create the container that will serve as the Logon Manager sub-tree root:
-
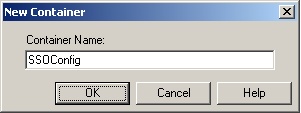
In the tree, right-click the desired parent container and select New Container from the context menu, as shown below:
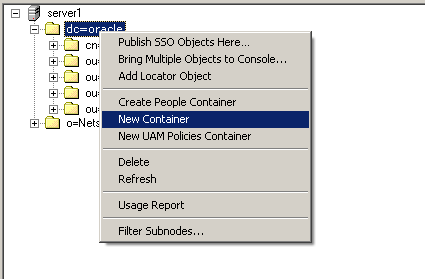
The Console displays the "New Container" dialog:
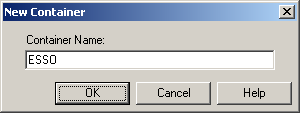
-
In the "New Container" dialog, enter the desired name and click OK.
Note:
Unless your environment calls for a specific name this container, Oracle recommends that you use the default name, ESSO.
-
-
Create the Logon Manager configuration object container (SSOConfig):
-
In the tree, right-click Logon Manager sub-tree root and select New Container from the context menu, as shown below:
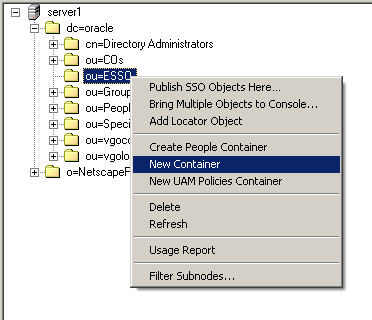
-
The Console displays the "New Container" dialog:
-
In the "New Container" dialog, enter the desired name and click OK.
Note:
Unless your environment calls for a specific name for this container, Oracle recommends that you use the default name, SSOConfig.
-
-
Repeat step 5 to create any additional containers you may need.
3.7.3 Creating the People OU
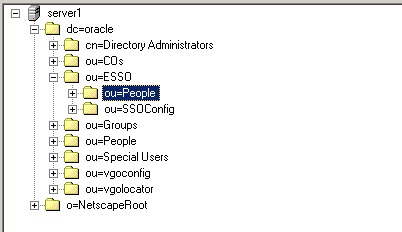
You must create the People OU that will hold application credentials for Logon Manager users. Oracle recommends placing the People OU inside the Logon Manager sub-tree root.
Note:
Do not place the People OU inside the Logon Manager configuration object container (SSOConfig). Doing so will cause Logon Manager to parse the credentials of every Logon Manager user when loading templates, placing a significant, unnecessary load on the directory.Sun Directory Server stores user accounts in a container named People in the root of the directory. You must not use that container to store Logon Manager application credentials; instead, create the Logon Manager People OU in another parent container.
To create the People OU:
-
In the Logon Manager Administrative Console, select the Repository node in the tree.
-
Click the Click here to connect link in the right-hand pane. The Console displays the "Connect to Directory" dialog. Fill in the fields as explained in steps 3-7 on page 29 and click OK to connect.
-
In the tree, right-click the root of the Logon Manager sub-tree, and select Create People Container.

-
Verify that the People OU now exists at the target location.
If the People OU does not appear after you complete the above steps, or if you receive errors indicating naming violations or other problems in the directory, consult the vendor documentation for your directory for possible causes and remedies.
3.7.4 Creating the vGOLocator Pointer Object
Once you have created the People OU, you must create the vGOLocator pointer object that will link user accounts to user application credentials stored in the People OU.
Note:
You must create the vGOLocator object at least at the same level as the container that holds user accounts. Ideally, vGOLocator should exist inside the directory's user accounts container.To create the vGOLocator object:
-
In the Logon Manager Administrative Console, select the Repository node in the tree.
-
Click the Click here to connect link in the right-hand pane. The Console displays the "Connect to Repository" dialog. Fill in the fields as explained in steps 3-7 on page 31 and click OK to connect.
-
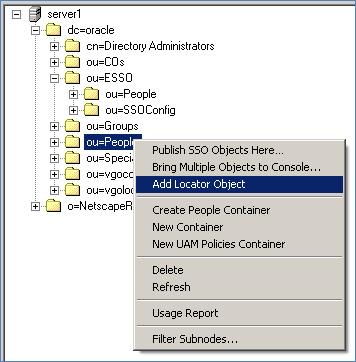
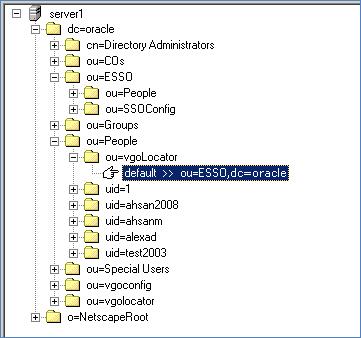
In the tree, right-click your directory's user account container (dc=oracle,ou=People in our Sun Directory Server-based example) and select Add Locator Object from the context menu, as shown below:
-
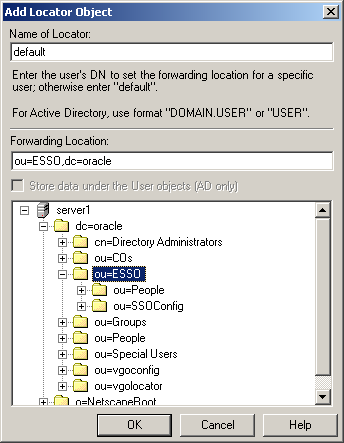
In the "Add Locator Object" dialog that appears, do the following:
-
In the Name field, enter default.
-
In the Forwarding Location field, enter the full path to the container that holds the People OU. (Alternatively, you may navigate to and select the target container using the tree.)
-
Click OK.
-
Verify that the vGOLocator object appears at the destination location.
-
3.8 Selecting and Configuring an Authenticator
An authenticator is necessary to uniquely authenticate the user to Logon Manager. In an LDAP environment, you have the choice to select one of the following authenticators, based on your configuration:
-
Windows Password Authenticator (Version 2). Oracle highly recommends using this authenticator, as it allows to eliminate authentication prompts when the following conditions are met (see Share LDAP Synchronizer Credentials with Authenticators for more information):
-
The user has an Active Directory or NT domain account.
-
The LDAP directory credentials are synchronized with Active Directory or the NT domain.
-
LDAP Authenticator (Version 2). Use this authenticator if you cannot uniquely identify the user based on the machine logon, for example in kiosk or other environments where users are logged in generically, or when the user has no Active Directory or NT domain account. Users will receive additional authentication prompts in this scenario unless their synchronization and user credentials are identical (see Share LDAP Synchronizer Credentials with Authenticators for more information).
-
3.9 Configuring the LDAP Synchronizer
After you have prepared LDAP for Logon Manager, you must configure the LDAP synchronizer for your environment. Configure these settings on your "template" client machine and include them in the MSI package you will use to deploy Logon Manager to end-users. Before starting this procedure, make sure that the Logon Manager Administrative Console and the Logon Manager Agent (including the LDAP synchronizer plug-in) are installed.
Note:
Do not include application templates in the MSI package as they will not function in a directory-synchronized environment. The ability to include templates directly in the MSI package is for specialized use only. Instead, push them to the directory for automatic retrieval by the Logon Manager Agent.-
Launch the Logon Manager Administrative Console.
-
In the left-hand pane, right click the Global Agent Settings node, then selectImport > From Live HKLM from the context menu. The Console imports the current Agent settings from the Windows registry.
-
Configure the Agent as described in Recommended Global Agent Settings and Recommended Administrative Overrides.
Note:
When the check box next to a setting is unchecked, the default value for the setting (shown grayed-out to the right of the check box) is in effect. -
Save your configuration to an XML file for future reference. From the File menu, select Save, enter the desired file name, and click Save. If you change your settings, you can load this XML file into the Console to revert back to your original choices.
-
From the Tools menu, select Write Global Agent Settings to HKLM. The Console writes your changes to the registry and restarts the Agent.