3 Cashless Payroll – Ocean Pay
In SPMS, the Cashless Payroll Transfer feature allows the crew to enroll in certain payroll deductions to be paid to a Visa, Master Card or debit card, and the card is directly printed onboard.
OceanPay Format
In order to use the Cashless Payroll feature, you must enable the parameters under the Payroll Group.
Table 3-1 Ocean Pay Parameters
| PAR Name | PAR Value | Description |
|---|---|---|
|
Cashless Payroll Option |
0 |
0 = Ocean Pay 1 = Salary@Sea |
|
OceanPay File Output Folder |
\\[shared network folder]\transfer |
Folder path to save the output file when generating card order for cashless payroll. You may need to specify the folder in a network path for security purposes. |
|
OceanPay MT Prefix Nbr |
54 |
Defaults prefix number for MT Card. Populated in Cashless Payroll setup |
|
OceanPay VISA Prefix Nbr |
45 |
Defaults prefix number for VISA Card. Populated in Cashless Payroll setup |
|
Pay codes For OceanPay Top-Up Transactions |
Value of SED_NO. Pay code for payroll deduction pay codes that will be transferred into the payments file when transactions are posted. Stores multiple SED_NO with Comma Delimited (,). |
|
|
Stock Code For OceanPay MT |
Default Stock Code for MT Card. Populate in Cashless Payroll setup. |
Configuring Ocean Pay Standard Parameter
On the General tab of the Standard Parameter Configuration, enter the information in all the mandatory fields.
Before you begin using the Cashless Payroll option, you must set up the basic configuration in the Cashless Payroll menu.
Figure 3-1 Cashless Payroll Standard Parameter Configuration
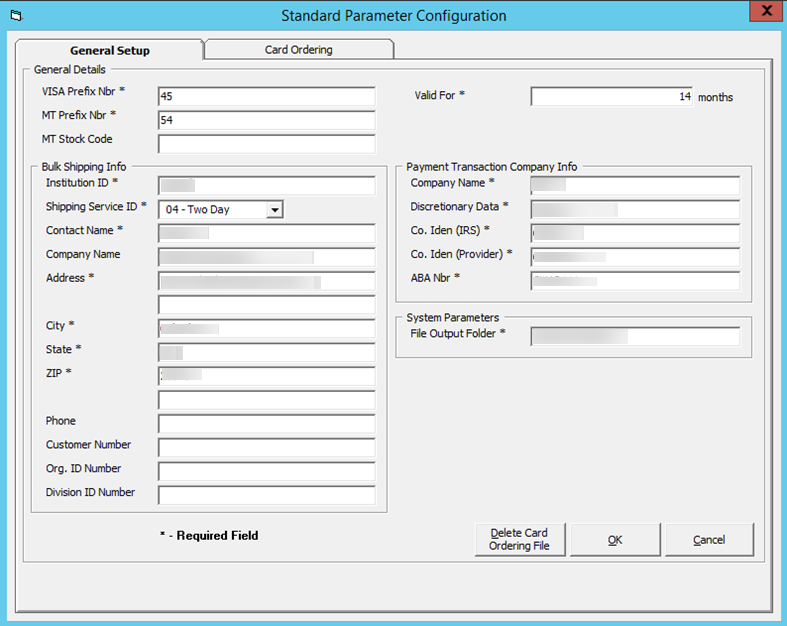
Table 3-2 Cashless Payroll Parameter Field Definition
| Field | Definition |
|---|---|
|
General Detail |
|
|
VISA Prefix Nbr |
Prefix number for VISA card. Default value is specified in parameter “OceanPay VISA Prefix Nbr.”. |
|
MT Prefix Nbr |
Prefix number for Master card. Default value is specified in parameter “OceanPay MT Prefix Nbr.”. |
|
MT Stock Code |
Card stock code for Master card. Default value is specified in parameter “Stock Code For OceanPay MT.”. |
|
Bulk Shipping Info |
|
|
Institution ID |
Institution Identification ID. |
|
Shipping Service ID |
Shipping Service ID.
|
|
Contact Name |
Contact name. |
|
Company Name |
Company name. |
|
Address |
Street address. |
|
City |
Address city. |
|
State |
Address state. |
|
ZIP |
Address zip code. |
|
Phone |
Contact phone. |
|
Customer Number |
Customer ID. |
|
Org.ID Number |
Organization ID number. |
|
Division ID Number |
Division ID number. |
|
Payment Transaction Company Info |
|
|
Company Name |
Company name. |
|
Discretionary Data |
Company Discretionary Data. |
|
Co. Iden (IRS) |
Company Identification. IRS Employer Identification number. |
|
Co. Iden (Provider) |
Company ID as specified by provider. |
|
ABA Nbr |
ABA number. |
|
System Parameter |
|
|
File Output Folder |
Output file location when generating GL file. Default location is specified in parameter “OceanPay File Output Folder”. The directory for storing the file needs to be under a network path for security purposes |
PGP Encryption
See the OHC Tools User Guide on the PGP Encryption process in the Oracle Help Center.
Deleting Card Ordering File
In order to protect the data from being comprised, the Delete Card Ordering File button is used to remove the unused, expired requests or files sent to PGP. For the delete function to work, this would require the SDelete component to be installed.
-
Unzip the SDelete.zip into the same directory of Oracle Hospitality Cruise program folder.
-
Click the Delete Card Ordering File button at the General tab.
-
Click the Open File button to browse for the file.
-
Click Delete to completely remove the data file.
Card Ordering
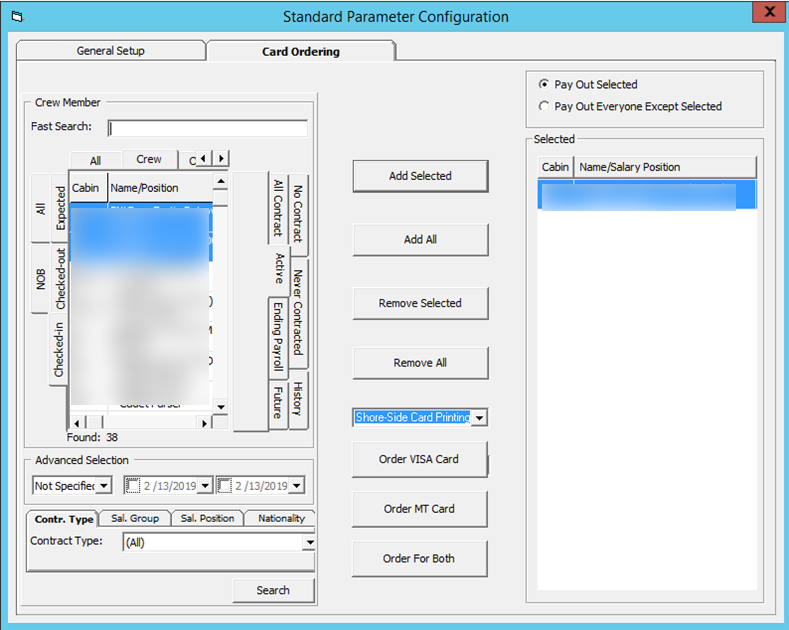
The Card Ordering tab enables you to create a card request file for submission to the bank. The screen shows all the crew members onboard and you can either select by embarkation or debarkation date.
Figure 3-2 Card Ordering Selection
To place the card order for the crew member,
-
Select the crew member from the grid.
-
Click Add Selected or Add All. You can also deselect them from the grid on the left and then click Remove Selected or Remove All.
-
Select the card type to print. You can choose to print the debit card onboard or at shoreside using the system provided by Ocean Pay.
-
Click the Order XXXX button to place the order.
-
If the crew has ordered a card or the card is not due to expire, the system prompts if you wish to continue to move the name to the selected column. Select the corresponding option.
-
The system creates three separate files containing the same information:
-
Order Visa Card: This uses the specific VISA prefix file format.
-
Order MT Card: This uses the specific MT Card Prefix file format.
Note:
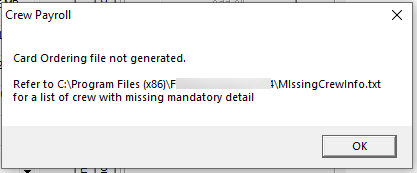
You are not allowed to generate the card ordering file without first specifying the encryption key.The program validates all the required information written to the file of each crew member. The mandatory fields are: Address, Street, City, State, Country and Zip code. An exception log file is created in the Oracle Hospitality Cruise folder for records that do not have the mandatory information.
Figure 3-3 Card Ordering File Not Generated
The following process takes place when the Card Ordering file is generated:
-
It saves the generated PGP Encrypted file into the network path specified and uses the following naming convention “
ship name” + “MMDDYYYY”+ “_” + “unique number”. For example: Demo12082009_180237.pgp -
Older files are automatically moved into the History folder for audit purposes. The files can be deleted using the Delete Card Ordering File.
-
The program does not allow a crew member to place the card ordering twice. The card ordering will not add the request into the card request file.
-
All generated records are stored in the CPT table.
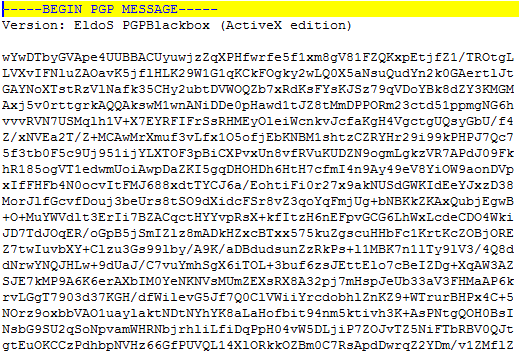
Below is an example of an encrypted output file.
Figure 3-4 Encrypted Output File
Salary at Sea Format
The Salary@Sea format is another cashless payroll functionality. To use this function, you must set up the following in the Administration and Payroll module:
-
Pay code Type.
-
Pay code.
-
Cashless Payroll Standard Parameter Configuration.
-
Database Parameter listed in below table.
In the Pay code setup, ensure these are configured:
-
Pay code Type setup:
-
Pay code Type ID: PC.
-
Pay code Type description: Cashless Payroll.
-
Enabled: Checked.
-
-
Pay code Setup:
-
Pay code ID: 0150.
-
Sort order: 150.
-
Pay code description : Salary@Sea.
-
Pay code type : PC Cashless Payroll.
-
Status : Active.
-
Calc Method : P-FLAT Flat Amount.
-
Apply Order : 150.
-
See Setting up Payroll Codes on how to configure a pay code.
Table 3-3 Salary@Sea Parameters
| PAR Name | PAR Value | Description |
|---|---|---|
|
Salary@Sea File Output Folder |
<network path> |
For security purposes, the path defined must be a network path. |
|
Cashless Payroll Option |
0 |
0 = Ocean Pay 1 = Salary@Sea |
|
Cashless Payroll Pay code Type |
Pre-configured Pay code Type in Payroll module. |
Configuring Salary at Sea Standard Parameter
In the Cashless Payroll menu, General tab, enter the value per the table below:
Figure 3-5 Cashless Payroll - Salary @Sea
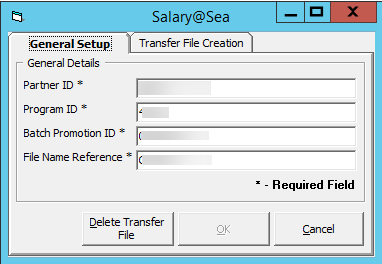
Table 3-4 Salary@Sea Field Definition
| Setup | Value | Remarks |
|---|---|---|
|
Partner ID |
0043 |
Default value will be set to 0043. |
|
Program ID |
4322 |
Default value will be set to 4322. |
|
Batch Promotion ID |
000000xx |
xx = refer to ship id. |
|
File Name Reference |
Citibank |
Default value will be set to Citibank. |
Generating a File
Once you have all the parameters in place, you can then generate the file from the Cashless Payroll menu, Transfer File Creation function.
-
Open the Cashless Payroll menu and navigate to the Transfer File Creation tab.
-
Select the Pay Period from the drop-down list.
-
You can receive multiple confirmation prompts depending on the records that are being processed. Read through each pop-up message and then click OK to continue.
-
Once the file is generated, the PAY_ID appears with Salary@Sea Pay code in the pay item list, as shown in the diagram below.
Figure 3-6 Pay ID in Pay Items List

Below, there are sample transfer files for single, multiple and voided Salary@Sea transactions.
Figure 3-7 Single Salary@Sea Transaction

Figure 3-8 Multiple Salary@Sea Transactions

Figure 3-9 Voided Salary@Sea Transaction

File Transfer Specification
The file name generated by Salary@Sea in a ‘tmp’ file format is saved in the following format; <ShipName>_<FileNameReference>_<ProgramID>_EOM_MMDDYYYY-HHMMSS.tmp
Transfer File layout
Each of the transfer file types has a specific header and layout format, as described in the following tables.
Table 3-5 Header Code/ ReportTtype
| Header code/ report type | Description |
|---|---|
|
01 |
File Header Record |
|
03 |
Batch Header Record |
|
09 |
Request Record |
|
05 |
Add Funds Action |
|
04 |
Batch Footer Record |
|
02 |
File Footer Record |
Figure 3-10 Sample Transfer File

Table 3-6 Layout Specification — Header code/ report type: 01
| Field Name | Position | Length | Type | Comment | SPMS Mapping |
|---|---|---|---|---|---|
|
Record Type |
1 – 2 |
2 |
Numeric |
“01” |
Hardcode to 01. |
|
Partner ID |
3 – 6 |
4 |
Numeric |
“0043” |
Refer to Partner ID configured/specified in Payroll, Cashless Setup. |
|
File Name |
7 – 56 |
50 |
Character |
Unique name for each transfer file |
<ShipName>_<FileNameReference>_<ProgramID>_EOM_MMDDYYYY-HHMMSS.tmp |
|
Pass through |
57 – 88 |
57 |
Character |
Client can use this field in whatever manner they choose. It will be passed backed in the reply file. |
Remain empty for now since response files are out of scope at this point. |
|
Creation date |
89 – 96 |
8 |
Date |
Date the file was created |
Date format: YYYYMMDD. |
Table 3-7 Layout Specification — Header code/ report type: 03
| Field Name | Position | Length | Type | Comment | SPMS Mapping |
|---|---|---|---|---|---|
|
Record Type |
1 – 2 |
2 |
Numeric |
“03” |
Hardcode to 03. |
|
Program ID |
3 – 6 |
4 |
Numeric |
“4322” |
Refer to Program ID configured/specified in Payroll > Cashless Setup. |
|
Batch description |
7 – 70 |
64 |
Character |
Payment memo will appear on recipient’s statement |
Format: PaymentYYYYMMDD YYYYMMDD is computer date. |
|
Pass through |
71 – 102 |
32 |
Character |
<Blank> |
Remain empty. |
|
Batch promotion ID |
103 – 110 |
8 |
Numeric |
‘00000021’ |
Refer to Promotion ID configured/specified in Payroll, Cashless Setup. |
|
Settlement Date |
111 – 118 |
8 |
Date |
<Blank> |
Remain empty as required. |
Table 3-8 Layout Specification — Header code/ report type: 09
| Field Name | Position | Length | Type | Comment | SPMS Mapping |
|---|---|---|---|---|---|
|
Record Type |
1 – 2 |
2 |
Numeric |
“09” |
Hardcode to 09. |
|
Partner user id |
3 – 52 |
50 |
Character |
Unique account identifier (Crew ID) |
Refer to crew’s external ID (UXP_C_EXTERNALID). |
|
Pass through |
53 – 84 |
32 |
Character |
Remain empty. |
Table 3-9 Layout Specification — Header code/ report type: 05
| Field Name | Position | Length | Type | Comment | SPMS Mapping |
|---|---|---|---|---|---|
|
Record Type |
1 – 2 |
2 |
Numeric |
“05” |
Hardcode to 05. |
|
Pass Through |
3 – 34 |
32 |
Character |
Remain empty. |
|
|
Amount |
35 – 44 |
10 |
Currency |
Amount $35.57 is display as ‘3557’ |
PAY_AMOUNT |
|
Taxable Flag |
45 – 45 |
1 |
Numeric |
‘0’ |
Hardcode to 0. |
|
Notification Indicator |
46 - 55 |
10 |
Numeric |
<BLANK> |
Remain empty. |
|
Partner payment id |
56 – 95 |
40 |
Character |
Prevent payment duplication <PayID>P<PayPeriod>T<SignonDate> |
<PayID>P<PayPeriod>T<SignonDate> <Pay_ID>P<SPP_NAME>T<RES_EMB_A> For example, 577104P201305T20130408. |
|
Direct/Claim Flag |
96 – 96 |
1 |
Numeric |
1 – standard payroll 0 – off cycle payroll |
Hardcode to 1. |
|
Imported record ID |
97 – 104 |
8 |
Character |
<BLANK> |
Remain empty. |
Table 3-10 Layout specification — Header code/ report type: 04
| Field Name | Position | Length | Type | Comment | SPMS Mapping |
|---|---|---|---|---|---|
|
Record Type |
1 – 2 |
2 |
Numeric |
“04” |
Hardcode to 04. |
Table 3-11 Layout specification — Header code/ report type: 02
| Field Name | Position | Length | Type | Comment | SPMS Mapping |
|---|---|---|---|---|---|
|
Record Type |
1 – 2 |
2 |
Numeric |
“02” |
Hardcode to 02. |