Purpose: Use the Store Connect Preferences screen to set preferences related to the Store Connect module.
For more information: See Setting Up Data for the Store Connect Module for more information on setup related to the Store Connect module, and see the Store Connect Overview for background.
How are orders assigned to Store Connect locations? The Order Broker preferences set up at the Preferences screen control the assignment of delivery orders to all locations, including Store Connect locations. These preferences also apply to store pickup order assignment; for example, a Store Connect location must be flagged as Pickup Available. See the Preferences screen for more information.
How to display this screen: Click
the Store Connect Preferences icon (![]() )
for an organization at the Organizations and Preferences screen.
This screen is available only if you have flagged a system as the Store Connect Default. See the Systems screen or Setting Up Data for the Store Connect Module
for more information.
)
for an organization at the Organizations and Preferences screen.
This screen is available only if you have flagged a system as the Store Connect Default. See the Systems screen or Setting Up Data for the Store Connect Module
for more information.
Note: Available if Use Store Connect is selected at the Tenant - Admin screen. Only users with Organization and Preferences authority can display this screen. See the Role Wizard for more information.
In this topic:
• Pick/Pack Preferences tab (Pick Pack)
• Shipping Preferences tab (Shipping)
• Receive Preferences tab (Receive)
• New Order Polling Schedule tab (Schedule)
• Integrated Shipping Setup and Troubleshooting: Store Connect
Field |
Description |
|---|---|
Organization |
The code and name of the organization you selected at the Organizations and Preferences screen. Display-only. |
Store Connect System |
The code and name of the system flagged as the Store Connect Default for the organization. Display-only. |
Settings |
|
Enter the number of minutes that an inactive store associate session should remain open before timing out. Once an associate’s session times out, the associate is presented with the login screen. Your entry can be 1 to 20 minutes. The default setting is 20 minutes. Required. |
|
The number of unsuccessful, sequential login attempts that triggers Order Broker to disable a store associate account. When an associate attempts to log in with a disabled account, Order Broker displays a general error indicating that the login failed. Example: If you set this number to 4, an associate account is disabled after the entry of 4 incorrect passwords in a row. Reset: An associate’s counter is reset: • after a successful login (for example, if there are 3 unsuccessful login attempts, followed by a successful login, the counter is reset to 0) • when you re-enable the account at the Store Associate User Profiles screen or the Edit Store Associate User Profile screen Your entry can be 1 to 99 login attempts. The default setting is 15. Required. |
|
Logo URL |
Enter the URL of the logo in the upper left corner of each Store Connect screen. The recommended logo size is 225 x 50 pixels. Preview:
Click the magnifying glass ( If you leave this field blank, then the screen does not include a logo. If there is no logo at the specified URL, then the screen displays a broken image icon. Note: For a cloud implementation, Oracle staff need to make sure that this URL is added to the proxy server’s allow list. |
Enter the number of hours within which store associates should process new delivery or pickup orders: • delivery orders should be shipped within this number of hours • pickup orders should be picked and ready for customer pickup within this number of hours Your entry should be a whole number from 1 to 999, or it should be blank. This setting is available at the Store Connect system level only. This setting does not apply to ship-to-store orders. Calculated how? The age is calculated based on the date and time when the oldest open (uncompleted) line was created: • delivery orders: the date and time when the oldest line still in polled, accepted, or picked status was created (that is, not yet shipped) • pickup orders: the date and time when the oldest line still in polled or accepted status was created (that is, not yet picked/customer notified that the order is ready for pickup) When an order’s age exceeds this number of hours: The Age on Store Connect screens is displayed in red, bold text instead of black once the order’s age exceeds this limit, indicating that the order has exceeded your service level. For example, in the image below, the Order Age Hours is set to 1 hour. 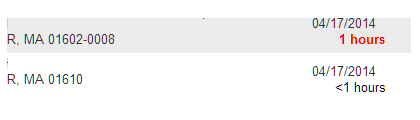
|
|
|
If no Order Age Hours specified: If you leave this field blank, then the Store Connect screens never display the order age for a delivery or pickup order in red, bold text. You should either enter a number of hours from 1 to 99 or leave the field blank; 0 is not a valid entry. This setting is available at the Store Connect system level only. Display of order age in Store Connect: • Screens where the store associate can search for orders or display multiple orders, such as the View New Orders screen, display the age as a whole number of hours. The time is truncated; for example, an age of 2 hour and 45 minutes is displayed as 2 hours. If the age is less than an hour, it is displayed as <1 hours. • Screens where the store associate can review details about the order, such as the View Order Detail screen, display the age as a whole number of hours and minutes: for example, if the order is 2 hours and 15 minutes old, this is how the age is displayed. Creation time, not polled time: The order age is based on the date and time when the order line was created in Order Broker, not the date and time when the order’s status was changed to polled, making the order available to store associates for processing. See the New Order Polling Schedule tab (Schedule) for information on setting up polling schedules for delivery or pickup orders. Reshopped delivery orders: If the original store location assigned to fulfill a delivery order rejects the order, the order’s age is still calculated based on the original date and time. When the order is assigned to a different store location, the order age may be displayed in red, bold text even though the order is new to the second store. Orders placed outside of a store location’s business hours: The calculation of order age does not reflect whether the order was placed during the store location’s regular business hours. For example, if the order is created at 6 o’clock, and the store location opens at 10 o’clock, the order’s age is listed as 4 hours. |
|
Consolidated orders: Store Connect presents multiple request IDs as a single order if they have the same order number, order type, store location assignment, and carrier. For example, if the customer places an order for a backordered item in Order Management System, then later adds another backordered item to the same order, the two lines create separate request IDs in Order Broker; however, Store Connect screens might display the two lines as a single order. In this situation, the order age displayed is based on the date and time when the first order line sent to Order Broker for fulfillment. If Store Connect does not present the two lines as a consolidated order, then the order age displayed is based on the individual request ID. For example, if request ID 100 is assigned to store location 10, and request ID 101 is assigned to store location 20. The order age displayed for request ID 101 is based on its own creation date and time, and not the creation date and time of request ID 100. |
Enter the number of hours after a pickup order is picked or a ship-to-store order is received that the order is considered unclaimed by the customer. Your entry should be a whole number from 1 to 999, or it should be blank; 0 is not a valid entry. This setting is available at the Store Connect system level only. Identifying unclaimed orders in Store Connect: Once the specified number of hours has passed since the pickup order was picked or the ship-to-store order was received and the customer notified, the Ready for Pickup age displayed on Store Connect screens is in red, bold text instead of black, and the order is included on the View Unclaimed Pickup Orders screen. For example, in the image below, the Unclaimed Orders Hours is set to 24 hours. 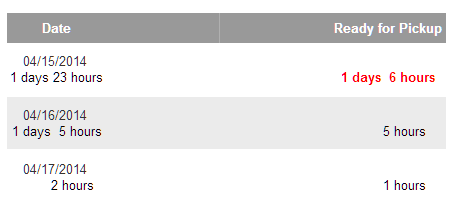
Pickup orders based on earliest picked, open line: If there are multiple lines on a pickup order and the lines were picked at different times, the Ready for Pickup age is based on the earliest date and time when an open line was picked. Under review: The age for a pickup order is based on the date and time when the order or item was picked, regardless of whether the order was under review. When a pickup order is under review it is not eligible for pickup, and no pickup notification email is generated to the customer until the Under Review indicator is cleared. For example, at 2:00 an associate picks an order that is under review. At 8:00, the order’s Under Review indicator is cleared, and the customer is notified that the order is ready for pickup. The Ready for Pickup age displayed at 10:00 in Store Connect is 8 hours, although the customer was notified 2 hours ago. Note: The Under Review indicator does not apply to ship-to-store orders. Ship to store orders based on earliest received line: If there are multiple lines on a ship-to-store order and the lines were received at different times, the Ready for Pickup age is based on the earliest date and time when an open line was received. If there are multiple request IDs with the same order number, the evaluation applies across all request IDs. |
|
|
Which screens display the Ready for Pickup age? The Ready for Pickup age is displayed on the: • View Pickup Ready Orders screen • Pick Up Order Detail screen • View Unclaimed Pickup Ready Orders screen If no Unclaimed Order Hours specified: If you leave this field blank, then the Store Connect screens never indicate an order is unclaimed, and the View Unclaimed Pickup Ready Orders screen lists all pickup-ready orders. |
Intransit Order Hours |
Enter the number of hours after a ship-to-store order goes into Intransit status after which the View Orders Ready to Receive and the Receive Order Detail screens display the amount of time the order has been in transit in red, bold text. 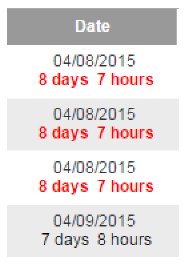
Your entry should be a whole number from 1 to 999, or it should be blank; 0 is not a valid entry. This setting is available at the Store Connect system level only. Earliest in transit line: If there are multiple lines on a ship-to-store order and the lines went into Intransit status at different times, the age displayed at the View Orders Ready to Receive and the Receive Order Detail screens is based on the earliest date and time when an open line went into Intransit status. If there are multiple request IDs with the same order number, the evaluation applies across all request IDs. If no Intransit Order Hours specified: If you leave this field blank or leave it set to 0, then the View Orders Ready to Receive and the Receive Order Detail screens never indicate a ship-to-store order has exceeded the intransit hours. |
Pick Verification Preferences These preferences control the screens and windows that a store associate uses to confirm that delivery and pickup orders are picked and ready for shipment or pickup by selecting the Verify Orders Picked option at the home screen. |
|
Controls the steps a store associate uses to confirm that delivery and pickup orders are picked and ready for shipment (delivery orders) or pickup (pickup orders). When the associate selects the Verify Orders Picked option at the home screen, if the Pick Verify Method is set to: • Immediate: The View Orders Ready for Picking screen opens, listing orders with at least one line eligible for pick verification. From this screen, the associate can select for an order: • Pick Order to open the Pick Order window, verifying that the entire order has been picked • Pick Items to advance to the Pick Order Detail screen, to verify that the entire order or individual items have been picked • Item: The Orders To Be Picked screen opens. The associate needs to enter a valid order number, for an order with at least one line whose next action is Pick, to advance to the Pick Order Detail - Item screen. From this screen, the associate can verify that the entire order or individual items have been picked. The Pick Order Detail - Item screen is virtually identical to the Pick Order Detail screen, but the Item method requires the associate to view the order detail before confirming the items as picked. • Scan: The Orders To Be Picked screen opens. The associate needs to enter a valid order number, for an order with at least one line whose next action is Pick, to advance to the Scan Items To Pick screen. At this screen, the associate can enter item numbers or scan UPC codes, based on the Item Scan Type setting, to specify each item that is picked. If the Item Scan Type is set to UPC, Order Broker uses the Item Scan Length to determine when to validate the UPC code and increment the quantity picked by one. For more information: See Pick Verification Options (Delivery and Pickup Orders) for a discussion. |
|
Indicates the method of identifying picked items on delivery and pickup orders. Used only if the Pick Verify Method is set to Scan. Possible methods are: • Item: The associate enters the item (system product) code at the Scan Items to Pick screen. • UPC: The associate scans the universal product code at the Scan Items to Pick screen. A UPC record is required for each item to be scanned, and the screen uses the Item Scan Length to determine when to validate the UPC and increment the picked quantity for the item. If the associate clicks DONE at this screen before completing the scan of all items, the Pick Order Warning window opens. See the Item Scan Length, below, for more information on scanning by UPC. |
|
The number of positions in the item UPC. When this number of positions is scanned, the Store Connect screen identifies the item that was picked on a delivery or pickup order. When using the UPC option, the screen increments the picked quantity by one each time the code is scanned. Creating barcodes: You can create UPC-A and EAN-13 barcodes in Order Broker. See the UPC screen and Importing UPC Barcodes through File Upload or File Storage API for more information. This field is available only when the Item Scan Type is set to UPC; if so, you must enter a length of 2 positions (from 1 to 99). Contact your Oracle project manager for more information. Used only if the Item Scan Type is UPC. |
|
Pick/Pack Preferences These fields control the generation of the pick list pull sheet and the packing slip, including when to generate the forms, the programs to print them, and the logo and messages to include on the printed documents. |
|
The BI Publisher template to use when generating the pick list pull sheet for delivery and pickup orders. The default template is ob_pullsheet_report. See Pick List Pull Sheet for information on form contents. Up to 20 positions. Required. Unique form? If you specify a pull sheet form, the cloud administration staff need to place the program file on the server. Language, date and time formats, and number formats are from the organization. If you leave this field blank, or if your entry does not match a file in the folder listed above, no pick list pull sheet PDFs are generated in Store Connect. |
|
The BI Publisher template to use when generating the packing slip for a delivery, pickup, or ship-to-store order. The default program is ob_packslip_stc_report. Up to 20 positions. Required. Sample: See the Packing Slip. Unique form? If you specify a unique template for the packing slip, the cloud administration staff need to place the program file on the server. Language, date and time formats, and number formats are from the organization. If you leave this field blank, or if your entry does not match a file in the folder listed above, no packing slip PDFs are generated in Store Connect. |
|
Controls when the packing slip for delivery and pickup orders is generated for printing in Store Connect. Required. When this preference is set to: • Order Accept: • At Accept & Print: The pick list pull sheet and the packing slip are generated for printing. • On demand: The store associate has the option to generate either document at any point until verifying the order is fulfilled. • At pick verification: The store associate has an option to generate the packing slip at the Pick Order window that opens during pick verification. • At shipment or pickup: The store associate has an option to generate the packing slip before confirming shipment or pickup. • Pick: • At Accept & Print: The pick list pull sheet is generated for printing, but not the packing slip. • On demand: The store associate has the option to generate the pick list pull sheet at any point until verifying the order is fulfilled, but cannot yet generate the packing slip. • At pick verification: The packing slip is generated for printing. • At shipment or pickup: The store associate has an option to generate the packing slip before confirming shipment or pickup. • Order Accept and Pick: • At Accept & Print: The pick list pull sheet and the packing slip are generated for printing. • On demand: The store associate has the option to generate either document at any point until verifying the order is fulfilled. • At pick verification: The packing slip is generated for printing. • At shipment or pickup: The store associate has an option to generate the packing slip before confirming shipment or pickup. • Fulfillment: • At Accept & Print: The pick list pull sheet is generated for printing, but not the packing slip. • On demand: The store associate has the option to generate the pick list pull sheet at any point until verifying the order is fulfilled, but cannot yet generate the packing slip. • At pick verification: No documents are generated for printing. • At shipment or pickup: The packing slip is generated for printing. Note: If this field is set to Fulfillment, the packing slip is also generated at pickup for ship-to-store orders. |
|
Enter the URL of the logo that prints on the packing slip in Store Connect. The recommended logo size is 225 x 50 pixels. Preview:
Click the magnifying glass ( If you leave this field blank, or if there is no logo at the specified URL, then the packing slip does not include a logo. Note: For a cloud implementation, Oracle staff need to make sure that this URL is added to the proxy server’s allow list. |
|
Optionally, enter a message to print on packing slips for delivery orders. The message prints below the addresses and above the items. See the Packing Slip for an example. Your entry can be up to 240 positions. |
|
Optionally, enter a message to print on packing slips for pickup orders. The message prints below the address and above the items. See the Packing Slip for an example. Your entry can be up to 240 positions. |
|
Optionally, enter a message to print on packing slips for ship-to-store orders. The message prints below the address and above the items. See the Packing Slip for an example. Your entry can be up to 240 positions. |
|
Shipping Service Configuration Shipping preference hierarchy: In order to use ADSI to ship delivery orders at any Store Connect location, you need to specify the shipping service as ADSO and complete the additional fields at this tab at the Store Connect system level. You must then set the Shipping Service preference at the system level, and can also set it at the location type or location level. The hierarchy is: 1. Use the setting at the location, if any. 2. If the setting for the location is Not Defined, use the setting at the location type, if any. 3. If the setting for the location type is Not Defined, use the setting for the Store Connect system. |
|
Navigational fields These fields are in the left-hand side of the screen, below the heading information. |
|
When you first advance to this tab, the location hierarchy is displayed in the left-hand pane, collapsed to the level of the Store Connect system for the organization you selected at the Organizations and Preferences screen. Shipping Service
specified? The system code and system name are displayed.
A blue arrow ( |
|

|
|
Type |
When you expand the System to highlight a location type in the left-hand pane, the location type’s code and name are displayed. A blue arrow next to the location type indicates that you have set a shipping preference at that level or lower. This setting, if any, applies if there is no setting at the location level. If the setting is Not Defined at both the location and location type level, the setting for the Store Connect system applies. |

|
|
Location |
When you expand the location type to highlight a location in the left-hand pane, the location’s code and name are displayed. If the Shipping Service is set to Not Defined at the location level, the location type-level setting, if any, applies; and if the Shipping Service is set to Not Defined at the location type level, the system-level setting applies. |
Shipping Preference settings |
|
Set this field to: • ADSI to use integrated shipping • Manual to use manual shipping (default) • Not Defined to check for a setting at the next higher level. If the Shipping Service is set to Not Defined at the location level, the location type-level setting, if any, applies; and if the Shipping Service is also set to Not Defined at the location type level, the system-level setting applies. Not a valid selection at the system level. |
|
Shipping Service Configuration Complete the following fields at the Store Connect system level to enable integrated shipping in Store Connect. If the Shipper URL and Shipper Name are not complete, integrated shipping will not be available at any store location, regardless of the setting of the Shipping Service. This information typically comes from your contact at ADSI. Note: These fields are display-only if the Shipping Service at the system level (highest level) is set to Manual. |
|
Enter the URL to use for the integrated shipping system when the store associate confirms shipments through integrated shipping. Required if the Shipping Service is set to ADSI at any level. Proxy: Order Broker uses the proxy server to relay requests to the integrated shipping system. See the Proxy Server Settings at the Tenant-Admin screen for background. Note: For a cloud implementation, Oracle staff need to make sure that this URL is added to the proxy server’s allow list. |
|
Enter the code that identifies you to the integrated shipping system. Required if the Shipping Service is set to ADSI at any level. |
|
Select the location to submit to ADSI as the return address for shipments: • Placed Location (default): The location that originated the order • Fulfilling Location: The store location fulfilling the order • Selected Location: Another location in your organization. If you select this option, the Location for Return Address field opens, so you can select the location to use as the return address. Note: The return address location must include: • contact name and company name • street address line 1 • U.S. city, state/province, and postal code • phone number of 10 positions, plus any formatting (for example, (508) 555-1111). The store location phone number is used if there is not a day or evening phone number for the order shipping address. See the Edit Location screen for more information on setting up locations. |
|
Location for Return Address |
Use this field to select the location in your organization to submit to ADSI as the return address for shipments. All locations for all systems within your organization are available for selection. This field is available only if you select Selected Location at the Shipping Label Return Address field. |
Receive Preferences tab (Receive) Use this tab to specify the worksheet to generate for receiving ship-to-store orders at a Store Connect location, and to specify whether to wait until all intransit items on an order are received before generating a pickup notification email. |
|
The BI Publisher template to use when generating the worksheet for receiving ship-to-store orders at a Store Connect location. The default program is ob_store_receive_form_report. Up to 255 positions. Required. Sample: See the Receiving Document. Unique form? If you specify a BI Publisher template for the receiving document, the cloud administration staff need to place the program file on the server. Language, date and time formats, and number formats are from the organization. If you leave this field blank, or if your entry does not match a file in the folder listed above, no receiving document PDFs are generated in Store Connect. |
|
Select this field to wait until all in transit items on a ship-to-store order are received before generating the Pickup Ready Notification to Customer (Pickup or Ship-to-Store Order). If there are any items in Intransit status using the same order number, even if the request ID is different, the notification email is withheld. Otherwise, leave this field blank to generate email notifications as items are received. Note: • The pickup ready notification email is still generated if there are items with the same order number that are in a status other than in transit, such as picked or new order. • The fact that the pickup ready notification email was held is not indicated to the store associate on any Store Connect screens. • The fact that there are any additional items in transit is not indicated on the View Pickup Ready Orders screen. • The store associate can still generate the Pickup Ready Reminder to Customer (Pickup or Ship-to-Store) for the order even before the initial pickup ready notification email is generated. For these reasons, and because the Ready for Pickup age displayed in Store Connect is based on the earliest date and when any item on the order was received, Oracle recommends that store associates check the order details before generating the pickup ready reminder email if the Hold Pickup Ready Email Until All Items Received flag is selected. |
|
New Order Polling Schedule tab (Schedule) Use this tab to set up the schedule to change new delivery or pickup orders from New Order status to Polled. Orders must be in Polled status before they are displayed on Store Connect screens and are available for processing by store associate users. Schedule options: • You can schedule polling of new orders based on the Interval Method specified at the system level for delivery and pickup orders. Each type of order can use a different method: • Immediate: Orders go into Polled status immediately. If you select this method at the system level, there are no other fields to enter at this tab. • Minutes: A job that runs every 15 minutes evaluates whether the specified interval specified for the location, location type, or system has elapsed; and, if so, it changes any new orders to Polled status. • Times: A job that runs every 15 minutes evaluates whether the time specified for the location, location type, or system has passed; and, if so, it changes any new orders to Polled status. • After specifying the method for each order type, you can specify different details if the Interval Method is Minutes or Time. For example, if an Interval Method of Minutes is specified at the system level for an order type of Delivery, you can set a default of 30 minutes at the system or location type level, but override the default to 20 minutes for individual locations. Schedule restrictions: • Single interval method for order type: You cannot set the Interval Method for an order type differently at different levels; the method is set for an order type at the system level only. For example, you cannot set the Interval Method to Minutes at the system level for delivery orders, but then override the method to Immediate for delivery orders for a location type or location; however, you could set the Interval Method to Time for delivery orders, and set it to Immediate for pickup orders. • No additional settings available when method is Immediate: If the Interval Method is Immediate, you cannot specify any other settings at the location type or location level. All new orders of the specified order type will be eligible for Store Connect processing immediately after creation. • Minutes must be 15 or more: If the Interval Method is Minutes, then you cannot set the Minutes to a number lower than 15, because the background job that evaluates whether to set new orders to Polled status runs only at 15-minute intervals. • Rejected orders: Even if the interval method is set to Immediate, rejected delivery orders are not polled immediately; instead, they are eligible to be polled every 15 minutes. • IN PROCESS location: If the Store Connect system is the default system and if your organization is configured to acknowledge orders before brokering, then the IN PROCESS location will be associated with the Store Connect system. In this situation, orders assigned to the IN PROCESS location are not polled until they are assigned to actual fulfilling locations. The polling schedule does not apply to ship-to-store orders. Note: The scheduled times are displayed and entered in the retailer’s time, which may be different from your local time. Note: Resolving scheduling issues: The Reschedule All option at the View Active Schedules screen stops and restarts the schedules for all jobs and periodic programs in the case of an interruption such as a server shutdown. Also, you use this option to start running all scheduled jobs and programs when first configuring Order Broker or after applying an upgrade. |
|
Navigational fields These fields are in the left-hand side of the tab, below the heading information. |
|
System |
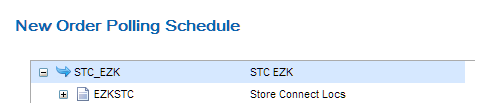
When you first advance to this tab, the location hierarchy is displayed in the left-hand pane, collapsed to the level of the Store Connect system for the organization you selected at the Organizations and Preferences screen. Polling schedule
specified? The system code and system name are displayed.
A blue arrow ( |

|
|
Type |
When you expand the System to highlight a location type in the left-hand pane, the location type’s code and name are displayed. A blue arrow next to the location type indicates if you have specified any scheduling options at that level or lower. If no scheduling options are specified at the location type level or the location level, the system-level setting applies. Location-level settings override settings at the location type or system level. Polling schedule
specified? The location type code and name are displayed.
A blue arrow ( |
|
|
Location |
When you expand the location type to highlight a location in the left-hand pane, the location’s code and name are displayed. If no scheduling options are specified at the location type level or the location level, the system-level setting applies. Location-level settings override settings at the location type or system level. Polling schedule
specified? The location code and name are displayed.
A blue arrow ( |
|
|
Current Server Time |
The current retailer’s time is indicated to help you determine the correct Daily Start Time, Daily End Time, and Times for scheduling, in case you do not use an Interval Method of Immediate. Note: The time is displayed here is in the format specified at the User Profile Configuration screen for your local time; however, when you enter times in the Times, you need to enter the times in 24-hour format. For example, even if the time displayed is 3:41 Eastern Standard Time, you need to enter 4:00 PM as 16:00. |
Delivery tab or Pickup tab You can set up a different interval method and schedule for updating delivery and pickup orders to Polled. For example, you might want to process pickup orders immediately, or at short intervals throughout the day, but make delivery orders available only at mid-morning and mid-afternoon. See above for a discussion. |
|
The method to use when evaluating whether to change new orders to Polled status for a Store Connect location, making the orders available for store associates to work with: • Immediate: Orders go into Polled status immediately. If you select this method at the system level, there are no other fields to enter at this tab. • Minutes: A job that runs every 15 minutes evaluates whether the specified interval specified for the location, location type, or system has elapsed; and, if so, it changes any new orders to Polled status. • Times: A job that runs every 15 minutes evaluates whether the time specified for the location, location type, or system has occurred; and, if so, it changes any new orders to Polled status. System level only: This setting is available at the system level only for Pickup and Delivery order types. Each order type can use a different method. Changing the interval method: When you change the interval method, your previous settings are lost. You will need to enter new interval settings. Rejected orders: Even if the interval method is set to Immediate, rejected delivery orders are not polled immediately; instead, they are eligible to be polled every 15 minutes. |
|
If you enter any settings at the location or location type level for an order type, you must complete all required settings as described below for that level. Any entry at the location level overrides any entry at the location type level. If there is no entry at the location level, the location type level overrides the system level. |
|
Day of Week |
Select one or more days of the week to change order status to Polled for the order type and the system, location type, or location. This option is: • not available if the Interval Method for the system and order type is set to Immediate • available at the system, location type, and location level for each order type if the Interval Method is set to Minutes or Time If the Interval Method is set to Minutes or Time, at least one day is required at the system level, and at any other level where you enter any settings. |
Daily Start Time |
Enter a daily start time in HH:MM, 24-hour format to indicate when to begin changing new orders to Polled status for the order type and the system, location type, or location. This option is: • not available if the Interval Method for the system and order type is set to Immediate • available at the system, location type, and location level for each order type if the Interval Method is set to Minutes or Time If the Interval Method is set to Minutes or Time, a daily start time is required at the system level, and at any other level where you enter any settings. |
Daily End Time |
Enter a daily end time in HH:MM, 24-hour format to indicate when to stop changing new orders to Polled status for the order type and the system, location type, or location. This option is: • not available if the Interval Method for the system and order type is set to Immediate • available at the system, location type, and location level for each order type if the Interval Method is set to Minutes or Time If the Interval Method is set to Minutes or Time, a daily end time is required at the system level, and at any other level where you enter any settings. |
Enter each time in HH:MM, 24-hour format, separated by commas and no spaces, to indicate when to change new orders to Polled status for the order type and the system, location type, or location. This option is available only if the Interval Method is set to Time. If the Interval Method is set to Time, at least one time is required at the system level, and at any other level where you enter any settings. |
|
Minutes |
Enter a number of minutes to indicate how often to change new orders to Polled status for the order type and the system, location type, or location. Your entry must be 15 or higher and a whole number. Examples: • You set an interval of 20 minutes. The background job wakes up at 10:00 and sets new orders to polled. The job wakes up again at 10:15 and does not update any orders, since 20 minutes have not yet passed. The job wakes up again at 10:30 and sets new orders to polled. • You set an interval of 15. Each time the background job wakes up, it sets new orders to polled. • You set an interval of 60. The background job wakes up at 10:00 and sets new orders to polled. The job wakes up again at 10:15, 10:30, and 10:45, but does not update any orders, since 60 minutes have not yet passed. The job wakes up again at 11:00 and sets new orders to polled. This option is available only if the Interval Method is set to Minutes. If the Interval Method is set to Minutes, this entry is required at the system level, and at any other level where you enter any other settings. |
Email Notifications The following settings control the email notifications sent to customers and to notify store locations of new orders. |
|
Retailer Email Address |
The email address to receive a notification when an item on a ship-to-store order is closed in Store Connect rather than received if, for example, an item was damaged in shipment or missing from the carton. Up to 255 positions. See the Close Notification to Retailer (Ship-to-Store Order) for an sample. Separate multiple email addresses with a semicolon. |
The “from” address used for email notifications to the customer (Shipment Notification Email, Pickup Ready Notification Email, and Pickup Ready Reminder Email). Up to 255 positions. Does not need to be a valid, existing email address, but the email domain must be valid; otherwise, emails to customers might not be generated. Required if any of the email notification templates at this tab are specified. |
|
New Order Notification Email |
Specifies the template used to generate a notification to a Store Connect location when an assigned order’s status changes from New Order to Polled. The base template name is NewStoreOrderNotification. Optional. Email templates are located in the Email Template Path specified at the Tenant - Admin screen. Contact your Oracle representative for information on using a unique template. Turn off email notifications? To turn off email notifications to a store location, delete the email address(s) specified at the Edit Location screen. To turn off email notifications for all store locations, leave this field blank. For more information: See: • contents: New Order Notification to Store Connect Location (Delivery or Pickup Orders) • email setup information: Store Connect Email Notifications Summary • scheduling polling for Store Connect orders: the New Order Polling Schedule tab (Schedule) • overview: Notifying Store Connect Locations about New Delivery and Pickup Orders |
Specifies the template used to generate a notification to the customer when any items on a delivery order is shipped from Store Connect. Required to generate shipment notifications from Order Broker. You would typically use this notification only if the originating system, such as Order Management System, does not also generate a shipment notification email. The base template name is ShipNotif. Optional. Email templates are located in the Email Template Path specified at the Tenant - Admin screen. Contact your Oracle representative for information on using a unique template. For more information: See: • contents: Shipment Confirmation to Customer (Delivery Order) • email setup information: Store Connect Email Notifications Summary |
|
Specifies the template used to generate a notification to the customer when the store associate confirms that one or more items on a pickup order is picked. Required to generate pickup notifications. The base template name is PickUpReadyNotif. Optional. Email templates are located in the Email Template Path specified at the Tenant - Admin screen. Contact your Oracle representative for information on using a unique template. For more information: See: • contents: Pickup Ready Notification to Customer (Pickup or Ship-to-Store Order) • email setup information: Store Connect Email Notifications Summary |
|
Specifies the template used to generate a notification to the customer when the store associate selects Resend Email for a pickup order that has been picked and is not under review. If no template is specified here, the Resend Email option is not available in Store Connect. The base template name is PU-Remind. Optional. Email templates are located in the Email Template Path specified at the Tenant - Admin screen. Contact your Oracle representative for information on using a unique template. For more information: See: • contents: Pickup Ready Reminder to Customer (Pickup or Ship-to-Store) • email setup information: Store Connect Email Notifications Summary |
|
STS Pickup Ready Notification Email |
Specifies the template used to generate a notification to the customer when a ship-to-store order is received. Required to generate ship-to-store pickup notifications. The Hold Pickup Ready Email Until All Items Received setting controls whether to generate the notification email as items are received at the store location, or wait until all shipped items are received. The base template name is STSPickUpReadyNotif, which is very similar to the base template for the Pickup Ready Notification Email. Up to 255 positions. Optional. Email templates are located in the Email Template Path specified at the Tenant - Admin screen. Contact your Oracle representative for information on using a unique template. For more information: See: • contents: Pickup Ready Notification to Customer (Pickup or Ship-to-Store Order) • email setup information: Store Connect Email Notifications Summary |
STS Pickup Ready Reminder Email |
Specifies the template used to generate a notification to the customer when the store associate selects Resend Email for a ship-to-store order that has been received. If no template is specified here, the Resend Email option is not available for a ship-to-store order in Store Connect. The base template name is STSPickUpRemind, which is identical to the base template for the Pickup Ready Reminder Email. Up to 255 positions. Optional. Email templates are located in the Email Template Path specified at the Tenant - Admin screen. Contact your Oracle representative for information on using a unique template. For more information: See: • contents: Pickup Ready Reminder to Customer (Pickup or Ship-to-Store) • email setup information: Store Connect Email Notifications Summary |
Email Image |
|
The URL for the logo to include on email notifications to customers. Emails include the image at a size 225 x 50 pixels. See Store Connect Email Notifications Summary for a list of email notifications to customers. Preview the logo:
After entering the URL, click the preview icon ( Note: For a cloud implementation, Oracle staff need to make sure that this URL is added to the proxy server’s allow list. |
|
Integrated Shipping Setup and Troubleshooting: Store Connect
Required setup: The setup required for shipping through an integrated system such as ADSI includes:
• Store Connect Preferences: the settings described above under Shipping Preferences tab (Shipping) at the Store Connect Preferences screen.
• return address: The Shipping Label Return Address specifies the location whose address is used as the return address on the shipping label must include:
• contact name and company name
• street address line 1
• U.S. city, state/province, and postal code
• phone number of 10 positions, plus any formatting (for example, (508) 555-1111). The store location phone number is used if there is not a day or evening phone number for the order shipping address.
See the Edit Location screen for more information on setting up locations.
• Carrier codes: The service codes set up in the integrated shipping system should match the carrier codes set up in Order Broker. If the service codes include leading zeros, then the carrier codes must match; for example, 1 is not a match for 01.
See Carriers for more information on setting up carriers.
• Boxes: The dimensions of the box used with each shipment is required for all delivery orders using an integrated shipping system. When the store associate confirms shipment of items on delivery orders through integration with an automated shipping system, the system requires you to select the box size on the Estimated Weight and Dimensions window. The store associate can select one of the predefined box sizes or manually define the length, width, and height of the box.
• originating address: The address of the fulfilling location is used as the originating address, and must include:
• street address line 1
• U.S. city, state/province, and postal code
• phone number of 10 positions, plus any formatting (for example, (508) 555-1111).
See the Edit Location screen for more information on setting up locations.
• proxy settings: If a store associate attempts to ship through integration with ADSI and the Proxy Server Settings at the Tenant-Admin screen are not correct, the Store Connect screen opens a pop-up window indicating an unhandled ADSI error. Also, an error message is written to the server log.
Restrictions for integrated shipping:
• International shipping not supported: Shipping to addresses outside of the United States is not currently supported through integrated shipping screens in Store Connect.
• Address line and apartment/suite: Address line 2 cannot exceed 35 positions; also, the apartment/suite number is appended to address line 2. If the address line 2 exceeds 35 positions, ADSI truncates the line for a Federal Express carrier, and returns an error for a UPS carrier.
Logging: The integrated shipping messages are logged in the shipping_ds.log file, based on the setting of the Integrated Shipping Request/Response field at the Event Logging screen. Also, integrated shipping errors are logged in the error.log file.
To help you identify possible response delays, the response time is logged in the shipping_ds.log file with the ResponseTime tag.
For more information: See the Troubleshooting chapter of the Operations Guide for more information on using the Order Broker log files.
Note:
• Duplicate service codes: If you set up multiple service codes in ADSI for the same carrier, the first service code is used on the shipment regardless of whether it was the carrier selected for the order. For example, if you set up both service code 10 and service code 20 in ADSI as UPS Next Day, and the associate confirms the shipment using carrier 20, service code 10 is returned from the integrated shipping system.
• Rate shopping: If the associate confirms a shipment using a rate-shopping service code, and ADSI returns a code that is not currently a valid carrier in Order Broker, Order Broker automatically creates the carrier code.
________________________________
Copyright © 2020, Oracle and/or its affiliates. All rights reserved.
Legal Notices