Configuring Drop Zones
This topic provides an overview of drop zones and discusses how to:
Insert configurable drop zones.
Note: Typically, as an Oracle customer, you should skip this step. PeopleSoft application teams have already added and delivered one or more configurable drop zones on selected pages.
Create custom subpages for dynamic injection into drop zones.
Configure drop zones.
Configurable drop zones allow you to add fields to delivered pages without customizing the delivered component or page definition. Your fields are displayed and processed along with fields from the main page definition and any nested subpages or secondary pages.
At design time, a placeholder subpage stub (PT_ERCSUBPAGE_STUB) is inserted into a special group box on the page definition, creating what is referred to as a “drop zone.” Drop zones can be added to a main page, to subpages at any nesting level, and to secondary pages. Typically, PeopleSoft application teams (PeopleSoft HCM, PeopleSoft FSCM, and so on) have identified which delivered pages can be extended by customers and have already added one or more configurable drop zones on these pages, subpages, and secondary pages. Then, you create custom subpage definitions and associate your subpages to one or more drop zones. Finally, at runtime during the component build process, the configured subpage dynamically replaces the subpage stub. The records and fields defined on your subpage are loaded into the component buffer along with the records and fields from the main page definition.
The complete procedure for inserting and configuring drop zones includes three tasks described within this topic:
(Optional) Inserting configurable drop zones.
Important! This task is described for informational purposes only. Drop zones are delivered by PeopleSoft application teams. Therefore, this step is typically not performed by you. While you could add drop zones to your own custom application pages, there really is no reason to do so. Moreover, if you were to add drop zones to pages delivered by Oracle, those changes would be considered customizations.
To understand the process used by PeopleSoft application development teams, see Inserting Configurable Drop Zones.
Creating subpages for these drop zones.
Configuring a selected drop zone by associating a custom subpage to it.
Important! This task is described for informational purposes only. Drop zones are delivered by PeopleSoft application teams. Therefore, this step is typically not performed by you. While you could add drop zones to your own custom application pages, there really is no reason to do so. Moreover, if you were to add drop zones to pages delivered by Oracle, those changes would be considered customizations.
Guidelines for Creating Configurable Drop Zones
Note: The following guidelines are valid for conventional components only. For “derived components”—that is, components with a derived record structure—you must carefully evaluate the derived record and key structure and database fetch, save, and commit mechanisms since these will not necessarily rely on the built-in processing of the PeopleTools component processor. Depending on the component’s architecture, adding a drop zone may or may not work and must be tested thoroughly.
Adhere to the following guidelines when inserting configurable drop zones:
Insert the group box type that is appropriate to the page type (fluid pages versus classic pages).
Insert the PT_ERCSUBPAGE_STUB subpage stub into the group box . (This subpage stub is identified on the PeopleTools Options page.)
Do not insert any other page controls within the group box.
If you add a drop zone on a secondary page, then you must also insert a secondary page control on the main page or subpage that launches the secondary page.
-
If you add a drop zone on a subpage or a secondary page rather than on the main page, then you must ensure that each drop zone that will be displayed along with the main page at runtime can be uniquely identified. The PeopleSoft system uses the combination of
occurs_lvl.RECORD_NAME.FIELD_NAME.Field_IDto identify each group box as a page record field. By associating each group box to a unique record field, you will ensure that each can be uniquely identified.Image: Unique page field identifier
The information that uniquely identifies page field can be found on the page definitions Order tab. In the following example, Top of Page Drop Zone is uniquely identified as
0.MYQKCONT_WRK.MQC_DZ_1.2.
Important! Because the PeopleSoft system uses the combination of
occurs_lvl.RECORD_NAME.FIELD_NAME.Field_IDto identify each drop zone, you cannot make any updates that would change any of the elements of this unique identifier such as moving the drop zone to a different occurs level, changing the associated record field, or deleting the drop zone. Any such change will orphan and break existing configurations based on that drop zone. If you need to make any such updates, delete any existing configurations first so that they are not orphaned. Make the required changes. Then, re-establish the configuration.
Inserting a Group Box as a Drop Zone
To insert a group box as a drop zone:
Insert the group box on your page in the general position you would like to display the content from the custom subpage.
Note: On classic pages, similar to inserting other page controls, ensure that there is a minimum of a 5 pixel vertical gap between the drop zone group box and other page controls.
Double-click the group box to open the Group Box Properties dialog box.
Then, configure the group box depending on the page type:
For fluid pages, on the Fluid tab, set the Group Box Type to Related Content.
For classic pages, on the Use tab, select these check boxes: Drop Zone Group Box and Hide all Fields when Group Box Hidden.
(Optional) Apply styling, if needed, to this group box that will only be rendered if a subpage is configured for this drop zone.
Select the Label tab and enter a descriptive label to identify this group box as a drop zone. Enter a label that describes the position, purpose, or both for this drop zone. The label is not rendered at runtime, but it will help at design and configuration time by:
Differentiating this drop zone from any others on this page as well as any associated subpages or secondary pages.
Providing a label on the drop zone during page preview in Application Designer.
Providing a label for the drop zone during the drop zone configuration task, which displays all available drop zones from the component.
Associate a record field to this drop zone to ensure that it has a unique page field identifier.
Insert the PeopleTools-defined PT_ERCSUBPAGE_STUB subpage stub into the related content group box:
On fluid pages, the upper left corner of the subpage must be located within the group box. On classic pages, the entire subpage must be located inside the boundaries of the group box.
Image: PT_ERCSUBPAGE_STUB subpage
In this example, the PT_ERCSUBPAGE_STUB subpage is located within the drop zone group box in a manner that satisfies both fluid and classic requirements on placement.

The subpage must be listed immediately after the group box on the Order tab for the page definition.
Image: Page definition: Order tab
In this example, the PT_ERCSUBPAGE_STUB subpage immediately follows the Data Area Drop Zone (Level 1) group box on the Order tab.
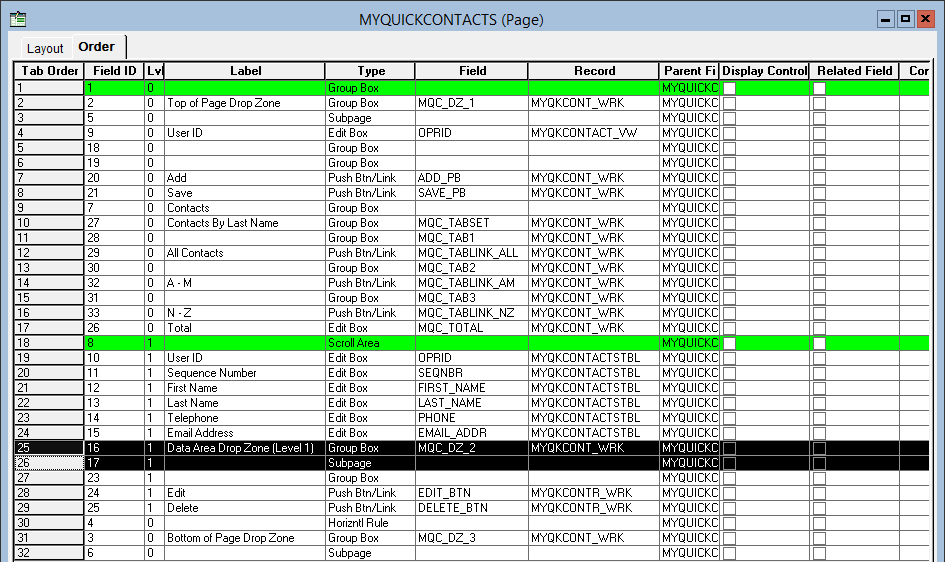
Important! If you insert multiple drop zones on the same page, always inspect and fix the order of group boxes and subpages on the Order tab.
For classic pages only, open the Page Properties dialog box. On the Use tab, select the Adjust Layout for Hidden Fields check box.
Save your changes.
(Optional) Use the page preview in Application Designer to preview the page with drop zones.
Special Considerations for Drop Zones on Fluid Pages
Note that adding a related content group box on a fluid page creates a “drop zone.” These fluid drop zones can be configured for two purposes:
Embedded related content only.
Note: The absence of the PT_ERCSUBPAGE_STUB subpage means that such a group box can be configured for embedded related content only.
Embedded related content was introduced in PeopleTools 8.55. While the procedure for creating and configuring embedded related content has not changed, the group box itself is now also referred to as a drop zone. See Working with Embedded Related Content.
Dynamically injected custom subpages or embedded related content.
A related content group box created for dynamically injected custom subpages could be configured for embedded related content instead. However, both uses cannot coexist simultaneously. If a drop zone already configured with embedded related content is reconfigured with a custom subpage, then the embedded related content configuration is overridden. If a drop zone is already configured with a custom subpage, it will not be available for configuration with embedded related content.
Considerations for Creating Custom Subpages
Consider the following when creating custom subpages for dynamic injection into drop zones:
The records and fields defined on your subpage will be loaded into the component buffer along with the records and fields defined on the page containing the drop zone.
However, the fields from your subpage that are dynamically added to the component buffer at runtime are not available in the component’s search record or its add search record.
In addition, the fields from your subpage that are dynamically added to the component buffer at runtime are also not available in component interfaces.
Multiple updatable tables are allowed at level 0 only.
If you add a grid or scroll area to the subpage, you must add a horizontal rule after it to reset the level to 0.
Unlike when a subpage is added directly as a page control on a main page definition, with this sort of dynamically injected subpage you cannot perform a record name substitution (that is, identify a from record on the subpage and a to record from the main page as described in Understanding Subpages).
Record field PeopleCode defined on your subpage will execute as part of the events in the component processor flow. If your implementation requires other scenarios or PeopleCode events, (for example, page Activate, PreBuild, PostBuild, component record, or component record field events), then you must use PeopleCode event mapping to avoid customizing delivered components and pages. See Mapping Application Class PeopleCode to Component Events for more information.
Note: While drop zones can be added to pages in unregistered components, unregistered components do not support event mapping.
Creating a Fluid Subpage Definition
To create a fluid subpage definition:
In Application Designer, select File, New.
Select Page (Fluid) in the New Definition dialog box, and click OK.
Select PSL_SIMPLE_SBP to create a fluid subpage.
Click Choose, and then enter the name for your custom subpage in the Save As dialog box.
Indicate whether you’d like to save the PeopleCode associated with the layout page for your new page (Yes/No).
Note: Typically, click Yes to include any PeopleCode from the layout page.
Open the Page Properties dialog box.
On the Use tab, select Subpage to specify this as a fluid subpage.
Add page controls on your subpage definition.
Creating a Classic Subpage Definition
To create a classic subpage definition:
In Application Designer, select File, New.
Select Page in the New Definition dialog box, and click OK.
Open the Page Properties dialog box.
On the Use tab, select Subpage to specify this as a classic subpage.
Insert a container that encompasses the full extents of the page definition. All other page controls inserted on your custom classic subpage must be enclosed by this container. You can use either a group box or a frame as this container.
Apply styling and settings to the container per your requirements. In some circumstances, you may want a title and borders on the container:
For a group box container:
Important! Do not select Drop Zone Group Box on the Use tab. This setting pertains only to the drop zone itself, which is found on the main page.
Clear the label text on the Label tab.
Set the Label Style to PAGROUPBOXLABELINVISIBLE.
If the drop zone appears in a classic plus component, set the Body Style to PSGROUPBOXCONTAINER to remove margins, padding, and the label from the container.
Select the Adjust Layout for Hidden Fields check box.
Optionally, select the Hide Border check box.
For a frame container:
Clear the label text on the Label tab.
Set the Style to PSGROUPBOXCONTAINER.
If the drop zone appears in a classic plus component, set the Body Style to PSGROUPBOXCONTAINER to remove margins, padding, and the label from the container.
Select the Adjust Layout for Hidden Fields check box.
Optionally, select the Hide Border check box.
Add page controls on your subpage definition.
Use the Configure Drop Zones pages to search for, select, and configure components containing configurable drop zones, including unregistered components.
Navigation
Image: Configure Drop Zones search page
This example illustrates the fields and controls on the Configure Drop Zones search page. You can find definitions for the fields and controls later on this page.
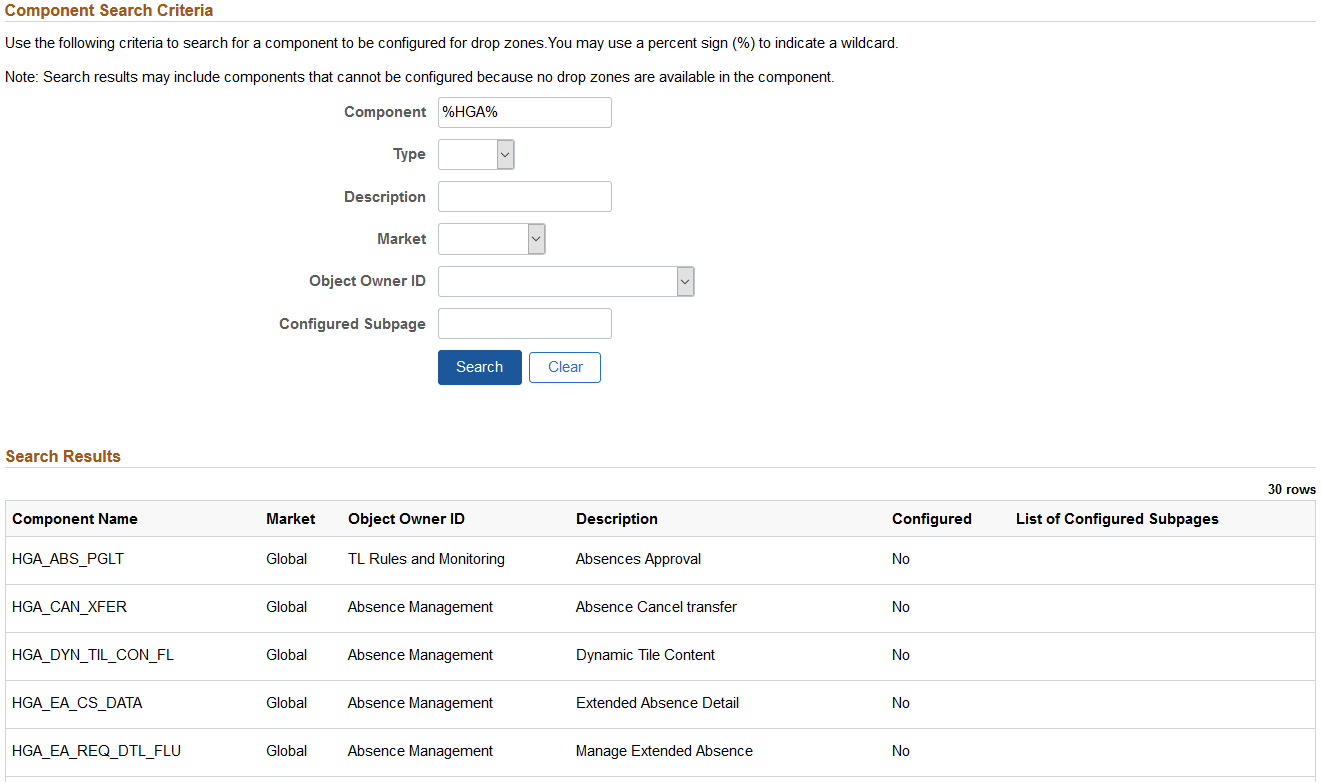
You must enter one or more search criteria to perform a search using this page. You may use % as a wildcard.
|
Field or Control |
Definition |
|---|---|
| Component |
Enter a definition name for the component as search criteria. |
| Type |
Select either Fluid or Classic to limit search results to either fluid or classic components. |
| Description |
Enter the description as defined on the General tab of the Component Properties dialog box as search criteria. |
| Market |
Select the market for the component from the drop-down list. |
| Object Owner ID |
Select the object owner ID for the component from the drop-down list. |
| Configured Subpage |
Enter the definition name for an already configured subpage as search criteria. |
Important! Search results may include components that cannot be configured because no drop zones are available in the component. Clicking such a component in the list will display a message that no drop zones are available.
In the search results, click a row to configure the available drop zones for that component.
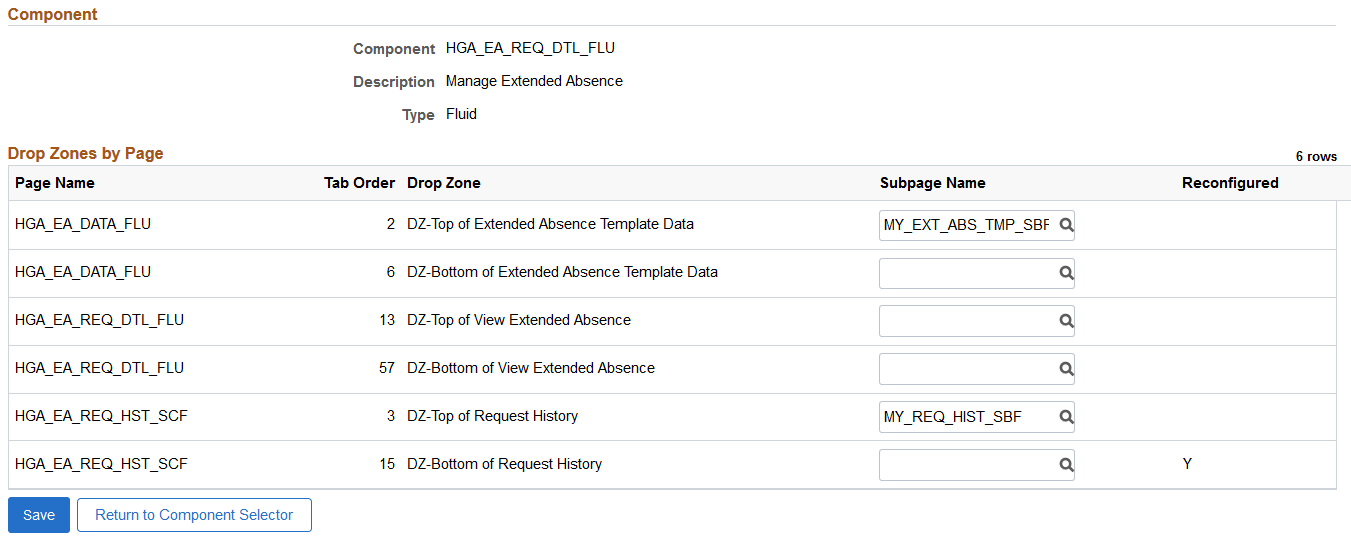
Image: Configure Drop Zones configuration page
This example illustrates the fields and controls on the Configure Drop Zones configuration page. You can find definitions for the fields and controls later on this page.
|
Field or Control |
Definition |
|---|---|
| Page Name |
Displays the name of the main page that contains a drop zone or that contains a subpage with a drop zone, or it displays the name of a secondary page that contains a drop zone. Note: Subpage names are not displayed in the grid; only the name of the main page that contains the subpage or nested subpage is displayed. Note: If you are attempting to configure a secondary page and that page does not appear on the list for this component, then the link to this secondary page is missing—that is, there is no secondary page control on the main page or subpage that launches the secondary page. Since modifying the main page or subpage yourself would be considered a customization, contact support to determine whether a bug should be logged. |
| Tab Order |
Displays the tab order number for the drop zone from the Order tab of the page definition (page or subpage) where the drop zone group box is physically defined. |
| Drop Zone |
Displays the label for the drop zone, which is derived from these values in descending order of precedence:
Important! If the label of a field other than the drop zone group box is displayed, then the PT_ERCSUBPAGE_STUB subpage is positioned incorrectly on the page definition. In particular, check the Order tab. Since modifying the main page or subpage yourself would be considered a customization, contact support to determine whether a bug should be logged. |
| Used By Related Content |
(Fluid only) Indicates that this drop zone has been configured for fluid embedded related content. Reconfiguring it with a subpage overrides the embedded related content configuration. |
| Subpage Name |
Select a subpage to associate with the drop zone. Note: Because fluid drop zones can be associated with fluid subpages only and classic drop zones can be associated with classic subpages only, the search results are filtered to show valid subpages only, and not all subpages. To remove a subpage configuration, clear the Subpage Name field and save your changes. |
| Reconfigured |
Indicates that an existing subpage configuration has been changed. Note: This indicator is displayed only after you save your changes. It is not displayed if you return to reconfigure drop zones for this component. |