Creating Essbase Dimensions
This topic discusses how to create Essbase dimensions in the dimension page.
Use the Dimension page (CUB_DIMENSION) to define an Essbase dimension.
When you first access the Dimension page to create a dimension, this page displays dimensional properties and a blank Dimension Structure section with a root node that has the same name as the dimension; most of the action icons at the bottom are disabled. Later on, depending on the Dimension Type value, the tree object members may or may not have all of the available properties that are shown in the following example. Action icons appear available as they become relevant when you build the dimensional structure.
Navigation
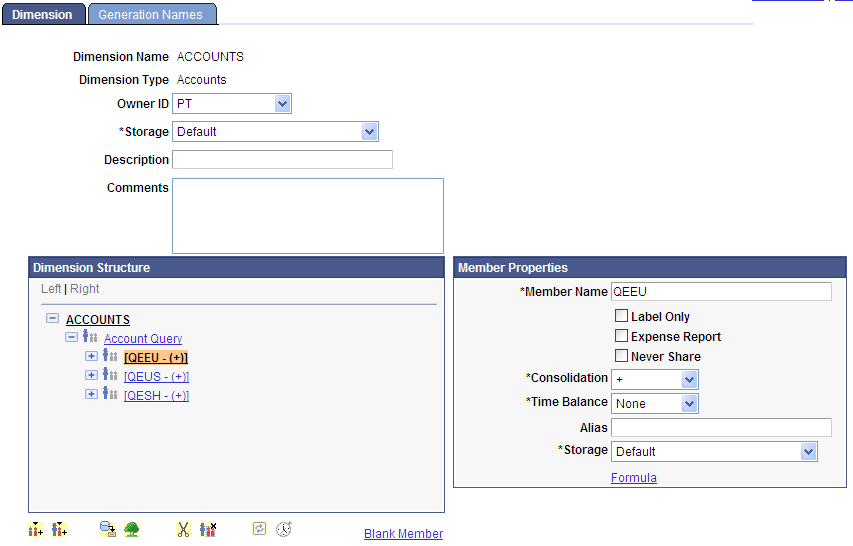
Image: Dimension page when you first access it to create a dimension
This example illustrates the fields and controls on the Dimension page when you first access it to create a dimension.
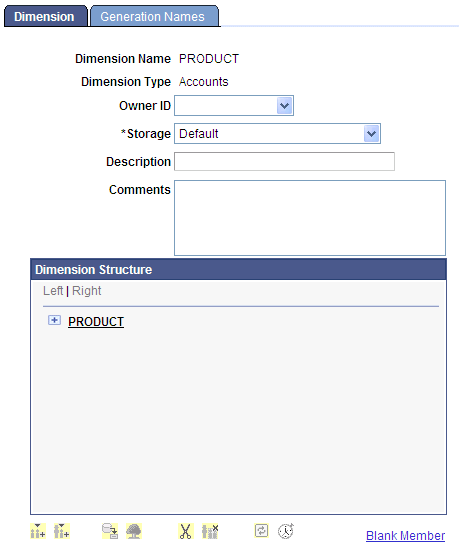
Image: Dimension page with some properties and active icons
This example illustrates the fields and controls on the Dimension page with some properties and active icons.
|
Field or Control |
Definition |
|---|---|
| Dimension Type |
The system displays the type of the dimension. Available options are:
|
| Owner ID |
Select the owner of the dimension. The owner ID helps to determine the product, feature, or application team that last made changes to this dimension. |
| Storage |
Select from the following storage options:
|
| Dimension Structure |
Displays dimension data graphically to show a tree hierarchy. |
 |
The Add Member Peer icon is available when you highlight a tree member. Click this icon to add a new member that is a peer of the currently highlighted member. |
 |
If the current member can have children, the Add Member Child icon is available when you highlight a tree member. Click this icon to add a new member that is a child of the currently highlighted member. |
 |
Click the Assign From Query icon to run a public query. The results of running the query will be placed directly under the currently highlighted member. You can select which query to run, and you need to supply any prompt values that the query requires. You need to supply the column of the query to use to populate the child members, which will be created when the query is run. You also can select the query to be run in dynamic mode. The query must return at least one row of data or it is considered invalid and is not used. |
 |
Click the Assign From Tree icon to copy a tree structure into the dimension. Select the starting node of the tree; the system copies the selected node and all of its children. The currently highlighted node becomes the selected tree top node, and the member name of the current node is changed to reflect this selection. As with queries, you can select to have the tree copy be dynamic. |
 |
Click the Delete Member icon to delete dimension (children) members. |
 |
Click the Delete All Children icon to delete all query or tree children. |
 |
Click the Reset Values icon to clear or refresh member override values, if any, that you have entered for dynamic trees and queries. Note: This icon is used for dynamic queries and trees when the concept of member overrides and templates is defined. This clearance is important if you have changed a template and want to reset all previously saved values. |
 |
Click the Time Dimension Wizard icon to access the Time Dimension Wizard page, where you can automatically populate the members of a time dimension. Note: The Time Dimension Wizard icon is available only for the time dimensions and not for other dimension types. |
| Blank Member |
Click to access the Dimension Options page where you can specify a unique name for the blank member in the dimension. The name that you specify for a dimension member is used as a placeholder for any blank member that Cube Builder finds in the resulting query data rows. |
| Member Name |
Enter the name or identifier of the member. |
| Label Only |
This option is available only for child members, which are not at level 0. Select to enable the system to group members together (with a dummy parent member) and enable easier access to the report. Note: If you define a parent member as label only, the system does not calculate parent member from its child and reserves no storage space for that parent member. Use the default calculations for parent members to save time and storage space. When you view the report in Microsoft Excel, the label-only member shows its first child value and does not occupy any storage space. |
| Expense Report |
Expense item applies to account dimensions only. Essbase has certain built-in formulas that can take advantage of the knowledge that an item is an expense. Select this check box to pass this knowledge on to Essbase. Valid values are Blank (set) and non-Blank (do not set). |
| Shared Member |
Select to share values between members. |
| Never Share |
Select to not allow members to be shared implicitly. Note: Members that are set as Never Share can only be explicitly shared. To explicitly share a member, create the shared member with the same name and set it as shared. |
| Consolidation |
This property enables you to define the mathematical operator used for rolling up members. Most often, you expect that data is added (using the + operator) when rolled up. However, you might occasionally need to specify other operators. The available operators are:
|
| Time Balance |
Time balance affects how the parent time value is calculated. Select from these values:
|
| Alias |
You have the options to either:
After saving the dimension, member aliases are displayed next to member names. Note: When you use a tree to create a dimension, the descriptions of the nodes will be the member aliases. |
| Storage |
Data storage enables Essbase to recognize what type of storage to allocate for the member. Select from these values:
|
| Formula |
Click to access the Member Formula page, where you can enter formula information for a dimension member. |
| Dynamic Source |
If you select a dynamic query or dynamic tree member of the dimensional structure, the attributes on the right also display the dynamic object key values that were used in creating the entries:
|
Using the Blank Member Option
PeopleSoft Cube Builder uses queries and trees to define the structure of a dimension. You can define a dimension query that returns data rows used to generate the members of a dimension as well as its hierarchical structure, or insert a tree structure into a dimension.
To populate the data in a cube, you need to define a data source query that must return one column for each dimension and one column for the measures (facts). If you are building a data source query for a cube that contains the amounts dimensioned by account, region, product, and date, then the output of the query should have five columns.
Image: Data source query of a cube
This example shows the data source query of a cube that contains the amounts dimensioned by account, region, product, and date.
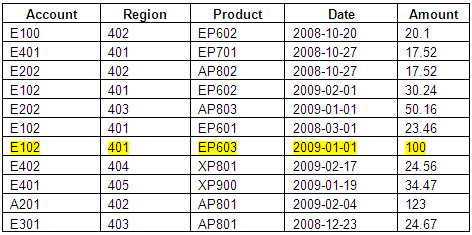
The dimension columns (Account, Region, Product, and Date) contain the dimension member names, and the measure column (Amount) contains the value of the measure. Thus, each result data row defines the data cell to be populated and the value of the measure column. For example, the amount (measure) of 100 is the results of the data cell where account equals E102, region equals 401, product equals EP603, and date equals 2009-01-01.
If the data is not defined for every dimension in the result data cells, then some data queries return rows with blank or empty dimension members.
Image: Data source query for a cube with blank members
This example shows the data queries that return rows with blank or empty dimension members.
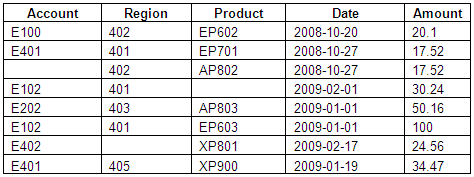
If blank members are returned and the blank member name is not specified, then the data load processing of Cube Builder ignores the rows that contain blank members. Thus, some measures are not added to the rollup total, and the rollup total is not accurate
To accurately add all measures to the rollup total when a member has no name, you use the Blank Member link in the Dimension page to access the Dimension Options page, where you can specify a unique name for the blank member in the dimension. The name that you specify for a dimension member is used as a placeholder for any blank member that Cube Builder finds in the resulting query data rows.
Using the Dimension Options Page
Use the Dimension Options page (CUB_DIM_OPTIONS) to specify a name for the blank member.
If the Blank Member field is specified, when you create dimension or load data, Cube Builder creates a dimension member for the blank member using the value in the Blank Member field to hold the blank member.
If the Blank Member field is blank, Cube Builder ignores the blank member when you create dimension or load data.
Navigation
Image: Dimension Options page
This example illustrates the fields and controls on the Dimension Options page.
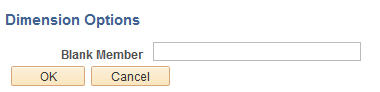
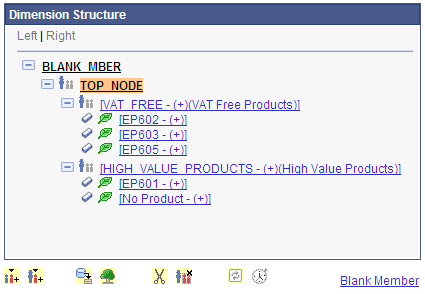
Image: Dimension for the blank member from a static tree
This example shows the dimension for the blank member (No Product) from a static tree when the Blank Member field is specified as No Product.
If the dimension is not populated from a static or dynamic tree structure, you can manually add the blank member name to the dimension and then specify the Blank Member field value using the same name to indicate that the dimension member using the specified name is the blank member.
To manually add a blank member name to a dimension:
In the Dimension Structure section of the Dimension page, add a dimension member.
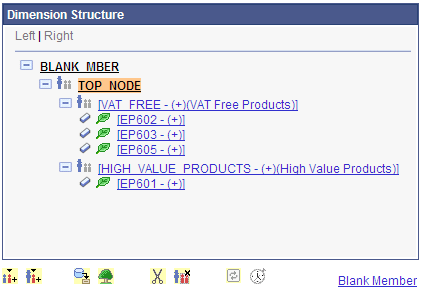
Image: Dimension member (NO_ACCT) in the Dimension Structure section
This example shows the newly added dimension member (NO_ACCT) in the Dimension Structure section.
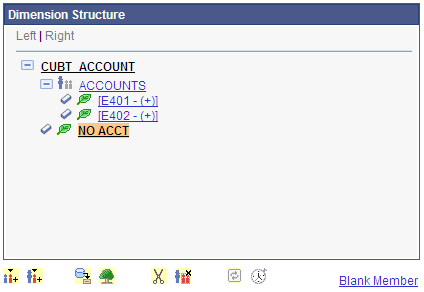
Select the newly added dimension member (NO_ACCT) and click the Blank Member link.
The Dimension Options page appears.
Enter a name (NO_ACCT) in the Blank Member field.
When Cube Builder creates the dimension structure:
If the dimension member (NO_ACCT) has the same name that is specified in the Blank Member field on the dimension, then the dimension member is used as a place holder for the blank member.
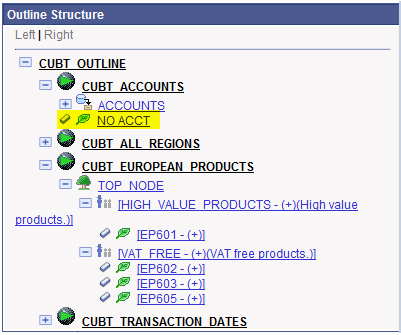
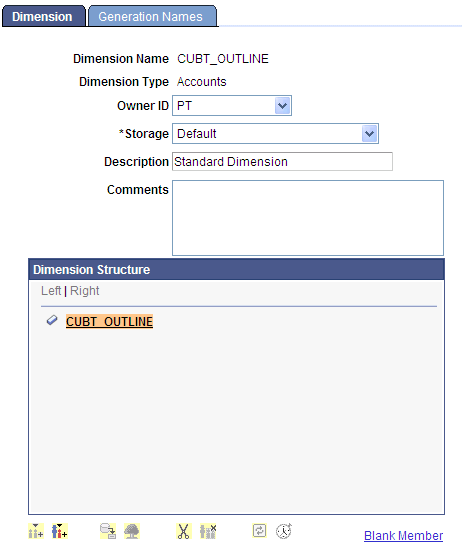
Image: Outline displays the blank member
This example shows the outline that displays the blank member (NO_ACCT) under the CUBT_OUTLINE dimension.
If blank member is not defined for the dimension, then when you insert a tree structure with a blank member (leaf) into the dimension, the blank member is ignored and no blank dimension is created.
Image: Outline displays the dimension structure without the blank dimension created
This example shows the dimension structure without the blank dimension created.
When you run the data to create or populate the cube, Cube Builder checks whether a blank member is defined for the dimension.
If the dimension has blank members and the blank member name is defined, then the measure value is populated to the cell for the blank member of the dimension.
If no blank member is found in the dimension or no blank member name is defined, then the measure value is ignored.
Image: Results from the data source query with a blank member
This example shows the results from the data source query with a blank member in the Account dimension.
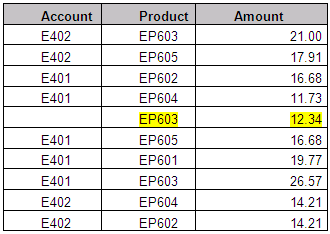
In the previous example, when member name NO_ACCT is selected as the blank member, the data row that shows Account equals <blank> and Product equals EP603 will be populated to a cell with Account equals NO_ACCT and Product equals EP603.
Image: Sample cube
This example shows the sample cube.
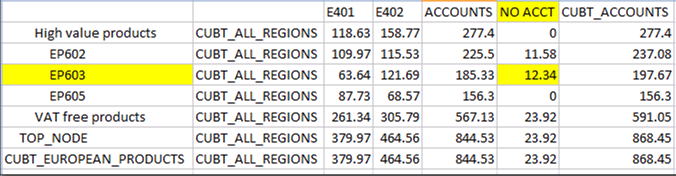
Note that:
If a dimension is already created from a static tree or query, entering a name for the blank member after inserting a tree or query to the dimension will not automatically add the blank member. In this case, you must manually add a member with the same name to indicate the member is a placeholder for blank member.
Using the blank member in dimension is optional. If the blank member name is not defined and if data rows contain blank members in the dimension during data load, then those blank members are excluded from the dimension on the cube.
Each dimension can have only one blank member name, so only one member is attached to the blank member name.
Essbase Cube Builder applies the duplicate member rules when it uses the blank member name.
The blank member name must be unique to the dimension.
Creating a Dimension from a Query Without the Blank Member Name Defined
To create a dimension from a query without the blank member name defined:
Select to add a new dimension.
In the Dimension page, select the root node in the Dimension Structure section and click the Add Member Child icon.
Enter the name for the child member.
Select the member child and click the Assign From Query icon to populate the dimension from a dimension query.
In the Find Query page, select the Dynamic option to create a dimension from a dynamic query.
Alternatively, clear the Dynamic option to create a dimension from a static query.
Search for and select a query, and click the OK button.
In the Select Column page, select the column that contains the member name and its alias.
Click the OK button to populate the dimension with members from the query.
Note: The blank members from the dimension query are not listed in the dimension structure because the blank member name is not specified in the dimension.
Creating a Dimension from a Query With the Blank Member Name Defined
To create a dimension from a query with the blank member name defined:
Select to add a new dimension.
In the Dimension page, select the root node in the Dimension Structure section, and click the Add Member Child icon.
Click the Blank Member link to access the Dimension Options page.
Enter a name for the blank member and click the OK button.
In the Dimension page, select the member child and click the Assign From Query icon.
In the Find Query page, select the Dynamic option to create a dimension from a dynamic query.
Alternatively, clear the Dynamic option to create a dimension from a static query.
Search for and select the dimension query.
In the Select Column page, select the column that contains the member name and its alias.
Click the OK button to populate the dimension with members from the query.
Note: The blank member from the dimension query is added to the dimension structure using the blank member name that you defined in the dimension.
Modifying the Blank Member Usage in an Existing Dimension with the Members Populated from a Static Query
If you add a blank member name to an existing dimension or remove a blank member name from an existing dimension that was created from a static query, the dimension query structure is not changed. To modify the blank member usage in a dimension that was created from a static query, you can use one of the following methods:
Reload the dimension members from dimension query by deleting the member structure and then adding it again.
Manually add the blank member to the dimension structure.
The name should be specified in the Blank Member option of the dimension.
Manually remove the blank member from the dimension.
Removing a Blank Member from an Existing Dimension with the Members Populated from a Dynamic Query
To remove a blank member from an existing dimension with the members populated from a dynamic query:
Select .
Open an existing dimension with the members from a dynamic query.
Click the Blank Member link in the Dimension page.
Clear the Blank Member field in the Dimension Options page, click the OK button, and save the dimension.
Reopen the dimension to see the changes.
The blank member is removed from the dimension structure.
Note: In a dimension with the members populated from a dynamic query, you must save and then reopen the dimension to view the changes of the blank member in the dimension structure.
Adding a Blank Member to an Existing Dimension with the Members Populated from a Dynamic Query
To add a blank member to an existing dimension with the members populated from a dynamic query:
Select .
Open an existing dimension with the members from a dynamic query.
Click the Blank Member link in the Dimension page.
Enter a blank member name in the Blank Member field.
Click the OK button and save the dimension.
Reopen the dimension to see the changes.
The blank member is listed in the dimension structure.
Creating a Dimension Using a Tree and Without the Blank Member Name Defined
To create a dimension using a tree and without the blank member name defined:
Select to add a new dimension.
In the Dimension page, select the root node in the Dimension Structure section and click the Add Member Child icon.
Enter a name for the member child and click the OK button.
The Dimension page reappears.
Click the Assign From Tree icon to populate the dimension from a tree.
In the Find Tree page, select the Dynamic option to create a dimension from a dynamic tree.
Alternatively, clear the Dynamic option to create a dimension from a static tree.
Select a tree and the top nodes that will be used to populate the dimension members.
Click the OK button and save the dimension.
Note: The Dimension Structure section in the Dimension page does not list the blank members or leaves from the tree because the blank member name is not defined (or no blank member name is specified) in the dimension.
Creating a Dimension Using a Tree With the Blank Member Name Defined
To create a dimension using a tree with the blank member name defined:
Select to add a new dimension.
In the Dimension page, click the Blank Member link.
Enter a blank member name in the Dimension Options page and click the OK button.
In the Dimension page, select the root node and click the Add Member Child icon.
Enter a name for the member child and click the OK button.
In the Dimension page, click the Assign From Tree icon to populate the dimension from a tree.
In the Find Tree page, select the Dynamic option to create a dimension from a dynamic tree.
Alternatively, clear the Dynamic option to create a dimension from a static tree.
Select a tree and top nodes that are used to populate the dimension members.
Click the OK button to populate the dimension from the tree structure.
Note: The blank member from the tree is added to the dimension using the blank member name that you entered in the Dimension Options page.
Adding a Child or a Peer Member
Use the Child Member Add page (CUB_DIMENSION_SEC) on initial member creation to enter the initial dimension name and consolidation operator, and to add a new member that is a child of the currently highlighted tree member.
Navigation
Access the Child Member Add page by highlighting a tree member on the Dimension page and click the Add Member Child icon.
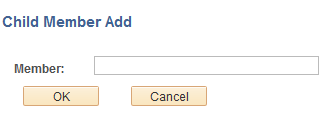
Image: Child Member Add page
This example illustrates the field and controls on the Child Member Add page.
Use the Peer Member Add page to add a new member that is a peer of the currently highlighted tree member.
Navigation
Access the Peer Member Add page by highlighting a tree member on the Dimension page and click the Insert Member Peer icon.
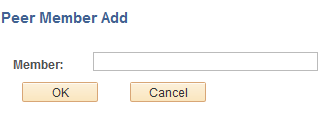
Image: Peer Member Add page
This example illustrates the field and controls on the Peer Member Add page. Definitions for the field and controls appear following the example.
|
Field or Control |
Definition |
|---|---|
| Member |
Enter the name of the new member that will be a child or a peer of the currently highlighted member on the Dimension page. |
| OK |
Click to add the child or a peer member and return to the Dimension page. |
Inserting a Member Formula
Use the Member Formula page (CUB_FORMULA_SEC) to enter formula information for a dimension member.
Navigation
Access the Member Formula page by clicking the Formula link on the Dimension page.
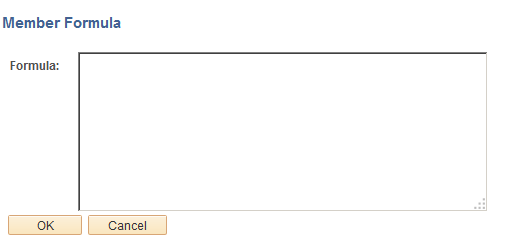
Image: Member Formula page
This example illustrates the field and controls on the Member Formula page. Definition for the field appears following the example. Use the Formula text box to enter a formula that will be used to calculate aggregates for the specific member.
Example: Defining Essbase Dimensions
Suppose that you need to create a product dimension based on a table that contains setID-controlled products.
To create a product dimension, access the Dimensions page:
Select .
Add a dimension with a name of PRODUCT.
Image: Example of the Dimension page when you first create the PRODUCT dimension
This is an example of the Dimension page when you first create the PRODUCT dimension.
At this point, the Dimension page:
Displays dimensional properties such as dimension type, storage option, and so on.
Later on, depending on the dimension type, some of the tree object members may or may not have all of the available properties discussed in this book.
Has an empty Dimension Structure section with a root node that has the same name as the dimension, PRODUCT.
Has all icons at the bottom of the page appearing not active.
Icons become active as they become relevant when you build the dimensional structure. For example, when you highlight a tree member, the relevant action icons become available.
All actions in the icon area are applicable to whatever tree member is highlighted. For example, for dynamic trees and queries, you cannot delete any children.
Note: To create dimension, you often add member children and peers manually and then supply the various attributes for each member. Parent members (those with children) may have attributes that leaf members (those without children) do not have, or vice versa.
To add a child member, highlight the PRODUCT node and click the Add Member Child icon. The Child Member Add page appears.
Enter the name for the child member and click the OK button. The Dimension page reappears.
Image: Example of the Dimension page with M1 member and its properties
This example shows a manually entered child member called M1 and the properties that are available to be set for that particular M1 member.
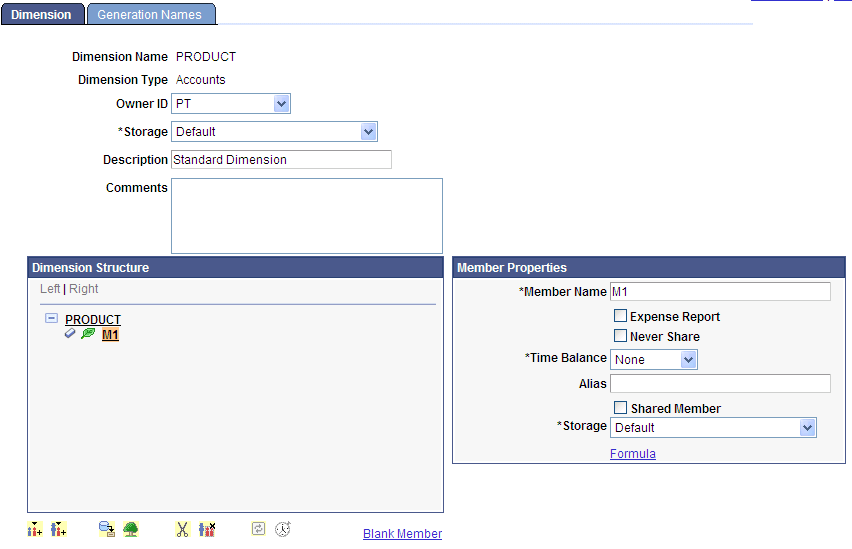
Note: M1 is highlighted and its corresponding attributes appear to the right of the tree. You can change any of these attribute values. After adding more members, you can view attributes of each member by selecting each new node. Selecting a node highlights it and displays the attributes for that node to the right of the dimension tree.
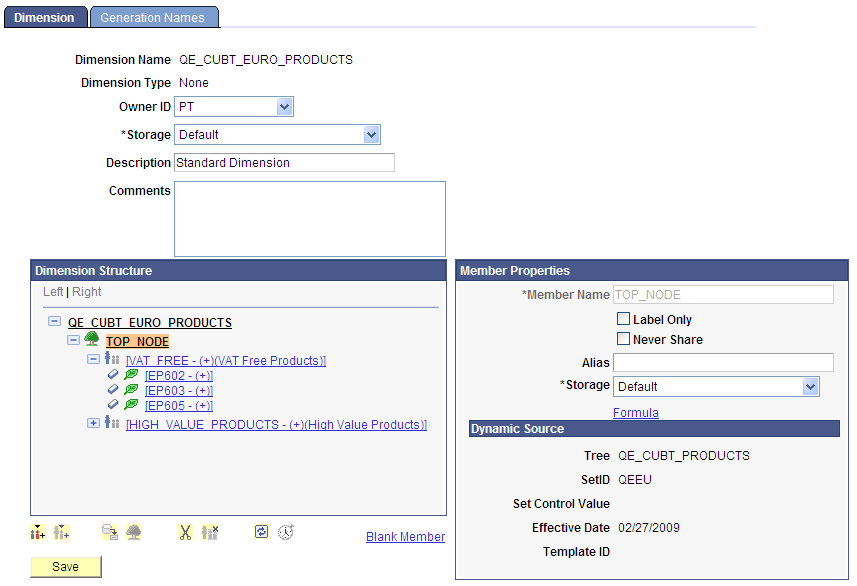
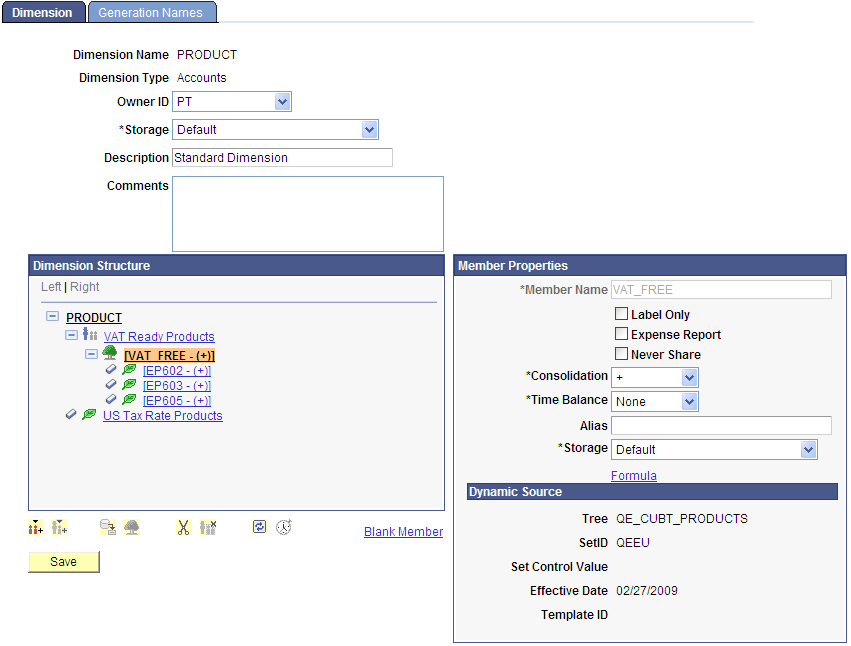
Image: Example of the attributes of the member VAT_FREE
This example illustrates the attributes of the member VAT_FREE, which shows that VAT_FREE member was built using a dynamic tree called QE_CUBT_PRODUCTS. All of the tree key field values appear in the Dynamic Source section of the attributes. The top portion shows the general relevant attributes for the current member node.

When inserting a tree structure into a dimension using the Find Tree page, you need to define whether that tree reference is dynamic or static. Note the following differences between dynamic and static (nondynamic) trees:
Dynamic trees do not store dynamic referenced members in the dimension. They store only a reference to the tree definition.
When the dimension is sent to Essbase, the tree is reopened, read, and sent to Essbase when the cube needs to be populated.
If you select the Dynamic option on the Find Tree page, the Template ID field appears, enabling you to select a template.
You use templates to determine what each member of the dynamic tree should have as its defined properties. You create templates in their own component You are not required to use templates because the system uses a default template automatically if you do not provide a value in this field. Only members that do not match template values are actually stored as part of the dimension.
For example, if a tree has 50 members, the dimensional definition will not save 50 rows in the dimensional definition. Instead, it will store only the single row that references the tree name. From that point on, if you decide to add an alias for the 45th member, then the system stores only the 45th member and the tree reference member. Basically, the system stores only members for which you have changed the default values in the dimensional structure. For all other members, the assumption is that the member values match what is in the template for that dynamic reference or the default template that is used automatically. This technique saves storage space in the database.
For static (nondynamic) trees, static references read the contents of the tree and store them within the dimension. All subsequent changes made to the tree are not reflected in the dimension. After the contents of the tree are read, the system does not save even the tree reference; it is as if you had manually entered all tree node and leaf values in the dimension.
Selecting a Tree
Use the Find Tree page (CUB_TREESEARCH_SEC) to search for and select a tree that is defined in the system.
Navigation
Access the Find Tree page by selecting a tree name on the Dimension page and clicking the Assign From Tree icon.
Image: Find Tree page
This example illustrates the fields and controls on the Find Tree page. Definitions for the fields and controls appear following the example.
|
Field or Control |
Definition |
|---|---|
| Dynamic |
Select to define this tree reference as dynamic. Deselect this option to define this tree reference as static. |
| Template ID |
If the Dynamic option is selected (for dynamic trees), the Template ID field appears, enabling you to select a template. If the Dynamic option is deselected (for static queries), after the contents of the query are read not even the query reference is saved. |
| Available Trees |
Displays a list of trees that are defined in the system after you click the Search button. |
Selecting the Top Node
Use the Select Top Node page (CUB_TREENODE_SEC) to select an existing node of a highlighted tree.
Navigation
Access the Select Top Node page by either:
Selecting a tree name on the Dimension page and clicking the Assign From Tree icon, or
Selecting trees on the Find Tree page and clicking the OK button.
Image: Select Top Node page
This example illustrates the fields and controls on the Select Top Node page. Definitions for the fields and controls appear following the example.

|
Field or Control |
Definition |
|---|---|
| Available Tree Nodes |
This section displays a list of all the nodes from the selected tree. |
| Select |
Select one tree node as a starting point in the tree definition to use when copying the structure into the current dimension. Note: If the actual top node of the tree is selected, then the entire tree will be copied. |
| OK |
After selecting the starting node, click the OK button to return to the Dimension page. The tree structure is read, and the contents of the tree are placed in the current node of the dimension. |
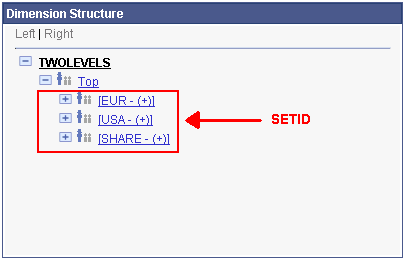
Example: Inserting a Tree Structure into the Dimension
The Dimension page has two nodes, VAT Ready Products and US Tax Rate Products, that were added manually under the PRODUCT node.
Image: Example of the Dimension page with two nodes added under the PRODUCT root node
This example illustrates the Dimension page that has two nodes, VAT Ready Products and US Tax Rate Products.
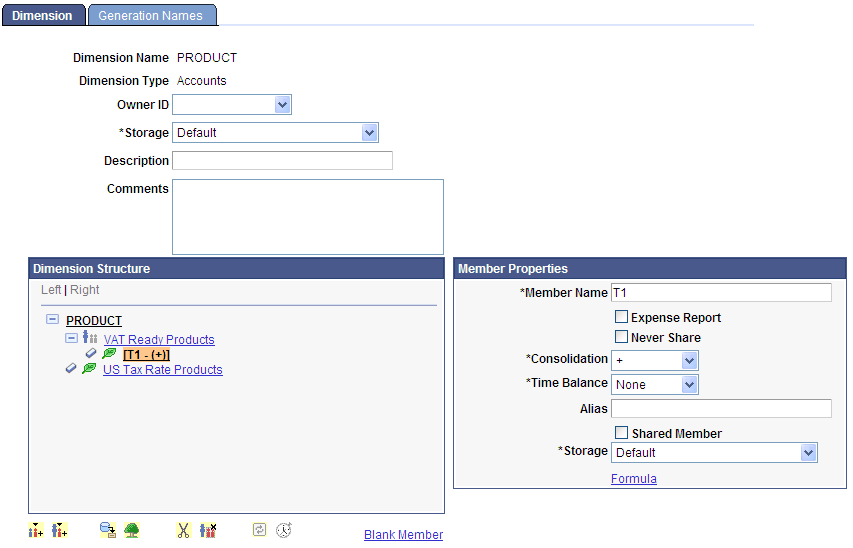
When you highlight the PRODUCT root node, the Add Member Child button below the tree becomes active. Subsequently, below the VAT Ready Products member, a child member was added with the name T1. When the T1 child member is highlighted, the Assign From Tree icon became active; click it to connect with a tree structure at that point in the dimension tree.
Click the Assign From Tree icon to access the Find Tree page, where you can select a tree.
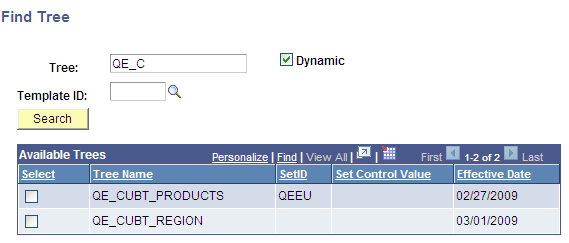
Image: Example of the Find Tree page
This example illustrates the fields and controls on the Find Tree page.
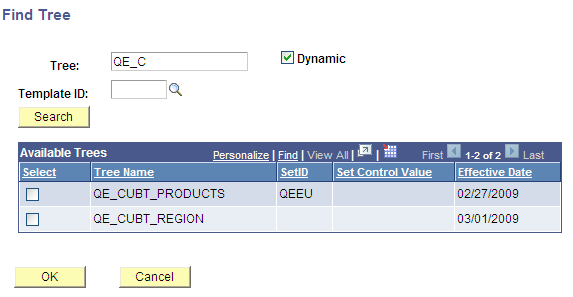
You need to define whether this tree reference is dynamic or static, select a tree name, and click the OK button. The Select Top Node page appears with the Available Tree Nodes section listing all the nodes from the selected tree.
Image: Example of the Select Top Node page
This example illustrates the fields and controls on the Select Top Node page.
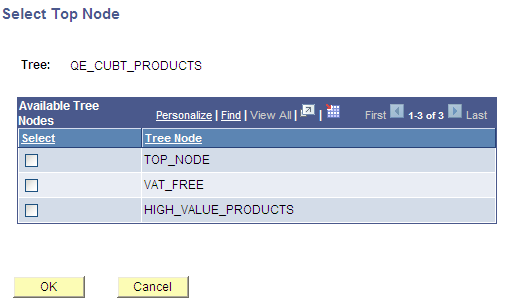
You need to select a starting point in the tree definition and click the OK button to return to the Dimension page. Note that the tree structure is read and the contents of the tree are placed in the current node of the dimension.
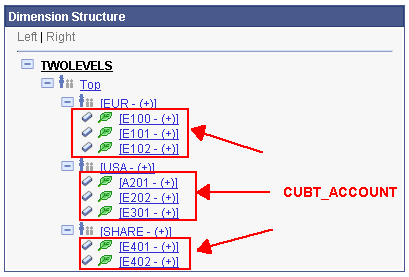
Because VAT_FREE was selected as the starting node, that member is placed at the starting point and all of the children of that node are read, after which all of them become members of the dimension.
Image: Example of the Dimension page with contents of the tree added in the VAT_FREE node
This example shows the PRODUCT dimension after the contents of the tree definition are copied.
In this example, because you selected a dynamic tree, a tree icon is present in the dimension member that references the tree definition. The three items that were read are not actually stored as part of the dimension, but they are read every time you view the dimension. That is, after you save this dimension to the database, if the tree is modified to have more nodes or leaves, then the next time you view the dimension it will display the contents of the tree with the modifications. Note that this process does not happen with static tree members.
For a static tree member, no reference is made to the tree that you used during the initial creation of the members and no tree icon appears to indicate that those members were originally created from a tree definition.
As with trees, queries can also be used to populate a dimension. Queries also use templates. While assigning members from query definitions, you need to supply prompt values, if any, that are required by the query.
For dynamic queries, as with dynamic trees, you do not actually store query results in the dimension definition, except for those that do not match any assigned template for the query (or the default template if no actual template was assigned). At the time the dimension is sent to the Essbase database, the query will be rerun to reflect the current result rows from the query.
For static queries, you take the query results and store all of those rows within the dimension.
Note: When you create dimensions, you may have issues with queries that return a large number of rows. When a query returns thousands of rows, it may cause PIA to crash or it may cause the dimension builder to have long waiting times to display the results in the dimensional tree.
If you have issues with large results query, use dynamic queries. By using dynamic queries, you ensure that only a certain number of rows appear at one time within the dimensional structure.
Selecting a Query
Use the Find Query page (CUB_QRYSEARCH_SEC) to select a query that is defined in the system.
Navigation
Access the Find Query page by highlighting a tree member on the Dimension page and clicking the Assign From Query icon.
Image: Find Query page
This example illustrates the fields and controls on the Find Query page.
|
Field or Control |
Definition |
|---|---|
| Dynamic |
Select to define this query reference as dynamic. Deselect this option to define this query reference as static. |
| Rollup |
Select to create a multi-level dimension structure using a single dimension query. Note: You do not need to create multiple queries to populate members on each level. Query results must be sorted properly to be used as wide query when you are creating members for dimension. Duplicate member names are still not allowed; for example, no duplicate member names are allowed at the lowest level of a dimension, so confirm that your query results do not return duplicate values for the column selected at the lowest level. |
| Template ID |
If the Dynamic option is selected (for dynamic queries), then the Template ID field appears enabling you to select a template. Optionally, assign a defined template to the query. If the Dynamic option is deselected (for static queries) after the contents of the query are read, not even the query reference is saved. |
| Available Queries |
After you click the Search button, select a query from a list of queries that are defined in the system. Note: Only public queries to which the current user has authorization appear in this section. |
Selecting a Column
Use the Select column page (CUB_QRYCOLUMN_SEC) to select an existing column of a highlighted query. The columns displayed are from the select statement of the query.
Navigation
Access the Select column page by either:
Highlighting a tree member on the Dimension page and clicking the Assign From Query icon, or
Selecting queries on the Find Query page and clicking the OK button.
Image: Select column page
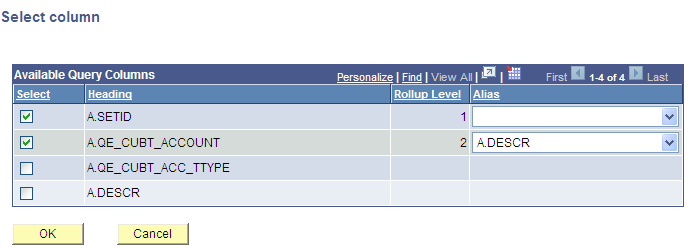
This example illustrates the fields and controls on the Select column page.
Note: If you are creating a multi-level dimension, you are able to define the dimension structure as well as a member alias for each level.
|
Field or Control |
Definition |
|---|---|
| Available Query Columns |
Select columns from a list of columns that are defined in the system. Note: You are able to select more than one columns from the query. Each column represent a different level on the dimension. |
| Rollup Level |
If you select the Rollup option in the Find Query page, the Rollup Level column appears displaying the hierarchical structure of the dimension and the query column that will be used to populate the dimension level. |
| Alias |
Optionally, select one or more columns from the query to be used to populate the alias for the selected member. Note: You do not need to manually enter the alias for each member; but if you want to enter the alias manually, you should not select any value for the Alias drop-down list. |
| OK |
Click to return to the Dimension page. |
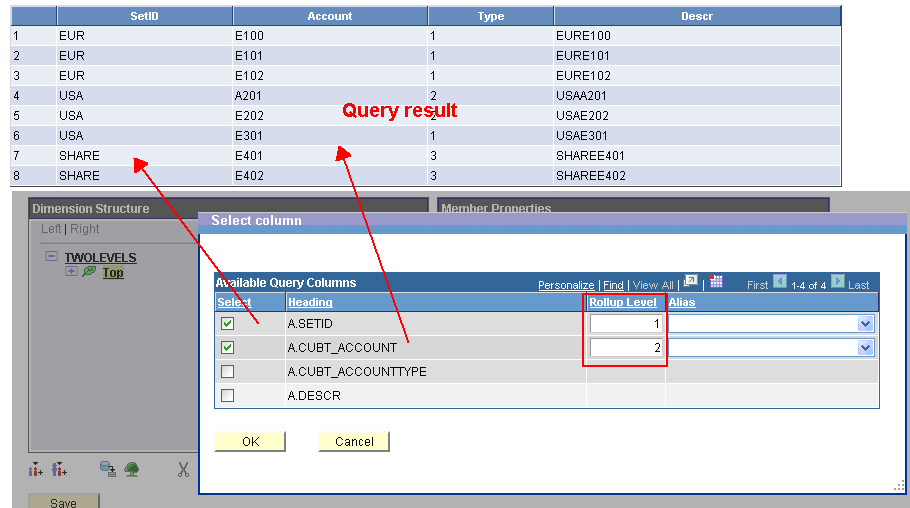
The following examples demonstrate the use of a wide query and rollup levels that define the hierarchical structure of a dimension:
Use the Select Column page to set the rollup levels:
Image: Setting the rollup levels
This example illustrates the setting of the rollup levels.
After you select columns and click the OK button in the Select Column page, the first level under the selected member is populated using the column that was designated as Rollup Level 1.
Image: Example of rollup level 1
This is an example of rollup level 1.
The second level is populated using the column designated as Rollup Level 2.
Image: Example of rollup level 2
This is an example of rollup level 2.
Example: Inserting a Query into the Dimension
Image: Example of the Dimension page with Account Query member
This example illustrates a child member of the root node called Account Query that was added manually.
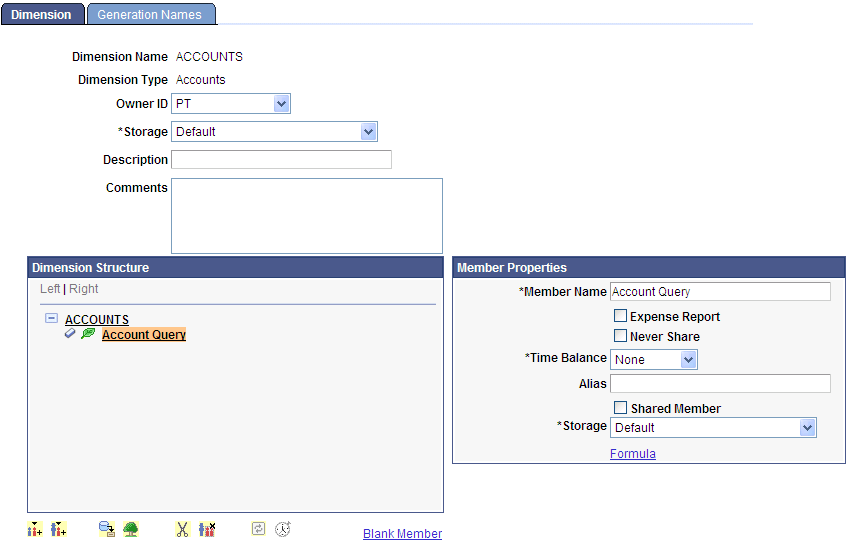
Highlight the Account Query member and click the Assign From Query icon, the Find Query page appears.
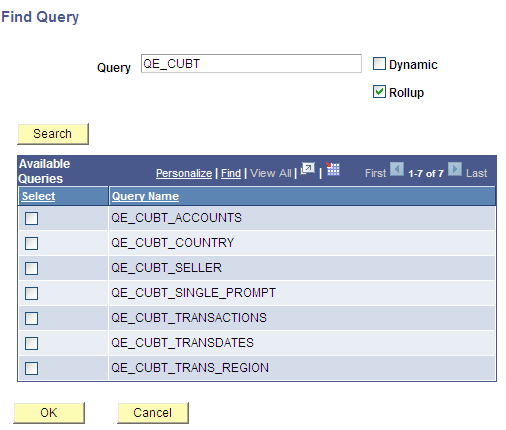
Image: Find Query page
This example illustrates the fields and controls on the Find Query page.
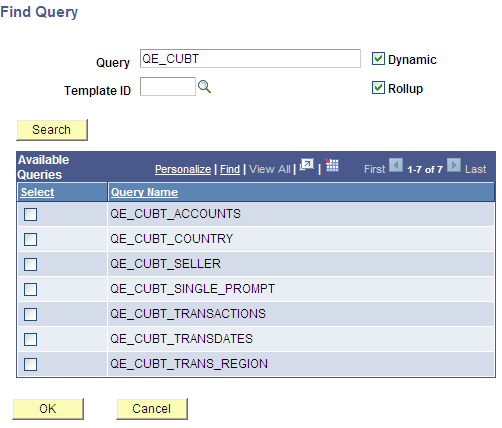
You can search a partial name query. Note that the system displays only public queries to which the current user has authorization. In this example, you select the QE_CUBT_ACCOUNTS query and click the OK button. You also can assign a defined template. In this example, the results of the query yield leaf members, so use the query dynamically.
If the selected query has a prompt criteria defined, then a prompt page appears enabling you to enter values to satisfy the prompt requirement for the query.
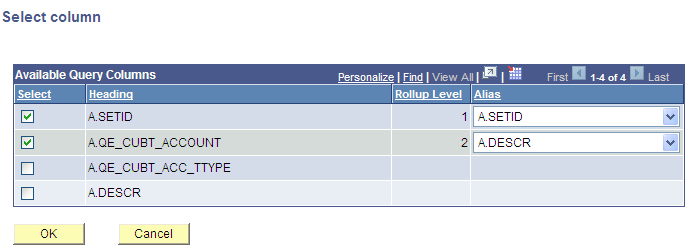
The last step is to select a query column to fill the dimension structure using the Select column page. In this scenario, you select the A.SETID and A.QE_CUBT_ACCOUNT columns as the desired fields. You also select the A.DESCR option as alias value for the A.QE_CUBT_ACCOUNT column
Image: Example of the Select column page
Example of the Select column page, A.SETID and A.QE_CUBT_ACCOUNT as desired fields, DESCR column as aliases.
Note: If you are creating a multi-level dimension cube, you are able to define the dimension structure as well as a member alias for each level.
After selecting the desired values, click the OK button to run the query. The results appear as part of the dimensional structure.
Image: Example of the Dimension page with results displayed as part of the dimensional structure
This example illustrates the Dimension page with results displayed as part of the dimensional structure.
Note: The results of running this query should yield unique values for the leaf members. All leaf values under the same parent must always be unique for the dimension to be valid.
A query icon is in the member that references the dynamic query. If the query was not run as dynamic, then a normal parent icon exists and—from that point on—no indication exists that the members were added as part of running a query. As with static trees, it is as if you had manually typed in all the members.
Use the Time Dimension Wizard page (CUB_TIMEDIMWIZ) to define the date and time ranges of the time dimension, and to automatically populate the members of a time dimension.
Navigation
Access the Time Dimension Wizard page by clicking the Time Dimension Wizard icon on the Dimension page.
Note: The Time Dimension Wizard icon is available only for time dimensions and not for other dimension types.
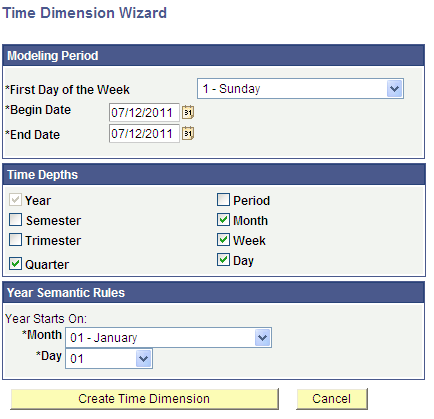
Image: Time Dimension Wizard page
This example illustrates the fields and controls on the Time Dimension Wizard page. Definitions for the fields and controls appear following the example.
|
Field or Control |
Definition |
|---|---|
| First Day of the Week |
Select the first day of the calendar week on which the intended calendar starts. |
| Begin Date |
Select the begin date for the time range for which members are created. |
| End Date |
Select the end date for the time range for which members are created. |
| Time Depth |
Select the option next to a hierarchy level to include it in the hierarchy. Note: Shaded levels cannot be used in combination with other selections. For example, Semester and Trimester hierarchies are mutually exclusive. Time-depth selections define the members that are created in the time dimension. |
| Year Semantic Rules |
Select to define the month and day when semantic rules start the year. |
Time Dimension Members
Time Dimension members are created as manual members (not dynamic) and they are in PeopleSoft Date-Time format, which is compatible with Essbase format. However, you should create the data query sources in a standard PeopleSoft Date-Time format as well; otherwise, the data-load process will fail because it will not recognize matching members.
During the data-load process, Essbase verifies that the passed cells match the members that are already in the dimension. For example, if the time members for the dates of a year were created in the dimension with format YYYY-MM-DD and the quarters in the data source query are set as mm/dd/yy, then Essbase returns an error message to inform you that the members were not encountered in the time dimension.
On the Time Dimension Wizard page, after you select the time dimension and click the Create Time Dimension button, the Time Dimension members appear on the Dimension page.
Image: Dimension page, Dimension Structure section
This example illustrates the fields and controls on the Dimension page, Dimension Structure section.
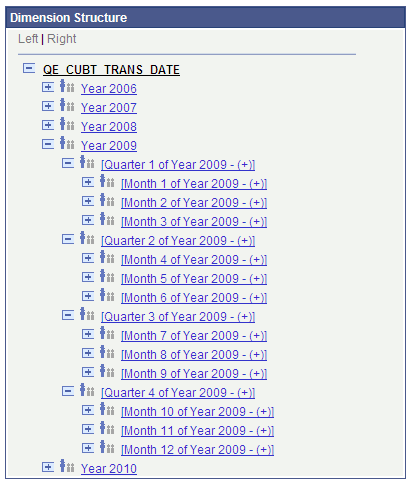
Note: To prevent date-time format conflicts, Essbase eliminates previously created members before it automatically displays new members.
You also can add new members to the time dimension posterior to the automatic population of members either by PeopleSoft trees, PeopleSoft queries, or manually. However, the members must be in the same PeopleSoft date-time format to be consistent with the automatically populated members.
Use the Generation Names page (CUB_DIMENSION2) to enter the generation names for the Essbase dimension.
Navigation
Access the Generation Names page by selecting the Generation Names tab on the Dimension page.
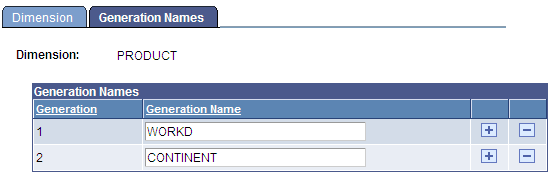
Image: Generation Names page
This example illustrates the fields and controls on the Generation Names page. Definitions for the fields and controls appear following the example.
|
Field or Control |
Definition |
|---|---|
| Generation |
Displays the generation of the dimension. The top parent of a dimension is called generation 1, each child of generation 1 is called generation 2, each child of generation 2 is called generation 3, and so on. For example, as shown on the Generation Names page, the PRODUCT dimension has two generation names: WORLD and CONTINENT. These names are not relevant to the graphical user interface (GUI), but they can be used on the Essbase side when Essbase references an entire generation in a member formula. Note: In Essbase terminology, a generation refers to a level within a dimension. A root branch of the tree is generation 1. Generation numbers increase as you count from the root toward the leaf member. Level also refers to a branch within a dimension; however, levels reserve the numerical ordering used for generations. |
| Generation Name |
Enter the generation name for each generation. |