Editing Data in Multiple Languages
This section provides an overview of multi-language entry and discusses how to enter data in multiple languages.
Use one of these two methods to maintain translations of application data:
Log into the system in a language other than the database's base language and update a field that is language-sensitive.
Use the multi-language entry option.
Using the multi-language entry option provides significant benefits over simply changing the session language and overwriting existing base language descriptions with their translations. It allows you to:
Enter or edit data in multiple languages during the same session without changing the sign-in language.
View all translations of a row of data in a single session, which may be important for multilingual implementations that need to describe data in a different language.
Easily recognize which fields on a page are language-sensitive and which are language-neutral.
Multi-language entry makes it more intuitive for a multilingual user, such as a Canadian operator who is proficient in both French and English, to maintain data in several languages before saving a page.
Multi-language entry is active if both of the following are true:
The multi-language entry option is enabled for the user operator.
The current page contains a record that has a related language record.
Multi-language entry makes it more intuitive for a multilingual user to maintain data in several languages before saving a page.
The following example shows the Option Category: General Options page that you use to enable multi-language entry.
Image: Personalizations: General Options page with multi-language entry enabled
This example illustrates the fields and controls on the Personalizations: General Options page with multi-language entry enabled.
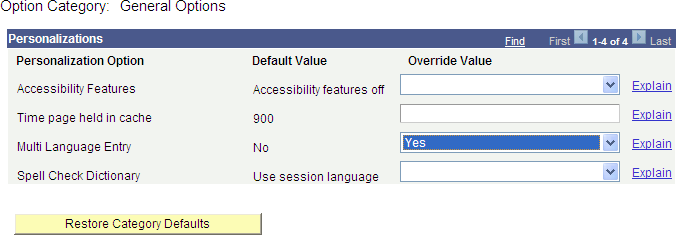
To enable multi-language entry:
Select on the navigation menu from your homepage.
The Personalizations page appears.
Click the Personalize Options button on the General Options line.
The Option Category General Options page appears.
Change the value for the Multi Language Entry option to Yes.
Click OK.
After you have enabled multi-language entry in My Personalizations, the display of pages changes in two important ways:
Image: A page with multi-language entry enabled
This example illustrates the fields and controls on the A page with multi-language entry enabled.
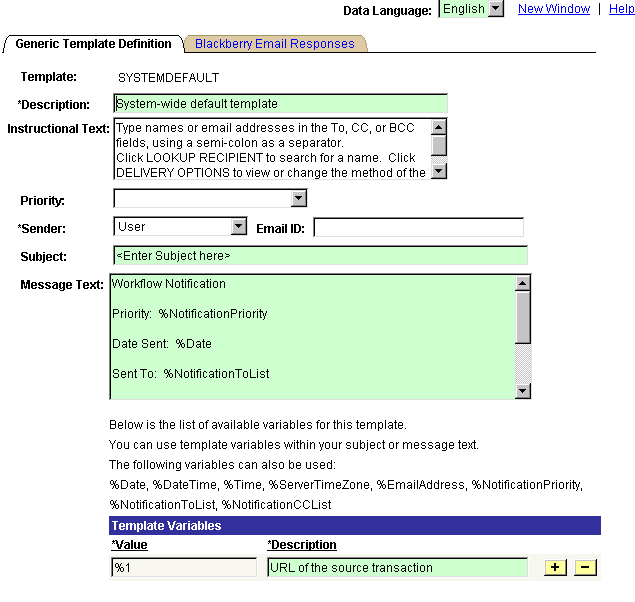
A Data Language field appears at the top of each page.
The Data Language field indicates in which language the language-sensitive fields on the current page are being maintained. You can switch the display of the page between different data languages and maintain translations in each by changing the selected language in the drop-down menu.
Any fields that are language-sensitive (that is, they are translatable as they exist both in the base language and related language records and are not keys) appear with a pale green shaded background.
This shading makes it easy to determine if the changes you make to the data will take effect in the current language only, or take effect across all languages in the database.
For example, in the previous graphic, the Subject field is language-sensitive. A different translation of the subject can be entered for each language enabled in the database, but the Email ID field is not, so any changes to the Email ID will be visible to all system users.
To translate this data into another language, simply pick a new language in the Data Language field. If translations exist for the current row of data in the new language, those translations will appear. If not, the base language values will still appear, and you can translate these into to the new language selected.
Note: Changing the data language of a page using multi-language entry only changes the language of application data; it does not change the language of the user interface of the page such as field labels and help text. The language of the user interface is controlled only by your sign-in language preference.
As changing the data language does not change the labels and other user interface elements of a page, it is also useful to determine terminology in different languages. For example, if Department descriptions in your Department table have been translated into several different languages, you can view the description of a department in each language simply by navigating to the Department table page and changing the data language. Because this only changes the language of the application data and not the user interface, you can “look up” terminology in other languages without needing to be able to navigate or use a page that has been translated into that language.
To enter data in multiple languages:
Enable the multi-language entry option.
Navigate to the page on which the data is to be maintained.
Any language-sensitive fields on the page are highlighted in green to make it easy to identify fields that permit data maintenance in multiple languages.
In the Data Languages field, select a target language.
The language that appears on the page remains the same; only the language-sensitive data is reloaded in the selected language.
Enter or edit data in any language-sensitive fields in the target language.
When finished editing the multilingual fields, click the Save button.
The system updates the base and related-language tables for the page.
Note: You can enter data using the input method emulator (IME) of your operating system when you enable the IME mode. To keep the IME mode enabled by default throughout the session for all fields, you can modify the PS_General stylesheet with the following code:
.PSEDITBOX{ime-mode: active;}
At present, the IME mode is only supported in Microsoft Internet Explorer.