Using Translation Designer
The Translation Designer within Application Designer provides an efficient mechanism for translating PeopleSoft pages, which are the highest volume and highest profile definitions.
Page definitions include:
Field labels.
Page text (not derived from field labels).
Translate values (which normally appear either as radio button labels or as values in drop-down lists).
Translation Designer facilitates translations with an easy-to-use grid where you can view the base language text and enter a translation simultaneously, enabling translators to review their translations side-by-side instead of simply overwriting source text with a translation.
This section discusses how to:
Open Translation Designer.
Use Translation Designer display options.
Work in Translation Designer.
Translation Designer shows all the translatable definitions in your current Application Designer project, along with their base language and translated text.
The grid contents are based on the Application Designer project that is open when Translation Designer is started. This association with Application Designer projects is a handy mechanism for organizing your translation effort. However, it also means that, to use Translation Designer, you must have a project open, and it must contain one or more pages. If you modify the project, Translation Designer won’t pick up the new objects in the project until you save the changes and refresh.
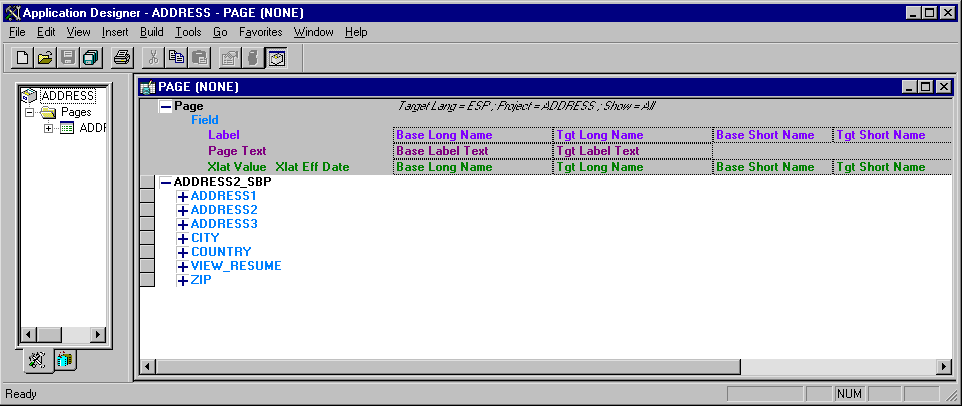
Image: Translating Page Definitions in Translation Designer
This example illustrates the fields and controls on the Translating Page Definitions in Translation Designer.
To open Translation Designer:
Set your language preference to the target language.
Because you use the Application Designer to access Translation Designer, set your language preference using PeopleSoft Configuration Manager.
Open Application Designer.
Create or open the project containing the definitions to be translated.
It makes sense to use projects with the non-base language versions of any pages. That way you’re sure to include all definitions on the pages. If you are creating a new project, you must save it before opening Translation Designer. Keep the number of pages in the project being translated to a minimum, as all the fields and other translatable definitions on each page in the project are loaded into memory when Translation Designer starts. A project with a lot of pages may take some time to open due to the sheer volume of fields on the page. Try to keep the number of pages in a project to be translated using Translation Designer under 20.
Open Translation Designer.
To translate the pages in your project, from the Tools menu select Translate and choose Translate Page Definitions.
This is the most versatile option because it shows you all translatable definitions that are associated with a page. You can use it to translate field labels, panel text (not derived from field labels), and translate values—all in one grid.
To translate only the fields in your project, from the Tools menu select Translate and choose Translate Fields.
This option lets you translate fields that are directly included as definitions in your project. Fields that are part of records or pages in your project are not included unless they are also explicitly included in your project as fields.
To translate only the translate values in your project, from the Tools menu select Translate and choose Translate Xlats.
You can also access all of these commands in the popup menu that appears when you right-click in the project workspace.
After you select one of the translate options, Translation Designer appears in the object workspace.
Depending on which translation grid you opened, different translatable definitions from the active project appear in the grid. All definitions are arranged hierarchically: pages (if included) are at the top level; fields are at the next level; and field labels, panel text, and translate (xlat) values are at the lowest level.
Use standard tree controls to expand and collapse the view in order to display definitions at different levels. You can also collapse or expand all levels of the tree by right-clicking on the tree node and selecting the appropriate option from the popup menu.
(Optional) Arrange the window to maximize Translation Designer.
If you want more space for the translation grid, maximize the Application Designer window and then maximize Translation Designer within the window. For even more space, hide the other frames in the Application Designer window. To toggle the display of the project workspace, from the View menu select Project Workspace, or press Alt+0 (zero). To toggle the display of the output window, from the View menu select Output Window, or press Alt+1.
This section discusses how to:
Use the information bar.
Expand and collapse nodes.
Choose which rows to view.
Resize columns and rows.
Using the Information Bar
Across the top of the translation grid, an information bar displays helpful information about the project. The target language, current project, and current viewing option (all, translated, untranslated, or modified) are set in italic.
On the left side of the bar, you can see the hierarchical organization that is used to display definitions in the grid: pages (at the highest level), fields (at the next level), and translatable definitions—field labels, page text, and translate values—at the lowest level.
Each definition is color-coded to remind you with which definition type you’re working.
Fields: blue.
Field labels: light purple.
Page text (not derived from a field label): dark purple.
Translate values: green.
Further, the following graphical cues help you understand the display:
All fields on the page are displayed, even if they are hidden fields.
The default label ID appears in italics, but not boldface.
Any label ID that is used but that is not the default label appears in boldface italics.
Page text from hyperlinks is displayed.
If the same field has multiple label IDs on the same page, it appears only once for that page.
Image: Color-coded definitions
This example illustrates the fields and controls on the Color-coded definitions.
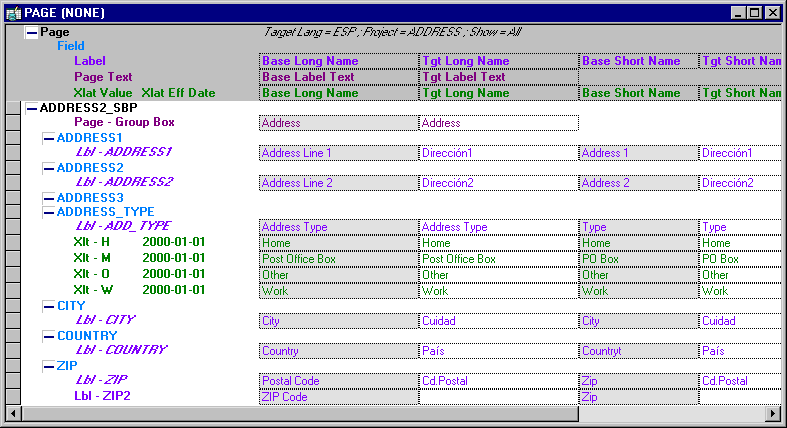
In this example, notice that there is a group box with page text that is not derived from a field label. The ADDRESS_TYPE field has a set of associated translate values. All other translatable definitions are field labels.
Notice also that the default label ID is italicized but not bold, while any non-default label IDs used are in bold italics. This is apparent when you look at the ZIP field, which has two labels. The other field labels appearing in the grid are associated with the field, but not used on the page being translated; they are displayed primarily so the translator can see the context in which they are translating the label and ensure consistency of terminology across labels.
Expanding and Collapsing Nodes
The left side of the translation grid is a hierarchical tree control that displays all the definitions on the page.
|
Field or Control |
Definition |
|---|---|
 |
Click once to expand the definition by one level. |
 |
Click once to collapse the definition by one level. |
To expand the entire tree structure, from the View menu select Expand All. To collapse the entire tree structure, from the View menu select Collapse All. Right-clicking anywhere in the grid displays a popup menu that contains these options. Another option on the popup menu, Expand Current Definition, expands the selected definition by one level.
Choosing Which Rows to View
Right-click anywhere in the translation grid to see a popup menu that lets you choose which rows are displayed in the grid:
|
Field or Control |
Definition |
|---|---|
| All |
Shows all translatable definitions. |
| Translated |
Shows only the definitions that have already been translated—that is, where the base language label and target language label do not match. |
| Untranslated |
Shows only the definitions that have not been translated—that is, where the target language label is blank or the base language label and target language label match. |
| Modified |
Shows the definitions that have been modified in the translation grid. Translation Designer defaults to this mode when it encounters a save conflict. |
Keep in mind that the options you select in the popup menu work together. If you select Expand Current Object while Untranslated is activated, you might not see anything. This means that everything in the current definition is translated.
Resizing Columns and Rows
To change the column width, place the cursor over the column divider on the information bar. When the cursor changes, drag the column divider to the desired position. You can resize only translatable columns; you cannot resize the columns that display the hierarchical tree of page definitions. Use the same technique to change row height.
This section discusses how to:
Enter translations.
Navigate in Translation Designer.
Search and replace.
Use Application Designer functionality.
Integrate with other applications.
Entering Translations
The working area of Translation Designer consists of four columns of data:Base Long Name, Tgt Long Name (target long name), Base Short Name, and Tgt Short Name(target short name).
As the column names imply, the two base language columns display the base language labels for the definitions in the grid. To translate the labels, type the translation into the Tgt Long Name and Tgt Short Name fields.
The grid incorporates standard text editing functionality. Cut, Copy, and Paste operations are available under the Edit menu. To force a line break within a label (so that the text wraps on the page), press CTRL+ENTER.
The first time that you translate a particular field label, the same translation is entered into any other occurrence of that field in the current grid. This ensures consistency and saves time.
The grid automatically limits the length of the text you enter based on the maximum length of the fields. When you reach the maximum length, you cannot add any more characters.
As with any Application Designer definition, changes are not permanent until you save them.
Note: To save related language data, you must have values in all fields. You cannot partially translate a single PeopleTools definition. For example, if you translate the long name but not the short name for a field, the short name defaults to the base language short name, and this value is saved in the related language table. Similarly, if you translate some but not all translate values for a particular field, any untranslated values pick up the base language text, which is then saved to the related language table.
Navigating Translation Designer
Click to move to a cell or node in Translation Designer, or use the standard Microsoft Windows keyboard shortcuts:
Press TAB or ENTER to move to the right; press SHIFT+TAB to move to the left.
Use any of the arrow keys to move from cell to cell.
For example, the UP ARROW key moves you to the cell above the current cell.
To move from the text cells to the tree, press the LEFT ARROW key.
To move from the hierarchical tree to the text cells, press TAB.
You can use the RIGHT ARROW key only when there are text cells in the same row—that is, if the current node is a translatable definition.
Use the UP ARROW and DOWN ARROW keys to move around in the hierarchical tree—for example, from a field to an adjacent field or to a page.
To move to a lower level, first press TAB to move into the main Translation Designer. Then move up or down to the desired node. Then use the LEFT ARROW key to move back into the tree.
If there are several pages in your project, scroll directly to the node for a particular page by right-clicking that page in the project workspace and from the menu select Translate and choose Translate Page Definitions from the popup menu.
Searching and Replacing
To search for a specific word within a single column:
Place the cursor anywhere in that column, and select Edit, Find and Replace In Current Column.
To search a column you cannot edit, from the Edit menu choose Find in Current Column.
The Find and Replace dialog boxes provide standard search and replace functionality, including the Find Next, Replace, and Replace All buttons. In either dialog box, select the Match case check box if you want to enable case-sensitive searching.
The Find option provides enables you to search up or down the column.
When you reach the top or the bottom of the column, the search does not cycle back through the column. Therefore, if you want to search the entire column, ensure that you’re in the top row when you press Find Next.
The Replace function always searches down the column.
If you want to replace all occurrences in the column, ensure that you’re in the top row when you press Replace.
Using Application Designer Functionality
Because Translation Designer is integrated into the Application Designer, you can use all standard Application Designer features while Translation Designer is open. Some features that are particularly useful during translations are:
Using the Find Definition References option to research where in the system a particular definition is used. To use this option, from the Edit menu select Find Definition References.
Opening a translated page in order to realign translated definitions.
Opening definitions to see the properties.
Remember, as long as you’re logged on using a non-base language, modifying labels in the definition updates the related language tables, not the base language tables.
There are several ways to open a definition:
Use standard Application Designer functionality to open the definition from the project window.
From the File menu, select Open.
Double-click or right-click the definition within Translation Designer and select View Definition from the popup menu that appears.
When you have selected page text that is not associated with a field definition, the page itself opens.
If there is a version of the page for the user’s language preference, that version appears; if not, the base language page appears.
Note: Security controls access to different Application Designer definitions. If you cannot open a particular type of definition from within Translation Designer, you may not have the necessary level of access.
Integrating with Other Applications
Because Translation Designer emulates a Microsoft Excel spreadsheet, you can use the standard Windows copy and paste tools to copy translations from Translation Designer into Excel or another Windows application. This is useful when running spell check against your translations or when saving your translations in a spreadsheet for offline review.
To copy the entire contents of the currently open Translation Designer into the clipboard:
Select the entire grid.
From the Edit menu choose Select All or click in the top left cell of the grid border.
From the Edit menu select Copy.
Note: With Translation Designer, you can copy an entire grid to the clipboard, but you can paste only individual field values back into the grid. You cannot paste the entire grid into Translation Designer after reviewing it in another application.