Configuring the Integration Network
This section discusses how to:
Use the Configuration Status page.
Verify and manage integration gateway configuration.
Verify node network status.
Add and modify nodes in the PeopleSoft database.
Add nodes to the network.
Verify publication/subscription server domain status.
Set the network node password.
The integration network is properly configured when the integration gateway is configured, when the default local node is configured, local and remote nodes are configured, and when the application server domain is active. The Integration Network folder features a Configuration Status page that enables you to quickly assess if the integration network is configured. The page also provides access to the PeopleSoft Integration Broker components used to perform configuration tasks if you want to view or modify settings.
The Configuration Status page indicates if the integration network is minimally configured to run. The following table lists the minimum configuration requirements for the network.
Note: All nodes to be managed and monitored in the Integration Network must be PeopleSoft nodes. PeopleSoft nodes are those nodes defined as PIA node types in the node definition.
|
Required Configuration |
Page and Object ID |
Integration WorkCenter Navigation |
Alternate Integration Broker Navigation |
|---|---|---|---|
|
Gateways – Gateways page IB_GATEWAY |
Gateway Configured
|
|
|
Register and configure PeopleSoft nodes on the local gateway. You must first create local and remote node definitions before you can register and configured them on the local gateway. |
Gateways – PeopleSoft Node Configuration page (PSGTWPROPS_SEC) |
Gateway Configured, Update Configuration Settings |
|
|
In the Integration Gateway CERTIFICATE Section of the integration gateway properties file for each gateway defined, specify the secure keystore path and password. |
Gateway Properties page (BGWPROPERTIESPAGE) |
Node Network Configured |
|
|
Default Local Node:
Remote Nodes:
After you create local and remote node definitions, you must register and configure them on the gateway using the PeopleSoft Node Configuration page. |
Nodes – Node Definitions (IB_NODE) |
Node Network Configured |
|
|
Assign the default local node and any other local nodes to a gateway and target connector. |
Nodes-Connectors page (IB_NODECONN) |
Node Network Configured |
|
|
Activate the application server domain. |
Domain Status (AMM_MULTIDOM) |
Domain Active |
|
|
Set the network node password. |
Update Network Node Password (IB_INTNET_NODEPWD) |
Node Network Password (This link is located in the Additional Links section at the bottom of the page.) |
. In the Additional Links section, click Node Network Password. |
The Configuration Status page indicates if the integration network is minimally configured to run as described in the previous section.
The page provides visual cues that enable you to quickly asses if the integration network is properly configured. Integration components that are properly configured display on the page with a green check mark icon next to them; components that are not configured, are not configured properly, or that require additional configuration display on the page with a red “X” icon next to them.
To access the Configuration Status page, select
Image: Configuration Status page
This example illustrates the fields and controls on the Configuration Status page. You can find definitions for the fields and controls later on this page.
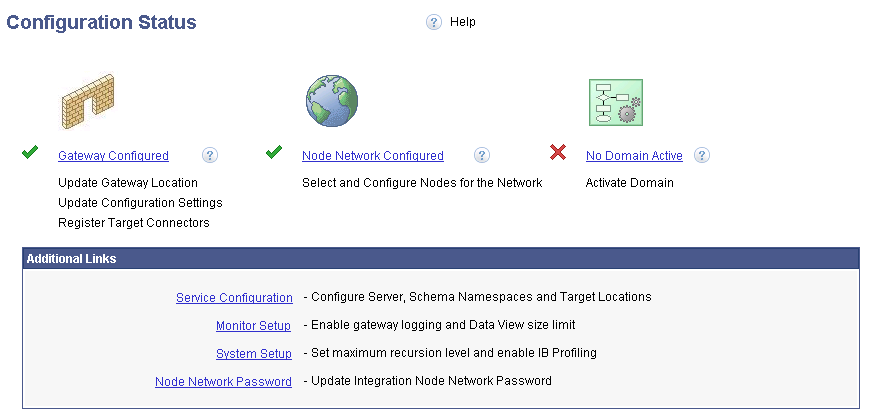
In the previous example, green check mark icons appear next to the Gateway Configured and Node Network Configured links and indicate that each of these integration components are properly configured. A red “X? icon appears next to the Activate Domain link, and indicates that the domain is not active.
The following page elements appear on the Configuration Status page:
|
Field or Control |
Definition |
|---|---|
 |
A green check mark icon appears next to an integration network component to indicate that the component is properly configured. |
 |
A red “X” icon appears next to an integration network component to indicate that the component is not configured, requires additional configuration, or is not properly configured. |
| Gateway Configured |
Click the link to access the Gateways component to view the gateway configuration or to configure the gateway. For the integration network to be properly configured, the integration gateway must be configured. |
| Node Network Configured |
Click the link to access the Node Network page and view, configure and manage PeopleSoft nodes in the integration network. For the integration network to be properly configured, the node network must be configured. |
| Domain Active |
Click the link to access the Domain Status page in the Service Operations Monitor to activate an application server domain. For the integration network to be properly configured, the application server domain must be active. |
| Service Configuration |
(Optional.) Click the link to access the Service Configuration page where you specify services settings, such as the service namespace, the schema namespace, the target location, and so on. |
| Monitor Setup Options |
(Optional.) Click the link to access the Monitor Setup Options page to set display and other options in the Service Operations Monitor. For example, use the page to verify or set the proper size limit (Data Length View Limit) for displaying XML in the Service Operations Monitor for asynchronous transactions, enable gateway logging, and more. |
| System Setup Options |
(Optional.) Click the link to access the System Setup Options page to set the recursion level (Message Builder Depth Limit) for message parts, enabling runtime profiling to generate system performance statistics, and more. |
| Node Network Password |
Click the link to access the Update Node Network Password page where you specify the node network password. The network node is used to perform functionality across all nodes in the integration network, including registering network nodes on participating systems. |
At a minimum the following settings and options must be configured on the integration gateway for the integration network to function properly:
Define the default gateway URL.
Load the delivered target connectors.
Register nodes.
Define the gateway keystore path and keystore password.
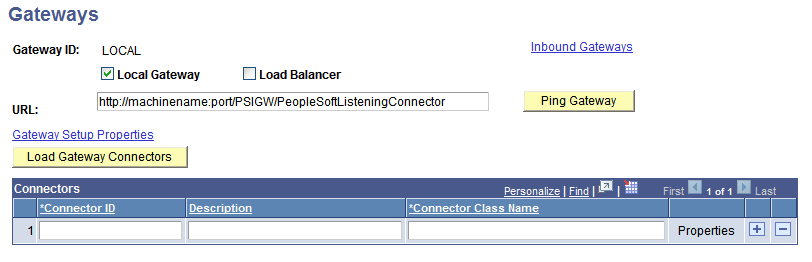
The Configuration Status page features a Gateway Configured link. When you click the link the Gateways component appears and you can view and configure integration gateway settings and options. You can also use the Gateway link in the Integration Network WorkCenter navigation pane to access the Gateways page and the features described in this section.
Image: Gateways page
This example illustrates the Gateways page when no integration gateway has yet been defined:
This table provides links to documentation that describes how to perform the minimum tasks required to configure the integration network:
|
Task |
Documentation |
Comments |
|---|---|---|
|
Define local and remote gateways. |
NA |
|
|
Load target connectors for each gateway. |
See the topic “Loading Target Connectors, Loading Connectors by Introspection. |
|
|
Register nodes. |
You must create the node definitions before you can register and configure them on integration gateways. |
|
|
Define the gateway keystore path and password. |
Gateway digital certificates must be installed on the gateway. Warning! Integrations will fail if you do not set the secure keystore path and password. |
The Configuration Status page features a Node Network Configured link that opens the Node Network page. Use the Node Network page (IB_INTNETWORK) to view and configure details about PeopleSoft nodes in the integration network. The Node Network page provides a view of all the PeopleSoft nodes in the database.
Note: Only PeopleSoft nodes can be viewed and managed in the integration network pages. A PeopleSoft node is one defined as a PIA node type on the Nodes – Node Definition page.
Image: Node Network page
This example illustrates the fields and controls on the Node Network page. You can find definitions for the fields and controls later on this page.
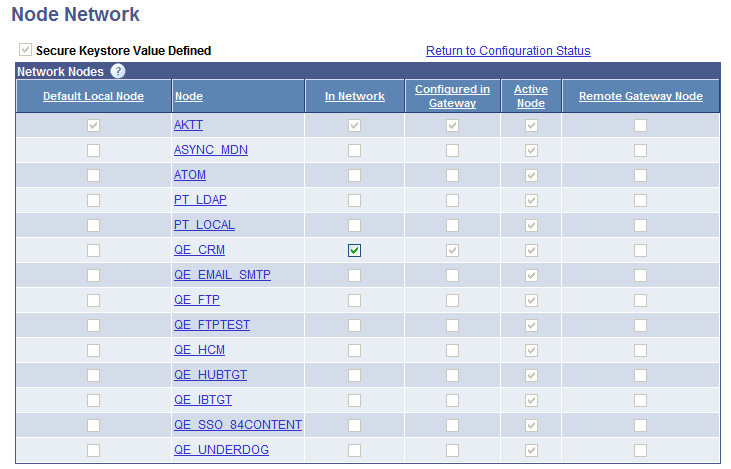
The Node Network page allows you to easily identify the current default local node, nodes that are defined in the integration network, active nodes, and so on.
The following page elements appear on the Node Network page:
|
Field or Control |
Definition |
|---|---|
| Secure Keystore Value Defined |
This page element is read-only. A check mark in the box denotes that the secure keystore path and password has been defined in the integration properties file for the default local gateway. The Node Network component is not set to Configured until the box is checked; The box displays checked after you define the keystore path and password in the integrationGateway.properties file. Warning! Integrations will fail if you do not set the secure keystore path and password. |
| Default Local Node |
This page element is read-only. A check mark in this column denotes the default local node in the system. There can be only one default local node in the PeopleSoft database. Additional information about the default local node is provided elsewhere in the product documentation. See Adding and Modifying Nodes in the PeopleSoft DatabaseUnderstanding Nodes. |
| Node |
The node column lists the PeopleSoft nodes in the database. Only nodes defined as PeopleSoft nodes appear on the page. PeopleSoft nodes are those defined as PIA node types in the node definition. Information about adding and modifying node definitions is provided elsewhere in this topic and in the PeopleTools product documentation. See Adding and Modifying Nodes in the PeopleSoft DatabaseUnderstanding Nodes. |
| In Network |
A check mark in this column denotes that the node is defined as part of integration network. Important! A node must be “in network? for you to be able view integration information and use the features of the integration network on the node. The default local node is automatically defined in the network. To include a node in the integration network, check the box. To remove a node from the integration network, clear the box. The In Network box is enabled only when the node is active and you have defined jolt connection strings for the node in the integration gateway. Additional information about adding nodes to the integration network is provided elsewhere in this topic. |
| Configured in Gateway |
This page element is read-only. A check mark in this column denotes that the jolt connection strings for the node have been defined in the integration gateway. Defining jolt connection strings for nodes is described elsewhere the product documentation. |
| Active Node |
This page element is read-only. A check mark in this column denotes that the node had been defined as an active node in the node definition. To change the active status of a node, click the node name in the grid to access the node definition. Information about activating a node is described elsewhere in the product documentation. |
| Remote Gateway Node |
This page element is read-only. A check mark in this column denotes that the node is defined on a remote gateway. If the node is defined using a remote gateway, the defined gateway will not be checked to determine if the node information is configured in that remote gateway. |
You can click the name of any node in the Node Network list to open the node definition in the Node Definition page and view or modify the node definition.
The following table lists the actions you must take to properly configure a node for the node network. The table also provides links to the corresponding product documentation that describes how to perform the actions:
|
Action |
Documentation |
Comments |
|---|---|---|
|
See Understanding NodesPrerequisites for Adding and Configuring Nodes, Adding Node Definitions, Configuring Nodes, Specifying Gateways and Connectors. |
|
This section describes how to:
Use the Node Network page to register nodes in the network.
Use the Network Node Registration page to register nodes in the network.
Understanding Registering Nodes in the Network
A node must be registered in the network for you to send and receive integrations with other network integration partners and to use many of the features of the integration network on the node.
You can view nodes that are registered in the integration network using the Node Network page, shown earlier in this topic. A check mark in the In Network column on the Node Network page indicates that the node is defined as part of the integration network.
Note: The default local node is automatically registered as a network node.
You can use two pages to register a node in the integration network. This table describes the differences between the two options:
|
Field or Control |
Definition |
|---|---|
| Network Node page |
To register a node in the network, you click the In Network page control. For a node to be available to register using this page it must be:
|
| Network Node Registration page |
For a node to be available to register using this page it must be registered in the integration gateway. Important! Local and remote nodes must be using PeopleTools 8.53 or higher integration gateways to use the Network Node Registration page to register nodes in the network. The processes on this page perform the following actions on the local database:
The processes on this page perform the following actions on the remote database:
Node definitions created using this page use the same authentication option that is defined on the local default node’s system. |
Prerequisites for Registering Nodes in the Network
The prerequisites for registering nodes in the integration network vary, depending on the page that you use.
To register a node in the integration network using the Network Node page the following conditions must exist.
The node must be active.
Information about activating a node is described elsewhere in the product documentation.
The jolt connection strings for the node must be defined in the integration gateway
Information about setting the jolt connection strings for a node is described elsewhere in the product documentation.
To register a node in the integration network using the Network Node Registration page the following conditions must exist:
The local and remote nodes must be using PeopleTools 8.53 or higher integration gateways.
The node must be defined in the local gateway on the PeopleSoft Node Configuration page.
The network node password must be set on the local and remote systems.
Information for setting the network node password is provided
To create the locally-defined node on remote network databases the authentication option defined on the IB_NETWORK node on the local database must be the same as defined on each remote database where the node is to be created. Before attempting to create the local node on remote databases ensure that the authentication options are properly updated on the IB_NETWORK node.
Using the Node Network Page to Register Nodes in the Network
To register a node in the integration network using the Node Network page (IB_INTNETWORK):
Access the Network Node page (
In the In Network column, check the box next to the node that you want to register.
Click the Save button.
Using the Network Node Registration Page to Register Nodes in the Network
This section describes using the Network Node Registration page (IB_INTNET_NODEREG) to register nodes in the integration network.
To access the Network Node Registration page, select
Image: Network Node Registration page
This example illustrates the fields and controls on the Network Node Registration page. You can find definitions for the fields and controls later on this page.
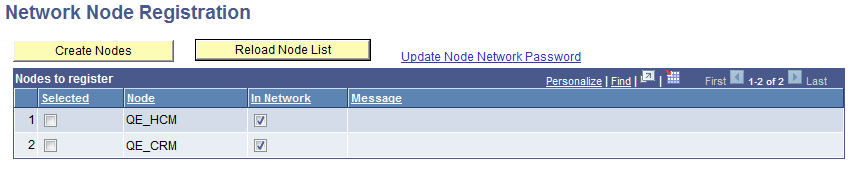
The page displays all nodes defined in the integration gateway on the PeopleSoft Node Configuration page that are not currently configured in the local database.
The following fields and controls appear on the page:
|
Field or Control |
Definition |
|---|---|
| Create Nodes |
Click the control to perform the following tasks on selected nodes:
|
| Reload Node List |
Click the control to refresh the page with nodes that are not currently defined in the local database. |
| Update Node Network Password |
Click the link to access the Update Node Network Password page to specify the network node password. |
| Selected |
Select the box to include a node in the registration process. |
| Node |
Node name. |
| In Network |
Check the box to register a node in the network. By default this control is selected. |
| Message |
Displays the results of the node registration. |
To register a node in the network using the Network Node Registration page:
Access the Network Node Registration page (.)
In the Nodes to Register grid, check the Selected box next to each node to include in the registration process.
Click the Create Nodes button.
The results of the registration process appear in the Message field for each selected node.
For the integration network to be properly configured the pub/sub server domain must be set to Active.
When the No Domain Active link appears on the Configuration Status page, the pub/sub server domain is not set to Active. Click the link to access the Domain Status page in the Service Operations Monitor and to activate the domain status.
PeopleTools is delivered with an IB_NETWORK node. This node is used to perform functionality across all nodes in the integration network, including registering network nodes on participating systems.
The network participants determine the password to be used.
Important! This password must then be set on each system participating in the network. The password set must be identical on all systems participating in the integration network.
Use the Update Node Network Password page (IB_INTNET_NODEPWD) to enter the password for the network node. To access the page select and in the Additional Links section, click the Node Network Password link.
Image: Update Node Network Password page
This example illustrates the Update Node Network Password page.
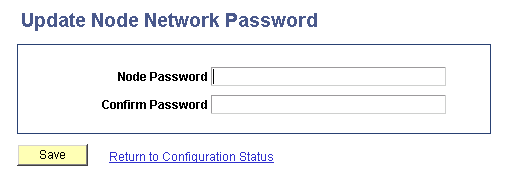
To set the network node password:
Access the Update Node Network Password page ( and in the Additional Links section, click the Node Network Password link).
In the Node Password field, enter the network node password.
In the Confirm Password field, enter the network node password again.
Click the Save button.
Click the Return to Configuration Status link to return to the Configuration Status page.