Creating Test Maintenance Reports
This section discusses how to create test maintenance reports using the Create Test Maintenance Report wizard.
Access the Create Test Maintenance Report wizard ().
The wizard consists of four steps:
Step 1: Manual Tasks
Step 2: Analyze Compare Data
Step 3: Select an Analyzed Project
Step 4: Generate Report
The tasks for Step 1 only to be executed once for the change project.
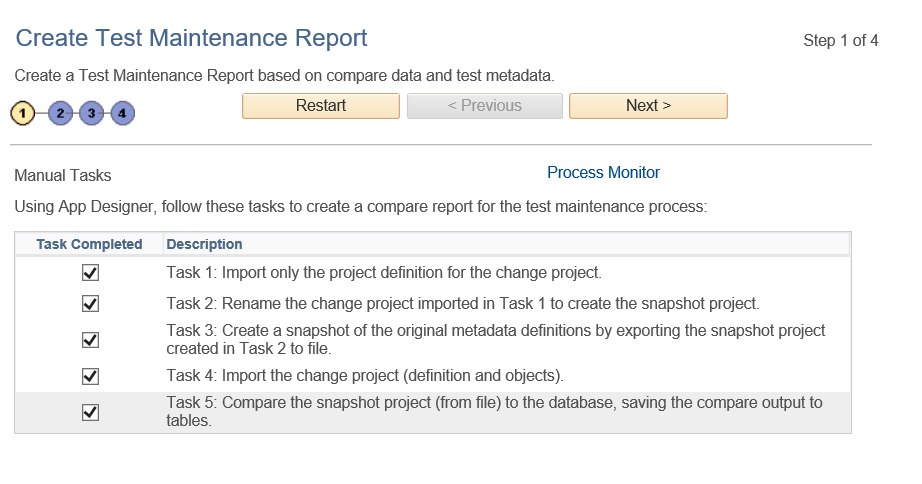
The first step in creating a test maintenance report is comprised of five manual tasks that you will complete in Application Designer to create a compare report that PTF will use as a basis for the maintenance report.
Perform these tasks to create a compare report from a project file.
Access the Create Test Maintenance Report wizard (PeopleTools, Lifecycle Tools, Test Framework, Create Test Maintenance Report).
Image: Create Test Maintenance Report Wizard: Step 1 of 4
This example illustrates the fields and controls on the Create Test Maintenance Report Wizard: Step 1 of 4.
As you progress through the Test Maintenance wizard the wizard tracks which tasks you have completed and which page you are on. When you exit the wizard and then return to the wizard again, the wizard sends you to the last visited page.
This tracking is done according to user ID. This means that if two users share the same user ID, the second user might not enter the first page when accessing the wizard. The wizard will take the second user to where the previous user left the wizard.
If two users with different user IDs work on the same project, the wizard does not track the state for the second user. For instance, if the first user completed the tasks for Step 1, the second user needs to check the five tasks on Step 1 to bypass that step.
Task 1: Import only the project definition for the change project.
Suppose you are about to apply a change project named SA_PROJ_ UPGD. Before the change project is applied, import the change project, SA_PROJ_ UPGD, as a project definition only.
In Application Designer, select .
In the selection box, highlight the change project, SA_PROJ_UPGD.
Click Select.
The Copy From File dialog box appears.
Click the Deselect All button to deselect all of the definition types so that only the empty project structure is imported.
At this point, you are importing only the names of the definitions into the project. None of the actual definitions in the upgrade project are copied.
If a definition exists in the original database with the same name as a definition in the upgrade project, the upgrade project in the database will (correctly) contain the original, unmodified definition of the object.
Click Copy.
Task 2: Rename the change project imported in Task 1 to create the snapshot project.
Create a copy of the change project, SA_PROJ_UPGD.
Select and name the new project SA_PROJ_SNAP.
Note: Creating the Snapshot Project is required to avoid naming conflicts later in the process.
Task 3: Create a snapshot of the original metadata definitions by exporting the snapshot project created in Task 2 to file.
Export the snapshot project, SA_PROJ_SNAP, to file:
Select .
If this project is large, as upgrades often are, you can save time during the compare process by deselecting all definitions in the Copy Options window, except for the five definitions that are referenced by PTF tests:
Menus
Components
Pages
Records
Fields
Accept the defaults and click OK.
Task 4: Import the change project (definition and objects).
Import the original change project, SA_PROJ_UPGD, from file:
Select .
Include all the definition types.
At this point, the database contains the new metadata.
Task 5: Compare the snapshot project (from file) to the database, saving the compare output to tables.
Compare the current (target) database with the pre-change (source) project, SA_PROJ_SNAP:
Select .
Highlight the snapshot project, SA_PROJ_SNAP, and click the Select button.
The Replace existing SA_PROJ_SNAP? dialog box appears.
Click Yes.
The Compare and Report From File dialog box appears.
Click Options to access the Upgrade Options dialog box.
Select the Report Options tab.
Select the Generate Output to Tables check box.
Select the Report Filter tab.
Click Select All.
Click OK.
Click Compare.
The wizard will use data from this compare report to create the test maintenance report.
This example shows Step 2 of 4:
Image: Create Test Maintenance Report Wizard: Step 2 of 4
This example illustrates the fields and controls on the Create Test Maintenance Report Wizard: Step 2 of 4.
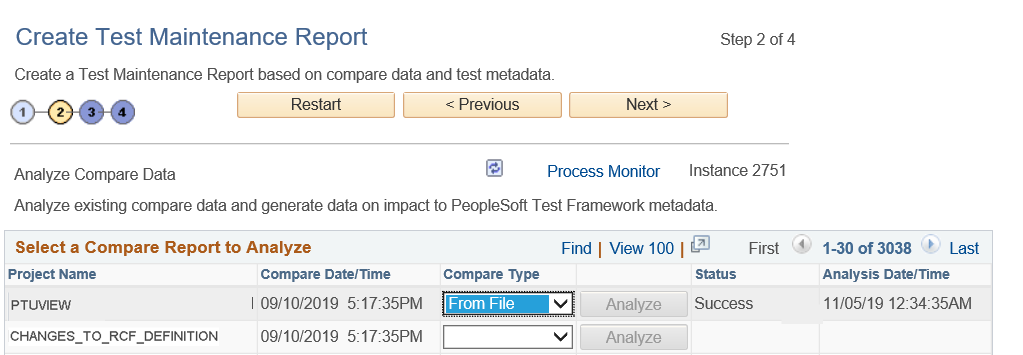
For a given change project the tasks for Step 2 only need to be executed once. This analysis is based only on the compare data, not on the test data; so changes to tests do not affect the result. The relationship between this analysis and test data is calculated in Step 3: Generate Impact Report. You may generate multiple Impact Reports based on a single analysis as tests change.
In this step, PTF analyzes data from the compare you performed in Wizard Step 1, Task 5.
For the project compare report you created in Wizard Step 1, Task 5, specify whether the Compare Type is From File or To Database.
Click Analyze.
This will launch the Application Engine program PSPTANALYSIS in Process Scheduler.
Note: A pop-up appears stating that the request is submitted to Process Scheduler. Click OK to proceed.
You can click the Process Monitor link or check the Status column to know the progress of the Application Engine program.
When the analysis is complete, the Status column shows Success or Fail. Click Next to continue.
Note: A project name can appear more than once in the list because the Compare Output to Table feature stores data by both project name and compare date/time. The most recent compare will appear first in the list.
This example shows Step 3 of 4:
Image: Create Test Maintenance Report Wizard: Step 3 of 4
This example illustrates the fields and controls on the Create Test Maintenance Report Wizard: Step 3 of 4.
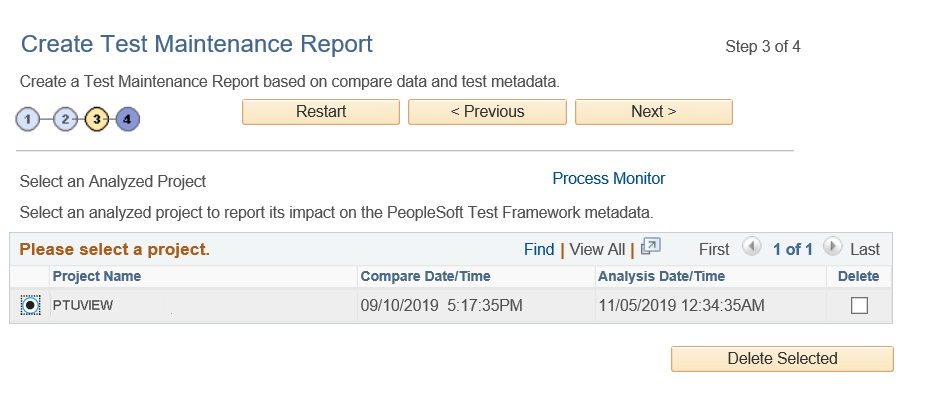
Use this page to select the analysis data PTF will use to generate the report.
Sets of compare data are listed by project name, the date and time the compare was generated, and the date and time the analysis was run.
Select the Delete check box and click Delete Selected to delete analyses.
This example shows Step 4 of 4:
Image: Create Test Maintenance Report Wizard: Step 4 of 4
This example illustrates the fields and controls on the Create Test Maintenance Report Wizard: Step 4 of 4.
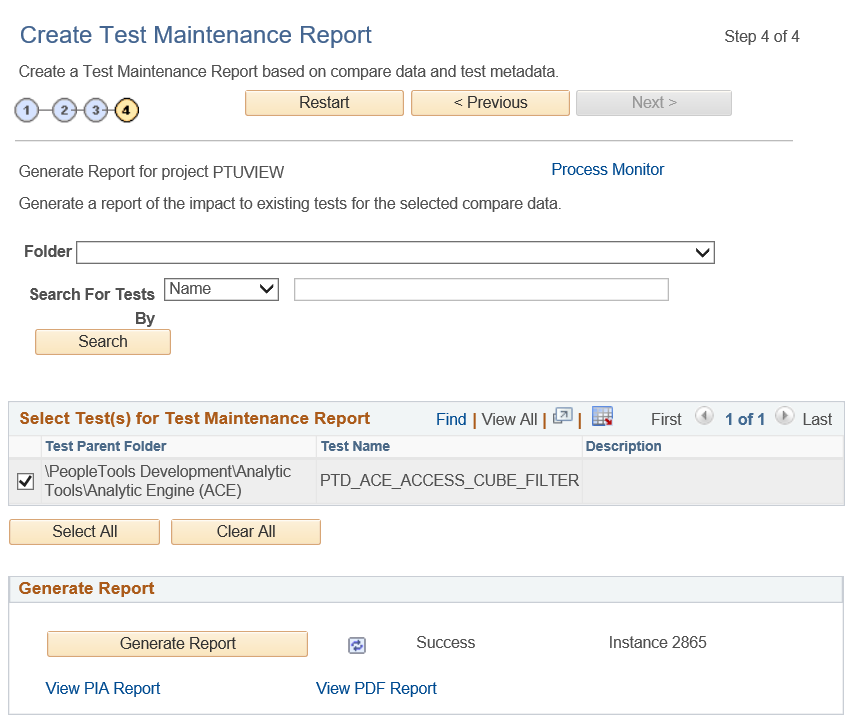
For a given change project you will use this page to generate multiple reports as changes are made to the PTF test metadata. As you make changes to tests based on the results of this report, rerun the report to verify that the issues were corrected. You can run this report repeatedly as you make changes to tests without having to redo steps 1 through 3 of the Create Test Maintenance Report wizard.
To generate a report:
Select one or more tests in the Select Test(s) for Test Maintenance Report grid to use for the report.
Use the Folder and Search for Tests By fields along with the Search button to filter the list of tests that are available to select for the report:
Select a value in the Folder list to specify the PTF Explorer Tree level to include. To include test from all folders, leave this field blank.
To include only tests that match a test name or description, select Name or Desc from the Search for Tests By list, then enter the search string in the adjacent edit box.
Click Search to populate the Select Test(s) for Test Maintenance Report grid with the tests that match the criteria specified.
Select the report format.
Click Generate Report to create the report.
This will launch the Application Engine program PSPTMAINTRPT in Process Scheduler.
The following fields are on the Create Test Maintenance Report Wizard: Step 4 of 4 page:
|
Field or Control |
Definition |
|---|---|
| Folder |
To limit the report to tests from a specific folder, select the level of the PTF Explorer Tree to include. To include tests from all folders, leave this field blank. |
| Search for Tests By |
Select Name to search for reports by test name, or Desc to search for reports by their description. Enter the search string in the adjacent edit box. To retrieve all reports, leave the edit box blank. |
| Search |
Click to populate the Select Test(s) for Test Maintenance Report grid with the tests that match the criteria specified. |
| Select All |
Click to select all tests that are listed in the Select Test(s) for Test Maintenance Report grid. |
| Clear All |
Click to deselect all tests that are listed in the Select Test(s) for Test Maintenance Report grid. |
| Generate Report |
Click to create the report. |
| Process Monitor |
Click to check the progress of the Application Engine program PSPTMAINTRPT. Note: The execution details, such as run status and process instance, are displayed on the Wizard after you click Generate Report. |
| View PIA Report |
Click to view the report in the application browser. This link is enabled after the report is created. |
| View PDF Report |
Click to view a PDF report. This link is enabled after the report is created. |
Running a Test Report from PTF Client
As you modify a test based on the results of a maintenance report, you can validate the test by running a test report from the PTF client. The report is generated for a single test, using analyses generated in Step 2 of the Test Maintenance Wizard.
In PTF Explorer, right-click on a test.
From the context menu, select Validate Test.
The Validate Test – Analysis Project list dialog box appears.
Select an analysis from the list and click Open.
The test maintenance report opens in a new window in the PTF client.