Viewing SSL for LDAP Transactions Setup Examples
For the LDAP transactions between PeopleSoft and a directory server, SSL must be configured in both PeopleSoft and the directory server. This section provides a sample SSL configuration between directory servers such as Oracle Internet Directory, Active Directory Server, Sunone, and PeopleSoft applications.
Important! The procedures outlined in this section are provided as examples. They may not necessarily apply to all situations. Verify the appropriate documentation for further details.
To set up SSL for OID:
Create certificate request in the wallet.
Create a new configuration set for SSL in Oracle Directory Manager.
Configure OID with the newly created configuration set.
Creating the Certificate Request in the Wallet
To create the certificate request:
Open Oracle Wallet Manager and select Operations, Add Certificate Request.
Fill in the fields and click the OK button.
Select Wallet, Save. (By default, it is stored in C:\Wallets.)
Creating a New Configuration Set for SSL in Oracle Directory Manager
To create a new configuration set for SSL in Oracle Directory Manager:
Open the Oracle Directory Manager and log in as an admin.
From the Server management section on the left pane, select the Default Configuration Set.
The Default Configuration Set properties appear in the right pane.
From the tool bar, click the Create Like icon.
A new configuration set will be created.
In this new configuration set, change these properties:
Number of Child Processes = 4
Non SSL Port = <Any number other than 389>. For example, 399.
Click the SSL Settings tab and enter the following values:
SSL Authentication = SSL Server Authentication.
SSL Enable = Both SSL and Non SSL.
SSL Wallet = <path of the Wallet>. For example, file:C:\wallets.
SSL Port = <any number other than 636>. For example, 646.
Note: The port numbers for both SSL and non-SSL can be changed to any values other than the default configuration set port values.
Configuring OID with the Newly Created Configuration Set
To configure OID with the newly created configuration set:
Restart the oidldapd server by navigating to <Oracle_Home>\ldap\admin and running the following commands in the command prompt:
oidctl connect=<database SID> server=<OID server type value> instance=<instance number value> stopExample:
oidctl connect=orcl server=oidldapd
instance=1 stop
Start the OID with the new configuration set (configset=1). The default configuration set is demoted (configset=0).
oidctl connect=<database SID> server=<OID server type value> instance=<instance number value> configset=<new configset value> startExample:
oidctl connect=orcl server=oidldapd
instance=1 configset=1 start
Close the Oracle Directory Manager and log in through SSL.
Enter the wallet path and the wallet password in the login dialog.
Note: If the SSL is incorrectly configured, you will not be able to log in.
The wallet path should be given as file:C:\wallets. The path of the wallet is sufficient; the wallet name is unnecessary.
Any utility or application that creates a valid PKCS #10 request can be used to form the SSL certificate request. The following example uses certreq.exe to form the request.
To set up SSL for Active Directory Server (ADS):
Find the Fully Qualified Domain Name (FQDN).
Request a server authentication certificate.
Verify an LDAPS connection.
To create certificate request, the Fully Qualified Domain Name (FQDN) of the Domain Controller (DC) is needed.
Finding the FQDN
To find the FQDN:
Select .
The dnsmgmt window opens.
Double-click the host name of your machine, and you will see the FQDN.
Requesting a Server Authentication Certificate
To request a server authentication certificate:
Copy and paste the following text into a new text file and save it as request.inf:
; ----------------- request.inf -----------------

[Version]

Signature="$Windows NT$"

[NewRequest]

Subject = "CN = LAB-SUMAHADE-WF.adserver.coretools”
; replace with the FQDN of the DC
KeySpec = 1
KeyLength = 1024
; Can be 1024, 2048, 4096, 8192, or 16384.
; Larger key sizes are more secure, but have
; a greater impact on performance.
Exportable = TRUE
MachineKeySet = TRUE
SMIME = False
PrivateKeyArchive = FALSE
UserProtected = FALSE
UseExistingKeySet = FALSE
ProviderName = "Microsoft RSA SChannel Cryptographic Provider"
ProviderType = 12
RequestType = PKCS10
KeyUsage = 0xa0

[EnhancedKeyUsageExtension]

OID=1.3.6.1.5.5.7.3.1 ; this is for Server Authentication

;-----------------------------------------------
Provide the fully qualified DNS name of the domain controller in the request. The semicolon (;) is used to indicate that the following text through the end of the line is a comment.
Create the request file and then, in a command prompt, navigate to the path where the request is and type the following command:
certreq -new <Name of the inf file> <name of the request file>Example:
certreq -new request.inf
request.req
A new request.req is created in the current directory. This is the base64-encoded request file.
Submit the request to a CA for a server certificate. Save the server certificate, servercert.cer, on your machine. The saved certificate must be base64–encoded.
Accept the issued certificate by opening a command prompt, navigating to the path where the server certificate is stored, and executing the following command:
certreq -accept <Name of the server certificate>Example:
certreq -accept servercert.cerNow the certificate is installed in your personal store. A private key is associated with this certificate. Verify this key by referring to the ADS documentation.
Restart the domain controller by restarting the server.
Verifying an LDAPS Connection
To verify an LDAPS connection:
Start the Active Directory Administration Tool (ldp.exe) by selecting
On the Connection menu, click Connect.
When prompted, enter the name of the domain controller (enter the FQDN) to which you want to connect and the SSL port number.
Click OK.
The RootDSE information should appear in the right pane, indicating a successful connection.
Open the Sunone Directory Server console and select Manage Certificates from the Tasks tab.
Select Request and then Next.
Enter your computer name (or server name) and other organizational details.
Enter a password and click Next.
The system creates a certificate request.
Click the Copy to Clipboard button to copy this request to the clipboard, or save the request to a file.
Submit the Certificate Request to a trusted CA and download the server certificate, for example, servercert.cer.
In the directory server, open the Manage Certificates page.
On the Server Certs tab, click the Install button.
Select this local file. Click the Browse button and select the server certificate, servercert.cer. Click Next on each of the following two pages.
Enter a name and a password and then click Done.
This section discusses how to configure the LDAP business interlink to establish SSL encrypted LDAP connections. The LDAP business interlink uses a root CA certificate that you install in the PeopleSoft database through the Digital Certificates page.
To enable SSL, the SSL parameter in the LDAP business interlink should be set to YES either:
Manually in Application Designer.
Programmatically through PeopleCode.
Setting the Business Interlink SSL Parameter in Application Designer
To set the SSL parameter in Application Designer:
Open an existing instance of the LDAP business interlink, or create a new instance.
Select the Settings tab.
Set the SSL parameter to YES.
Save the business interlink.
Image: Example LDAP Business Interlink SSL parameter
This example shows the correct setting of the SSL parameter for the LDAP_ADD business interlink.
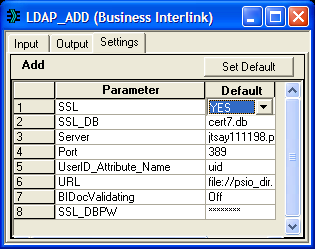
Note: This example shows the LDAP_ADD business interlink transaction, but it applies to all LDAP business interlink transactions.
Setting the Business Interlink SSL Parameter Programmatically
To set the business interlink SSL parameter programmatically:
Drag the business interlink definition into the PeopleCode editor. The following code is created:
/* ===>
This is a dynamically generated PeopleCode template to be used only as a helper
to the application developer.
You need to replace all references to ’<*>’ OR default values with references to
PeopleCode variables and/or a Rec.Fields.*/
/* ===> Declare and instantiate: */
Local Interlink &LDAP_SEARCH_1;
Local BIDocs &inDoc;
Local BIDocs &outDoc;
Local boolean &RSLT;
Local number &EXECRSLT;
&LDAP_SEARCH_1 = GetInterlink(INTERLINK.LDAP_SEARCH);


/* ===> You can use the following assignments to set the configuration parameters.
*/
&LDAP_SEARCH_1.SSL = "NO";
&LDAP_SEARCH_1.SSL_DB = "cert7.db";
&LDAP_SEARCH_1.URL = file://psio_dir.dll";
&LDAP_SEARCH_1.BIDocValidating = "Off";
...
Note: This example uses the search transaction, but the principle applies to any transaction.
Change the SSL parameter setting to indicate that SSL should be used. For example:
&LDAP_SEARCH_1.SSL
= "YES";
Note these points:
The SSL parameter setting in PeopleCode takes priority over the setting in Application Designer. For example, setting YES in Application Designer and NO in PeopleCode will result in a non-SSL transaction.
The application server binds as a client to the LDAP server as part of the authentication, so it is only necessary to have access to the root certificates. The LDAP administrator at your site should have already installed a server (Node) certificate on the LDAP Server.
Whenever you enable or disable Signon PeopleCode, reboot the application server domain.
Whenever you install or uninstall a certificate, reboot the application server.