Working with Query Trees
This section provides an overview of Query access group trees and discusses how to:
Open Query access group trees.
Define the Query tree.
View and modify definitions.
If you have worked with Tree Manager or trees, take a moment to review the following information describing the differences between typical trees and the Query access group trees.
Nodes
Regarding nodes, consider the following points:
Query access group trees contain two types of nodes: groups and records.
Groups are a logical representation of a set of child groups or records, similar to folders in Microsoft Windows.
Records represent a PeopleSoft record definition.
Structure
Regarding structure, consider the following points:
Always use the ACCESS_GROUP Tree Structure.
Do not use SetID or UKV/BU.
Do not have Details.
Do not use Levels.
Do not use Branches.
Requirements
Regarding requirements, consider the following points:
The Root Node is always a group.
Groups must be unique in a given tree while records definitions can be repeated.
Groups and records could have Child Groups and Child Records.
Each record needs a unique fully qualified path in the tree.
You can't add the same record under the same parent node (group or record).
Access the Query Access Manager page ().
Image: Query Access Manager - Search page
This example illustrates the fields and controls on the Query Access Manager - Search page.
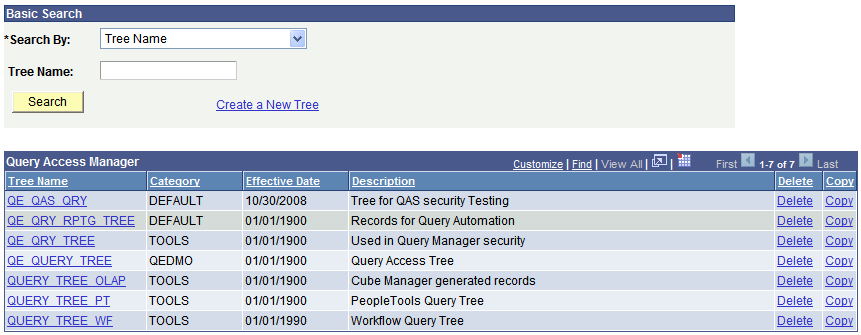
Before you can view and modify a Query access group tree definition, you need to locate the correct tree definition.
To open a query tree definition:
On the Basic Search page select your search criteria.
You can search by Tree Name, Tree Category, Tree Description, Group Name used in a Tree, or Record Name used in a Tree.
Click Search.
After clicking Search, a list appears containing the definitions that meet your criteria.
Click the tree name link.
The search page also enables you to delete or copy a tree. Click the Delete or Copy link to perform the desired task. If you click Delete, the system prompts you to confirm the action, and if you click Copy, the system displays the Copy Tree page where you can enter the name for the copied tree.
Some of the trees in the grid may appear without Copy and Delete buttons visible. In this situation, Definition Security settings are such that you have only read-only access to these trees.
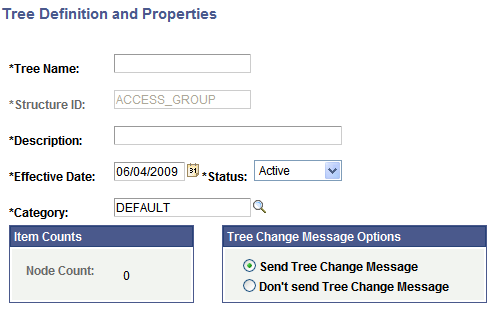
Access the Tree Definition and Properties page (click the Create a New Tree link on the Basic Search page).
Before you can insert nodes for access groups and record components, you must first define a number of important characteristics for the tree.
Image: Tree Definition and Properties page
This example illustrates the fields and controls on the Tree Definition and Properties page.
|
Field or Control |
Definition |
|---|---|
| Tree Name |
For the tree name, we recommend that you start the name with QRY_ so that you can easily identify the tree as a custom query tree. The standard query trees we deliver with the system start with QUERY_. |
| Structure ID |
The Structure ID is read only and always reads ACCESS_GROUPS for Query access trees. |
| Description |
The description appears with the name and effective date in the list box when you select from a list of trees. |
| Effective Date |
The status default is set to Active. Query trees are available immediately if the effective date is active; you don’t need to run an SQR utility like you do for organizational security trees. |
| Category |
If necessary add a category, which are groupings of the definitions. |
| Item Counts |
Item Counts shows the number of nodes within the access group. |
Once you've completed the tree definition, click OK. On the Enter Root Node for Tree page, select an existing Access Group using the Lookup Access Group control, or create a new one.
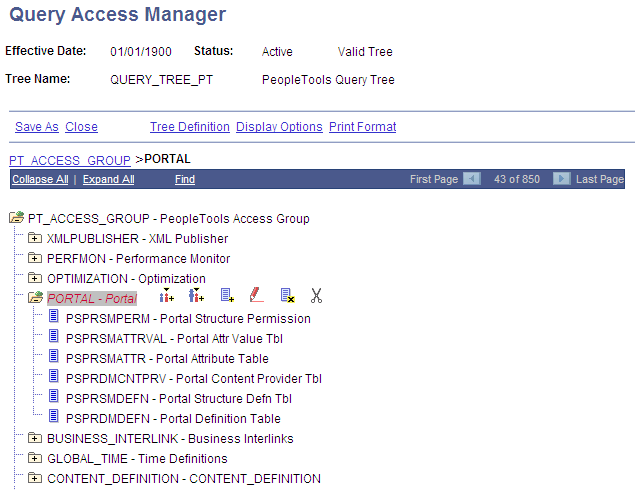
This section describes the controls you use to modify Query Access Group Trees after you have opened one from the search page.
Image: Query Access Manager page
This example illustrates the fields and controls on the Query Access Manager page.
|
Field or Control |
Definition |
|---|---|
| Effective Date |
Shows the current effective date. |
| Status |
Shows either Active or Inactive. |
| Tree Name |
Shows the name of the current tree. |
| Save, Save As |
These are the two save options. Each option appears only if it relates to the current activity. Save enables you to save your changes to the database. Save As enables you to clone tree definitions at save time. |
| Close |
Closes the definition and returns you to the search page. |
| Tree Definition |
Shows the Tree Definition and Properties page that you modified when you created the definition. |
| Display Options |
Shows the Configure User Options page where you can adjust the presentation of the trees. For example, you can choose whether the Node ID appears and how many lines of the definition appear at a time. Most of these don’t apply for Query Access Trees so they’re disabled. |
| Print Format |
Displays a print preview of the tree definition. |
| Bread Crumbs |
Once you have drilled down into a definition, a “bread crumb” view appears just above the Collapse/Expand All controls to provide orientation, especially within large trees. |
| Collapse All |
Collapses all nodes of the tree into their parent groups so that you see only the root node and the first layer of child groups. |
| Expand All |
Expands all nodes of the tree so that each child object is visible. |
| Find |
If you are looking for a specific access group or a record you can use the Find Value page rather than drilling down into the tree. You specify an access group or a record or its description. You can select a case sensitive search and specify that an exact match must be found. You can use pattern search option by deselecting the Exact Matching check box. This performs platform independent search for the Record/Group starting from the specified pattern. If you want to perform pattern search not starting from the beginning of Record/Group name, specify a platform dependent wildcard character at the beginning of the pattern. For example, to find all occurrences of ‘TBL’ in the Records, you specify %TBL as a search condition (for Microsoft SQL Server database). If you specify both Group and Record search conditions the search is performed on Group condition. If you specify both Group/Record ID (name) and Description conditions the search is performed on ID/name condition. Note: Always save modifications to the tree prior to using the Find feature. |
Node/Record Controls
When you have a node or record selected, the actions you perform are controlled by the icons that appear to the left and right of the definition. The descriptions of the actions are below. You can pass the mouse pointer over an icon to reveal its label.
|
Field or Control |
Definition |
|---|---|
 |
When a node folder is open, click the Collapse Node icon to collapse the node. |
 |
When a node folder is closed, click the Expand Node icon to expand the node. |
 |
The Insert Sibling Group icon inserts an access group node at the same level as the currently selected node. |
 |
The Insert Child Group icon inserts an access group node at the next level lower than the currently selected node. |
 |
The Insert Child Record icon inserts a record definition within an access group node. |
 |
For access groups, click the Edit Data icon to edit the Description and the Definition (long description) on the Access Group Table. |
 |
Click the Delete icon to delete both access groups and records. You can't delete the root node. |
 and and  |
You can cut and paste access groups and records to move them within the tree. Once you click the Cut icon, the Paste as Child icon becomes enabled. You can't cut the root node. Note: After you perform the cut function, only navigation and search features are available until you execute the paste function. This protects the node in the clipboard. |