Specifying Data Conversion Values
This topic provides an overview of specifying data conversion values and discusses how to:
Assign trading partner conversion IDs.
Create conversion data profiles.
In many cases, the set of possible values in a particular field of an EDI transaction does not match the corresponding set of values in the PeopleSoft database. For example, the EDI transaction might identify bank transaction codes using three-digit numbers, while the PeopleSoft database uses single letters to represent the same codes.
In such cases, PeopleSoft EDI Manager needs to translate the external values into the corresponding internal values.
Access the Conversion Type Definition page.
Image: Conversion Type Definition page
This example illustrates the fields and controls on the Conversion Type Definition page.
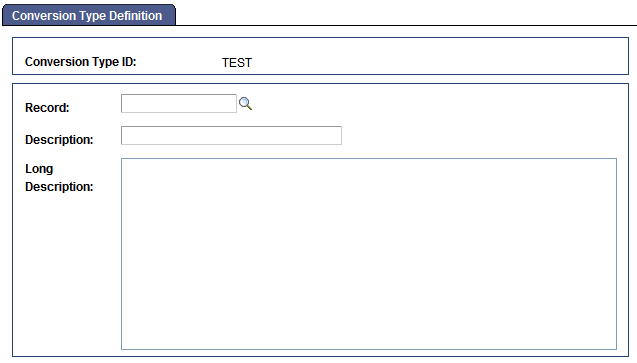
To identify a database table whose values need to be converted:
Select
Enter a conversion type ID or search for an existing one.
You can also search for the record name.
Enter the record name of the table whose values you want to convert and enter a description.
You can enter a description in the Description text box, the large edit box, or both.
Save the page.
Access the Conversion Data Profile page.
Image: Conversion Data Profile page
This example illustrates the fields and controls on the Conversion Data Profile page.
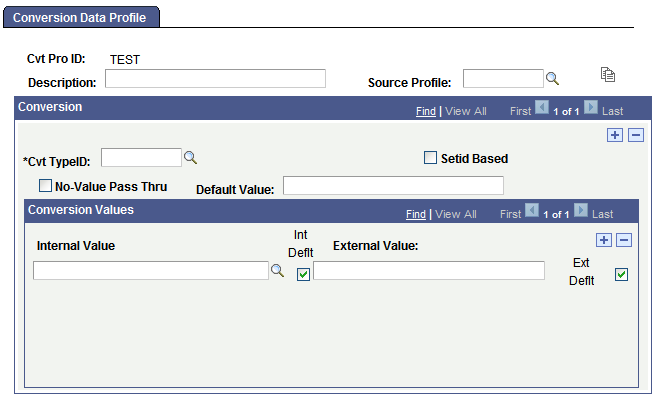
A conversion data profile takes the values from a particular PeopleSoft database table (such as the table holding bank transaction codes) and specifies how the values appear in PeopleSoft business documents. You can create multiple conversion data profiles for the same table, because you might need to create different conversions for different trading partners. For example, different banks might use different transaction codes.
To create a conversion data profile:
Select
Search for an existing Conversion data profile or enter a new value.
The Conversion Data Profile page appears. You use this page to specify translation values for one or more database tables, identified here by their conversion profile IDs.
The page includes two areas to enter data. The outer area enables you to add multiple conversion type IDs to the conversion profile. The inner area enables you to scroll among the values in the table identified by the conversion ID.
(Optional.) Copy the definition of a similar conversion data profile.
If the profile you are creating is similar to an existing profile, you can copy the details of the existing profile definition into this component. Then, you can change just the parts that are different.
Select the existing Source Profile, and then click the EC Copy Conversion Profile button. The system copies the conversion values from the selected profile.
Enter a description of the conversion data profile.
You can enter both a short description (in the Description text box) and a long description (in the long edit box). These descriptions are for your information only; the system does not use them.
Select a conversion type ID.
In the Cvt TypeID field, select the trading partner conversion type ID of the table for which you want to provide external values.
Specify whether the table whose values you are converting has a setID key.
Many tables in PeopleSoft Financials applications have a setID key. The setID key enables you to store data for multiple business units on the same table while making sure that each unit only accesses its own data. Selecting a setID controls the list of internal values available for mapping: if the table you are retrieving the internal values from has a SetID field, then the Conversion Data Profile page only displays the values for the selected setID.
To select a setID, select the SetID Based check box, and then select the appropriate SetID in the field that appears.
Select an internal value and enter the corresponding external value.
In the Internal Value drop-down list, select a value from the table whose conversion ID you selected. Then, in theExternal Value text box, type the corresponding value as it will appear in PeopleSoft business documents.
Specify which internal and external values to use when multiple possibilities exist.
One potential complication of having many-to-one mapping occurs with outbound transactions: for a given internal value, what value should the outbound EDI agent write into the outbound file? In this situation, the outbound EDI agent uses the row marked as the internal default (Int Deflt field) value.
The same scenario holds in reverse when you have multiple internal database values that you need to map to the same external value. No problem occurs with outbound transactions: the outbound EDI agent maps the internal value to the appropriate external value. For incoming transactions, however, you need to specify which of the multiple internal values to use. You do so by selecting one of the rows as the external default (Ext Deflt field) value.
When you need to convert multiple external values to the same internal value, you should mark each of the external values as an external default, and then mark one of the rows as the internal default. When you need to convert multiple internal values to the same external value, mark each of the internal values as an internal default, and then mark one row as the external default.
Note: You must perform this step even if all mappings are one-to-one mappings. Select the Int Deflt and Ext Deflt check boxes for every row.
Repeat the previous steps to add additional conversion IDs.