Saving and Configuring Trees
This topic discusses how to save and configure trees.
From the Tree Manager page, you can perform actions on the selected tree using the links that are displayed above the navigation bar.
Note: Not all of the options appear on the screen initially. For example, the Save Draft link does not appear until the tree is modified, and the Navigation Options link appears only if the multi-navigation option has been set for the tree structure.
|
Field or Control |
Definition |
|---|---|
| Save Draft |
Saves the tree or branch, but does not perform detail audits. Trees are marked as Draft until the audits are performed by saving the tree using the Save command, or by manually performing the detail value audits from either the Tree Definition page or the Tree Maintenance page. |
| Save |
Saves the tree or branch and performs audits on detail values. |
| Save As |
Saves the current tree or branch with a new name, new effective date, or modified properties. |
| Close |
Closes the tree or branch and displays the Search page. When you are through editing a tree, it is important to save any changes you have made and use the Close link to let the system know that you are finished editing the tree. |
| Tree Definition |
Displays the Tree Definition and Properties page where you can access the Performance Options page, change audits and edit levels, edit category of the tree, and edit description. |
| Display Options |
Changes the way trees appear on the page. Also changes the way the drag-and-drop functionality behaves in the current session. |
| Navigation Options |
Changes the navigation path for a selected node or detail to any of the components on the menu bar that are specified on the tree structure. |
| Print Format |
Formats all or part of the tree so that it can be printed by using your browser’s print function. Also prints the open branch of branched trees. |
| Export to PDF |
Click to access the Export to PDF page, where you can select the optional tree attributes to be exported to PDF files. |
Saving a Tree in Draft Mode
Draft mode prevents detail audits from being performed when a tree is saved. Thus, it's possible to save draft trees that are invalid. The system considers all draft trees invalid and they cannot be used in other PeopleSoft applications – such as PeopleSoft Query or PeopleSoft nVision – until they are saved or until a tree audit is performed from either a regular Save, the Tree Definition page, Tree Maintenance page, or using Tree Auditor.
To view all invalid values in a tree, you can run the audits from the Repair Tree program and use the View Results option to see a list of audit problems. After an audit is performed with no errors, the status of the tree changes from draft tree to valid tree.
You can see if your tree is a valid tree or draft tree by viewing the Last Audit value at the top of the Tree Manager page. You can also check the status of a tree from the Tree Maintenance page.
You can copy a tree using the Save As link from the navigation bar, or you can use the copy function from the Tree Maintenance page. The whole tree is copied, including its branches.
Note: To reduce copy time, PeopleSoft recommends copying large trees using the Copy function instead of the Save As function.
You can copy a tree into another setID. However, you are only copying tree data, not the supporting application data.
If the TREE_NAME field exists in the User Node table, then the user node data (node descriptions, and so on) cannot be shared between trees with different names. For this reason, if you copy a tree using the Save As function in PeopleSoft Tree Manager or the Copy function in the Copy/Delete Tree utility, and user node table includes the TREE_NAME field like one of the key fields, you must manually insert the new tree's node descriptions.
To copy a tree using the Save As link:
Select Tree Manager, Tree Manager.
Open the tree that you want to copy.
Select the Save As link from the Tree Manager page.
The Tree Definition and Properties page appears.
Update the information for the new tree.
You must enter at least a new tree name and effective date. You can also change any of the other settings, although there are restrictions on your changes to the Use of Levels setting.
Note: You can change the Use of Levels setting, but you cannot change a tree from not using levels to using them. Changing a tree from loosely enforced levels to strictly enforced levels is not recommended.
Click the Save As link or Save As Draft button.
Use the Tree Definition and Properties page (PSTREEDEFN) to edit tree properties for an existing tree, and to save a tree with a different name, effective date, and other properties.
Navigation
Select Tree Manager, Tree Manager.
Search for an existing tree or create a new one.
Open a tree on the Tree Manager page and click the Save As link.
Alternatively, open a tree on the Tree Manager page and click the Tree Definition link.
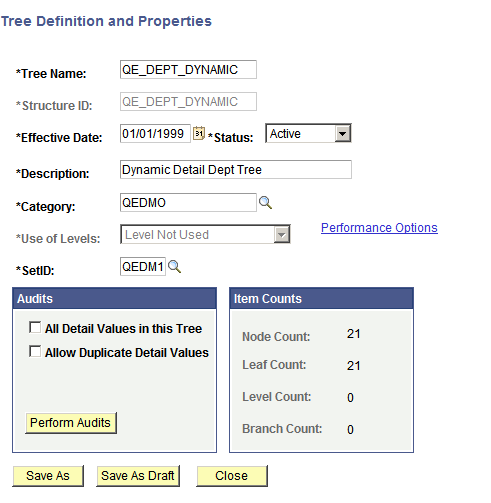
Image: Tree Definition and Properties page
This example illustrates the fields and controls on the Tree Definition and Properties page.
To modify tree definitions:
In the Tree Definition and Properties page, enter a new description or select a new category for the tree.
In the Status drop-down list, select the status of the tree to be Active or Inactive.
An active tree can be used by other applications. An inactive tree cannot be used by the system.
In the Use of Levels field, select how levels in the tree are enforced.
The available options depend on the type of tree that you are modifying. If levels are not defined in the selected tree structure, this field is unavailable and the value Level Not Used is displayed. Also, the Define Tree Levels link is not displayed.
Click the Define Tree Levels link to access the Tree Node Definition page and add, update, or delete levels.
In the Audits group box, select how you want the tree to handle detail values.
Detail Value options are not active for trees that are:
Keyed by business unit or user key value.
A business unit is a corporation or a subset of a corporation that is independent with regard to one or more operational or accounting functions.
Simple winter trees, as they do not have detail values.
Click the Performance Options link to change performance options.
The available options depend on the type of tree that you are modifying.
Click the OK button to save your changes.
When the multiuser environment is enabled, users can only modify a tree definition to a branched tree when the branch is checked out and the tree has no other checked out branches, and add new levels or perform modifications to a tree definition when the root branch is checked out and the tree has no other checked out branches.
Note: When the multiuser environment is enabled, a user cannot check out a tree branch if another user working with a different branch of the same tree has modified the tree definition and either has or has not saved the changes.
If users edit specific branches without modifying the tree definition, other users can still edit different branches of the same tree at the same time.
Use the Tree Levels page (PSTREEDEFNLEVELS) to add, delete, and modify tree-level information.
Navigation
Select Tree Manager, Tree Manager.
Search for an existing tree or create a new one.
Open a tree on the Tree Manager page and click the Save As link.
Alternatively, open a tree on the Tree Manager page and click the Tree Definition link.
Click the Define Tree Levels link on the Tree Definition and Properties page.
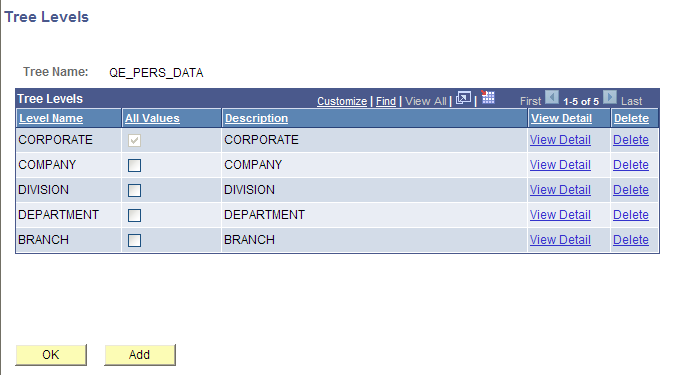
Image: Tree Levels page
This example illustrates the fields and controls on the Tree Levels page.
To modify, add, or delete tree levels:
In the Tree Levels page, click the appropriate View Detail link to edit level details.
To permit nodes to skip over a level and report to a higher level, clear the All Values options.
For example, you might want to skip levels if you have one or more departments that are not part of any division but report directly to the COMPANY level. Select the All Values option to make sure that all values from lower levels report to a node at this level.
Note: The All Values option for the top level (root node) is selected but not available. You cannot skip over the top level.
To delete a level, click the appropriate Delete link.
You cannot delete a level that has nodes associated with it.
To add new levels, click the Add button.
The Tree Levels page appears.
Note: When the multiuser environment is enabled, users can only add new levels to a branched tree when the root branch is checked out and the tree has no other checked out branches.
Enter a name for the level.
Use a name that reflects what the nodes at this level represent. For example, the first level in the Department Security tree is CORPORATE, indicating that the root node is Corporate Headquarters.
Specify whether nodes can skip over the level.
Select this option if you want to make sure that all values from lower levels report to a node at this level. To allow nodes to skip a level, clear the All Values option.
Click the OK button.
The Tree Level page closes. If you entered the name of an existing level from another tree, the level name is added. If you entered a new name, PeopleSoft Tree Manager displays the page for entering tree level information. The displayed page is the page specified for levels in the tree structure. For most trees, it is the Tree Level page.
Use the Configure User Options page (PSTREEMGROPTIONS) to specify what information appears on the Tree Manager page. You can also use this page to turn off and on tree node descriptions and set the default action for dragging and dropping nodes.
Use these steps to access the Configure User Options page:
Select Tree Manager, Tree Manager.
Search for an existing tree or create a new one.
Open a tree on the Tree Manager page and click the Display Optionslink to access the Configure User Options page.
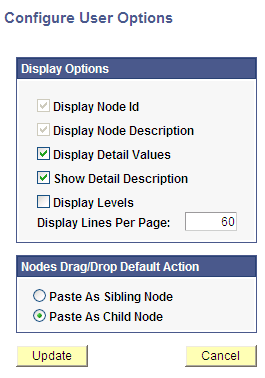
Image: Configure User Options page
This example illustrates the fields and controls on the Configure User Options page.
To enable or disable tree node descriptions:
In the Configure User Options page, select each option to enable or disable its display option.
The Display Levels option is not available if levels are not used.
Enter the number of lines that you want each page to show.
The default number of lines is 60. The new number of lines entered remains valid until you change it again. The value remains persistent even if the user ends and restarts an internet session.
Note: Displaying a large number of lines may impede performance. Oracle recommends a number of less than 300 lines per page.
Image: Example of a tree with all display options selected
This example illustrates all display options on the screen: node ID, node description, detail values, and levels.
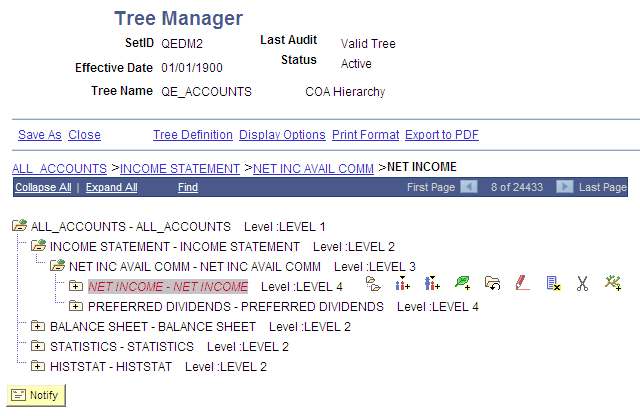
You can click the level name next to the node to display the Levels page and edit the level information.
Note: Tree node descriptions will not be visible if the effective date of the tree is earlier than the effective date of the node.
Setting the Default Action for Dragging and Dropping Nodes
You can use the Nodes Drag/Drop Default Action group box to set the default action for dragging and dropping nodes; you can select either the Paste as Sibling Node icon or the Paste as Child Node icon.
Note the following options when setting the drag-and-drop default action:
When right-handed users drag nodes using the left mouse button, they drop nodes using the set default action.
When right-handed users drag nodes using the right mouse button, they drop nodes using the action that is not set as the default action.
When left-handed users drag nodes using the right mouse button, they drop nodes using the set default action.
When left-handed users drag nodes using the left mouse button, they drop nodes using the action that is not set as the default action.
For Macintosh systems, because one mouse button exists instead of two, users dragging nodes will drop nodes using the set default action.
The setting for the drag-and-drop default action is session-based. For this reason, after a user closes a tree, this setting reverts to the default assignment Paste As Child Node.
Use the Detail Navigation page (PSTREEMGRNAV) to select a detail page to open from the tree when editing data for the selected node or detail. For example, using the Personal Data tree, you can navigate to pages such as Personal Data, Benefits, or Salary Information.
Navigation
Select Tree Manager, Tree Manager.
Search for an existing tree or create a new one.
Select a node or detail on the Tree Manager page and click the Navigation Options.
Note: The Navigation Options link appears only if multi-navigation flags have been selected in the tree structure for nodes, details, or both.
Image: Detail Navigation page
This example illustrates the fields and controls on the Detail Navigation page. Definitions for the fields and controls appear following the example.
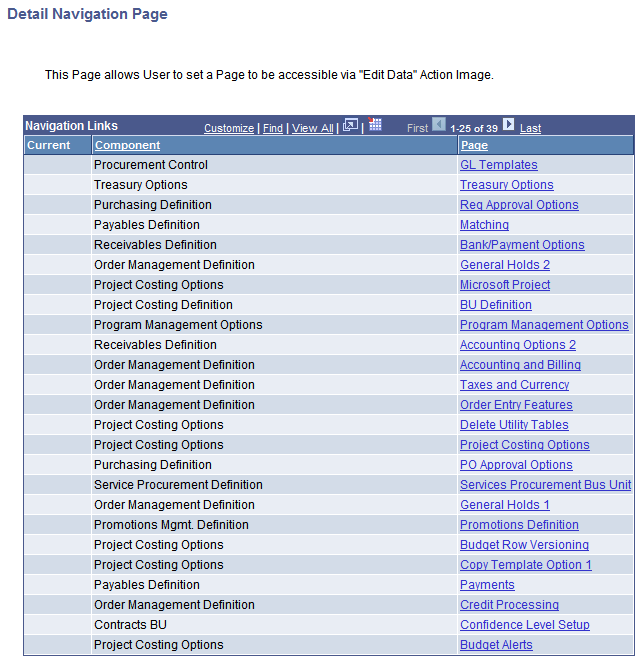
You can select a detail page to open when editing data for nodes or details. For example, using the Personal Data tree, you could navigate to pages such as Personal Data, Benefits, or Salary Information.
The page reflects the node or detail selection when you clicked the Navigation Options link. If no selection was made, the page reflects the first entry, node or detail, on the Tree Manager page.
Note: This page is available only if the multiple navigation options have been selected on the Tree Structure record.
|
Field or Control |
Definition |
|---|---|
| Component |
This column lists components that you can navigate to when editing tree node or detail value data. |
| Page |
This column displays pages that you can navigate to within the component. |
 |
Click the Current Navigation icon to identify the current navigation selection. |
| Set |
Click a page and then click this button to change navigation to the selected page. |
| Reset Default |
Click to change the navigation back to the default page specified in the tree structure. |
| Cancel |
Click to return to the Tree Manager page without saving any changes. |
Note: The newly selected navigation path remain current for the browser session. The path returns to the default for each new session.